

British Armour Vs DAK Panzer Company
After the success of the last Desert tank battle against Jez I decided that we aught to have a couple more games to try out my house rules for IABSM 'Confused Tank Actions'.
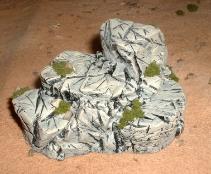
Clivey came round with his DAK Panzers which, when added to mine, gave us just over a full Company for the Germans. Essentially I used a similar force to that which Jez had used but added a troop of Crusaders to the Brits and gave them a couple of 6pdr AT guns firing direct over open sights from off-table using our house rules for these. The table was of 6' x 4' size and largely flat and featureless. Once again by using cork tiles under the cloth, I had created undulations providing rises and depressions for hull down positions. In addition I decided to use my recently acquired rocky out crops bought from Peter Pig's scenery range at this years SALUTE.


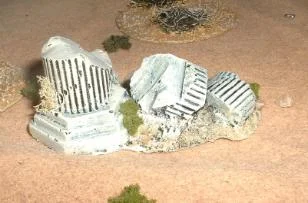
A small area of scrub was a feature of the SW corner of the table and ruined a few ruined Roman columns available from The Square (7 Oakwood Road, Moordown, Bournemouth, BH9 3DF. Tel 01202531659)

I decided that we would number all fakes and unit blinds and then would decide where to locate two blinds. Clive would choose the number of the first two blinds to come onto the table, and I would do likewise. The first two blinds would be placed within 6" of ANY table edge on our side of the centre line running EW.
Subsequent forces would arrive two at a time at a location we chose on our baselines. Once again we would choose each others blinds numbers.
Our forces consisted of:
Clivey's DAK Panzer Company
(All Veteran Troops)
Gun 1
- Marder III
- Gefreiter URSIGER Big Man 7 (D4)
Gun 2
- Marder III
Panzer HQ
- PzKpfw IV ‘Special’
- PzKpfw IV F1
- Hauptmann BEREICH Big Man 1 (D4)
Panzer Platoon One
- PzKpfw III J
- PzKpfw III J ‘Special’
- PzKpfw IV F1
- PzKpfw IV ‘Special’
- Leutnant BOCKSTEIN Big Man 2 (D4)
Panzer Platoon Two
- PzKpfw IV F1
- Two PzKpfw III J
- Feldwebel KENDERMANN Big Man 3 (D4)
Panzer Platoon Three
- PzKpfw III H
- Two PzKpfw III ‘Special’
- PzKpfw IV F1
- Unterfeldwebel BASSERMANN Big Man 4 (D4)
Panzer Platoon Four
- Four PzKpfw IIF
- Feldwebel RUPPERTSBERG Big Man 5 (D4)
Panzer Platoon 5
- Three PzKpfw IIF
- Obegefreiter WURZGARTEN Big Man 6 (D4)
Off-Table Artillery
- Four 105mm Howitzers guns firing indirect fire only using BIG MAN 1 as Forward Observer
Blinds
- One Blind Per Unit Plus D6+2 Fake Blinds = 11 - 16 Blinds
National Characteristics Cards
Blitzkrieg; Recce Force; Petrol Shortage; Vehicle Breakdown; Gun Bonus Fire; Rally; Dynamic Commander; Heroic Leader; Ammo Shortage
Kev's British Armoured Company
Forward Observer
- Carrier Mounted Forward Observer
Tank HQ
- Four M3 Grant I
- Captain ‘Lifter’ ROUNDWOOD Big Man 1 (D4)
Tank Platoon One
- Three M3 Grant I
Tank Platoon Two
- Three M3 Grant I
Cruiser Platoon
- Three A15 Crusader Mk II
Recce Troop
- Three Stuarts
- Lieutenant Hugh JARCE Big Man 2 (D4)
Off-table AT Gun
- 6pdr AT Gun (5 crew) firing direct fire long range
Off-table AT Gun
- 6pdr AT Gun (5 crew) firing direct fire long range
Off-Table Artillery
- Four 25pdr guns firing indirect fire only using Forward Observer
Blinds
- One Blind Per Unit Plus D6+2 Fakes = 8 – 13 Blinds
National Characteristics Cards
Gun Bonus Fire; Armoured Bonus Move (Cruisers only); Recce Force; Vehicle Breakdown; Heroic Leader
The Game
Down to the action.....
Clive and I chose the location for our inital blinds, BEFORE finding out what each of had picked for each other.
A Platoon of Panzer IIF's appeared down my left flank, with another unspotted blind hiding behind a low ridge, in the centre.
One of my blinds, which was hidden by a low rocky rise, I chose to reveal at tea break, voluntarily, as a troop of Stuarts, with another unspotted blind behind the ruins and scrub on my left.
Luckily, at the beginning of my next turn Lt Hugh Jarce, commander of the troop put a nice couple of shots into a German panzer, destroying it. Next, my troop card came up and the other two Stuarts opened up immobilising another Panzer II.
I chose to spot the blind with one of my tanks revealed as a mixed Platoon of Pz III's and Pz IV's. Big mistake, Clive had held his dice on his blinds move card and had brought on another couple of blinds.
Clive spotted my other blind as a fake, and raced the remaining Pz II up the table after hitting a Stuart with fire from his Pz IV's. Tip here, try not to spot blinds which have reserved dice, they fire first!
Another couple of blinds appearred for the Brits. One adjacent to the Stuarts. Clive successfully spotted again, a troop of Crusaders was revealed. My other blind, on the extreme right flank, remained unspotted as yet.
The Panzer II which had been immobilised, bailed out, and the last remaining platoon member occupied the scrub and ruins.
Two more of Clive's blinds appeared, again, this time taking advantage of dips in the terrain opposite my right.
I opened up with my Crusaders, destroying a Pz III, with no small amount of luck, at long range. However, Clive's Pz IV's opened up knocking out one A15, immobilising a second and forcing the other off-table at tea break.
The big factor here had been the Veteran Panzer crews and their three man turret design allowing a multitude of shots.
I had actually managed to save quite well though, with only the third shots penetrating my armour.
Clive spotted my right flank blind as three Grants and then fired at them with a Marder III from a hull down position opposite them. In quick succession the long 75mm Kanone despatched two Grants, its gun 12 no match for their armour rating of 7.
At tea break, I revealed another blind, behind the Stuarts as four Grants.
When the next turn ensued, the remaining right flank Grant was brewed up by the Marder. However, my other Grant troop engaged first the Panzer IIF destroying it and then commenced firing upon the German Panzer III's and IV's.
Another bloody Marder was revealed by Clive which, quickly knocked out another Grant. My losses were piling up now as crews abandoned their burning hulks and made their way to the rear, concussed and somewhat chagrined by the DAK Panzers. Their Veteran status was ensuring that their shots were more accurate than those of mine, and the advantage of the turret design making itself felt.
The first Marder III however, no doubt celebrating their success against the Grants, and despite being directed by Gefreiter Ursiger managed to hit only one target in ten attempts!
To cap it all the Marder III then found itself low on ammo, and able to fire only at short range (12").
Clivey's Panzer Company HQ appeared and commenced firing the shots bouncing off the Grant's armour. I managed to knock out the PzKpfw IV F2's long 75mm Kanone however, with return fire.
Casualties were now piling up as my troop of Grants in the centre knocked out a couple of Panzer III's but then became immobilised and bailed. Clivey's second Marder ran out of fuel and so its crew bailed, no doubt to beg some jerry cans from somewhere.
I had only two Grants functioning by now and they were outnumbered by three to one with a second Panzer II unit appearing on my right.
Discretion being the better part of valour I buggered off.
The game revealed many tenets that I'd read about Desert tank battles;
1) Although the Grants have a good sponson gun and good armour their high silhouette makes them easier to hit. In addition the hull gun is unable to fire when they are hull down. This is a real sod as the 37mm is not really adequate for taking on later marks of Panzer III and Panzer IV's
2) Generally short 5cm Kanones and to an extent long 5cm Kanones of the Panzer III's are not really able to penetrate the Grants effectively, certainly frontally.
3) The Stuart is really quite a decent tank in the Desert. A gun and armour rating of 5 is adequate for facing Panzer II's and early model Panzer III's. Its manouverability and recce card inclusion makes it very hard to pin down and it is able to hit and run very quickly seeking cover.
3) The Desert itself plays a huge factor. Dust gets in the way of visibility which can make a real difference but its the propensity of vehicles to bog down in soft sand (two ones rolled for movement) and breakdown if the wrong card turns up that can really frustrate you.
4) Long 75mm Kanones are killers! If the DAK have even only a couple kiss your arse goodbye!
5)Self-propelled AT guns such as Marders, with four initiative dice and the ability to keep up with the advance and then shoot-and-scoot can be really effective.
5) The German tanks have a massive advantage in the three man turret and Veteran crews as they are able to fire faster and more accurately from longer ranges and don't need to practice fire and movement whereas the British tanks, particularly Crusaders and Stuarts have to close if they are to have a chance.
Again a cracking, fun game, with lots of action and packed with incident.
A good win for Clivey.
Kev