Clive was deciding whether or not to buy some Panthers for IABSM so I decided to play a game of IABSM set loosely in Holland 1944 and let him try some out.
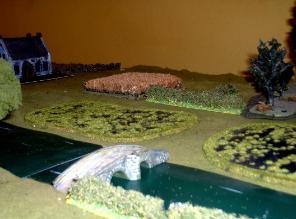
The table consisted of a small hamlet with an adjacent bridge crossing a small, shallow river. Infantry could cross the river, whereas vehicles needed to cross at the stone bridge. To the west the river was crossable to smaller vehicles at what was essentially a stone footbridge.
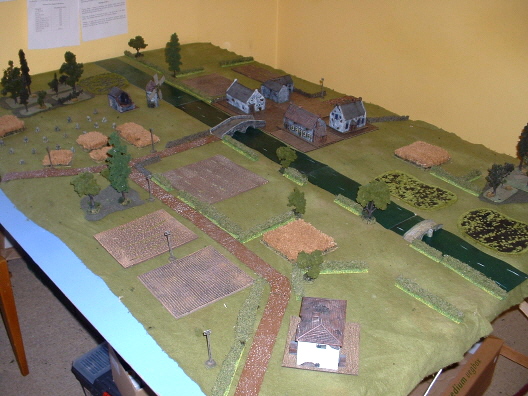
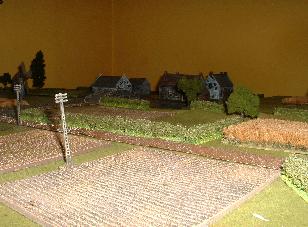
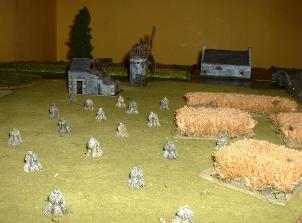
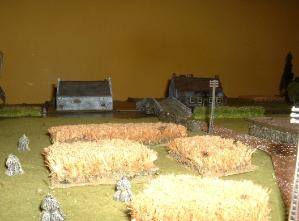
The countryside around the Hamlet consisted of small fields of crops, ploughed fields and hedges. There were also a couple stand alone buildings; a farmhouse and a Windmill, three small copses and two patches of boggy ground, adjacent to the small bridge. Generally quite good terrain for making a good defence of things.
Pictures of the terrain (click image to see more):


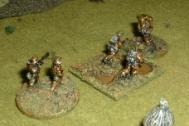
The Forces
Our forces are detailed below but basically I was moving forward, making a recce in strength with a British Infantry Company.
I had a Company HQ of two sections, two Platoons each of three sections, including a 2" mortar and PIAT. Also attached was a reduced Carrier Platoon of two sections and two Troops from an Armoured Recce Squadron with Cromwell's. I also had a FOO in contact with the Battalion's 3" Mortars.
I had based Jez's orbat around a much reduced German Infantry Company. I had worked out an orbat of nine units from which Jez could choose just five to use. That way I would not have unrealistic knowledge of what I was facing.
Kev's Force: British Infantry Company
Forward Observer
- Forward Observer in Jeep, carrier or Humber scout car in contact with six 3" mortars
HQ Platoon
- Two Rifle sections (8 men each)
- Major D. Saster (D4)
Infantry Platoon 1
- Three rifle sections (8 men each)
- PIAT (2 men)
- 2” mortar (2 men)
- Sergeant Les Bean (D6+2)
- Two trucks
Infantry Platoon 2
- Three Rifle sections (8 men each)
- PIAT (2 men)
- 2” mortar (2 men)
- Corporal ‘Ripper’ Himen (D6+1)
- Two trucks
Infantry Platoon 3
- Platoon HQ of Carrier and Dingo Scout Car
- Two Rifle Sections (8 men each)
- One PIAT (2 men)
- Three LMGs (1 man)
- One 2” mortar (2 men)
- in Six Carriers
- with Sergeant P. Niss (D6+1)
Armoured Recce Squadron
HQ Troop
- Three Cromwell Mk IV
- Cromwell Mk IV CS
- Captain Hugh Jego (D4)
Recce Tank Troop
- Three Cromwell Mk IV
- Sergeant Dick Endom (D4)
National Characteristics Cards
Vehicle Breakdown; Rally; Tank Bonus Fire; Anti-Tank Bonus; Armoured Bonus Move; Recce Force
D6 Dummy Blinds
Max and Clivey's Force: German Infantry Company
Forward Observer
- Forward Observer in contact with four 120mm mortars firing from off-table
- Must have a static OP
- D4 pre-registered locations
Sniper
- The sniper is a feature of a defending force only. His position is marked upon the player’s map and fires when his card is drawn. He may not move and will not be placed on table unless he is spotted, NOT if he fires. If his cover is occupied he will slip away unnoticed.
HQ Platoon
- Rifle Squad (8 men with extra LMG)
- Three Panzerschrecke (2 crew each)
- Hauptmann Bereich (D4)
Infantry Platoon 1
- Three Rifle squads (8 men each, with extra LMG)
- Leutnant Bockstein (D4)
Infantry Platoon 2
- Three Rifle squads (8 men each, with extra LMG)
- Unterfeldwebel Pfalz (D6)
Support 1
- Two HMG/MMG’s (3 men each)
- Unterfeldwebel Kendermann (D6)
AT Gun 1
- PAK40 (5 crew)
Panzer Platoon
- Three Panthers
- Stabsfeldwebel Ursiger (D4)
StuG Platoon
- Two StuG III G
- Obegefreiter Wurtzgarten (D4)
Nine units to choose from: German player/s may choose FIVE only.
National Characteristics Cards
Sniper; Rally; Dynamic CO; Forward Observer; Off-Table Artillery; MMG Bonus; Petrol Shortage; Heroic Leader; Vehicle Breakdown; AT Bonus Fire; Rapid Deployment; Short on Ammo
Add D6+1 Fakes.

Only two blinds from each side would be allowed initially on table the rest arriving one blind at a time upon the 'Blinds Move' chip arriving. Fake blinds could be deployed in preference to units at the start and as reinforcements.
This would, it was hoped, create an air of uncertainty conducive with a meeting engagement of two well-armed recce forces, prepared to fight.
The game started.....
Max Maxwell continues:
"This week saw us in Normandy, 1944. Winston's valiant boys were pushing through France attempting to "bounce" the German defenders of a stream line and village. The stream was unfordable by vehicles making the bridge's capture a priority for the Brits, but their humble infantry could move through it, albiet slowly.
"The Germans were able to select five units from a list (attached) of nine, and chose the HQ, two infantry platoons, some tasty Panthers and an FO with a heavy mortar battery. The Brits were made up of most of an infantry company with two squadrons of Cromwells in support. A strong combination but one that would be channelled by the need to capture one of the two crossing sites to make their numbers tell.
"The Germans started with the FO dug into some light woods at the top of their left table edge, and an infantry platoon behind the town. Other units would come in as the blinds card turned up. The Brits led with a carrier platoon opposite this left position heading towards a small bridge with the first infantry platoon, led by the redoubtable Sgt P. Niss advancing across the fields opposite the town towards the main bridge.
"Clive's propensity for drawing the Tea Break now showed and some time passed before the Germans were able to move their next blind, the Panthers. Entering behind the town, they were to move to a field adjacent to the bridge to overlook the main line of attack. The Brits pushed forwards, but not before the German FO was able to set severe fire on the right hand blind. The Germans had elected to site their three strikes on the likely forming points, near the small bridge, left of the central crossroads and at the far right table edge near the wood.
"Readers of this site will know not to see this as tactical "nowse", we have clearly demonstrated little of this in the past, they just seemed sensible. This time, they were...as Kev advanced Les's men right into three strikes! We play it that the strike is resolved when the blind is revealed. This saves the mystery a little longer but can bugger things for the blind owner.
"Erratic cards followed with both sides moving new blinds in, the Germans secreting a platoon to support the FO and a blind into the far right fields. The Brits moved their own FO into position and then let loose.
"The FO was to be grateful of this support as the Carriers were spotted and then rushed the bridge. Kev had misjudged their keeness as, remembering the 2" tactical movement rule, his carriers were snaked out along the wrong bank. Close terrain (marshy ground) saw Sgt P. Niss, move keenly towards a damp bush only to find its owner unwilling to yield! The Germans Panzerfausted the leading Humber jamming the path. The move saw their HQ take residence in the town's left corner and the Brits infantry spotted.
"Working out the stonks was a rare moment of triumph for the Fatherland. 120mm Mortars are killers. Nearly a third of the force were hors de combat in seconds, crippling their dice and forward momentum. Having been pinned by these strikes they were hit continuously. Stray fire also KO'd his FO whose 3"ers would have to wait until the CO's arrival.
"The British luck was further dented when the RAF came to help! The most obvious targets were clearly the carriers stalled on the small bridge and Albie Rightback dove in to flatten the central carrier, peppering its neighbours. The light mortar crew over the bridge tried to jump out to find cover only to be riddled with MG fire. The British blinds now arrived bringing on the first squadron of Cromwells to even the fight.
"The left hand copse became a vicious firefight for most of the balance of the game. A game that split into two sectors quite quickly. A brave assault by the dismounted elements of the carriers, supported by their mgs and the tanks decimated the German platoon. The Brits finally moved over the river having killed their Big Man, but it was too little too late as their casualties rendered them ineffective. Out of range of the panzerfausts the Germans were prey to this harassing fire until the CO was able to bring in his Panzershrecks. As powerful as Anti Tank Guns they dissuaded the Brits from this riverside jaunt and the vehicles moved off to support the main attack.
"In the centre the Brits blinds brought in another troop of tanks. The Cromwell is VERY FAST. They moved across the field quickly forcing the Germans to reveal their Panthers to try and stem this attack. A lucky shot, first go, 12! Disabled one Panther. With its engine alight, the crew bravely ran off to find another one. Poor shooting by the Germans and great saving by Kev limited the German response but time was pressing.
"Kev threw his big man into an assault and a Cromwell, part of a team that was dissuading Panzershrecks by blowing down every building in France around their ears, sprinted over the bridge. Kev had reckoned without Panzershreck 3 which shattered it and its crew. One Panther, ably crewed by Stabsfeldwebel Ursiger, crept round into the town to hide in its smoking wake and pick off its friends.
"At this point the RAF returned. We randomly selected Kev sites and Alby's boys clearly liked the carriers. An overshoot into the FO's position buried them. They would now have to wait 6 moves at least before the CO could regain contact.
"Kev skirmished his tanks forward and prayed for infantry. The first platoon struggled forward now clear of crippling artillery fire and tried to position a PIAT to take one of the big cats with it. The tanks quite literally played cat and mouse. It was an unequal battle as they were picked off one by one.
"Finally moving his reserve platoon into position the Brits tried for one last attempt. Corporal 'Ripper' Himen came over all heroic! Grabbing the PIAT crew by its lapels he dragged them over the bridge, bullets flying, set up to the rear of the Panther, survived a ribald exchange over Rear Shots(!) and let fly! The ensuing explosion put him and his crew out of action but so shook the crew that they needed to retreat on their next action. Bravery indeed.
"Too late sadly for the Brits. A steady tally of artillery cards saw, for the first time in one of my games, the German mortars arrive. We agreed that they should land at whichever site we pulled. It was perfect for the Germans, the follow on platoon were broken up with heavy casualties. At this point Kev threw the towel in. Probably the only thing he hadn't used to take the town.
"A great game, and despite the casualties surprisingly close.
"German infantry at this stage of the war are deadly tank killers. Panzerfausts keep light armour at bay whilst, in closer terrain at least, the Panzershrecks are as tough as anti tank guns. The infantry in defence are strong enough to fend of unsupported attacks as Kev found to his cost crossing the river. Kev's FO being killed early on allowed the Germans more time than they deserved and it was the German artillery that won the day. In fact the most dangerous period came when the FO was killed by the RAF (by accident). This allowed Kev to move a sizeable force up to the town but their luck held and that final strike was enough to put him off.
"The Brits were able to force the Panthers away albiet at cost. The fear of Air Strikes was very real and hindered German movement for most of the game. The Brits shooting also helped. While the Panthers were not destroyed, fragile crews and sufficient bits falling off took two out of the game.
"A great fun outing although Kev admits, he never expected to win. But then, he would say that, wouldn't he!"
Kev & Max