
Jez and me were long overdue for a game of IABSM, it being several months since we'd had a game. I decided that we should make a concerted effort to play some sort of campaign set in my favourite Barbarossa campaign of 1941.
Rob Avery's IABSM campaign supplement 'Vyazma or Bust' seemed a great starting point. For those with any interest in the period this book is a must have (see Too Fat Lardies or Rob's IABSM site Vis Lardica to purchase). Rob had kindly asked me to proof read it for him but I had still failed to play any of the scenarios as yet.
Rob has worked out a multitude of IABSM scenarios which are linked dependent upon the victor. Scenario 1 - Izdeshkovo was our starting point, though you can start wherever you wish, or fight the scenarios as one-offs even.
Details of the exact scenario are to be found 'Vyazma or Bust' but below is the table set up at Wally HQ:

I played the Soviets (as usual), Jez taking the Germans. Essentially the Germans were tasked with clearing a section of road which their Division will use to advance to their assault. The Germans were to enter on the southern table edge whilst the Soviets could deploy anywhere northwards of the hill line.
I deployed two sections of my infantry Platoon in shellscrapes behind the central woods, the third section was holed up in village along with my sole MMG and Mortar. The woods on the far side of the stream hid two 45mm AT guns and a sniper. My two remaining 45mm AT guns were deployed with one just off-road to the west in the light woods and another in reserve at the rear of the village. The scenario called also for three T-26s but I decided to replace them with BT7's. These were kept out of sight behind the village. Finally my KV-1 was deployed in the far north western corner of the table, ready to roll eastwards along the road towards the village.
The Soviets can also call for three fire missions from four off-table 120mm Heavy Mortars. I decided that these would be best represented as pre-registered on a target location - the house centrally located. Using Rich Clarke's national characteristics for artillery, Soviet artillery arrives after three turns with three D6 deviation. The Germans deployed the majority of their blinds opposite the East Hill and village. One blind was deployed in the south western corner of the table.


Right from the start of the game the Germans had the bit between their teeth. Jez is an extremely aggressive player who believes in going the shortest possible route to victory (or death). Sentiments which I have to say I agree with. True to form the German blinds raced forward to dead ground cover of the East hill, one traversing the hill to the east close to the stream. Disconcerting for me was that the Germans actually crossed the stream and began to get close to my sniper (who wisely buggered off pronto) and my hidden AT guns.
Once my blinds chip came up I managed successfully to spot three enemy infantry-bearing halftracks skirting the hill and a German Support Platoon deploying three HMGs, two mortars and a flamethrower. Nasty! 'Use it or lose it' was going through my mind as my AT guns roared into life. Immediately the closest halftrack brewed up; its engine catching fire. A second hit on the halftrack saw it blown to smithereens taking four occupants with it. Another of the two remaining halftracks ground to a halt as its track slewed off. The Soviet mortar, dug in near the village now fired, but the excitement (or fear) of the crew caused them to miss wildly. The German blinds continued to mass in the centre. I spotted one as being three trucks off-loading their Platoon close to a building. Luckily for me this was precisely where my 120mm mortars were ranged upon. However, I would have to wait for some time for the runner to get through with my orders.

The Germans now dismounted their halftrack infantry and began to work his way forward as covering fire from the remaining Hanomag raked the AT guns.


The staccato rattle of a Maxim MG resounded as half a German section fell for the Fatherland. The AT guns roared into life again as the final Hanomag also shed a track.
I had managed to halt the Germans initial advance on the village but the second Platoon, in the centre now made swift progress though the East Woods trying to probe for a flank.
I was forced to manoeuvre my hidden AT gun back through the West Woods, and revealed my KV-1 as it headed eastwards along the road to a more central position.
The German Support Platoon began to pour fire into my AT guns. I was incredibly lucky that despite the high scores I lost only a couple of crew picking up several 'wounds' though. However, a lucky 17 score on the Maxim wiped out its crew and also accounted for the Big Man accompanying it.
The Germans then surprised me by aggressively assaulting my dug in mortar. This wasn't part of my plan! The two remaining crewmen fought like savages against a full enemy section, led by a Big Man, eventually expiring after two drawn rounds of combat. An adjacent building now revealed its infantry section as they fired their reserved dice on the victorious Germans.
Undeterred the Germans threw their armour into, and advanced infantry further into, the East Woods, also choosing to cross the road into the West Woods in another attempt to probe and outflank my position in the centre. An enemy blind edging forward in the West Woods was spotted but not before it had discovered that they were empty of Soviet troops.
At last my 120mm mortars dropped their shells onto their target - or rather they missed wildly, but gave warning to the enemy who were unaware that I had off-table artillery.

I revealed a section of Soviet infantry dug into scrapes parallel to the road, behind the woods as they fired into the enemy advancing towards them. A further section supporting the KV-1 were spotted when they fired upon the enemy infiltrating the West Woods.
The German Support Platoon caused further casualties upon the AT guns, albeit slowly, with their MG fire, until the Flamethrower got close enough to turn the crew into screaming fire-engulfed demons.
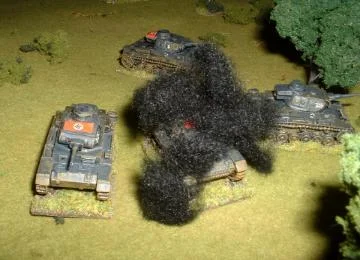
I now revealed my BT-7s, so far hidden from view behind the village. One advanced close to the bridge with one die, its MG felled the flamethrower with another as Jez threw a six for a hit upon it! The next turn it subsequently ran out of fuel blocking the road and access to the bridge completely. A second BT-7 now fired and hit the German Panzer III H command tank which exploded into a fireball! The third BT-7 fired but missed.
Suddenly a Stuka screamed out of a cloud dropping its black egg straight onto a BT-7 which disintegrated into large chunks of burning metal.
My remaining AT gun fired and hit another Panzer jamming its turret.
A Panzer III managed to destroy my last mobile BT-7 and then sprayed the building causing significant casualties with its hull MG.
There was now a lull in the fighting lasting several turns where the Tea Break chip came up repeatedly early. This benefitted me greatly as it prevented the Germans moving any forces but proved savage as our forces at short range blasted away at one another. The German section which had assaulted the mortar were all but wiped out and though I picked up many 'wounds' I had the best of the luck suffering few kills.
The Soviet section in the building proved its worth yet again as the brave defenders by threw grenades disabling a Panzer III which had strayed too close without infantry support.
My 120mm mortars also managed to land on target blowing away the house in the centre, along with four empty trucks, and hitting a blind which had moved from the reserve.
The Stuka descended yet again and missing the KV-1 managed to hit its supporting infantry section causing several 'wounds'.
The short on ammo chip appeared though and robbed my AT gun of any more shots other than at short range. This had very little effect in reality though as the crew were finally killed by the German MMGs and mortars.
The lull ended when Jez threw two sections of infantry into the woods around the flank of the KV1 and then revealed his HQ section . This, he discovered to his dismay, had already suffered two kills and three wounds as a result of the 120mm's hitting its blind earlier.
The Germans withdrew their remaining Panzer III as the crews all bailed out of the other damaged Panzers and trudged to the rear.
My KV-1 hit and disabled this last Panzer but was itself partially disabled by a shot from an AT rifle firing ito its flank. It continued to do great damage to the enemy infantry with its MGs as they tried to flank it though.
A last ditch assault from the German HQ and led by the Coy CO saw the enemy finally take a toe hold in the village but effectively the game was over. This had proved an incredibly bloody affair. The German armoured Infantry Platoon had lost 80% casualties and all three Halftracks, the motorised Infantry Platoon had also lost all transports and had suffered a third of its men lost. The Panzer Platoons four Panzers were all knocked out or abandoned, but the Support Platoon had suffered very few losses.


I had prevented capture of the village and bridge and also still blocked the main highways use with my KV-1. Thereby the game had resulted in a Soviet Victory. "Uhraieeeee, za Rodinu!"
But at what cost; the Soviets had suffered severe losses. Two AT guns and two BT-7's lost with one out of fuel, albeit blocking the road. Out of a forty man strong Platoon only eleven survivors, with mortar and Maxim crews lost in addition.
Jez had placed his Support Platoon in an ideal position but had lost his Armoured Infantry halftracks to carefully located AT guns. The dismounted infantry had blundered into the Maxim defending the village without spotting it first. His other Platoon had become bogged down in the woods for most of the game - largely due to the Tea Break turning up at short intervals, granted. He had tried to do the right thing by pinning my centre and trying to flank me but by then attrition had taken its toll. The Panzers did great damage to my village garrison with their MGs but on the whole were not used very well. Their poor armour ratings, my lucky hit scores and Jez's dreadful saving rolls all contributed to their downfall.
I had decided to defend in essence the last 12" of my base edge and correctly assumed that Jez would go straight for the village, ensuring it was defended by heavy weapons and infantry with armour in reserve and flanked by AT guns. It could have been so very different though. Had the Tea Breaks not come up so quickly in the middle of the game, robbing the Germans of their chance to manoeuvre, the village would almost certainly have fallen to them. It is still doubtful that they would have controlled the highway.
Anyhow a fun game and a great scenario from Mr Avery. I cannot recommend this supplement too highly.
Next week sees Scenario 2B with an very interesting action around Belyj....
Kev
