

My regular opponent, Neil, and I played our first game of IABSM3 today with a game that also saw the inaugural battle in both my new house and using my new tables.
The original plan to turn the playroom into a permanent wargames room had fallen by the wayside as the playroom had been turned into...a playroom; but as the living room was very big and still very empty, we used that instead. As for the tables, I had purchased a couple of 6" x 2½" trestle tables at the same time as we had moved so, for the first time, had access at home to a 6x5 playing area: very satisfactory!
In honour of the occasion, we played a big game: scenario #3B from the Vyazma or Bust scenario pack, The Outskirts of Vyazma. This is one of the climatic, end-of-campaign battles in the pack, so features large amounts of material on the table. The basic plot is that the Soviets are on the retreat, forced back to the aforementioned outskirts of Vyazma, and must defend a railway yard for a set number of turns. The Germans must, of course, take the railway yard area before the game ends.
Below are two pictures of the gaming table, and a close up shot of the back building of the railway yard. You can just see the command piece that was Neil's objective, and clearly see the NKVD blocking detachment (dressed as Battlefront Soviet scouts!) all ready to stop any backsliding from the willing troops of the Motherland.
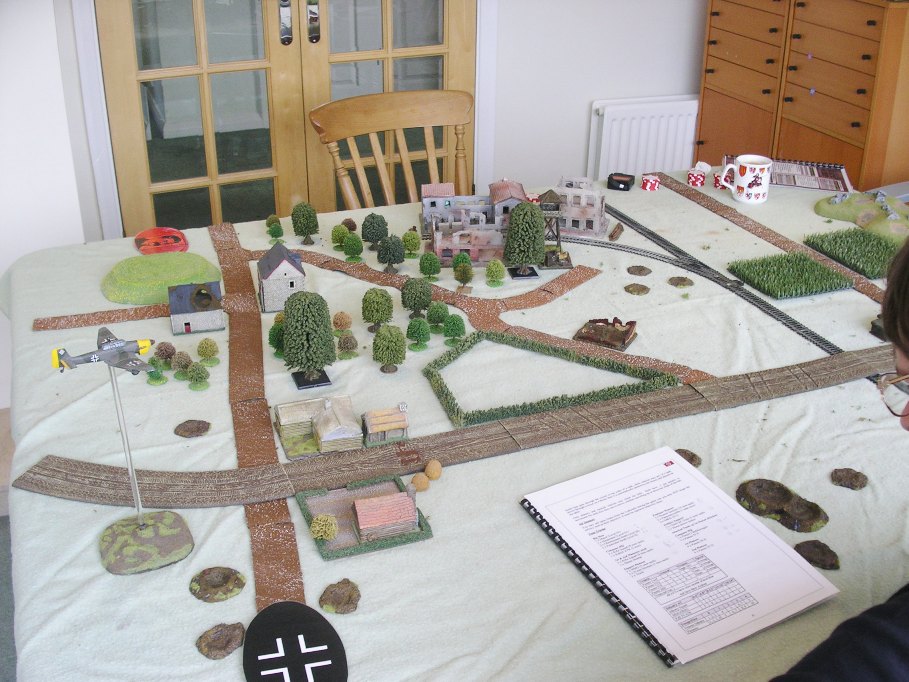
View from the German side of the battlefield
The objective
Another viewpoint
The Soviets start the game on table under concealed Blinds. They have four 30-man platoons of infantry, all Green troops, and with one platoon having no guns! As compensation, one squad in two platoons are tank killers. The infantry are backed up by four MMGs, two ATGs, a sniper and an armoured contingent: one platoon of two KV-1s; one paltoon of a T-34 and two T-35s. As I said, the Soviets are in a bit of a desperate situation!
The Germans have a Company HQ and two platoons of infantry giving eight veteran infantry squads, with another two squads of Pioneers in half-tracks. They have support in the form of three MMGs, three medium mortars, and two 75mm infantry guns. Their armour is also a bit tasty: an HQ platoon of a Panzer IV F2 with a Befelswagon to tell it where to go, a platoon of four Panzer III Hs, and a platoon of Panzer IV Ds. As I said, quite a big game.
My Soviets had to cover quite a big frontage, so were a bit spread out. This would have nasty consequences very early on, leaving me thinking that perhaps I should have bought smaller tables! On the left flank were the KV-1s, ATGs and a platoon of infantry. At the back in the middle were the MMGs and another platoon of infantry. In front of them in the centre were two platoons of infantry. On the right, were the other three tanks.
The Germans arrived on table en masse. On the left, their Panzer IV deployed and immediately came under fire from one Soviet T-35. One Panzer IV was permanently immobilised, but it didn't take the others too long to force the T-35's crew to bail out and run away! As this was happening, the right-hand Panzer IV came under attack from tank killers hidden in a farmhouse, but survived unscathed.
Seeing this, the German Pioneers slammed forward in their half-tracks, de-bussed, and close assaulted the farm, flamethrowers at the ready. The combat between the single squad of Green Soviet troops and two squads of heavily-armed veteran Pioneers was laughably one-sided, with the Soviets quickly fleeing. The German Pioneers were quickly backed up by the German Panzer HQ, with large numbers of Blinds then appearing in the centre. The photos below show the situation just after the Pioneer close assault. You can also see the Panzer F2 coming under tank killer attack, this one more effective and causing two points of engine damage. Note also the absence of any Germans on their right: Neil had quite rightly decided to go for a schwerepunkt attack down the left-hand road rather than waste his time trying to assault along the whole front.

After the engineers' attack

A close up
The Soviet assets on the left hand side of the battlefield could, however, spot...and did so, forcing the German infantry advancing over open ground in the centre off their Blinds. Fantastic, I thought, and deployed my infantry platoon in the centre and opened fire. Green troops suck! Some casualties were done, and the German advance slowed, but nothing like the devastation that should have happened!
This unfortunately attracted the attention of the German Panzer IIIs, who promptly advanced and tried to crush my infantry under their tracks!
One squad succumbed, but the other, doubtless due to the 'encouragement' of the Soviet Commissar, just refused to be squished, and would prove a thorn in the centre of the German advance for the whole game. The Panzer IIIs did, however, lose one tank's gun to the ATGs, but quickly got in amongst the Soviet infantry and so out of shot. The pictures below show the German Blinds revealed, and the Panzer IIIs coming forward to start their squishing!
German Blinds revealed
Not one step back, Comrades!
The German Panzer IVs then advanced on the left. The other T-35 revealed itself, failed to do any damage, and then was blown to bits. Methinks that they would have been better removing a few guns and putting more armour on the damn things. Even worse, the Soviet T-34, my Ace in the hole, moved out from its hiding place, shot, missed, moved back into cover...and promptly ran out of petrol!
Meanwhile, the German Company HQ squads had moved through the re-bussing Pioneers and close assaulted the other Soviet platoon in the centre. This was the one without guns, so I was quite keen to get them stuck in.
Hah! Two squads of veteran Germans versus two squads of Green troops was again a foregone conclusion. Back went the Green troops: leaving the whole left flank open. Neil took full advantage, and slammed everything he could left and forward. Two extraordinary Blitzkrieg cards saw him move almost his entire force left and forward twice in a row: his schwerepunkt tactics meaning that everything was in a 6" chain. The pictures below show the unfortunate T-34; and the start of the German surge.

Out of petrol

T-35 out of action
And here is an even better look at the extraordinary, two-Blitzkrieg card German advance:

Blitzkrieg!
The Germans continued to push forward. The Soviet platoon that had been in the centre kept being pushed back, and the Panzer IVs started to swing around at the bottom of the table. Meanwhile, the Soviets were rushing everything they could from the left hand side of the battlefield, including the KV-1s. The pics below show some of this phase of the action...
Platoon Four lose again
Panzer IVs sweep round
KV1 on the way
The stage was set for a massive confrontation at the railway yard itself. The Soviets had almost all their remaining troops crammed into the buildings, the Germans had massed their men outside ready for close assault. The woods prevented any decent firefights from taking place and the Germans, under orders to take the railway yard intact, couldn't bring their superior firepower to bear. Here are a couple of pictures:
Final strongpoint
The Germans gather
As Neil was running out of time (in real-life, not game turns: the Turn card had been surprisingly reticent about appearing!) at the next Tea Break card we decided to start the next turn with a massive German assault on the main station building. In went the Germans, rolling 65 dice, with the Soviets hanging on in there with 55 dice. Warhammer-like rolling occurred and, against the odds, the Soviets prevailed by one kill, sending their attackers back into the woods again.
At this point we declared the game a damn good draw! Yes, the Germans hadn't actually taken the railway yard, but they probably would have done so eventually. The pictures below show the situation at the end of the battle:
The new version 3 of IABSM was a great improvement on the old one. Although the concepts are the same, almost all the mechanics have been smoothed and tightened. Things that before might have taken several rolls of the dice now take one. The effect of fire on tanks and APCs is more cohesive (one KV-1 managed to blow one of the Pioneer half-tracks, along with crew and passengers to bits). Things just generally work better.
All in all, we had a great game, and I'm already planning the next one!
Robert Avery