

This week saw the third game in our Eastern Front campaign, set in 1941 and taken from Rob Avery's excellent "Vyazma or Bust" campaign supplement, and available from Too Fat Lardies for their WW2 rules, "I Ain't Been Shot Mum".
The action has moved to the road to Smolensk. After two tentative victories at Belyj and Ideshkovo the Soviets are poised to take the city but first need to mop up isolated strongpoints centred on two hamlets on the approach to Smolensk. My orders were to take both of the villages on the road to Pochinok.
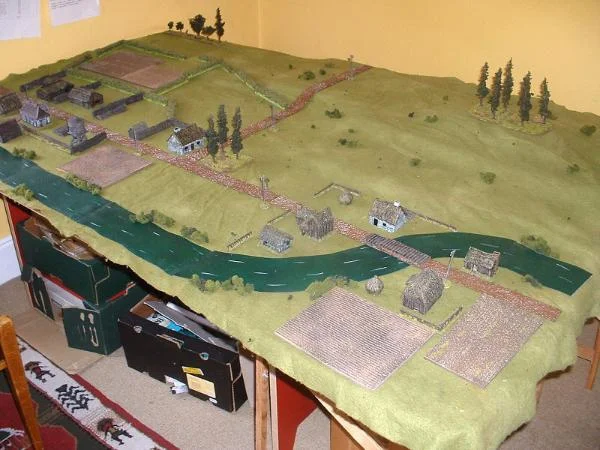
The table layout can be seen below. The Soviets come onto the table from the East where there is a low hill running along much of the table edge.
The German forces, under Jez, were deployed in and around the two hamlets which guarded bridges over an unfordable river along the Western table edge.
My Soviet forces consisted of a Company of three infantry Platoons, each of three ten-man sections and a support Platoon of three Maxim MMGs and two light mortars. In addition I had attached a Platoon of SMG troops, two scout sections, and two tank Platoons of four BT-7's and four T34's respectively. Off-table support was provided by three strafing air attacks courtesy of the Red Airforce and four fire missions from a four gun battery of 122mm howitzers. To top it all I had a stonk available to me prior to my deployment.
My Plan was essentially to set up a base of fire with my support Platoon, stonk the southern hamlet then attack it with tanks and the majority of my infantry. My Scouts and SMG troops were to pin the forces in the northern and central sectors, whilst I called in artillery upon the northern hamlet.
Once the southern hamlet had been reduced my forces were to attack the northern hamlet from the south.
Southern Hamlet
Northern Hamlet
In defence Jez had a Company HQ section and AT rifle, two infantry Platoons each of three eight-man sections plus a 50mm mortar, and an MG Platoon of three MG34's. In addition, Jez could call upon and Engineer Platoon with two ten-man sections and two Flammenwerfers, two horse drawn 37mm AT guns, two StuG's and two Panzerjager I's. Off-table support came from two fire missions provided by a four-gun 105mm field gun battery firing on two pre-determined aiming points.
Whilst Jez was permitted to deploy in an around the hamlets he was only able to deploy two sections maximum east of the road.
OK, so it started really well. My 'Blinds Move' chip came up first in the opening two moves, allowing my total force virtually to advance onto the table.
As planned I had stonked the southern-most hamlet, although we would both have to wait to see the effect that it had upon any defenders, once their respective chip had been drawn. As it turned out later the stonk had had no effect.
I took the opportunity of being on blinds to attempt to co-ordinate my attack. Once your troops have been spotted and they are activating on their own chips things are much tougher.
Engines roaring, my four T-34's and BT-7's raced to the village being spotted automatically at 'Tea Break'. In their wake three Platoons of infantry. Jez's hamlet garrison, dug in around, and occupying the flimsy buildings, revealed themselves at 'Tea Break' by making some attempts to throw grenades in desperation at the advancing metal monsters.
However, when the next turn began with the 'German Blinds Move' chip being drawn Jez decided to avenge his last two defeats in style. Guns roaring, two Panzerjager I's revealed their positions in the southwestern corner of the table. In quick succession two BT-7's were hit by a string of accurate 4.7cm shells. Gun 7 Vs Armour 2 = Immobilised, engines on fire and with damaged turrets, their crews soon decided discretion was the batter part of valour and bailed out. A third was forced to retreat at the next 'Tea Break'.
It didn't stop there either. Two adjacent 3.7cm PaK35's also opened up on the T-34's. I felt relatively safe with Armour 7 Vs Gun 5 at that range but I didn't reckon on Jez rolling for five penetrations with his first shot. I deflected only one as my lead T-34's turret blew skywards as its ammunition supply detonated. A second T-34 was hit and partially immobilised, by the excellent shooting of the seasoned German gun crews.
Four tanks, half my armoured force lost in one turn alone. Ouch!
My luck changed somewhat when I decided to assault a German squad deployed in trenches to the west of the hamlet. Surprisingly, I managed to take it relatively easily even though I had only ten men to his eight in prepared positions. Fortune favours the brave (well, reckless anyhow).
The second T-34, which had been partially immobilised, fell foul of a German AT rifle attached to the German HQ in the hamlet and accumulated a multitude of minor damage factors; turret jam, potential engine damage x 2. Its crew wisely and promptly bailed out the very next chip.
Unperturbed by my losses, I decided to press on with my infantry attack. I managed to capture one trench killing all its defenders by leading an assault with one Big Man. Pinning the defenders of one house and killing a German Big Man, I then assaulted with two sections led by another Big Man, the last remaining defender being summarily despatched with gusto by the victorious Soviets. I had managed to capture the eastern half of the hamlet but the western half still held two sections of infantry plus the Panzerjagers and PaK's. I lost my third BT-7 to yet another Panzerjager I which had closed to within 12" of the hapless tank, thereby increasing its gun value to 9.
Meanwhile, elsewhere on the table, I had managed to spot a German Platoon which had moved to occupy a centrally placed building and small copse. I had opened fire from the hill with three Maxims and two 50mm mortars causing a string of wounds and a couple of kills. In turn though Jez had managed to spot both my SMG Platoon sneaking along behind a hedgerow and my Scout Platoon loitering around the eastern environs of the northern located hamlet. Things got significantly worse for my scouts as two MG34's opened up from the hamlet wiping out half a section in one turn, and a third MG killing the SMG Platoon Big Man and causing a multitude of wounds on a section. The SMG Platoon suffered further from heavy casualties when the next turn the German infantry Platoon's chip came up straight away and they blazed away happily at the prostrated and frustrated Soviets.

Suddenly 105mm shells were falling in and around the remnants of my scout Platoon as the German off-table artillery arrived. Jez had called it in earlier and it had taken several turns to arrive - just in the nick of time. As per the briefing he had pre-logged co-ordinates and with only one die for deviation he could hardly miss.
Whilst this one sided combat ensued Jez had manoeuvred two StuG's through the northern most hamlet and began to fire threateningly on the flanks of my sole two remaining T-34's.

Concerned I decided to leave the two Platoons of infantry to clear out the southern hamlet and to deal with the threat from the German assault guns head on. I manoeuvred my T-34's, supported by a Platoon of infantry towards the centre of the German position.
Repeated and sustained fire from my Maxims had caused a drain of casualties on the defenders. The SMG Platoon, though weakened, had now been able to add a further dice to its firing for the weight of fire of so many automatic weapons and had even managed to kill another German Big Man....
Jez returned a few days later to finish the game off.
Realising from the outset that I couldn't win and capture both hamlets, I decided just to settle down and have a fun time. I still plumped for throwing a spanner in the works though by now concentrating my efforts on the northern hamlet.
Successfully pinning the remnants of a German Platoon which had occupied a building in the centre, I managed to switch a Platoon of my infantry and advance to close range. A couple of chips later, and the 'Uhraieeee' chip came up. Led by its Big Man my Platoon assaulted and took the building killing the defenders in bitter close combat.
The German MMGs were pouring fire into my prone and wound-ridden SMG and Scout Platoons which had ceased all attempts at movement under the weight of fire.
The southern most hamlet now degenerated into firefights from the cover of the buildings across the river, making it impossible for either side to progress and push their opponents out of the remainder of the settlement.

German PaK's and Panzerjagers, having little else to shoot at, decided to riddle the ramshackle buildings still further, their 37mm and 47mm shells having very little effect other than pinning the Soviets down further and reducing their firepower.
Jez's StuG's were now without practical infantry support and so wisely he decided to activate his engineers upon the 'German Blinds' chip being drawn. Ten men strong and with flamethrowers, the attached the engineers appeared, as I had foreseen, in the northern hamlet and advancing at full speed, closed to short range and torched an entire section of Soviet infantry.
Small arms fire from the engineer squad, poured into the hapless SMG Platoon reducing them to their last initiative dice. Without a Big Man their combat effectiveness was virtually nullified by their inability to remove wounds.
Things got worse, when suddenly a Soviet aircraft dived from the clouds and strafed two squads of infantry that I was sending as reinforcements to the centre.
The 'Heinies' cheered as the cannon shells ripped through the screaming Ivan's. However, their cries of support turned to anguish as a StuG was hit in the flank by Soviets throwing grenades from close range causing it do be immobilised.
Sensing a chance, the sole remaining survivor of the BT-7 platoon bounced across the battlefield to within close range of the disabled StuG.
As luck would have it the 'Tea Break' came up. The StuG, not having been activated this turn as its chip had not been drawn, therefore didn't need to make a roll for its crew abandoning, and had one shot to hit the onrushing enemy. Clearly unphased, the German gunner could hardly miss. Coolly he depressed the button and the BT disintegrated in a ball of flame and exploding 45mm ammunition.
Soviet Maxim's now opened up long range fire upon the German engineers and managed to knock out one flamethrower, the second deciding against sticking its nose out of the hamlet's centre.
Return fire from the MG34's silenced a Maxim with a lucky 17 scored on the fire effect chart. Things got decidedly worse when the Big Man, my Company CO failed his test by scoring a 1 on the D10! This meant that my artillery IF it ever arrived would be unable to be adjusted as my Company CO was the only one in contact with the battery.
The game degenerated now into close range and spasmodic firefights. Neither side with the inclination nor initiative dice to push out their opponents. My last Soviet Platoon which was at 75% strength, failed to activate thereby denying me the chance to swing the situation in either of the hamlets but it was clear that I didn't have enough troops to continue.
Jez's surviving StuG threatened at one point but when a T- 34 came bounding along hitting the assault gun a couple of times, but with the shells bouncing off, the crew made a hasty retreat.
The one chink of light for me in a game of increasing gloom came when another Soviet aircraft dived from above, this time successfully strafing an German engineer squad.

The game was over. The German's had managed to survive their early reverses and ran out as victors by preventing me from taking both hamlets. They were just too strong for my remaining troops.
I had lost much of my impetus by losing most of my armour early on to Jez's well placed PaK's and Panzerjagers . Once again my infantry had fought superbly in assaults in first the southern hamlet and then in gaining a toehold in the northern one.
My artillery support never arrived, which in view of the fact that I couldn't control it after the loss of my Company CO was probably a good thing as it would doubtless have resulted in it landing on my own troops.
Another great game which we both enjoyed loads.
So, the German's hold onto Smolensk and now the action shifts to the centre of Yelna for scenario 4F and streetfighting, a la Kev stylee.
More IABSM action from a certain wargames room soon.....
Kev