
Battle Report: 28th September 2002
1879 Zulu ~vs~ Later British
(Robert Avery ~vs~ Sandy Laird)
|
1879 Zulu |
|||||||
| Brigade |
Unit |
Fig.'s | Org. | Class | Weapons | Pts/Fig | Points |
| . | CinC |
1 |
. | .. | . | 100 | 100 |
| Head | 2inC | 1 | 50 | 50 | |||
| Red Dot Impi | 30 | 1x30 | FanA | spear, shield | 7 | 225 | |
| Yellow Dot Impi | 30 | 1x30 | FanA | spear, shield | 7 | 225 | |
| Green Dot Impi | 30 | 1x30 | FanA | spear, shield | 7 | 225 | |
| Right Horn | 2inC | 1 | 50 | 50 | |||
| 2xYellow Dot Impi | 30 | 1x30 | FanA | spear, shield | 7 | 225 | |
| 2xGreen Dot Impi | 30 | 1x30 | FanB | spear, shield | 7 | 225 | |
| 2xBlue Dot Impi | 30 | 1x30 | FanB | spear, shield | 7 | 225 | |
| Left Horn | 2inC | 1 | 50 | 50 | |||
| 2xRed Dot Impi | 30 | 1x30 | FanA | spear, shield | 7 | 225 | |
| 1Red1Blue Impi | 30 | 1x30 | FanB | spear, shield | 7 | 225 | |
| 1Blue1Green Impi | 30 | 1x30 | FanB | spear, shield | 7 | 225 | |
| 2275 | |||||||
|
Later British |
|||||||
|
Brigade |
Unit |
Fig.'s |
Org. |
Class |
Weapons |
Pts/Fig |
Points |
|
|
CinC |
1 |
|
|
|
100 | 100 |
| 1st | 2inC | 1 | 50 | 50 | |||
| Brigade | 78th Highlanders | 20 | 4x5 | LightsB | lbl | 15 | 340 |
| 24th Foot | 40 | 8x5 | RegB | lbl | 13 | 600 | |
| Naval Brigade | 24 | 6x4 | RegB | lbl | 13 | 372 | |
| Cavalry | Dragoon Guards | 16 | 4x4 | RegA | sabre, blc, pistol | 19 | 344 |
| Frontier Light Horse | 8 | 2x4 | RegC | sabre, blc, pistol | 15 | 140 | |
| Artillery & | 2inC | 1 | 50 | 50 | |||
| Wagons | RA Field Battery | 2 | 2x1 | RegB | light blrb FA | 93 | 206 |
| RA HMG Battery | 1 | 1x1 | RegB | hmg | 88 | 98 | |
| Wagons (inc Ammo) | 3 | 3x1 | RegC | (50) | 50 | ||
| 2350 | |||||||
| . | Zulu | British |
| Foot | 5400 | 1680 |
| Horse | 0 | 480 |
| Guns | 0 | 6 |
Report
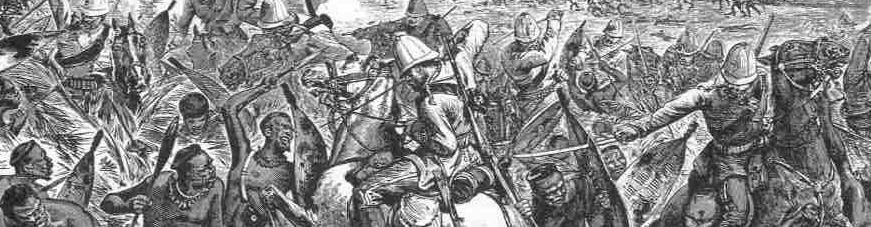
A British column had been sent to relieve a farm under attack by Zulus. On their way, they are ambushed by a much larger Zulu army.
Both sides began the battle far more extended than they would have liked. The British were in a long column on a road with the Highlanders in front, followed by the 24th Foot, followed by the artillery and wagons, the Naval Brigade at the rear, and the cavalry dispersed in squadrons to each flank. The Zulus had a Head, Right Horn and Left Horn, but these were a long way apart and not easily able to offer each other close support.
The battle began as the British spotted all three Zulu horns. Although the Zulu left horn was a long way away and behind a donga, the right horn and head were almost on them! Perhaps not realising just how fast the Zulus can move, the British commander ordered the following: the Highlanders rushed forward to engage the head, five companies of 24th headed for the right horn, the artillery deployed one battery verses each horn, the wagons laagered, and the Naval Brigade moved to fill the gap between the wagons and the reserve of three companies of 24th. The Zulus doubled forward.
To the front of the Britishcolumn, although one Impi was damaged by artillery and Highlander fire, another smashed into the Highlanders before they had time to properly form square: pushing them back into a bloody melee that left half the Scotsmen disembowelled and the other half fleeing the field.
To the left of the British column, another Impi was temporarily halted by artillery fire, but the other two rushed towards the five companies of 24th Foot that were hurriedly deploying into line. Although battered by rifle fire, the two Zulu Impi's were not stopped and, likewise smashed the five companies of 24th Foot from the field.
To the right of the British column, three squadrons of Dragoon Guards had been sent to slow down the Zulu left horn and, in a series of bloody engagements were wiped out but not before they had destroyed one Zulu impi and severely battered another. This left the field clear for the British HMG and Naval Brigade to slam long range fire into the Zulu impi's as they regrouped after dealing with the British horsemen: causing the remaining two Impi's to either rout or to retreat!
Meanwhile, back in the centre, the remaining three companies of 24th Foot and the artillery prepared to meet the next phase of Zulu charges. The Frontier Light Horse were led by the British CinC in a desperate charge to delay the advancing Zulus. The brave horsemen were massacred, but gave the remaining Brits time to form square and, more importantly, a lucky shot by a dying Boer spectacularly killed the Zulu CinC!
Although the remaining British were worried by the loss of half of their infantry, they held steady and, now in a small triangular square, poured fire into the advancing warriors. Zulus fell right, left and centre: but not enough of them. Both batteries and the remaining three companies of 24th Foot were destroyed or sent routing from the field. The Zulus, however, had paid a heavy price for their success: of the six impis comprising the right horn and head, two had been routed, three were shaken with around half their number dead or dying, leaving only one relatively unscathed.
At this point an uneasy stalemate descended. The British with only the Naval Brigade and one battery of hmg's were unable to advance out of their square. The Zulus had only one or two unbattered impi's with which to oppose them: they desperately needed time to recover and regroup.
Casualties
The Zulus lost at least 1740 warriors killed, and had three impi's routed from the field. They also lost their CinC to a spectacular death, and one of their 2inC's suffered a light wound.
The British lost 200 Highlanders; 300 24th Foot; all the Dragoon Guards and 120 Frontier Light Horse plus loads more killed in the rout of the head of the column. They had the Highlanders, 24th Foot, both gun batteries and the FLH routed from the table. Their CinC also suffered a light wound before fleeing!
Result
A draw was declared.
Analysis
Whenever the British could form a descent formation and pour fire into Zulu impis, they broke or shook them: it's just that the scenario and terrain meant that only the rear half of the British column had a chance to do so.
The Zulus really should have won, but the British had the most spectacular luck throughout the game: with double six "unexpected devastation" coming up twice and no shooting roll ever under seven!