Battle Report: 22nd December 1998

Zulu ~vs~ Late British

(Robert Avery ~vs~ Dave Lancaster) .

Zulu

Brigade

Unit

Fig.'s Org. Class Weapons Pts/Fig Points
  CinC 1         100
Head 1 30 1x30 FanB sp, sh   225
  2 30 1x30 FanB sp, sh   225
  3 30 1x30 FanB sp, sh   225
  4 30 1x30 FanB sp, sh   225
Right 5 30 1x30 FanB sp, sh   225
Horn 6 30 1x30 FanB sp, sh   225
  7 30 1x30 FanB sp, sh   225
  8 30 1x30 FanB sp, sh   225
Left 9 30 1x30 FanB sp, sh   225
Horn 10 30 1x30 FanB sp, sh   225
  11 30 1x30 FanB sp, sh   225
  12 30 1x30 FanB sp, sh   225
Misc. Skirmishers 8 1x8 FanB sp, sh, blr   119
              2919
.

Later British

Brigade

Unit

Fig.'s

Org.

Class

Weapons

Pts/Fig

Points

.

CinC

1


  100
1st 2inC 1         50
Brigade 24th Foot 40 8x5 RegB lbl   340
  78th Highlanders 20 4x5 RegB lbl   300
  Naval Brigade 24 6x4 RegB lbl   372
Cavalry 17th Lancers 8 2x4 RegB s, p, blc, l   164
Brigade Dragoon Guards 8 2x4 RegA s, p, blc   172
  Frontier Lght Hrse 8 2x4 RegC s, p, blc   140
Artillery RA Battery 3 3x1 RegB light blrb FA   309
  RA HMG Battery 1 1x1 RegB gatling gun   98
  Naval Brigade 1 1x1 RegB gatling gun   98
Support Ammo Wagon 1         50
  Wagons 3 3x1 RegC wagon + 2 crew    
              2503
.
. Zulu British
Foot 7360 1680
Horse 0 480
Guns 0 10

Report

This was a training battle for Dave’s first attempt at command: with the Zulus moving to a pre-set plan with their only option being to charge British units that moved into view.

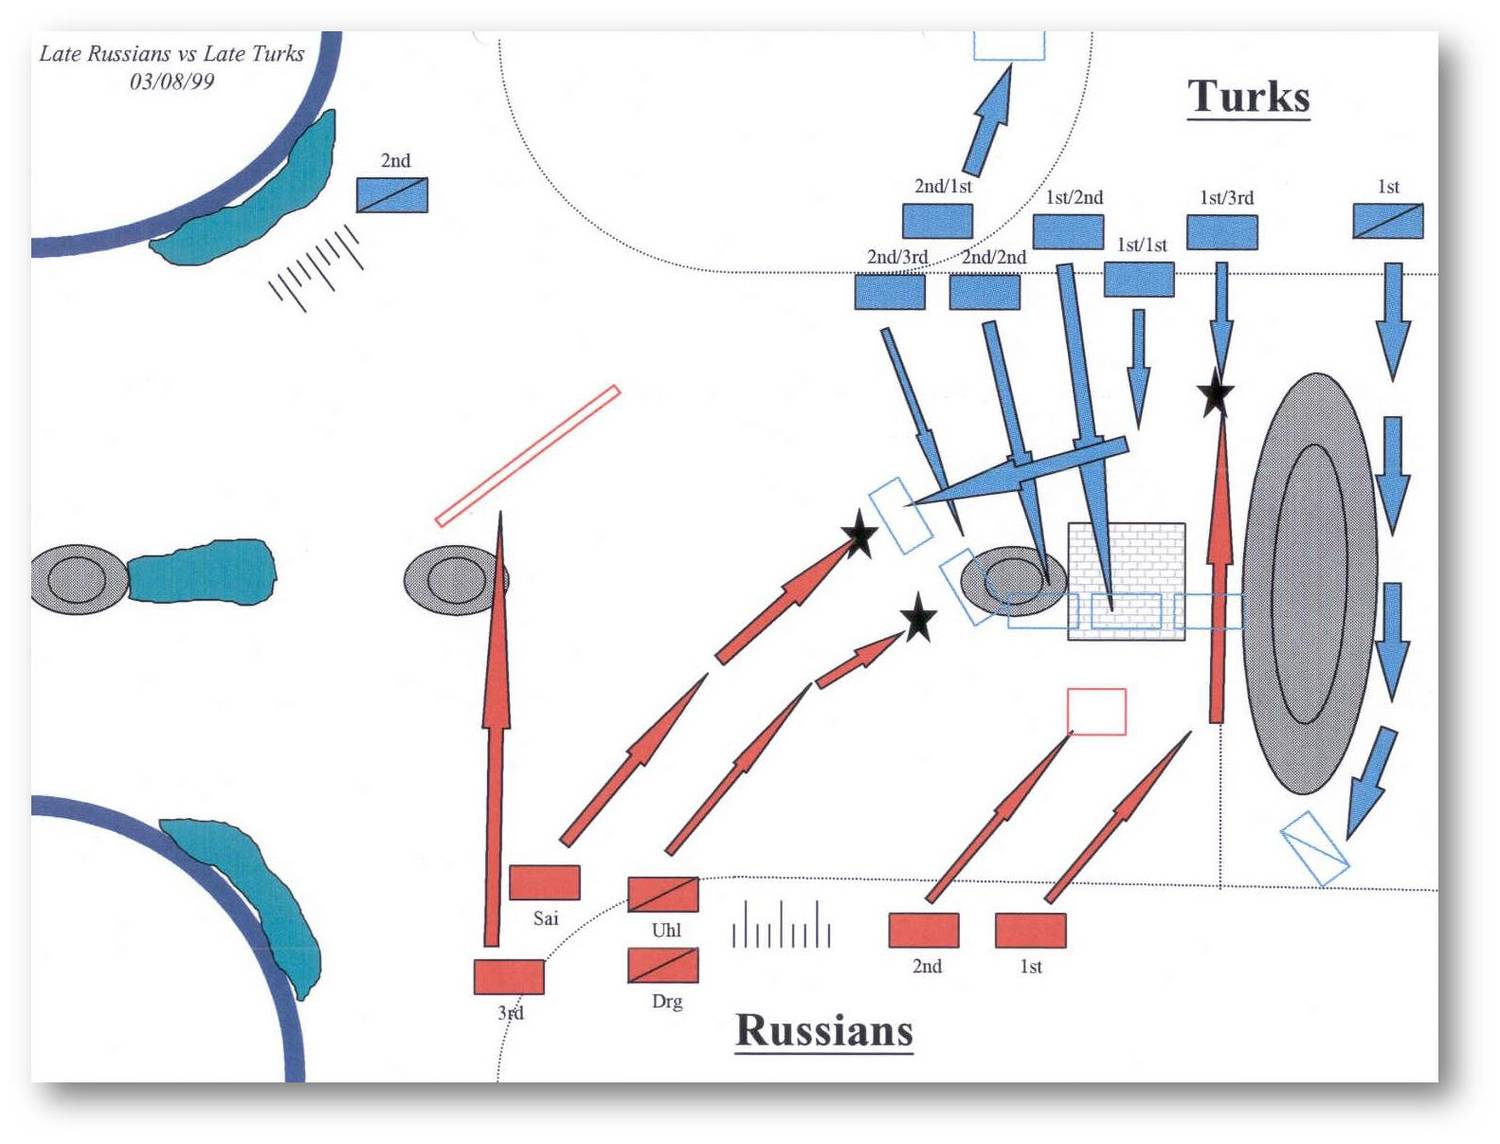
As the Zulus hove into view, the British left their camp and formed an extended battle line. Their right flank was anchored on a steeply sloped hill: which they invested with six companies of infantry, two guns and four squadrons of cavalry in support.

The Zulus moved forward in the traditional horns of the bull formation.

Pre-warned about the Zulus’ normal outflanking tactics, the British commander moved his two wings forward. On the right, the troops on the hill opened long range fire on the rapidly approaching Zulu regiments: but the cavalry supporting them was forced to retreat as an impi charged them.

On the left, the British had sent forward a gun and the Dragoon Guards. These were also charged by an impi who, although they failed to make contact, forced the gun crew to flee and wiped out a squadron of Dragoon Guards with thrown spears.

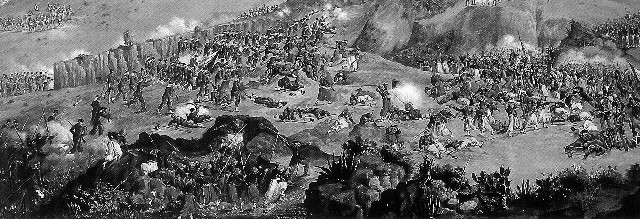
Back on the British left, the Zulus charged the troops on the hill: who were by now formed into a forward line of three companies, supported by a second line of three companies and two guns. Three Zulu Impis charged the first line. The first was stopped by fire; the second (amazingly) bounced back on impact, but the third caused the line to flee. This however, exposed the victorious Zulus to fire from the second Zulu line - holding firmly under the command of the British 2inC - who blew the Zulus away with artillery and smallarms fire.

In the centre, meanwhile, the Zulu skirmishers had been doing unusually high amounts of damage: routing a squadron of Lancers and inflicting devastating fire on the three infantry companies protecting the British camp.

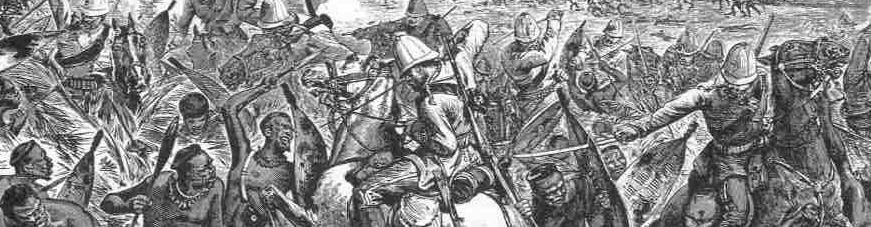
The battle had to end, unfortunately, as the Zulu main charge was about to hit. There were seven impis due to charge. The first overwhelmed two companies of infantry that had been sent to support the Dragoons: slaughtering them in melee. The second was repulsed by another three companies of Brits, under the command of the CinC. As for the others...well, they were well placed to wipe out a squadron of Frontier Light Horse and the RA Gatling Gun, but whether they could have recovered from the losses already taken is a moot point.

Casualties

The Zulus lost 1400 out of 7360 tribesmen (19%).

The British lost one section of artillery; one company of the 24th and one of the 78th; and 60 other infantry. They also lost 60 cavalry: for a total of 400 men.

Results

A winning draw for the British.

Analysis

A fun battle which had to finish too soon to reach a firm result.

The British unconsciously had their three main infantry bodies in two lines - one supporting the other - a tactic that worked well whilst opening volleys were used. Whether it would have continued to work is another matter: the isolated wings had already been overrun and the Zulu “head” was moving in for the kill.

‘Unit of the Match’ award, however, goes to the Zulu skirmishers: 60 casualties caused and rising!


Battle Report: 30th December 1998

United States 1835-50 ~vs~ Early Mexican

(Robert Avery ~vs~ Richard Avery) .

United States 1835-50

Brigade

Unit

Fig.'s Org. Class Weapons Pts/Fig Points
  CinC 1         100
1st 2inC 1         50
Brigade 1st Us Volunteers 20 4x5 MilC mlr   180
  Rough Riders 20 4x5 MilB mlr   180
  4th Mitchigan Volunteers 20 4x5 MilC mlr   180
2nd USMC 16 4x4 RegB sbm   168
Brigade 2nd Massachussetts 16 4x4 RegC mlr   152
  Buffalo Soldiers 16 4x4 RegC sbm   152
3rd 1st Texican Volunteers 15 3x5 MilB sbm   120
Brigade 2nd Texican Volunteers 15 3x5 MilB sbm   120
  3rd Texican Volunteers 15 3x5 MilB sbm   120
Cavalry Personality 1         25
  7th Cavalry 10 2x5 RegB s, mlc   190
Artillery 1st US Artillery 2 2x1 RegC light mlsb FA   158
  Ammo Wagon 1         50
              1937
.

Early Mexican

Brigade

Unit

Fig.'s

Org.

Class

Weapons

Pts/Fig

Points

.

CinC

1


  100
  Los Supremos Podres 30 6x5 RegC sbm   270
1st 2inC 1         50
Brigade 1st Bttn Saltillo 30 6x5 MilC sbm   240
  2nd Bttn Saltillo 30 6x5 MilC sbm   240
  3rd Bttn Saltillo 30 6x5 MilD sbm   180
  4th Bttn Saltillo 30 6x5 MilD sbm   180
Cavalry 2inC 1         50
Brigade 1st Holy Lancers 12 2x6 RegC s, l   164
  1st Divine Line 12 2x6 RegC s   164
Artillery 1st Battery 3 3x1 RegC light mlsb FA   237
  Ammo Wagon 1         50
              1937
.
. US Mexican
Foot 3060 3000
Horse 200 480
Guns 4 6

Report

The battle opened with the Americans deploying in their three brigades: with the 1st on the left, positioned to outflank the Mexican right; the 2nd on the right, again outflanking, and supported by the cavalry; and the 3rd in the centre, supported by the artillery.

The Mexicans deployed the 2nd and 3rd Line infantry, supported by one section of artillery and the Line cavalry, on their left; the 1st Line, the Lancers and a second section of artillery on their right; with the 4th Line infantry, the Los Supremos Podres (LSP) and the final section of artillery in the centre, aiming to invest a stone-wall surrounded village.

The battle was divided into two areas of operation. On the US right flank, the Marines doubled forward successfully:  reaching the crest of the hill by the river. The other two infantry battalions unfortunately became disordered. From their crest, the Marines saw the two Mexican columns start to charge them and so, after firing a quick volley, disengaged: aiming to take cover behind their colleagues who were rapidly forming line. Meanwhile, the Mexican cavalry had charged their US counterparts.

The infantry forces met: with the held Americans going shaken as they waited until point blank range to open fire. Despite being shaken, the Mexican columns were halted, also shaken, and returned fire: doing a few casualties to the Americans.

The Mexican cavalry, meanwhile, had also shaken the US cavalry, but had also, in turn, been stopped by fire. Three shaken units faced three shaken units. At this point, fate intervened: as both sides lost their officers to enemy fire: the Mexican 2inC suffering a spectacular death! This destroyed the morale of each side so that where, a moment ago, three had faced three, suddenly everyone was routing. It seemed that the actions on this flank were over!

In the centre and on the left, the Americans advanced quickly. To the centre, the 3rd Brigade attacked the village, which had been invested by the LSP’s. Although the 3rd Battalion of Texican Volunteers managed to charge forward and take a section of Mexican artillery, they ended up under the guns of the LSP’s and, despite the LSP’s going “out of ammo”, were soon dispersed. The other two Texican regiments settled down to a firefight with the LSP’s.

On the left, the mlr-armed 1st US Brigade fired a few volleys at the Mexican 1st Line Regiment and then made the mistake that would eventually decide the battle. The 1st Regiment charged to the right, dispersing the 4th Line Regiment of Mexicans. Unfortunately, this exposed their flank to the section of Mexican artillery far to the Mexican right. Twice the guns fired, and the 1st US Volunteers fled.

With the US losses on the right flank, this rout began a domino effect that eventually led to the US departing the field. At the same time, the Mexicans almost suffered the same fate: but the CinC and the LSP’s provided a rallying point.

Casualties

The Mexicans lost 180 LSP’s; 140 from the 1st, 2nd and 3rd Line Battalions each; 320 from the 4th Line; and 40 Line cavalry. The cavalry 2inC also suffered a spectacular death. A total of 960 casualties.

The Americans lost 160 men from the 1st Brigade; 200 Texicans (mostly from the 3rd Battalion); and 140 from the 3rd Brigade. They also lost their cavalry Personality. A total of 500 casualties.

Results

A (very) narrow victory for the Mexicans.

Analysis

Both sides attacked extremely aggressively: coming to grips after only 15 minutes of time had elapsed. Luck was with the US: their die-rolling was extraordinary, and the fact that, with this luck, they still lost was down to three things. Firstly, the skill of the Mexican commander; secondly waiting for a FOC morale check on the right flank before firing at the charging Mexicans; and thirdly making two charges too many in the centre.


Battle Report: 1st January 1999

Later British ~vs~ Egyptian

(Robert Avery ~vs~ Richard Avery) .

Later British

Brigade

Unit

Fig.'s Org. Class Weapons Pts/Fig Points
  CinC

1

. .. .   100
  2inC 1         50
  Ammo Wagon 1         50
Infantry 43rd Foot 20 4x5 LightsB lbl   340
  95th Highlanders 40 8x5 RegB lbl   600
Cavalry Camel Corps 8 2x4 RegC s, p, blc   140
  17th Lancers 10 2x5 RegB s, p, l, blc   200
Artillery RHA 3 3x1 RegB light blrb HA   372
Naval Brigade 24 6x4 RegB lbl   392
Brigade HMG's 2 2x1 RegB gatling gun   196
              2440
.

Egyptian

Brigade

Unit

Fig.'s

Org.

Class

Weapons

Pts/Fig

Points

.

CinC

1


  100
1st Brigade 1st Bttn 20 4x5 RegC blr   240
(white) 2nd Bttn 24 4x6 RegC blr   280
  3rd Bttn 24 4x6 RegC blr   280
2nd Brigade 1st Bttn 24 4x6 RegC blr   280
(blue) 2nd Bttn 24 4x6 RegD blr   256
  3rd Bttn 24 4x6 RegD blr   256
Cavalry Lancers 12 2x6 RegC l, s, blc   200
Brigade Lancers 12 2x6 RegC l, s, blc   200
Artillery Attached Art. 2 2x1 RegC light blrb FA   198
Brigade Attached Art. 2 2x1 RegC light blrb FA   198
              2488
.
. Later British Egyptian
Foot 1680 2400
Horse 360 480
Guns 10 8
.

Report

Both sides began the battle in column: rushing into battle lines as they spotted the enemy.

The Egyptians held their centre with three battalions of infantry: who advanced forward in a combination of line and column behind a skirmish screen. This allowed them to develop their flank attacks: with two battalions attacking the British right, and one the British left. Their Lancers were split between the flank attacks.

The British, meanwhile, rushed into line behind a skirmish screen of the 43rd Foot. I say rushed: as the British never really got into a formation that they were happy with. For example, the horse artillery became bunched on the left wing: only supported by the dismounted camel corps; and the Highlanders never managed to get into a full battalion frontage.

The Egyptians attacked and, despite losing a unit of cavalry in a foolish attempt to clear the British skirmish screen, soon had the British on the back foot.

On the British right, two battalions of Egyptians attacked the still deploying Highlanders. Although one battalion was badly mauled by Scottish fire, the other managed to outflank the Highlander line and make it shaken. This flank looked decidedly dodgy for the Brits!

On the British left, the Artillery (who had so far spent the battle destroying one Egyptian battery) were charged by two units of infantry and the remaining Lancer unit: who had already successfully routed the British Lancers with carbine fire!

The defending Camel Corps inflicted devastating casualties on one Egyptian battalion, sending it shaken and ending its charge, but them fled as the Lancers came in. Two of the three British sections fired and, despite being shaken, stopped their charge too.

One charge left: this the British just managed to stop with the Naval Brigade, including gatling guns.

One more attack would have broken the British line but, unfortunately, the Egyptian army had sustained such heavy casualties already that all their units were either shaken or routed. The Egyptian commander had no choice but to retreat. 

Casualties

The British lost 100 men from the 43rd; 140 Highlanders; 40 Lancers and 40 Camel Corps. Their 2inC also suffered spectacular death as he tried to deploy the Highlanders. In all, 320 men. 

The Egyptians lost two sections of artillery; 100 men from the 1st Brigade; 260 from the 2nd Brigade and 260 Lancers (including the entire blue regiment). A total of 700 men.

Results

The narrowest of victories for the British. 

Analysis

The British, quite frankly, did not deserve to win the battle! Their deployment from column was abysmal: leading to all kinds of traffic jams and limited fields of fire. As a result, they passed the initiative to the Egyptians: who took full advantage with aggressive flanking attacks that almost won the day.

It must also be noted that the Egyptians did not all the time realise the strength of their guns: failing to add the bonuses for breechloaders some of the time. The extra casualties that this could have caused could have crumbled the British line: leaving it unable to stop the Egyptians charges that were so narrowly halted.

A lucky escape for the British.


Battle Report: 5th January 1999

Later British ~vs~ Zulu

(Dave Lancaster ~vs~ Robert Avery) .

Later British

Brigade

Unit

Fig.'s Org. Class Weapons Pts/Fig Points
  CinC

1

. .. .   100
1st 2inC 1         50
Brigade 78th Highlanders 20 4x5 RegB lbl   300
  24th Foot 40 8x5 RegB lbl   600
  Naval Brigade 24 6x4 RegB lbl   372
Cavalry Dragoon Guards 16 4x4 RegA s, p, blc   344
Brigade 17th Lancers 8 2x4 RegB s, p, l, blc   164
  Frontier Light Horse 8 2x4 RegC s, p, blc   140
Artillery 2inC 1         50
Brigade RA Battery 3 3x1 RegB light blrb FA   309
  RA HMG 1 1x1 RegB gatling gun   98
  Naval Brigade HMG 1 1x1 RegB gatling gun   98
Support Ammo Wagon 1         50
  Wagon Train 3 3x1 RegC wagon + 2 crew   n/a
              2675
.

Zulu

Brigade

Unit

Fig.'s

Org.

Class

Weapons

Pts/Fig

Points

.

CinC

1


  100
Head 1 30 1x30 FanA sp, sh   225
  2 30 1x30 FanA sp, sh   225
  3 30 1x30 FanB sp, sh   225
Right 4 30 1x30 FanA sp, sh   225
Horn 5 30 1x30 FanA sp, sh   225
  6 30 1x30 FanB sp, sh   225
Left 7 30 1x30 FanA sp, sh   225
Horn 8 30 1x30 FanA sp, sh   225
  9 30 1x30 FanB sp, sh   225
Loin 10 30 1x30 FanB sp, sh   225
  11 30 1x30 FanB sp, sh   225
Misc. Skirmishers 8 1x8 FanB sp, sh, blr   119
              2694
.
. Later British Zulu
Foot 1680 6760
Horse 640 0
Guns 10 0


Report

Outscouted once again, the Zulu’s set up in their horns of the bull formation. The British, in reply, formed an extended line across the battlefield: mixing companies of their different units into three commands.

Both sides advanced rapidly, but with the Zulu’s sending their centre units (the Head and half their Loin) doubling across to the left flank. Meanwhile the Right Horn advanced and demonstrated: keeping the British in front of them occupied.

Far on the British right, three squadrons of cavalry supported a section of artillery. These units were separated from their supporting infantry, positioned on a hill, by an area of dense scrubland. Seeing this, a Zulu impi charged the single section of artillery. Two squadrons of British cavalry counter-charged, but were thrown backwards by the fanatical, formed, charging Zulu’s. A massive melee developed: but the outcome was never really in question. The 600-odd Zulu warriors quickly overwhelmed their 160 mounted opponents.

At the same time, a squadron of Dragoon Guards had charged the Zulu impi on the far left of the Zulu Left Horn. The impi received at the halt, and the Dragoon Guards were wiped out by thrown spears.

This left the right wing of the British somewhat exposed: with the Zulu Left Horn and Head impis streaming towards it. After 15 minutes of positioning, the Zulus charged six impis into the right of the British line:  with the charges going in neatly from left to right.

The three companies of British Regulars on the hill went first: overwhelmed by two impis. Then four impis charged the first of the British central command: five companies of infantry supported by another squadron of Dragoons and the British CinC. These troops had already lost a gatling gun to fire from the Zulu skirmishers and, even worse, had let gaps develop in their advancing line. Two companies were hit by two impis, and were routed. Then the other two impis hit the rest: and they routed as well.

The British had now lost four out of eight squadrons of cavalry; eight out of eighteen companies of infantry, their CinC (seriously wounded); and two out of five sections of artillery. Their left flank and left centre units had used up their “opening volley” bonus trying to suppress the Zulu Right Horn, and their were six Zulu impis behind their right flank (although one was shaken)!

Worse, if they tried to turn to face this threat, the Zulu Right Horn and remaining Loin impis would threaten their other flank. No Zulu impis were routed: although one had been reduced to half strength.

The end was nigh for the British!

Casualties

The Zulu’s lost 880 tribesmen.

The British lost 40 Lancers; 80 Frontier Light Horse (routed); 80 Dragoons (routed); their CinC; two sections of artillery and a smattering of infantry. The Zulus were, however, about to massacre and ritually disembowel, another eight companies of infantry.

Result

A win for the Zulu’s.

Analysis

The Zulu tactics were superb. At the end of each move, they lay prone and so minimised the casualties from artillery and small-arms fire taken as they moved into charge range. They switched an evenly spaced attack to a massive assault on the British right wing, and succeeded in keeping half the British firepower out of contention as they sliced his line up bit by bit.

At the end of the battle, they had outflanked the British line, and were perfectly posed to flank charge his remaining infantry force.

The British made a few minor tactical errors (e.g. counter-charging a charging impi) but in the main, their error was to allow the Zulu’s to seize the initiative and dictate where their attacks went in. 


Battle Report: 9th March 1999

Crimean British ~vs~ Crimean Russian

(Robert Avery ~vs~ Rupert Avery) .

Crimean British

Brigade

Unit

Fig.'s Org. Class Weapons Pts/Fig Points
  CinC

1

. .. .   100
Infantry 2inC 1         50
Brigade Grenadier Guards 40 10x4 RegA mlr 12 580
  57th Regt 40 10x4 RegB mlr 10 500
  66th Regt 40 10x4 RegB mlr 10 500
  Extra for Light Co's         2 48
  Rifles 16 4x4 LightsA mlr 15 280
Cavalry Light Dragoons 10 2x5 RegA s, mlc 17 190
Brigade 17th Lancers 10 2x5 RegA s, l 17 190
  11th Hussars 10 2x5 RegA s 16 180
Artillery 1st Battery 3 3x1 RegB light mlsb FA 73 249

Brigade

2nd Battery 2 2x1 RegA light mlsb HA 98 216
  3rd Battery 1 1x1 RegA rocket launcher 88 98
              3181
.

Crimean Russian

Brigade

Unit

Fig.'s

Org.

Class

Weapons

Pts/Fig

Points

.

CinC

1


  100
Moscva 2inC 1         50
Regt 1st Bttn 48 4x12 LightsC mlr 10 520
  2nd Bttn 48 4x12 RegB sbm 8 424
  3rd Bttn 48 4x12 RegD sbm 6 328
  4th Bttn 48 4x12 RegD sbm 6 328
  Cossacks 48 4x12 RegD sbm 6 328
Cavalry 2inC 1         50
Brigade Uhlans 16 2x8 RegC s, l 15 260
  Hussars 24 4x6 RegC s 14 376
  Cossacks 10 1x10 IrregD s, l 10 115
  Dragoon Guards 16 2x8 RegB s, mlc 17 292
Artillery 1st Battery 3 3x1 RegC light mlsb FA 69 237
  2nd Battery 2 2x1 RegB heavy mlsb FA 112 244
  Ammo Wagon 1         50
              3750
.
. Crimean British Crimean Russian
Foot 2720 4800
Horse 600 1320
Guns 12 10

Report

A set piece battle with the two sides fighting over a village on the Crimean peninsular.

The British set up in two divisions: the Rifles, Guards and Hussars under command of the CinC aimed directly at the village, with the rest of the force moving forward over the open ground to the left.

The Russians sent a small force to occupy the village, but concentrated their main thrust in the centre of the battlefield.

As battle commenced, the Russians let loose an almighty cavalry charge at the British horse artillery that had advanced rapidly to the front-left. The RHA were, however, unlimbered and ready for action: and blew the first rank of Russian horse from the field. The others followed: shaken by the carnage.

On the right, the British elite column was confronted by some Hussars and D-class Russian infantry. Impatient for combat, the Guards charged, in column, but were counter-charged by the Hussars and, horror of horrors, thrown back. This was doubtless due to the fact that the Guards had disordered themselves by charging through a line of Rifles that had already KO’d one squadron of Hussars.

This meant that the British right flank elite force spent the rest of the battle re-organising behind a screen of Rifles that were inflicting heavy casualties on the Russian infantry. As the battle ended, the Guards were advancing once more, and the Russians beginning to crumble, but the Rifles were also starting to look a bit shaky: having been under constant artillery fire for two hours.

In the centre, the two lines continued exchanging fire and, as the battle ended as the short Russian day drew to a close, the three Russian and two British battalions had fought each other to a standstill.

With the British right flank force about to break through; the Russian right stalled due to the threat from flanking cavalry; and the Russian centre crumbling faster than the British centre: it looked grim for the Russians. Despite this, and despite the disparity in forces, due to the fact that the battle had to end at this point, the battle was declared a draw.

Casualties

The British lost 140 Rifles; 20 Horse Artillery crew; 260 men from the 66th; 20 men from the 57th; 20 Field Artillery crew; 100 Lancers and 80 Guards. A total of 640.

The Russians lost 140 Dragoons; 200 Hussars; 40 Cossacks; and 780 infantry. A total of 1160. 

Results

The Russians escaped with a lucky draw.

Analysis

Warning: remember that a small number of inferior troops can hold up your elite flanking column in a town or other enclosed space!

Whilst the British would undoubtedly have eventually crumbled the Russian forces, it is doubtful whether they would have had enough men left to do anything about it. Oh, for those missing 600 points!


Battle Report: 18th May 1999

1860's Mexican ~vs~ Spanish Colonial

(Robert Avery ~vs~ Dave Lancaster) .

1860's Mexican

Brigade

Unit

Fig.'s Org. Class Weapons Pts/Fig Points
  CinC

1

. .. .   100
Infantry 2inC 1         50
Brigade Los Supremos Podres 30 6x5 RegC mlr   300
  1st Battalion 30 6x5 MilC mlr   300
  2nd Battalion 30 6x5 MilC mlr   300
Cavalry 2inC 1         50
Brigade Lancers 12 2x6 RegC s, l   176
  Dragoons 12 2x6 RegC s, mlc   176
Artillery 1st Battery 3 3x1 RegC light mlsb FA   237

Brigade

Ammo Wagon 1         50
Volunteers Personality 1         25
  Guerillos 30 1x30 IrregC mlr   225
              1989
.

Spanish Colonial

Brigade

Unit

Fig.'s

Org.

Class

Weapons

Pts/Fig

Points

.

CinC

1


  100
Talavera 2inC 1         50
Regt 1st Bttn 24 4x6 MilD mlr   184
  2nd Bttn 24 4x6 MilD mlr   184
  3rd Bttn 24 4x6 MilD mlr   184
  4th Bttn 24 4x6 MilD mlr   184
  Light Battalion 20 4x5 LightsC mlr   240
Cavalry 2inC 1         50
Brigade 1st Line 20 4x5 RegC s, mlc   300
  2nd Line 16 4x4 RegD s, mlc   232
Artillery 2inC 1         50
  1st Battery 2 2x1 RegC light mlsb FA   158
  2nd Battery 1 1x1 RegC medium mlsb FA   95
              1981
.
. 1860's Mexican Spanish Colonial
Foot 2400 2320
Horse 480 720
Guns 6 6

Report

The Spanish had decided to take advantage of the unrest in Mexico and invade:  attempting to regain some of the land that they had lost earlier that century.

Near a small village, on a largely open plain, the two forces both set up in a conventional manner: infantry in the centre and cavalry on the wings. Both sides would attempt to outflank the other’s left wing.

The battle opened with a very strong advance from both sides. Unfortunately, the Mexicans overreached themselves slightly, and were in serious danger of letting the Spanish outflanking force get behind their front line. The Volunteers, led by the village priest, were dispatched to hold up the Spanish, and performed superbly: setting up shop in a hedged field and halting and then routing the Spanish 1st Line Cavalry Regiment. The Volunteers were, however, soon routed in their turn, as the Spanish brought up the Talavera Regiment, supported by artillery: but had done enough to stabilise the Mexicans’ open flank and allow their own outflanking manoeuvre to happen.

On the Mexican right, their own outflanking force had run into a few problems. The Supreme Podres had been delayed, and thus the two Mexican cavalry units found themselves unable to advance further, as they faced a combined infantry, cavalry and artillery opposition. The Spanish sought to take advantage of this position, and charged the hesitating Mexican cavalry with their own 2nd Cavalry Regiment and the 4th Battalion of Line Infantry.

Unfortunately, the Mexicans had anticipated their move. The Mexican cavalry disengaged: to reveal a column of Supreme Podres, rapidly deploying into line with their CinC personally commanding them. The Mexican infantry opened fire at the charging Spanish at a distance of 120 yards: i.e. before fear-of-charge came into play, their commander rightly assuming that deploying foot in the face of charging cavalry was not good for the morale (+6).

Both Spanish units were stopped in their tracks and, next moment, the Podres charged the faltering troops themselves who, quite sensibly, turned and ran, but were routed from the field, taking their supporting artillery with them. The victorious Mexicans, not even pausing to reform, continued their charge and captured the Spanish guns: turning them onto the Spanish infantry.

Despite having four units routing, and the rest of the Mexican army advancing in good order, the Spanish commander (despite being stunned in an attempt to resist the charge of the Podres) decided to fight on; but the following phase of the battle saw the Mexicans rout the rest of his Line infantry: effectively leaving only the Talavera regiment and the medium artillery battery on the field.

Casualties

The Mexicans lost 120 Volunteers; 20 Lancers and 160 Los Supremos Podres.

The Spanish lost about 600 cavalry; 320 Line Infantry and 4 guns. The Mexicans would also have followed up the routing Spanish with their (untouched) cavalry: doubtless doing great injury there too!

Results

A total victory for the Mexicans!

Analysis

An excellent battle, concluded in about three hours.

The fortunes of war swayed both ways with, at the beginning, it looking as if the Spanish had managed to outflank the Mexicans. Fortunately, the Mexicans could deploy their reserve to delay this advance whilst they got their outflanking manoeveur in place themselves.

The real damage was done by the Mexicans disengaging their cavalry to allow infantry to deploy and fire at charging Spanish. This was a risk - it hadn’t worked in the Mexican/American battle fought last year - but this time the infantry fired before FOC and had their CinC and Opening Volley advantage: enabling them to stop the charge, before charging in turn themselves. This should be noted as a very risky manoeuvre: but one that works well if it goes right!

There were a number of extraordinary die rolls throughout the battle: two rolls of devastating fire and an out of ammo roll per side.


Battle Report: 21st June 1999

1860's Mexican ~vs~ Spanish Colonial

(Dave Lancaster ~vs~ Robert Avery) .

1860's Mexican

Brigade

Unit

Fig.'s Org. Class Weapons Pts/Fig Points
  CinC

1

. .. .   100
Infantry 2inC 1         50
Brigade Los Supremos Podres 30 6x5 RegC mlr   300
  1st Battalion 30 6x5 MilC mlr   300
  2nd Battalion 30 6x5 MilC mlr   300
Cavalry 2inC 1         50
Brigade Lancers 12 2x6 RegC s, l   176
  Dragoons 12 2x6 RegC s, mlc   176
Artillery 1st Battery 3 3x1 RegC light mlsb FA   237

Brigade

Ammo Wagon 1         50
Volunteers Personality 1         25
  Guerillos 30 1x30 IrregC mlr   225
              1989
.

Spanish Colonial

Brigade

Unit

Fig.'s

Org.

Class

Weapons

Pts/Fig

Points

.

CinC

1


  100
Talavera 2inC 1         50
Regt 1st Bttn 24 4x6 MilD mlr   184
  2nd Bttn 24 4x6 MilD mlr   184
  3rd Bttn 24 4x6 MilD mlr   184
  4th Bttn 24 4x6 MilD mlr   184
  Light Battalion 20 4x5 LightsC mlr   240
Cavalry 2inC 1         50
Brigade 1st Line 20 4x5 RegC s, mlc   300
  2nd Line 16 4x4 RegD s, mlc   232
Artillery 2inC 1         50
  1st Battery 2 2x1 RegC light mlsb FA   158
  2nd Battery 1 1x1 RegC medium mlsb FA   95
              1981
.
. 1860's Mexican Spanish Colonial
Foot 2400 2320
Horse 480 720
Guns 6 6

Report

This battle was a re-fight using the same sides as the battle of 18th May, above.

Neither side outscouted, so both deployed simultaneously.

The Mexicans split their force into three elements: the right wing consisted of the 2nd Bttn Line, two companies of LSP’s, one section of artillery, and one squadron each of Lancers and Line cavalry; the centre consisted of the 1st Bttn Line, two companies of LSP’s, and the other two sections of artillery; and their left wing element consisted of the Guerillos, the remaining two companies of LSP’s, and the remaining squadrons of Lancers and Line cavalry.

The Spanish, on the other hand, set up in a double line formation: with the Talavera regiment deployed in skirmish formation in front of their four battalions of Line infantry; the artillery on the left; and one unit of cavalry on either wing.

As battle commenced, both sides advanced rapidly. It soon became clear that the Mexican left flank element would get tangled in the woods and fields to their front and only make slow progress forward. This proved to be the case: and that element only arrived at a range to make a difference in the dying moments of the battle.

The Mexican centre advanced strongly in line, gradually edging to their left. Facing them, the Spanish Talavera regiment raced forward in their skirmish formation, and almost immediately started firing at the 1st Battalion Line and artillery.

The Mexican right element advanced strongly, only to have a squadron of Lancers routed by artillery fire from the Spanish batteries facing them. The rest of the element, seeing how the battle was going, began to edge to their left towards the centre: doubtless hoping that they would eventually be able to deploy in a position to threaten the flank of the main Spanish infantry body: advancing slowly forward behind their skirmish line.

It was now that the battle was truly decided. Seeing the Mexican right element edging to their left, the Spanish cavalry, supported by artillery moved into a position to threaten them: hoping to delay their arrival in the centre. The Mexicans, however, not really seeing the threat, continued the shift to the left. This was too good an opportunity to miss: and the larger, better Spanish cavalry regiment, headed by their CinC, charged forward towards four Mexican units all of whom were either changing formation or moving leftwards.

Desperately the Mexicans turned to face this threat but the Line cavalry, caught moving, had to take a fear-of-charge from their rear, went shaken and then broke. Next the LSP’s, taking a fear-of-charge whilst changing formation, went shaken, did minor casualties to the cavalry, and then broke on impact. These two routing units shook the 2nd Battalion Line, who then broke on impact; which, in turn, broke the artillery. One glorious cavalry charge, costing some 40 casualties, had destroyed the Mexican right wing element!

Meanwhile, in the centre, the Talavera regiment had been doing stirring work: shaking the rest of the Mexican artillery, and doing some damage to the 2nd Line. Unfortunately, eventually the amount of casualties taken proved too much, and they routed: but, by then, the rest of the Spanish line was in place and ready to open fire.

The battle then became a firefight: with three battalions of Spanish Line firing on the Mexican 1st Line and artillery. Despite the fact that the Mexicans lay prone, the casualties began to mount up. The battle would have been decided at this point but, unfortunately, a lucky shot took out a Spanish general, which caused the 2nd Battalion of Line to rout (“snake eyes”), which necessitated some adjustment from the Spanish before the uneven firefight could continue.

As a last gasp attempt to save the day, the Mexican left flank force (having finally arrived in range) charged forward: but the Spanish 1st Line had been deployed to meet them (in fact they had been waiting for them for about ½ an hour), and blew them from the field with a devastating fire opening volley.

At this point, the Mexican commander accepted defeat.

Casualties

The Spanish lost 120 men from the Talavera regiment before it routed from the field; 80 Line infantry (all from the 2nd Bttn) and 140 cavalry (all from the 1st Regiment). A total of 340 casualties.

The Mexicans lost 40 Lancers (ROT); 120 Line Cavalry (ROT); 60 LSP’s (2 companies ROT); 100 men from the 2nd Bttn; 140 men from the 2nd Bttn (ROT); 180 Guerillos and 60 artillerymen (with one section ROT). A total of 700 casualties.

Results

A victory for the Spanish.

Analysis

A great battle that was, effectively, decided by one cavalry charge.

Even so, the Mexicans proved quite resilient: and there were several dicey moments for the largely D-class Spanish, especially when the 2nd Bttn decided that the death of a sub-General was reason enough to flee the field themselves!    


Battle Report: 3rd August 1999

Later Turkish ~vs~ Later Russian

(Robert Avery ~vs~ Rupert Avery) .

Later Turkish

Brigade

Unit

Fig.'s Org. Class Weapons Pts/Fig Points
  CinC 1         100
1st Brigade 2inC 1         50
  1st Bttn 20 4x5 RegB blr 11 260
  2nd Bttn 24 4x6 RegC blr 10 280
  3rd Bttn 24 4x6 RegC blr 10 280
  Attached Lancers 12 2x6 RegC l, s, blc 15 200
  Attached Artillery 2 2x1 RegC light blrb FA 89 198
2nd Brigade 2inC 1         50
  1st Bttn 24 4x6 RegC blr 10 280
  2nd Bttn 24 4x6 RegC blr 10 280
  3rd Bttn 24 4x6 RegC blr 10 280
  Attached Lancers 12 2x6 RegC l, s, blc   200
  Attached Artillery 2 2x1 RegC light blrb FA   198
              2656
.

Later Russian

Brigade

Unit

Fig.'s

Org.

Class

Weapons

Pts/Fig

Points

.

CinC

1


  100
1st 2inC 1         50
Foot 1st Battalion 48 4x12 RegC poor quality blr 9 472
  2nd Battalion 48 4x12 RegC poor quality blr 9 472
  3rd Battalion 48 4x12 RegD poor quality blr 8 424
  Attached Sailors 48 4x12 RegD poor quality blr 8 424
1st 2inC 1         50
Horse Dragoon Guards 8 1x8 RegB s, blc 16 138
  Uhlans 8 1x8 RegC s, l, p 14 122
Artillery Battery 3 3x1 RegC light mlrb FA 79 267
  Ammo Wagon 1         50
              2569

Report

The Russians, being outscouted, deployed first. They set up very much in a block:  with the 1st and 2nd Bttn’s opposite a small village; their guns on their left; their cavalry to the left of the guns; and their remaining infantry to the left of the cavalry.

The Turks, on the other hand, split their forces into two parts. Their combined artillery, supported by the 2nd Brigade Cavalry, were placed on the far left of the field: allowing them to shoot across the battleground and into the flanks of any advancing Russians. Their entire infantry marched in column towards the village and its neighbouring hill; with their remaining cavalry on the far right beginning an outflanking manoeuvre.

As battle opened, both sides marched forward: the Russians sending their left flank infantry forces (the 3rd Bttn and the Sailors) towards the Turkish guns, and their other two infantry units toward the village. The Turks sent their entire infantry force doubling towards the village: with varying degrees of success.

Spotting a weakness in a disordered Turkish unit, the Russian commander charged  the 1st Bttn down the road near the village straight into the heart of the Turkish advance. Although the Turks were momentarily stopped in their tracks, the single Russian unit effectively faced six battalions of Turkish infantry. It’s charge failed, and the retreating Ruskies were hit by a charge themselves that routed them off the table.

Meanwhile, the Russians had brought up the 2nd Bttn to attack the village. Unfortunately, they came under flanking fire from the Turkish guns, which halted them before the village was reached. Worse, the Turkish 1st Bttn cavalry had completed their outflanking manoeuvre and were now threatening their other flank. Not sure what to do, the Russians formed square.

To the left, two battalions of Russians were still marching towards the Turkish guns. Unfortunately, the Russians had chosen to advance in line rather than, say, skirmish or column formation: so the advance was very slow.

The Turks now took the initiative: taking the village and the hill, and forming on their edges and preparing to pour fire into the halted Russian 2nd Bttn. Realising that a crisis point had been reached, the Russian commander attempted to shift the Turks from the village hill by charging his Sailors and entire cavalry at them as they were still forming. Unfortunately, the Turks were readier than they looked: their guns fired into the rear of the charging cavalry and sailors, and there were actually three battalions of infantry able to add their fire to repulse the charges.

With only the 2nd Bttn and artillery now still a fighting force (the 3rd Bttn had finally forced the guns to move: but only far enough to start pouring fire into it), the Russian commander ordered a retreat.

Casualties

The Turks lost 60 men from the 1st/2nd Bttn; 40 men from the 2nd/1st Bttn; and 80 men from the 2nd/3rd Bttn. They also lost 20 gunners and a sub-general (spectacular death): for a total of 200 casualties.

The Russians lost 180 men from the 2nd Bttn; 20 men from the 1st Bttn (ROT); 120 Sailors (ROT); 120 Dragoons (ROT); and 80 Uhlans (ROT). They also lost their CinC to a heavy wound: a total of 520 casualties.

Results

A win for the Turks.

Analysis

A good battle in which the long range Turkish artillery proved a thorn in the side of the slow-moving Russians. Had the Russian CinC suppressed the artillery sooner, then things might have been different: but the Turks took full advantage of their outscouting to get the best position possible.


Battle Report: 20th November 1999

1859 Austrians ~vs~ 1859 French

(Robert Avery ~vs~ Rupert Avery) .

1859 Austrians

Brigade

Unit

Fig.'s Org. Class Weapons Pts/Fig Points
  CinC 1         100
1st Brigade Attached Jaegers 32 4x8 LightsB mlr 12 424
   1st (Grenadier) Battalion 32 4x8 RegB mlr 11 392
  2nd (Fusilier) Battalion 42 6x7 RegC mlr 9 438
  3rd (Fusilier) Battalion 42 6x7 RegC mlr 9 438
Cavalry Uhlans 14 2x7 RegB l, s, p 16 244
Artillery Battery 3 3x1 RegB light mlsb FA 73 259
              2295
.

1859 French

Brigade

Unit

Fig.'s

Org.

Class

Weapons

Pts/Fig

Points

.

CinC

1


  100
  Imperial Guard 16 4x4 RegA mlr 12 232
1st Regiment 1st Battalion 36 6x6 RegC mlr 9 384
  2nd Battalion 36 6x6 RegC mlr 9 384
  3rd Battalion 36 6x6 RegC mlr 9 384
  Attached Zouaves 36 6x6 RegC mlr 9 384
Cavalry Cuirassiers 12 2x6 RegB s, armour, mlc 16 212
Artillery Battery 3 3x1 RegC light mlrb FA 79 267
              2347
.
. Austrians French
Foot 2960 3200
Horse 280 240
Guns 6 6

Casualties

The Austrians lost 160 Jaegers; 240 Grenadiers; and 80 Uhlans: for a total of 480.

The French lost 160 Imperial Guard; 80 1iere Bttn; 60 2ieme Bttn; 200 3ieme Bttn; 200 Zoauves and 100 Cuirassiers for a total of 800.

Results

A win for the Austrians.

Analysis

A good battle played over about 3 hours.

The French were somewhat unlucky at the beginning of the battle: by rights their counter-battery fire should have taken out the Austrian artillery. The fact that it didn’t was to prove crucial: as the Austrian artillery contributed muchly to the French defeat. The Austrian skirmishers also proved incredibly difficult to hit: not taking any casualties until at least half-way through the battle.

However, if there was one moment that perhaps the French could have played better, it was the moment when the Austrian Grenadiers were disordered in the woods. If, instead of firing (which would have worked in open terrain) the French had charged, then the Austrians would probably have broken and fled (they would have counted as under partial flank fire and disordered). This would have enabled the French battalion to appear on the Austrian flank and put an entirely different perspective on the battle.


Battle Report: 29th December 1999

Prussian ~vs~ Later French

(Robert Avery ~vs~ Dave Lancaster) .

Prussian

Brigade

Unit

Fig.'s Org. Class Weapons Pts/Fig Points
  CinC 1         100
1st Brigade 2inC 1         50
  Guards 48 4x12 RegA blr 13 664
  Jaegers 48 4x12 LightsB blr 13 664
2nd Brigade 1st Foot 24 2x12 RegC blr 10 260
  2nd Foot 48 4x12 RegC blr 10 520
Cavalry 2inC 1         50
  Cuirassiers 24 4x6 RegA s, armour, blc 17 448
  Uhlans 24 4x6 RegB s, l, p 14 376
  Dragoons 16 4x4 RegB s, blc 16 296
Artillery HA Battery 3 3x1 RegA light blrb HA 118 384
              3812
.

Later French

Brigade

Unit

Fig.'s

Org.

Class

Weapons

Pts/Fig

Points

.

CinC

1


  100
  Imperial Guard 20 5x4 RegA lbl 14 320
1st Battalion 2inC 1         50
  1st Battalion 36 6x6 RegC lbl 11 456
  2nd Battalion 36 6x6 RegC lbl 11 456
  3rd Battalion 36 6x6 RegC lbl 11 456
  Attached Zouaves 36 6x6 LightsB lbl 14 564
Cavalry 2inC 1         50
  Dragoon Guards 12 2x6 RegA s, blc 18 236
  Guides 12 2x6 RegA s, blc 18 236
  Cuirassiers 12 2x6 RegB s, armour, blc 17 224
  Lancers 12 2x6 RegB s, l, p 16 212
Artillery Battery A 2 2x1 RegC light mlsb FA 79 178
  Battery B 3 3x1 RegC mitrailleuse 84 282
              3820
.
. Prussians French
Foot 3360 3280
Horse 1280 960
Guns 6 10

Report

The French were hugely outscouted, so set up first. They set up in three main blocks. The right wing consisted of half the cavalry (one squadron from each regiment) on the wing, supporting infantry consisting of three companies from each of the Third and Zouave regiments, and the whole of the Second regiment. The Zouaves skirmished forward as the rest of the infantry advanced in column. On the left wing, the Imperial Guard, two sections of HMG and the rest of the cavalry advanced forward in column, covered by a skirmish screen of the rest of the Zouaves. In the centre, the remaining troops advanced in column, with the artillery placed on a hill at the back.

The Prussians placed their entire cavalry on their left wing, covered initially by a skirmish screen of half the Jaegers, and supported by the 1st Regiment. The cavalry quickly advanced into cover in a sunken road, freeing the Jaegers to skirmish forward.

The right wing consisted of, from the right, the Guards and then the 2nd Regiment: screened by the rest of the Jaegers, and supported by the Horse Artillery. 

As battle joined, the Jaegers, Guards and Horse Artillery of the Prussians doubled forward, immediately bringing the French left wing under fire. One Mitrailleuse was knocked out almost immediately, and the Zouave skirmish screen somewhat damaged before they managed to lie prone. Both sides settled down to exchange skirmish screen fire while they brought up the rest of their infantry, moving slowly in line.

On the left, the French advanced smartly forward behind their skirmish screen towards the waiting Prussians.

Battle proper was joined when the French cavalry on their left decided to try and clear the Jeager skirmish screen by charging them. Unfortunately, the Jaegers were halted, ready to fire, supported by artillery, and were able to repulse the densely packed cavalry column with ease.

The action then switched to the opposite side of the field, where the Prussians decided to try the same thing. Half the entire Prussian cavalry brigade ie two squadrons each of Cuirassiers, Dragoons and Uhlans charged the unfortunate French Zouaves. These were caught moving forward, but elected not to disengage, doubtless encouraged by the performance of the Jaegers moments ago.

Unfortunately, the Zouaves were not as set as the Jaegers, there were less of them, more cavalry, that was not in column and, after taking a few casualties, the Prussian cavalry smashed them from the field. This left the Prussian cavalry, however, under the guns of half of the Third and Second Regiments. They were in line, but had been caught moving (ie CH orders), and had been shaken by the routs across their bows. Nevertheless, they fired, but unfortunately rolled appallingly, and did desultory casualties to the Prussian cavalry. They managed to rout the Dragoons, but were now left at the mercy of the Cuirassiers and Lancers.

Just as the French commander was realising that his right wing was about to collapse (the Jaegers and 1st Regiment were moving up behind the cavalry to finish the job), the Prussian Guards unexpectedly charged his left wing. Over 720 A class Guardsmen charged in line, with their CinC, and swept one HMG, the Zouaves, two squadrons of cavalry and, most importantly, the Imperial Guard (caught moving in column on partial flank – they had been trying to edge around the Prussian flank) from the field.

The French Commander now had both wings collapsing and, in the centre, Prussian Jaegers and the 2nd Regiment were leapfrogging each other and pouring fire into his remaining infantry. With Prussian artillery following up infantry fire, the French could stand no longer, and gradually their whole line collapsed into rout. The Prussian cavalry charged forward into the rear of many of the routing units (one squadron going into each one), and the battle was over! 

Casualties

The Prussians lost 40 Jaegers; 20 artillerymen; 160 Guards; 340 2nd Regiment; 40 Uhlans; 160 Dragoons and 160 Cuirassiers for a total of 920 or 18% of their force!

The French lost 1 HMG; 140 Zouaves (ROT); 80 Dragoons (1 squadron ROT); 60 Lancers (1 squadron ROT); 160 Second Line; 80 First Line; 80 Imperial Guard (ROT); 60 Third Regiment plus had a squadron of Guides and Cuirassiers ROT (at the end of the battle, only the 1st Regiment and the remaining cavalry was unshaken or un-routed) for a total of 740…although the Prussian cavalry were about to horribly decimate most of the infantry!

Results

A crushing victory for the Prussians. 

Analysis

A great battle fought in about four hours.

It was historically accurate in that the French charged forward without consideration for the superior range of their chassepot rifles, and the Prussian did the same. The real damage was done by the bayonet on each side: although the Prussian artillery was a thorn in the French side for the whole battle. If the French had hung back and tried sniping the Prussians, then the Prussians would have had more problems.

Both sides had way too much cavalry proportionately, but the Prussians cavalry charge against the French skirmish line was a sight to see:  32 cavalry figures charging in line (a frontage of 48 cms!), emerging out of a sunken road and sending four half regiments of French infantry into rout before chasing them from the field. Von Bulow is avenged!

Again breechloader-armed, trained skirmishers proved almost impossible to counter except through charges (1-5 saving rolls if lying prone). Although not recorded in the main report, the Prussians had to sacrifice a company of infantry to clear two companies of skirmishing French Zouaves. The French had first fired, and the Prussians therefore routed them, but were largely annihilated by the rest of the French infantry following behind.


Battle Report: 18th September 2000

Egyptian ~vs~ Late British Indian

(Robert Avery ~vs~ Dave Lancaster) .

Egyptian

Brigade

Unit

Fig.'s Org. Class Weapons Pts/Fig Points
. CinC

1

. .. . 100 100
1st 2inC 1       50 50
Brigade 1st Battalion 20 4x5 RegC blr 10 240
  2nd Battalion 24 4x6 RegC blr 10 280
  3rd Battalion 24 4x6 RegC blr 10 280
  Attach'd Cavalry 12 2x6 RegC s, l, blc 15 200
  Attach'd Artillery 2 2x1 RegC light blrb FA 89 198
2nd 2inC 1       50 50
Brigade 1st Battalion 24 4x6 RegC blr 10 280
  2nd Battalion 24 4x6 RegC blr 10 280
  3rd Battalion 24 4x6 RegC blr 10 280
  Attach'd Cavalry 12 2x6 RegC s, l, blc 15 200
  Attach'd Artillery 2 2x1 RegC light blrb FA 89 198
Forts Zereba 90"         30
Tribal 2inC 1       50 50
Group Yellow Flags 18 1x18 FntcsC sw, sh 6 123
One Blue Flags 18 1x18 FntcsC sw, sh 6 123
  Red Flags 18 1x18 FntcsC sw, sh 6 123
Tribal 2inC 1       50 50
Group Blue Flag Horse 10 1x10 IrregD sw, sp, mlr 8 95
Two Green Flag Horse 10 1x10 IrregD sw, sp, mlr 8 95
  P'rple Flag Horse 10 1x10 IrregD sw, sp, mlr 8 95
  Red Flag Horse 10 1x10 IrregD sw, sp, mlr 8 95
              3467
.

Later British Indian

Brigade

Unit

Fig.'s

Org.

Class

Weapons

Pts/Fig

Points


CinC

1


100 100
1st  2inC 1       50 50
Brigade 95th Highlanders 40 8x5 RegB lbl 13 600
  Sikh Battalion 40 8x5 RegC blr 9 440
  Ghurka Battalion 40 8x5 RegC blr 9 440
  2 companies Lights 10       +2 20
Indian 2inC 1       50 50

Brigade

1st Bengal Foot 32 8x4 RegC blr 9 368
  2nd Bengal Foot 32 8x4 RegC blr 9 368
  Bengal Lancers 15 3x5 RegC s, l, blc 15 255
  Bengal Horse 15 3x5 RegC s, blc 15 240
Artillery RA Field Battery 3 3x1 RegB light blrb FA 93 309
Brigade Mountain Battery 3 3x1 RegB Mountain Guns 66 228
  Ammo Wagon 1       50 50
              3468

Report  

The Egyptians were defending the small town of Hotep:  small in terms of size, but vital in terms of strategic importance as it overlooked where the main east-west and north-south roads crossed. 

They set up with four battalions of their regular infantry in a long line behind their zereba to the right of the town, supported by one artillery battery, whilst the other two battalions and artillery battery invested the town itself. The tribal foot and regular cavalry were protecting the right flank of the zereba; the irregular horse the left flank.

The British ignored the central hill of the battlefield, placing only two sections of artillery there. They split their force into two:  each aimed to attack one flank of the zereba. The left flank force comprised four companies of Sikhs, the Highlanders and Ghurkas, supported by the Bengal Horse and two section of artillery. The right flank force comprised the rest of the Sikhs along with the two Bengali Foot battalions and the Bengal Lancers, supported by tow sections of mountain artillery.

The battle opened with an artillery duel:  and immediately the British suffered a major reverse:  losing the two sections of artillery they had placed on the central hill to counter-battery fire for no reply!  Meanwhile, on the Egyptian left, the irregular tribal horse, all four warbands, had advanced strongly towards the guns supporting the British 1st Brigade. On the Egyptian right, the fanatical foot and regular cavalry advanced quickly towards four columns of Sepoy/Sikh foot and cavalry.

The tribal horse thundered forward. The British guns fired and stopped one warband (Purple Flag), shaken, but, next turn, rather than wait for the horse to close to canister range, they fired again:  before the irregulars had started their charge. Despite this early firing, they did enough casualties to rout another warband (Green Flag) which, given the Irregular D status of all of them, could have send them all flying off the board. Three morale checks were required. The first shook the Green Flags, the second routed them, but the third ‘double-sixed’ to put them back to good morale and continue their charge!

There is only one God, and his name is Allah!

Of the four horse warbands, two had now been routed, but two charged forward into the artillery batteries:  hacking and slashing as they went. The artillery crews routed and this, unfortunately, caused the Bengal Horse (who had moved up to contain the irregulars) to rout as well:  partly, it must be said, due to the fact that as they moved up they had exposed their flanks to artillery fire from the Egyptian guns defending the town. The flight of the Bengal Horse also caused four companies of Sikh infantry to rout (‘old snake eyes’)!

Although the tribal horse were then quickly annihilated by the Ghurkas and Highlanders, they had, in effect, totally stymied the British attack on the Egyptian left flank! Incidentally, the tribal SubGeneral who had accompanied the horse right into the artillery batteries themselves survived unscathed!

There is only one God, and his name is Allah!

Meanwhile, things were also developing on the other side of the battlefield. Recognising the importance of this flank, the British commander despatched one of his Brigadiers to take charge. Unfortunately, whilst passing through some rocks on his way to the Indian Brigade, the Brigadier was spectacularly mauled to death by a mountain lion panicked by the sound of the guns! Four sixes on 4d6, plus another 6 for effect!

There is only one God, and his name is Allah!

However, battle continued:  three warbands of fanatical tribal foot, supported by the Egyptian regular lancers heading quickly towards four columns of Indian troops.

Seeing an opportunity to catch the Indian wrong-footed, the fanatics and some of the Egyptian cavalry immediately charged the sepoy columns. Caught at the halt and changing formation, the Bengal Lancers and Sikhs were impacted by two fanatical foot units. The lancers routed, with the Sikhs following after a vicious melee with the fanatical swordsmen, exposing the infantry and mountain artillery to a squadron of charging lancers. Although the infantry destroyed the lancers with fire, they were shaken and the guns abandoned.

Now the rest of the Egyptian cavalry charged forward:  into Indian troops who were now also coming under flank fire from the Egyptian artillery defending the zariba. It was too much for the sepoys, and the troops on that flank crumpled away:  pursued by the lancers right off the table!

Although this effectively took out the tribal foot and Egyptian regular cavalry, it had not just stopped, but destroyed, the British force attacking the right flank of the zariba.

The British now had only four companies of Sikhs, the Highlanders and Ghurkas left:  a fine fighting force but hampered by the knowledge that they had lost so many comrades. They bravely advanced against the town of Hotep:  but marched into concentrated Egyptian artillery and breech-loader fire from inside the town walls. It was never going to be and, reluctantly, the British commander conceded defeat.

Casualties

Casualties were horrendous on both sides!

The British lost a Sub-General; 20 Highlanders; 280 Sikhs (35% and ROT); 160 Ghurkas (20%); 400 Bengali foot (31% and ROT); 220 Bengali cavalry (37% and ROT); and all their artillery except one mountain section. A total of 1481 men!

The Egyptians lost one squadron of lancers; 240 tribal foot (22%); and 480 tribal horse (60% and ROT). A total of 840.

Results

A win for the Egyptians.

Analysis

There is only one God, and his name is Allah.


Battle Report: 28th December 2000

Early Austrian ~vs~ Early French

(Robert Avery ~vs~ Richard Avery) .

Early Austrian

Brigade

Unit

Fig.'s Org. Class Weapons Pts/Fig Points
. CinC

1

. .. . 100 100
Infantry 2inC 1       50 50
  Attached Jaegers 32 4x8 LightsB mlr   424
  Grenadiers 32 4x8 RegB mlr   392
  1st Fusiliers 42 6x7 RegC mlr   438
  2nd Fusiliers 42 6x7 RegC mlr   438
Cavalry 2inC 1 2x1 RegC light blrb FA 50 50
  Uhlans 14 2x7 RegB s, l, p   244
  Dragoons 14 2x7 RegB s, mlc   230
Artillery 1st Battery 3 3x1 RegB light mlsb FA   249
              2615
.

Later British Indian

Brigade

Unit

Fig.'s

Org.

Class

Weapons

Pts/Fig

Points


CinC

1


100 100
  Imperial Guard 4 1x4 RegA mlr   58
Infantry  2inC 1       50 50
  1ere Battalion 36 6x6 RegC mlr   384
  2ieme Battalion 36 6x6 RegC mlr   384
  3ieme Battalion 36 6x6 RegC mlr   384
  Zouaves 36 6x6 LightsB mlr   492
Cavalry 2inC 1       50 50
  Cuirassiers 12 2x6 RegB s, mlc, armour   212
  Lancers 12 2x6 RegB s, l, p   212
Artillery 1st Battery 3 3x1 RegC light mlrb FA   267
  Ammo Wagon 1       50 50
              2643
.
. Austrian French
Foot 2960 2960
Horse 560 480
Guns 6 6

Report  

Neither side outscouted, and both moved forwards under cover of the early dawn. As the mist cleared, the Austrians saw that the French had stolen a march on them:  with a powerful force (the 2ieme battalion; half the zouaves, lancers and cuirassiers; and all the artillery) already in position on the Austrian right flank. All that the Austrians had posted to cover that flank were a squadron each of dragoons and uhlans; two companies of Jaegers; and two sections of artillery.

In the centre, the Austrians had made a powerful thrust straight for the village, with a column of all their non-Jaeger infantry. Opposite them were the rest of the French:  although the rest of the zouaves and half the 1ere battalion were faced to protect their right flank.

The battle opened with the Austrian artillery on their right flank bombarding the outflanking 2ieme battalion. Although casualties were minimal, the 2ieme were definitely not in the mood for fighting, and routed immediately! This effectively halted the French thrust on this flank, especially as the Austrians sent their cavalry over the river to capture a section of French guns now unmanned due to skirmish fire from Jaegers.

In the centre, both sides still advanced towards the village, with the French repositioning their right flank protection force to begin advancing on the relatively weak Austrian left flank.

The Austrians decided to try to take advantage of their success on the right flank, and charged half their cavalry into the French force that was shaken from seeing the 2ieme rout, whilst moving up with their Jaegers, Unfortunately, the Austrians were a bit too carried away with themselves to weigh up the odds realistically (the French still had four guns; 240 cavalry and 360 zouaves present), and their cavalry, although it sent some more French routing, was reasonably easily dispersed. The French then followed up with their own cavalry:  succeeding in driving back the rest of the Austrians and even managing to get into a position where, later in the battle, they would threaten the Austrian right flank.

In the centre, the Austrians charged for the village with the grenadiers, but these usually noble individuals turned tail and routed at the first sign of trouble. Both sides now deployed into line. The French right flank force was still trying to get into a position to threaten the Austrian left:  now totally exposed as the covering cavalry had been dispersed by zouave skirmishers.

Meanwhile, the French on the Austrian right had crossed the river, although downstream of their original intended crossing point, and had deployed their zouaves and remaining artillery into a position from which they had dispersed the remaining Austrian jaegers and were now threatening the Austrians efforts in the centre. Both sides sent a battalion of infantry to reinforce this flank: with the Austrian 2nd battalion arriving first and charging away the zouaves, artillery and the reinforcing French 3ieme battalion.

At this point the battle ended. The Austrains were in a very powerful position:  deployed into a line that effectively formed a semi-circle across the centre/front of the battlefield. They were also in the process of deploying captured French guns against their former masters. The French, however, were still relatively unscathed (as opposed to the definitely ‘scathed’ Austrians!):  but needed to consolidate before attacking again.

Casualties

The French lost 140 line infantry; 40 zouaves and all the Imperial Guard. Their artillery were also lost, and a SubGeneral lightly wounded.

The Austrians lost 60 grenadiers; 180 fusiliers; 280 Jaegers; 180 Uhlans; 100 dragoons and had their cavalry SubGeneral heavily wounded. A total of around 800 men! Two of their three sections of artillery also routed off the table, along with the rest of the Jaegers; Uhlans and Dragoons.

Results

The battle was declared a draw:  although the Austrians had a slightly better position on the field, they had sustained around four times as many casualties as the French.

Analysis

As the Austrian commander, it must be said that the French commander read the ground perfectly and deserved to win the battle on the strength of his original deployment alone. It was only some appalling dice rolls on his part, and by expending large amounts of Austrians (hence the one-sided casualty figures) that the Austrian position was retrieved at all. Had this been “real”, I would have been tempted to withdraw immediately the mist cleared!

The battle went backwards and forwards but ended with both sides regrouping for the next series of attacks. Had battle continued, the outcome was by no means certain:  the Austrians had the superior position, and had disposed of the French artillery; but were down five units already, compared to the single French unit casualty. The Austrians could only have won if they had taken advantage very quickly of their superior field position:  if the French had been allowed to regain their balance, then a French victory would have been more likely.    


Battle Report: 5th January 2001

Prussian ~vs~ Austrian

(Dave Lancaster ~vs~ Robert Avery) .

Austrian

Brigade

Unit

Fig.'s Org. Class Weapons Pts/Fig Points
. CinC

1

. .. . 100 100
Infantry 2inC 1       50 50
  Attached Jaegers 32 4x8 LightsB mlr   424
  Grenadiers 32 4x8 RegB mlr   292
  1st Fusiliers 42 6x7 RegC mlr   438
  2nd Fusiliers 42 6x7 RegC mlr   438
Cavalry 2inC 1       50 50
  Uhlans 14 2x7 RegB s, l, p   244
  Dragoons 14 2x7 RegB s, mlc   230
Artillery 1st Battery 3 3x1 RegB light blrb FA   309
  Ammo Wagon         50 50
              2725
.

Prussian

Brigade

Unit

Fig.'s

Org.

Class

Weapons

Pts/Fig

Points


CinC

1


100 100
Infantry 2inC 1       50 50
  Guards 24 2x12 RegA blr   332
  Jaegers 36 3x12 LightsB blr   498
  1st Line 24 2x12 RegC blr   260
  2nd Line 48 4x12 RegC blr   520
Cavalry 2inC 1       50 50
  Cuirassiers 12 2x6 RegA s, armour, blc   224
  Lancers 12 2x6 RegB s, l, p   188
  Dragoons 8 1x8 RegB s, blc   148
Artillery 1st Battery 3 3x1 RegB light blrb FA   309
  Ammo Wagon         50 50
              2729
.
. Austrians Prussians
Foot 2960 2640
Horse 560 640
Guns 6 6

Report  

Neither side outscouted. The Austrians formed their line infantry into a line across the centre of the battlefield, protected by a skirmish line of jaegers, and supported by a section of artillery at either end. On their right flank, they had the grenadiers in column, with one artillery section. Their left flank was anchored on the wood, behind which sheltered their cavalry and ammo wagon.

The Prussians had a company of guards; the 1st line battalion; and 3 companies of the 2nd line battalion in line opposite the Austrian infantry, also protected by skirmishing jaegers (2 companies). The right flank of their line was protected by a squadron of uhlans and the cuirassiers, formed into column, and with a single section of artillery on a hill further to the right, supported by the remaining company of line infantry. Their left flank comprised the remaining companies of guards and jaegers, supported by the remaining two sections of artillery, and the rest of the cavalry.

The battle opened with both sides advancing towards each other, exchanging artillery fire to little effect.

In the centre, the Austrian line reached the edge of the wood that their left flank was anchored on, and halted. The Prussian skirmishers advanced quickly, but then halted as they waited for the infantry in line to catch them up, mysteriously conserving their ammunition rather than advancing into their superior range against the Austrian line.

Suddenly the Prussians changed tactics:  on their left, thecavalry and infantry charged the deploying Austrian grenadiers; on the right, their cavalry charged the end of the Austrian line.

Neither charge worked. On the left, the cavalry were routed by fire from half the grenadiers (at 120 yards ie before fear of charge), and the infantry were destroyed or routed by the rest of the grenadiers point blank fire supported by double canister from the guns. On the right, the cavalry were annihilated by fire from the main Austrian line (the skirmishers had disengaged) and the single section of artillery there.

From that moment, the battle was really decided in the Austrians’ favour. On their right, the grenadiers advanced and captured the now unsupported Prussian guns. In the centre the two skirmish lines started an inconclusive firefight. On the left, the Austrian cavalry emerged from their cover and moved forward to threaten the Prussian flank.

The Prussian line came under fire from their flank from the Austrian artillery, grenadiers and captured Prussian guns. This routed half of them and although the remainder attempted a charge on the Austrian centre, this was easily repulsed.

As the battle ended, the Prussians were in full retreat as the Austrian cavalry moved in for the kill!

Casualties

The Austrians lost 80 grenadiers; 20 fusiliers; and 80 jaegers:  a total of 180 men.

The Prussians lost all the Uhlans; 40 dragoons; all the cuirassiers; 140 jaegers; 120 guards; 20 artillerymen and 1 gun; 180 line infantry and one sub-general suffered a heavy wound:  a total of 981 men!

Results

A total victory for the Austrians.

Analysis

The Prussian commander threw away the battle when, despite warnings, he threw away his cavalry charging the front of formed or forming infantry closely supported by artillery.


Battle Report: 9th January 2001

Prussian ~vs~ Austrian

(Dave Lancaster ~vs~ Robert Avery) .

Austrian

Brigade

Unit

Fig.'s Org. Class Weapons Pts/Fig Points
. CinC

1

. .. . 100 100
Infantry 2inC 1       50 50
  Attached Jaegers 32 4x8 LightsB mlr   424
  Grenadiers 32 4x8 RegB mlr   292
  1st Fusiliers 42 6x7 RegC mlr   438
  2nd Fusiliers 42 6x7 RegC mlr   438
Cavalry 2inC 1       50 50
  Uhlans 14 2x7 RegB s, l, p   244
  Dragoons 14 2x7 RegB s, mlc   230
Artillery 1st Battery 3 3x1 RegB light blrb FA   309
  Ammo Wagon         50 50
              2725
.

Prussian

Brigade

Unit

Fig.'s

Org.

Class

Weapons

Pts/Fig

Points


CinC

1


100 100
Infantry 2inC 1       50 50
  Guards 24 2x12 RegA blr   332
  Jaegers 36 3x12 LightsB blr   498
  1st Line 24 2x12 RegC blr   260
  2nd Line 48 4x12 RegC blr   520
Cavalry 2inC 1       50 50
  Cuirassiers 12 2x6 RegA s, armour, blc   224
  Lancers 12 2x6 RegB s, l, p   188
  Dragoons 8 1x8 RegB s, blc   148
Artillery 1st Battery 3 3x1 RegB light blrb FA   309
  Ammo Wagon         50 50
              2729

Report  

The battle was an exact re-fight of the battle above (of 5th January 2001):  same terrain and same forces.

The Austrians set up identically to the battle above. The Prussians split their force into three parts. On their right was a company of 1st and 2nd Line, supported by the uhlans and a section of artillery. In the centre there was two companies of 2nd Line and the remaining company of 1st Line, again supported by a section of artillery. On their left were the Guards; the remaining company of line troops; the Cuirassiers; the Dragoons and the remaining section of artillery. The whole of the Prussian front was covered by a screen of Jaegers.

As before, both sides advanced towards each other. This time, however, the Prussian Jaegers advanced to a position where they could use the superior range of their breechloaders without the Austrian muzzleloaders being able to hit them. They lay prone and commenced fire on the Austrian skirmish line. The Austrian commander knew that if he did nothing, then he would find himself needle-gun-ed to death very quickly so, next turn, as the Prussian Jaegers first fired, he charged at the head of three companies straight at the Prussian skirmish line!

The Prussian fire failed to stop the Austrian charge, and the Prussian Jaegers lost the impact and fell back shaken. The Austrians were still charging, and a furious melee developed, right under the guns of the main Prussian line. Both sides ended up routing in melee:  the Prussians losing all their breechloader-armed 720 Jaegers ROT, the Austrians losing three of their four muzzleloader-armed Jaeger companies. The Austrian CinC survived the melee, and calmly rode back to his own lines:  most satisfied with having cleared the Prussian Jaegers from the field.

The main battle lines, now uncovered, marched towards each other in line.

However, before anything else interesting could happen in the centre, the action moved to the Austrian left flank, where the two enemy forces had now deployed facing each other. The Prussians had a column of their cavalry on the road, placed immediately behind a line of guard and line infantry. The Austrians faced them with two sections of artillery (which had already eliminated the Prussian gun facing them) and a line of grenadiers. Again the Austrians took the Prussians by surprise:  exchanging only one round of fire before charging into them! Caught about to move forward, the Prussian line infantry went shaken and then routed. The Prussian guard was made of sterner stuff and, despite taking fire from the Austrian artillery and seeing their line comrades rout, the Guard held and another melee developed.

This time, however, nothing was going to stop the Austrians:  with their blood up, the Austrian grenadiers did horrendous casualties to the shaken Prussian guard:  routing them from the field. Seeing this, the already disordered (by their own routing infantry) Prussian cavalry also routed:  the Prussian left flank had collapsed! Unfortunately, the Austrian grenadiers were out of ammo, battered (40% casualties), and disordered:  it would take time for them to get over to the centre of the field.

In the centre, a firefight had developed between the main battle lines. For two turns things seemed about even:  but the Prussian breechloaders were causing havoc in the Austrian line. The Austrians moved the left three companies of their line backwards to clear a field of fire for some artillery, and to guard against an expected Prussian infantry charge (the Prussian right flank formation slightly overlapped the Austrian line). The infantry charge didn’t come, but the Prussian commander assumed that the Austrian troops moving back were in retreat, and decided to throw in his uhlans in a massive charge. Unfortunately, the Austrianswere not in retreat, only retreating, and could still bring their rifles and some artillery to bear on the charging cavalry. The cavalry were routed and caused the Prussian right flank force to lose its nerve and, at the same time, to panic fire their remaining ammunition

Now it was the turn of the Austrian commander to see an opportunity. His main line was about to collapse under the weight of Prussian breechloader fire, but he had moved up his cavalry in anticipation of needing to cover a retreat. The Austrian uhlans and dragoons moved forward in two lines and swept the shaken Prussian right flank force from the field.

With Austrian cavalry loose on his right flank, Austrian grenadiers finally advancing towards his left flank, and the Austrian battleline shaken but not stirred, the Prussian commander, now down 5 units, ordered a retreat, leaving the field to the battered enemy!

Casualties

The Austrians lost 400 Jaegers (3 co’s ROT); 240 Grenadiers; 360 1st Fusiliers; 360 2nd Fusiliers; 40 Dragoons; 60 Uhlans; and 80 artillerymen for a total of 1540 men.

The Prussians lost 160 Jaegers (all the rest ROT); 280 Guards (all the rest ROT); 60 1st Line; 260 2nd Line (1 co ROT); 100 Uhlans; 80 Cuirassiers (all the rest ROT); 80 Dragoons (all the rest ROT) and one section of artillery for a total of 1100 men.

Results

A narrow and hard-fought victory for the Austrians. 

Analysis

An excellent battle, with the Prussian commander putting into practice many of the lessons learnt in the last battle. The Austrians won, yes, but at a cost of 40% more casualties than the Prussians! They had to act extremely aggressively and risk everything on, effectively, three charges.

If the Prussian right flank force had not gone out of ammo, then the Austrian cavalry charge would probably have been blown away, their centre collapsed, and the field belong to the Prussians! A narrow and hard-fought victory indeed!


Battle Report: 30th September 2001

Later French ~vs~ Prussian

(Robert Avery & Carlo Anziano ~vs~ Steve Austin & Dave Hathaway) .

Later French

One complete Corps:  comprising a Division of Legion Etrangere; two Algerian Divisions; one Cavalry Division; and the Corps Artillery.


Prussian

One complete Corps:  comprising one Barvarian, one Prussian, and one Hessian Infantry Divisions; a Cavalry Division;  and the Corps artillery.

Report

An encounter battle fought as a Prussian Corps marched towards a ridge overlooking a town that a French Corps were investing.

The French 1st Brigade of the 1st Division advanced rapidly through the town and managed to gain a foothold on one end of the ridge that the Prussians were flooding with their entire 1st Division.

Unfortunately, French reinforcements were then held up and, for a time, the French fielded only one brigade against a division and a half of Prussians, the latter having managed to deploy half of the 2nd (Prussian) Division.  Initially successful, the French were gradually pushed backwards off the ridge.

As French reinforcements finally arrived, a “devil’s cauldron” developed at the bottom (French) side of the ridge:  as an area of ground overlooked on all sides became the focus of both French and Prussian attacks.  Brigade after brigade was thrown into this melting pot, which rapidly became a confused and crowded situation.  The Prussian 2nd (Prussian) Division was taking the brunt of the French attacks, and began to soften but, before the French could deliver a hammer blow to finish it, was reinforced by Barvarian troops, freed up by the retreat of the French initial attack.

Up until now, the French had managed to keep the Prussians from properly deploying their artillery but, as the French in the “devil’s cauldron” consolidated, the ridge top was lined with Prussian guns!  Not only this, but French 3rd Division reinforcements were forced to delay their advance towards their 1st Division comrades as large numbers of Prussian cavalry appeared on their flank.

Meanwhile, the French 2nd Division had arrived on the left of the battlefield, opposed to the now arriving Hessian Division of the Prussians.  Both sides formed rough lines, with the Hessians advancing towards the waiting French, who made good use of their time by deploying their Corps and 2nd Division Artillery.

A firefight developed to the advantage of the French:  longer ranged Chassepots stationary verses advancing Needle Guns, supported by large amounts of artillery.  It looked as though, in this sector of the field, the French could hold the Prussians…maybe even turn them back.

It was not, however, to be.  Earlier in the battle, the French lancers had charged Prussian Chevaux Legeres off their position in the centre of the ridge.  For a time, the Lancers roamed around in the centre of the Prussian position:  causing the Prussians to further delay their deployment forwards but not really doing much damage.  As the Prussians brought up their overwhelming numbers, the French lancers were gradually forced backwards until they had a choice of either retreating or charging newly advancing Prussians.

Naturally, the French charged.  One regiment almost made contact with a Prussian infantry battalion, but ended up routing back down the ridge:  causing some consternation amongst the French 2nd Division infantry.  The other regiment attempted to mix it with the Prussian Hussars:  but was likewise routed, and further shook the 2nd Division infantry.

The defeat of the French Lancers had opened a slight gap in the centre of the French line, between the 1st and 2nd Divisions, into which some more Prussian cavalry began to stream.  The French Cuirassiers were thrown against them, but to no avail.

With their battered 1st Division threatened by two regiments of Prussian artillery; their 2nd Division compromised on a flank by Prussian cavalry; and their 3rd Division still some way from playing a significant role, the French had no option but to retreat. 

Casualties

Heavy!

Results

A victory for the Prussians. 

Analysis

The French plan was to hit the Prussians hard and fast in an attempt to stop them gaining the ridge commanding the battlefield and to stop them properly deploying their superior numbers and, especially, their superior artillery.

Although initially meeting with some success, the French could never concentrate enough men to crack the Prussian line and, as the battle went on and more Prussian troops kept appearing, both French commanders felt much as their historical counterparts must have:  a Canute-like feeling of trying to hold back a tide of Prussians with only a paper army to do it with.

An excellent battle.


Battle Report: 16th November 2001

Egyptian ~vs~ Mahdist

(Dave Lancaster ~vs~ Robert Avery) .

Egyptian

Brigade

Unit

Fig.'s Org. Class Weapons Pts/Fig Points
. CinC

1

. .. . 100 100
1st 2inC 1       50 50
Brigade 1st Battalion 20 4x5 RegC blr 10 240
  2nd Battalion 24 4x6 RegC blr 10 280
  3rd Battalion 24 4x6 RegC blr 10 280
  Attach'd Cavalry 12 2x6 RegC s, l, blc 15 200
  Attach'd Artillery 2 2x1 RegC light blrb FA 89 198
2nd 2inC 1       50 50
Brigade 1st Battalion 24 4x6 RegC blr 10 280
  2nd Battalion 24 4x6 RegC blr 10 280
  3rd Battalion 24 4x6 RegC blr 10 280
  Attach'd Cavalry 12 2x6 RegC s, l, blc 15 200
  Attach'd Artillery 2 2x1 RegC light blrb FA 89 198
              2618
.

Mahdist

Brigade

Unit

Fig.'s

Org.

Class

Weapons

Pts/Fig

Points


CinC

1


100 100
1st  2inC 1       50 50
Tribal Brown Henandoah 36 1x36 FanA sw/sp, sh 8 303
Group White Henandoah 36 1x36 FanB sw/sp, sh 7 267
2nd 2inC 1       50 50
Tribal Blue Flag 32 1x32 IrregB sw/sp, sh, blr 10 335
Group Green Flag 32 1x32 IrregB sw/sp, sh, blr 10 335
  Purple Flag 32 1x32 IrregC sw/sp, sh 4 143
  Red Flag 32 1x32 IrregC sw/sp, sh 4 143
  Yellow Flag 32 1x32 IrregC sw/sp, sh 4 143
Horse 1st Unit 10 1x10 IrregA l, sw, sh, arm., mlr 14 155
  2nd Unit 10 1x10 IrregA l, sw, sh, arm., mlr 14 155
Artillery Tribal Guns 3 1x3 IrregC light blrb FA 107 336
  Ammo Wagon 1       50 50
              2615
.
. Egyptian Mahdist
Foot 2800 4640
Horse 480 400
Guns 8 6

Report  

Neither side out-scouted, so set up was simultaneous.

The Egyptians formed a line of infantry across the centre of the battlefield (from right to left, 1st/1st; 1st/3rd; 2nd/3rd), immediately supported on their left flank by the 2nd/1st in column and the 2nd Brigade's artillery.  On their right flank, they had a "horn" of half the cavalry from each brigade and the 1st/2nd in column; on their left flank, they had a "horn" of the other half of the cavalry supported by the 2nd/2nd in column.  The 1st Brigade artillery were way at the back on the right, occupying a small hill.

The Mahdists formed a rough line across their side of the battlefield.  From left to right, they had the two Henandoah units; followed by the Blue, Green and Red Flag units supported by the Yellow and Purple Flag units;  followed by the artillery and then the cavalry.

As battle commenced. both sides advanced forwards quickly, with the Mahdist artillery occupying a small hill on their side of the field, and the two Egyptians flanking "horns" moving forwards at the double.  The 1st Brigade artillery also realised at this point that they were too far away to do any good, so began to extricate themselves from the positions they had occupied on the hill.

The Mahdist line then halted, drums falling silent, obviously not keen to get into the range of the Egyptian breech-loaders, waiting for their opponents to close.

The Egyptian line carried on moving forward, and some effective artillery fire briefly routed the Red Flag tribesmen before the Mahdist CinC rallied them at the edge of the field.  The Purple Flag tribesmen took their place in the Mahdist front line.

At this point, however, the Egyptian right "horn" got a bit overenthusiastic and came just a little too close to the two fanatical Henandoah units.  The 240 Egyptian Lancers charged forward, but changed their mind as 1440 screaming madmen charged at them!  

Unfortunately the retreat of the Lancers shielded the charging fanatics from the sight of the 1st/2nd battalion of Egyptian infantry.  They saw the Henandoah tribesmen too late to form a proper line and were smashed from the field in a crush of mangled fezs!

Half the Henandoah charged after the still retreating cavalry, but the other half had a better target:  the now exposed right flank of the main Egyptian line!  Not pausing for a second, they fell onto the rear of the 1st/1st!

Meanwhile, the first lot of Henandoah had disposed of the Egyptian cavalry:  catching them in a bloody melee as the horsemen tried to form up.  They then found themselves under the guns of the 1st Brigade's artillery, finally down on the field after wrestling their guns down the slopes of their hill.  The fanatics charged again, but just didn't have enough "umph" any more.  The guns canistered them into little pieces!

On the other side of the field, things had progressed slowly but steadily:  the Mahdist guns had been routed by infantry and artillery fire, but not before disposing of the rest of the Egyptian cavalry with a few well-aimed shots, including a hit of "unexpected devastation".  Otherwise, the Egyptian battle-line was now fully deployed and ready to move forward.

However, they never got their chance.  When we last left the centre of the field, the Brown-clad Henandoah unit was about to fall on the rear of the other end of the Egyptian line.  They did, and the 1st/1st broke and ran;  followed by the 1st/3rd; 2nd/3rd; and 2nd/1st.  A horrendous domino effect occurred as the Fanatics rolled up the Egyptian line.

The rest of the Mahdist line now moved forward and the Egyptians were caught on two sides.  It's fair to say that only the 1st Brigade artillery would have escaped the massacre that followed!

Casualties

The Egyptians lost 300 infantry; 80 cavalry; and one battery of artillery:  a total of 460 casualties (although large numbers of them would have been massacred fleeing the field!).

The Mahdists lost 320 Henandoah tribesmen; 180 other tribesmen; 80 horse; and 120 artillerymen:  a total of 700 casualties.

Result

A victory for the Mahdists.

Analysis

This was a battle won by the commander who made least mistakes. 

The Egyptians threw away their superiority in artillery by placing the 1st Brigade's battery where it could do nothing; and then allowed his right "horn" to get too far ahead of his main line, and had bunched its infantry and cavalry components too close together.

Once the Fanatics had got behind the main Egyptian battle-line, the result was a foregone conclusion:  helped by the fact that the Egyptians were sluggish to react to the Henandoah threat, still concentrating on moving forward.   


Battle Report: 31st December 2001

Egyptian ~vs~ Mahdist

(Dave Lancaster ~vs~ Robert Avery) .

Egyptian

Brigade

Unit

Fig.'s Org. Class Weapons Pts/Fig Points
. CinC

1

. .. . 100 100
1st 2inC 1       50 50
Brigade 1st Battalion 20 4x5 RegC blr 10 240
  2nd Battalion 24 4x6 RegC blr 10 280
  3rd Battalion 24 4x6 RegC blr 10 280
  Attach'd Cavalry 12 2x6 RegC s, l, blc 15 200
  Attach'd Artillery 2 2x1 RegC light blrb FA 89 198
2nd 2inC 1       50 50
Brigade 1st Battalion 24 4x6 RegC blr 10 280
  2nd Battalion 24 4x6 RegC blr 10 280
  3rd Battalion 24 4x6 RegC blr 10 280
  Attach'd Cavalry 12 2x6 RegC s, l, blc 15 200
  Attach'd Artillery 2 2x1 RegC light blrb FA 89 198
              2618
.

Mahdist

Brigade

Unit

Fig.'s

Org.

Class

Weapons

Pts/Fig

Points


CinC

1


100 100
1st  2inC 1       50 50
Tribal Brown Henandoah 36 1x36 FanA sw/sp, sh 8 303
Group White Henandoah 36 1x36 FanB sw/sp, sh 7 267
2nd 2inC 1       50 50
Tribal Blue Flag 32 1x32 IrregB sw/sp, sh, blr 10 335
Group Green Flag 32 1x32 IrregB sw/sp, sh, blr 10 335
  Purple Flag 32 1x32 IrregC sw/sp, sh 4 143
  Red Flag 32 1x32 IrregC sw/sp, sh 4 143
  Yellow Flag 32 1x32 IrregC sw/sp, sh 4 143
Horse 1st Unit 10 1x10 IrregA l, sw, sh, arm., mlr 14 155
  2nd Unit 10 1x10 IrregA l, sw, sh, arm., mlr 14 155
Artillery Tribal Guns 3 1x3 IrregC light blrb FA 107 336
  Ammo Wagon 1       50 50
              2615
.
. Egyptian Mahdist
Foot 2800 4640
Horse 480 400
Guns 8 6

Report  

This battle was an exact re-fight of the previous battle:  with the terrain and forces exactly the same.  The Mahdists set up in the same start positions as last time too, but the Egyptians were allowed to set up as they pleased.

The battle opened with the Egyptians marching forwards quickly towards the more cautiously advancing Dervishes.  An exchange of artillery fire saw one battery of Egyptians guns and all the Mahdist guns blown from the field and.

The Egyptians, careful not to repeat the same mistake as the last encounter, then deployed into line.  The Mahdists were now faced with a deployed line of six battalions all armed with breech-loading rifles!

The Dervish commander, realising that a frontal charge would have little success, doubled his reserve of one infantry warband and all the cavalry to his right flank, where he had noticed an opportunity to overlap his Egyptian opponent.

As the Egyptian line came within rifle range, they opened fire on the waiting Mahdists, causing enough casualties to make the Mahdist commander order his men to lie prone:  something that protected them whilst he attempted his outflanking "hook".

The cavalry and infantry warband thundered towards the Egyptian left flank.  One of the Mahdist cavalry warbands dashed two squadrons of Egyptian lancers from the field and penetrated behind the Egyptian line but, unfortunately, the other cavalry and single foot warband were stopped by fire from the remaining Egyptian artillery battery and the single foot battalion that protected that end of the Egyptian line.

Still, there was hope yet, and the penetrating cavalry warband pulled up their horses, turned, and charged towards the rear of the Egyptian infantry.  Now shaken, the Egyptian troops, headed by their CinC, rushed into square, barely having time to form up before the horsemen were upon them.  Form up they did, however, and used their breechloaders to devastating effect:  even with the CinC ordering them to fire at a distance of 60 yards instead of the usual point blank.  The Mahdist outflanking manoeuvre was over!

Meanwhile in the centre the Egyptian line had continued to pour fire into the waiting, prone, Mahdists:  most of whom had no guns.  The end was now in sight and an attempt at a final glorious charge died even before it got off the ground.  The Mahdists retreated, harassed by the Egyptians all the way!

Casualties

The Egyptians lost one battery of artillery; two squadrons of cavalry; and around 280 infantry:  a total of around 500 men.

The Mahdists lost 20 Henandoah tribesmen; 880 other tribesmen; 220 horse; and all the artillerymen:  a total of around 1300 casualties.

Result

An easy victory for the Egyptians.

Analysis

The Egyptian commander learnt the lessons from the previous battle well...or at least he had plenty of notes to remind him of what to and not to do!

His regulars deployed into firing lines before the Mahdists were in any danger of contacting him, and his artillery was massed rather than dispersed.  

Possibly his only weakness was a lack of reserve:  something that would have cost him dearly had the Mahdist outflanking manoeuvre succeeded as had the final cavalry charge succeeded the Dervishes would have rolled up the battalion attempting to stop them, his artillery, and another infantry battalion before running out of steam!

Still, a nice solid performance:  the boy done good!    


Battle Report: 13th April 2002

Spanish Colonial ~vs~ Mexican Juarista

(Robert Avery ~vs~ Rupert Avery) .

Spanish Colonial

Brigade

Unit

Fig.'s Org. Class Weapons Pts/Fig Points
. CinC

1

. .. . 100 100
1st 2inC 1       50 50
Brigade Talavera Regt. 20 4x5 LightsC mlr 10 240
  1st Battalion 24 4x6 MilC mlr 7 208
  2nd Battalion 24 4x6 MilC mlr 7 208
  3rd Battalion 24 4x6 MilD mlr 6 184
  4th Battalion 24 4x6 MilD mlr 6 184
Cavalry 2inC 1       50 50
Brigade 1st Dragoons 20 4x5 RegC s, mlc 13 300
  2nd Dragoons 16 4x4 RegD s, mlc 12 232
Artillery 2inC 1       50 50
Brigade Light Battery 2 2x1 RegC light lmsb fa 69 158
  Medium Battery 1 1x1 RegC medium mlsb fa 85 95
  Ammo Wagon 1       50 50
Confederate 2inC 1       50 50
Brigade Zouaves 25 5x5 MilB mlr 9 275
  1st Homelanders 25 5x5 MilC mlr 8 250
  2nd Homelanders 25 5x5 MilC mlr 8 250
  3rd Homelanders 25 5x5 MilC mlr 8 250
  4th Homelanders 25 5x5 MilC mlr 8 250
              3434
.

Mexican Juarista

Brigade

Unit

Fig.'s

Org.

Class

Weapons

Pts/Fig

Points


CinC

1


100 100
1st 2inC 1       50 50
Brigade Zapadores 30 6x5 LightsC mlr 10 360
  Los Supremos Podres 30 6x5 RegC mlr 8 300
2nd  2inC 1       50 50
Brigade 1st Line 30 6x5 MilC mlr 8 300
  2nd Line 30 6x5 MilC mlr 8 300
  3rd Line 30 6x5 MilD sbm 4 180
  4th Line 30 6x5 MilD sbm 4 180
Cavalry 2inC 1       50 50
Brigade Line 12 2x6 RegC s, l 13 176
  Lancers 12 2x6 RegC s, mlc 13 176
  Rancheros 12 2x6 MilD l, mlc 11 152
Artillery 2inC 1       50 50
Brigade Battery A 3 3x1 RegC light mlsb fa 69 237
  Battery B 1 1x1 RegC medium mlsb fa 85 115
  Ammo Wagon 1       50 50
Guerillos 2inC 1       50 50
  Red Flag Foot 30 1x30 IrregC mlr 7 225
  Blue Flag Foot 30 1x30 IrregC mlr 7 225
  Yellow Flag Horse 10 1x10 IrregC mlc 10 115
              3441
.
. Spanish Mexican
Foot 4820 4800
Horse 720 720
Guns 6 8

Report  

Seeking to take advantage of the confusion reigning in Mexico at the end of the French Intervention, a force of Spanish troops invades to reclaim the territory for His Most Catholic Majesty.  With them are the "Homelanders":  a brigade of Confederate troops looking to carve out a "new South" for themselves down Mexico way.

Both sides set up with their line infantry in the centre, all in line formation.  The Spanish had massed the Confederates on their left flank, and the Talavera Regiment supported by the 1st Dragoons on their right flank.  The Mexicans had their medium artillery and 3rd Line Regiment protecting their left flank; and had massed the Guerillos on their right, supported by the other artillery battery placed on a commanding hill.

As the battle opened, both lines marched smartly towards each other in the centre, with the Mexican Zapadores deploying into skirmish formation.  On the Spanish right, the Talaveras also went into skirmish, advancing forward quickly.  On the Spanish left, the Confederates quick marched forward in column to threaten the Guerillos and Mexican light artillery battery.

The first action was for the Confederate Zouaves and 1st Battalion to deploy into line and fire into the massed Guerillos.  Their fire routed the Guerillos Horse, and did several casualties to both Guerillos Foot regiments.  

Then disaster struck for the Confederates.  The Mexican artillery fired a perfectly aimed barrage at the 1st Battalion:  doing unexpected devastation and wiping out an entire company of 100 men.  The Homelanders were unprepared for this, and routed from the field.  The Guerillos foot then charged the Confederate Zouaves, and incredibly, the Zouaves were bounced back by the mangy Guerillos foot:  who now threatened the flanks of the 2nd Homelanders battalion who were deploying to replace their erstwhile compatriots.

Then 4th battalion of Mexican line infantry (coming across from the centre line) charged the 2nd Battalion of Homelanders.  In an embarrassing display of Confederate incompetence, the 2nd Homelanders were smashed from the field by the D-class conscript levy recruits!  This, now, was too much for the Zouaves, who also fled the field.  With three routing battalions passing them, and the Mexican 4th Line still charging forward, the two remaining Confederate battalions, now disordered by the their panicked comrades, also decided that they had had enough and turned tail and fled!

Meanwhile, on the Spanish right, a squadron of Mexican Line and Lancer cavalry charged forward in an attempt to clear away the skirmishing Talavera regiment.  The first line of Mexican horse was easily destroyed by the Talaveras and this encouraged the 1st Spanish Dragoons to charge through the skirmish line at the second line of Mexican cavalry.  

This line broke and fled before contact had been made, but another two lines of Mexican cavalry (the Rancheros) charged forward.  Although they were outnumbered, the Mexicans managed to rout the 1st Dragoons.  The Talaveras, next in line, dismayed by the loss of their cavalry support and what they had heard about the rout of the Confederate brigade, also gave up the ghost and routed from the field!

With his right flank in ruins and his Confederate allies fleeing, the Spanish commander had no choice but to order a return to their ships.

The Spanish invasion of Mexico was over!

Casualties

The Spanish lost 60 infantry and 20 cavalry; with their Confederate allies losing 100 men, all to the same artillery barrage.   A total of 180 casualties.  However, the Talavera Regiment, 1st Dragoons and the entire Confederate brigade were routed from the field.

The Mexicans lost 80 Guerillos cavalry; 380 Guerillos foot; 120 line infantry; 60 Zapadores and 90 Lancers.  A total of 730 men.  However, only the Guerillos cavalry and half the Lancers were routed from the field.

Result

A clear victory for the Mexicans.

Analysis

The turning point of this battle was the devastating Mexican artillery fire on the 1st Confederate Homelanders.

Up until then, the Spanish had definitely held the initiative.  The Confederates were in a position to sweep the Guerillos and Mexican artillery from the field, and then to roll up the Mexican main line.  If this failed, then the Talaveras had achieved a useful overlap on the right, and had begun to annoy the Mexicans facing them with some good skirmish fire.

Then the artillery fire routed the 1st Homelanders leaving a massive hole in the Spanish plans.  The Mexican commander seized the initiative and smashed into the Confederates before they could replace what was a serious but not necessarily fatal loss.  Again fate sided with the Mexicans:  the Zouaves should easily have beaten the Guerillos foot...but they didn't, and then the 'domino' effect of routing units destroyed the Confederate brigade as a fighting force.

Luck wasn't all with the Mexicans:  the Spanish rolled their share of 'double 6's':  just not at any vital moments:   and it's luck at those vital moments that really counts, and having the initiative to exploit that luck that wins battles.

A great battle.  I just hope the Confederates get over being beaten by a load of mangy Guerillos and D-class infantry in time for their next encounter!


Battle Report: 28th September 2002

1879 Zulu ~vs~ Later British

(Robert Avery ~vs~ Sandy Laird) .

1879 Zulu

Brigade

Unit

Fig.'s Org. Class Weapons Pts/Fig Points
. CinC

1

. .. . 100 100
Head 2inC 1       50 50
  Red Dot Impi 30 1x30 FanA spear, shield 7 225
  Yellow Dot Impi 30 1x30 FanA spear, shield 7 225
  Green Dot Impi 30 1x30 FanA spear, shield 7 225
Right Horn 2inC 1       50 50
  2xYellow Dot Impi 30 1x30 FanA spear, shield 7 225
  2xGreen Dot Impi 30 1x30 FanB spear, shield 7 225
  2xBlue Dot Impi 30 1x30 FanB spear, shield 7 225
Left Horn 2inC 1       50 50
  2xRed Dot Impi 30 1x30 FanA spear, shield 7 225
  1Red1Blue Impi 30 1x30 FanB spear, shield 7 225
  1Blue1Green Impi 30 1x30 FanB spear, shield 7 225
              2275
.

Later British

Brigade

Unit

Fig.'s

Org.

Class

Weapons

Pts/Fig

Points


CinC

1


100 100
1st 2inC 1       50 50
Brigade 78th Highlanders 20 4x5 LightsB lbl 15 340
  24th Foot 40 8x5 RegB lbl 13 600
  Naval Brigade 24 6x4 RegB lbl 13 372
Cavalry Dragoon Guards 16 4x4 RegA sabre, blc, pistol 19 344
  Frontier Light Horse 8 2x4 RegC sabre, blc, pistol 15 140
Artillery & 2inC 1       50 50
Wagons RA Field Battery 2 2x1 RegB light blrb FA 93 206
  RA HMG Battery 1 1x1 RegB hmg 88 98
  Wagons (inc Ammo) 3 3x1 RegC   (50) 50
              2350
.
. Zulu British
Foot 5400 1680
Horse 0 480
Guns 0 6

Report  

A British column had been sent to relieve a farm under attack by Zulus.  On their way, they are ambushed by a much larger Zulu army.

Both sides began the battle far more extended than they would have liked.  The British were in a long column on a road with the Highlanders in front, followed by the 24th Foot, followed by the artillery and wagons, the Naval Brigade at the rear, and the cavalry dispersed in squadrons to each flank.  The Zulus had a Head, Right Horn and Left Horn, but these were a long way apart and not easily able to offer each other close support.

The battle began as the British spotted all three Zulu horns.  Although the Zulu left horn was a long way away and behind a donga, the right horn and head were almost on them!  Perhaps not realising just how fast the Zulus can move, the British commander ordered the following:  the Highlanders rushed forward to engage the head, five companies of 24th headed for the right horn, the artillery deployed one battery verses each horn, the wagons laagered, and the Naval Brigade moved to fill the gap between the wagons and the reserve of three companies of 24th.  The Zulus doubled forward.

To the front of the Britishcolumn, although one Impi was damaged by artillery and Highlander fire, another smashed into the Highlanders before they had time to properly form square: pushing them back into a bloody melee that left half the Scotsmen disembowelled and the other half fleeing the field.

To the left of the British column, another Impi was temporarily halted by artillery fire, but the other two rushed towards the five companies of 24th Foot that were hurriedly deploying into line.  Although battered by rifle fire, the two Zulu Impi's were not stopped and, likewise smashed the five companies of 24th Foot from the field.

To the right of the British column, three squadrons of Dragoon Guards had been sent to slow down the Zulu left horn and, in a series of bloody engagements were wiped out but not before they had destroyed one Zulu impi and severely battered another.   This left the field clear for the British HMG and Naval Brigade to slam long range fire into the Zulu impi's as they regrouped after dealing with the British horsemen:  causing the remaining two Impi's to either rout or to retreat!

Meanwhile, back in the centre, the remaining three companies of 24th Foot and the artillery prepared to meet the next phase of Zulu charges.  The Frontier Light Horse were led by the British CinC in a desperate charge to delay the advancing Zulus.  The brave horsemen were massacred, but gave the remaining Brits time to form square and, more importantly, a lucky shot by a dying Boer spectacularly killed the Zulu CinC!

Although the remaining British were worried by the loss of half of their infantry, they held steady and, now in a small triangular square, poured fire into the advancing warriors.  Zulus fell right, left and centre:  but not enough of them.  Both batteries and the remaining three companies of 24th Foot were destroyed or sent routing from the field.  The Zulus, however, had paid a heavy price for their success:  of the six impis comprising the right horn and head, two had been routed, three were shaken with around half their number dead or dying, leaving only one relatively unscathed.

At this point an uneasy stalemate descended.  The British with only the Naval Brigade and one battery of hmg's were unable to advance out of their square.  The Zulus had only one or two unbattered impi's with which to oppose them:  they desperately needed time to recover and regroup.

Casualties

The Zulus lost at least 1740 warriors killed, and had three impi's routed from the field.  They also lost their CinC to a spectacular death, and one of their 2inC's suffered a light wound.

The British lost 200 Highlanders; 300 24th Foot; all the Dragoon Guards and 120 Frontier Light Horse plus loads more killed in the rout of the head of the column.  They had the Highlanders, 24th Foot, both gun batteries and the FLH routed from the table.  Their CinC also suffered a light wound before fleeing!

Result

A draw was declared.

Analysis

Whenever the British could form a descent formation and pour fire into Zulu impis, they broke or shook them:  it's just that the scenario and terrain meant that only the rear half of the British column had a chance to do so.

The Zulus really should have won, but the British had the most spectacular luck throughout the game:  with double six "unexpected devastation" coming up twice and no shooting roll ever under seven!