Classical Indians vs the Greeks

Restrictions lifted on Sunday, first face-to-face game on Tuesday!

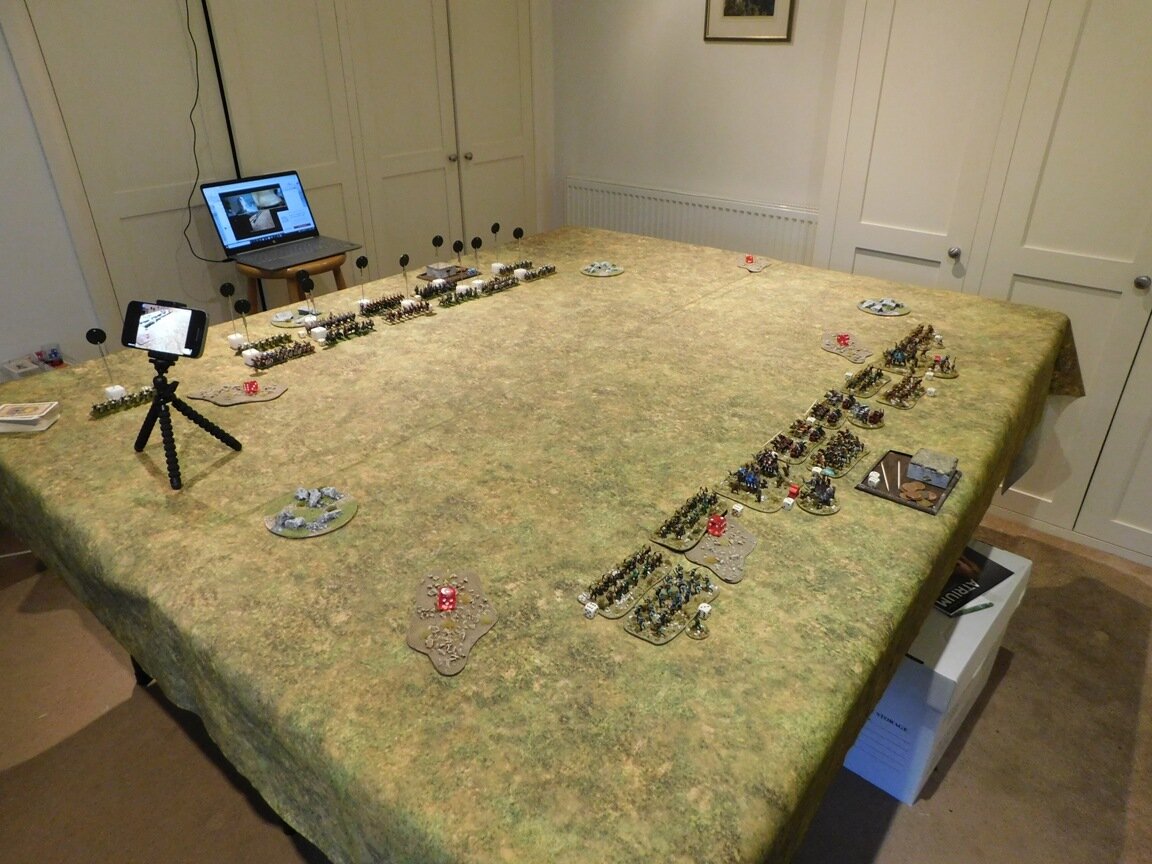
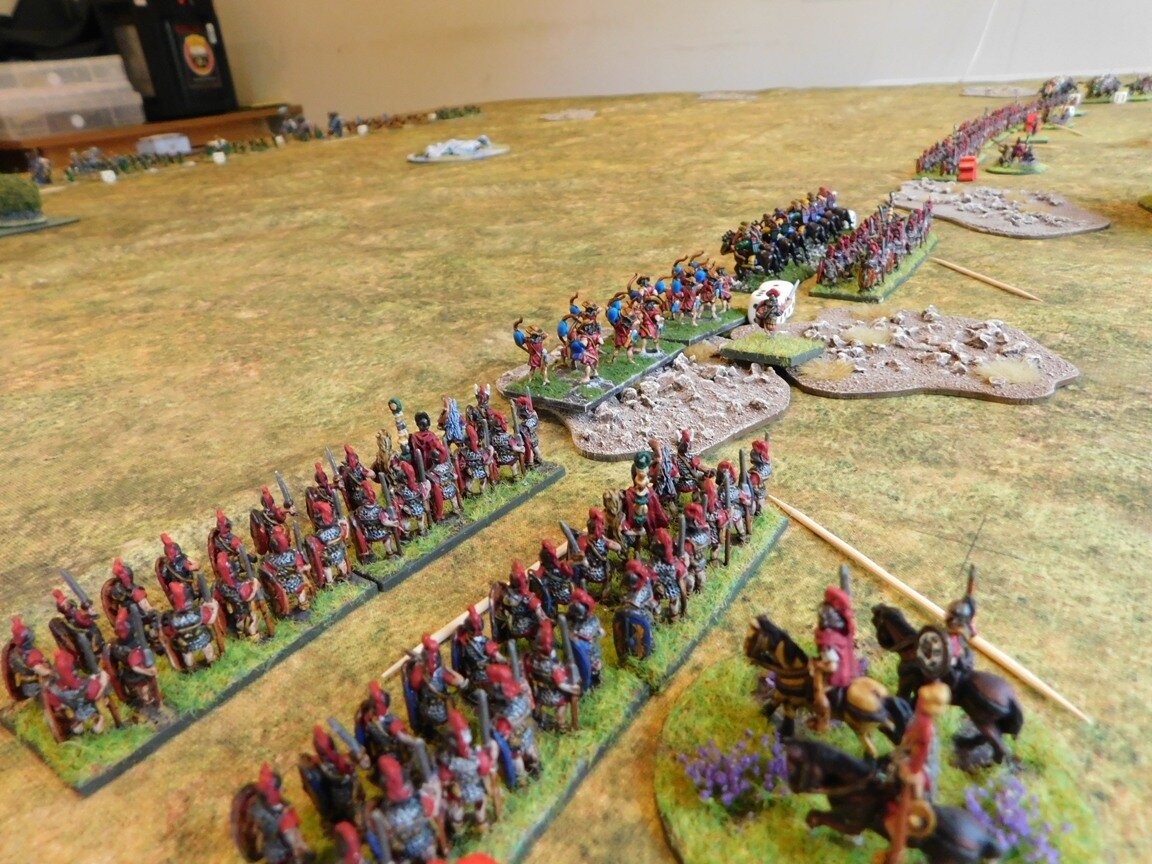
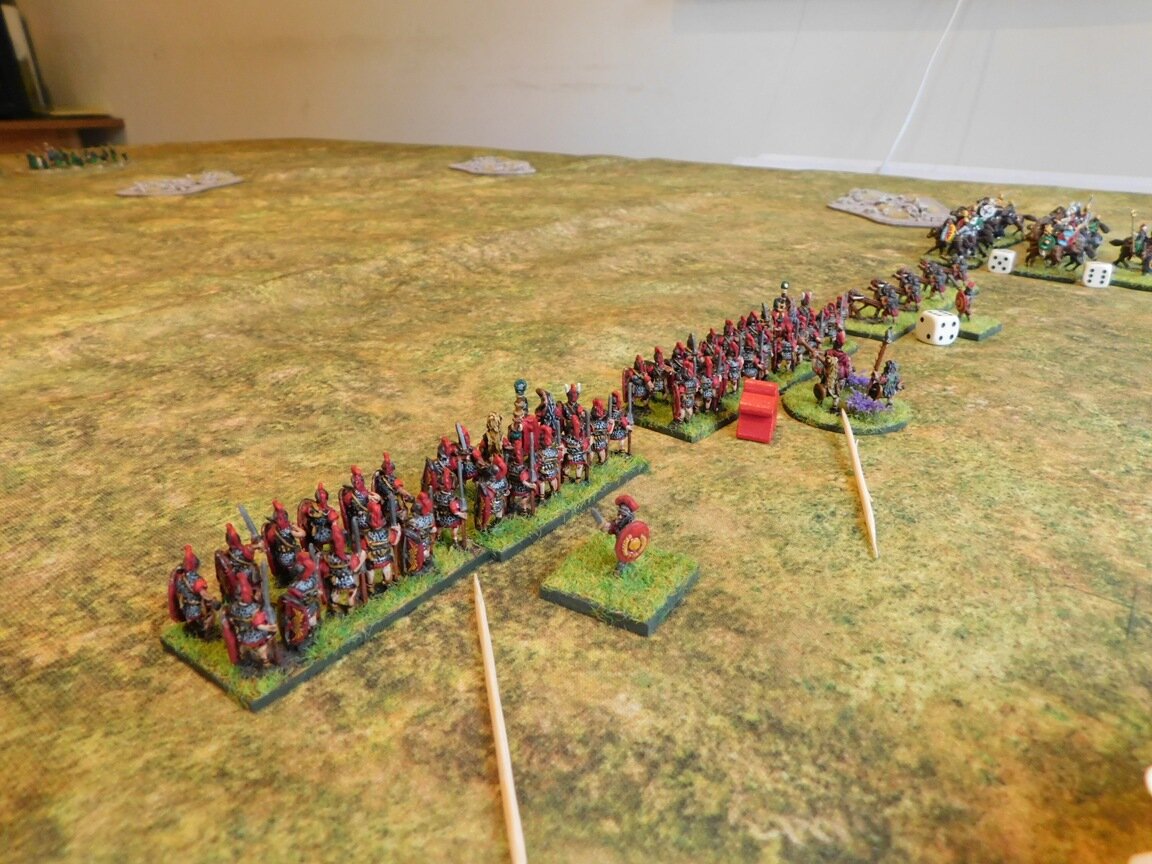
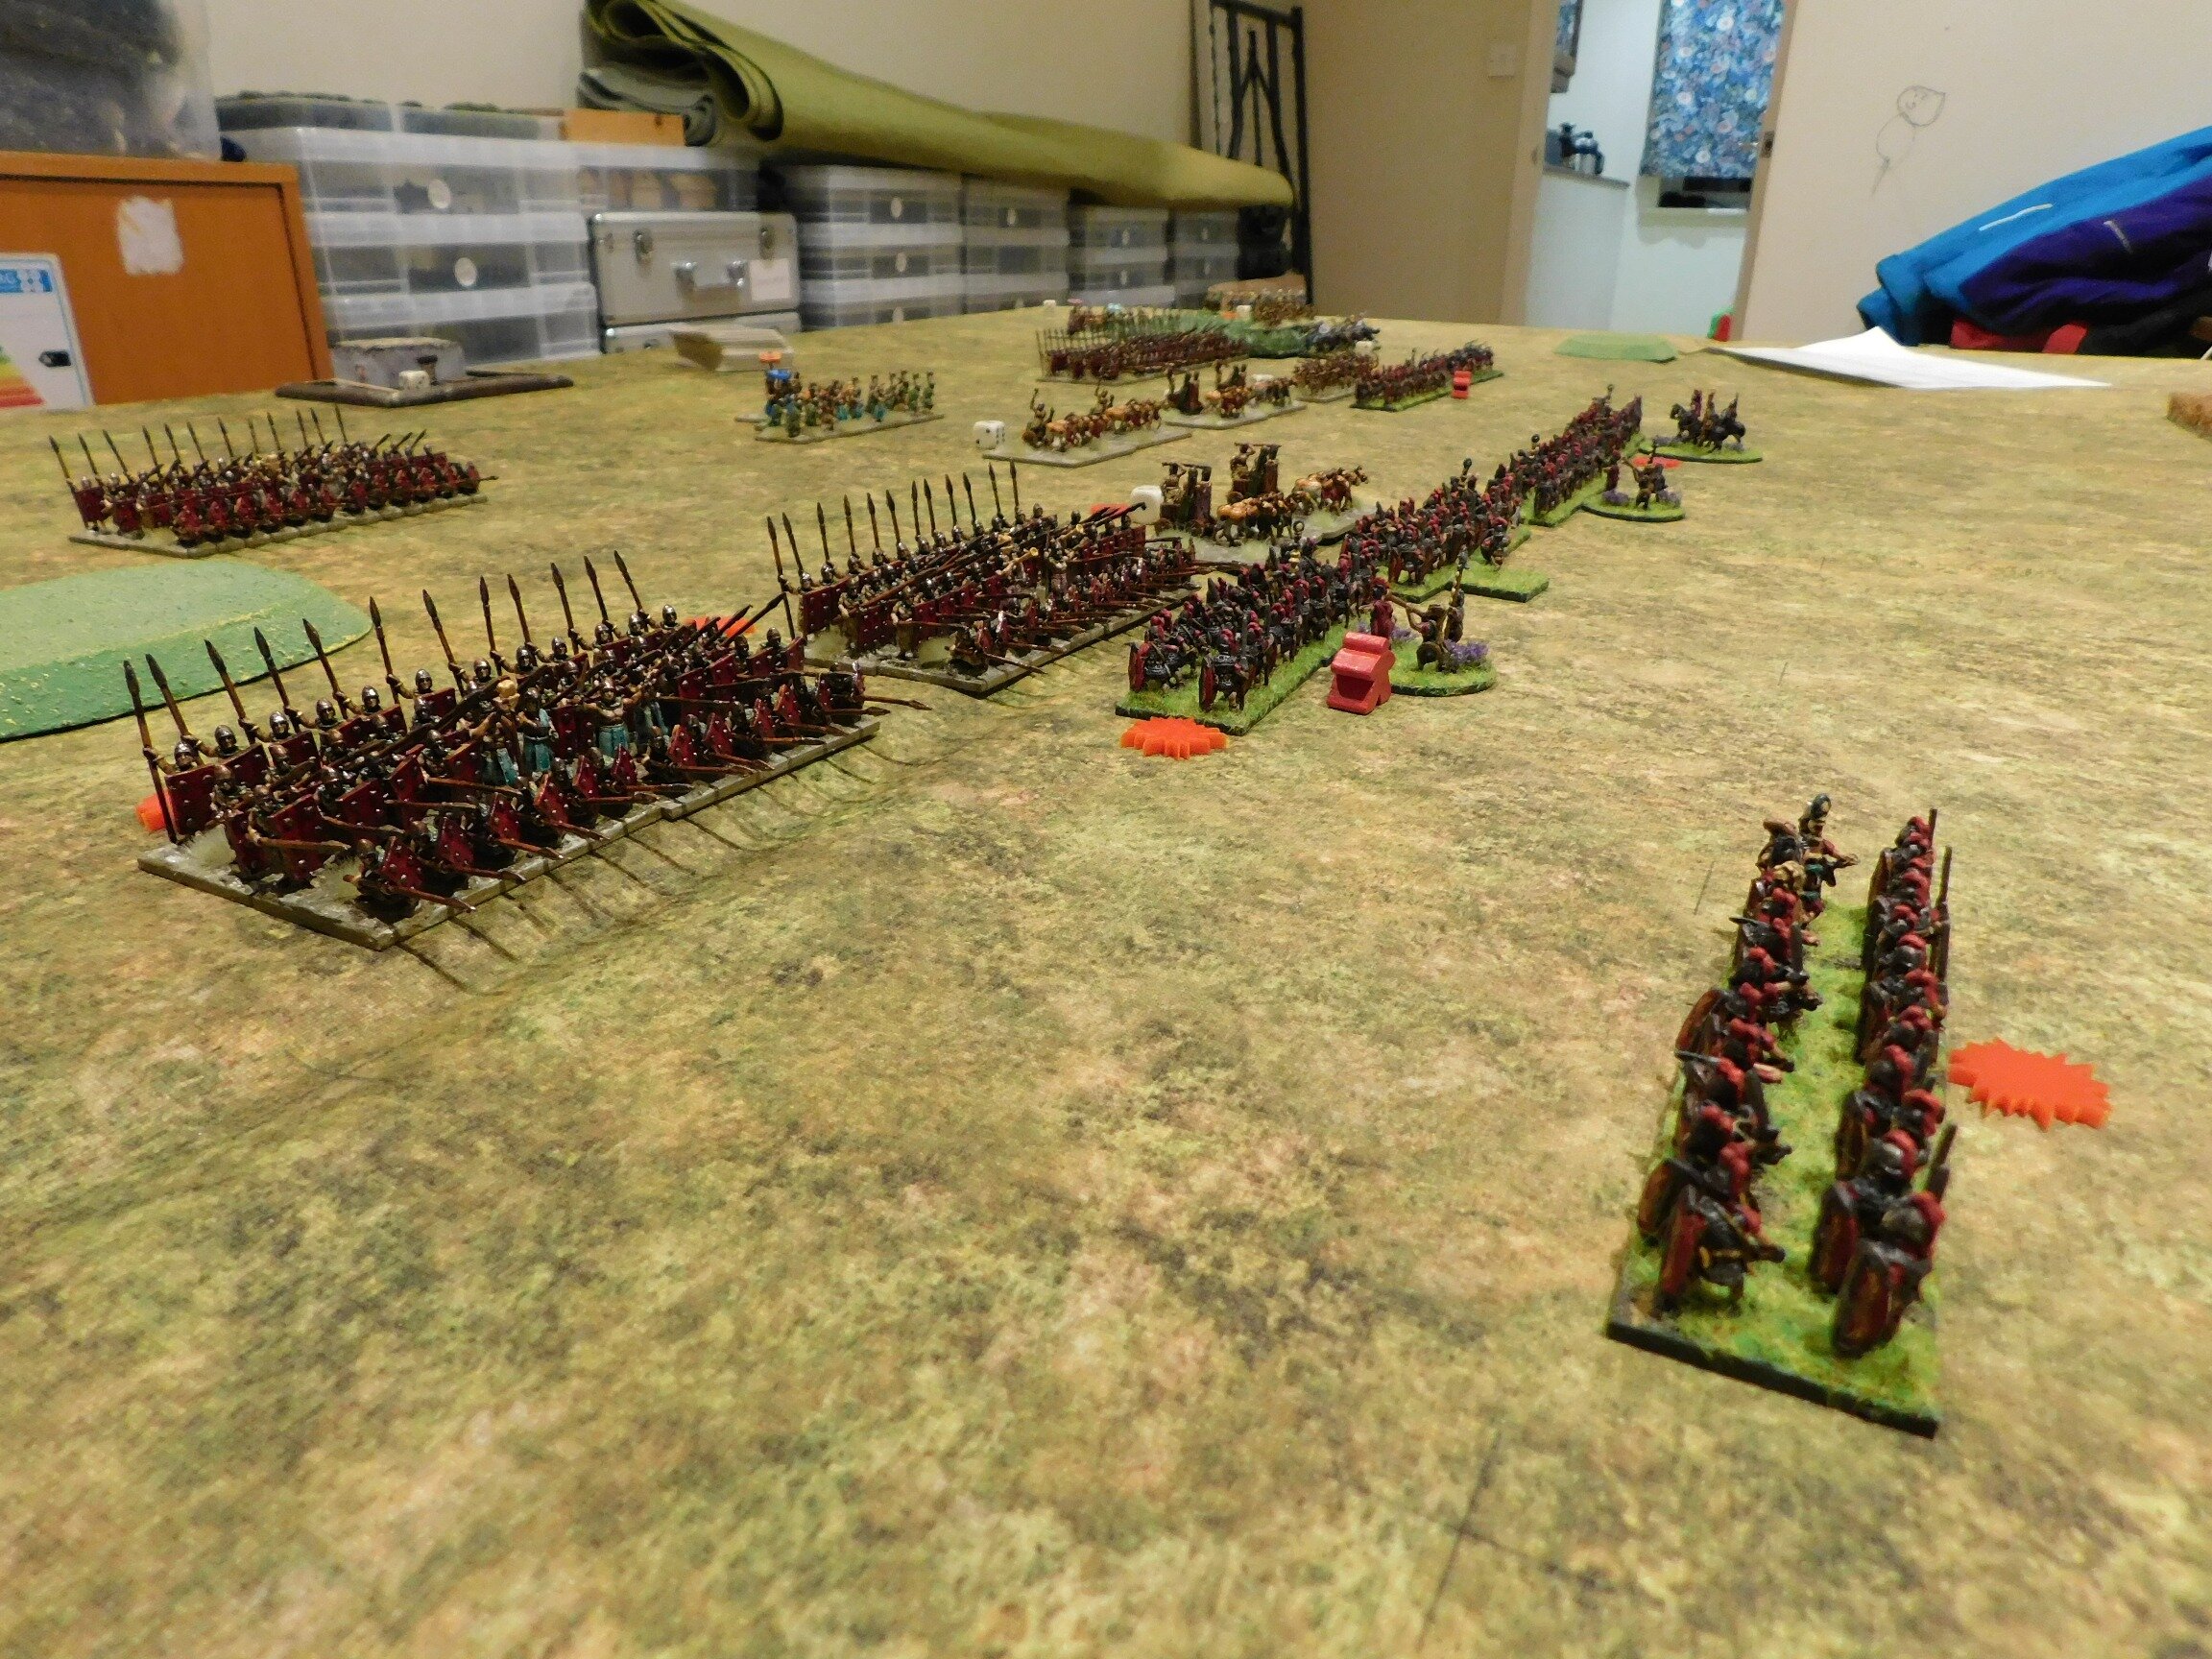
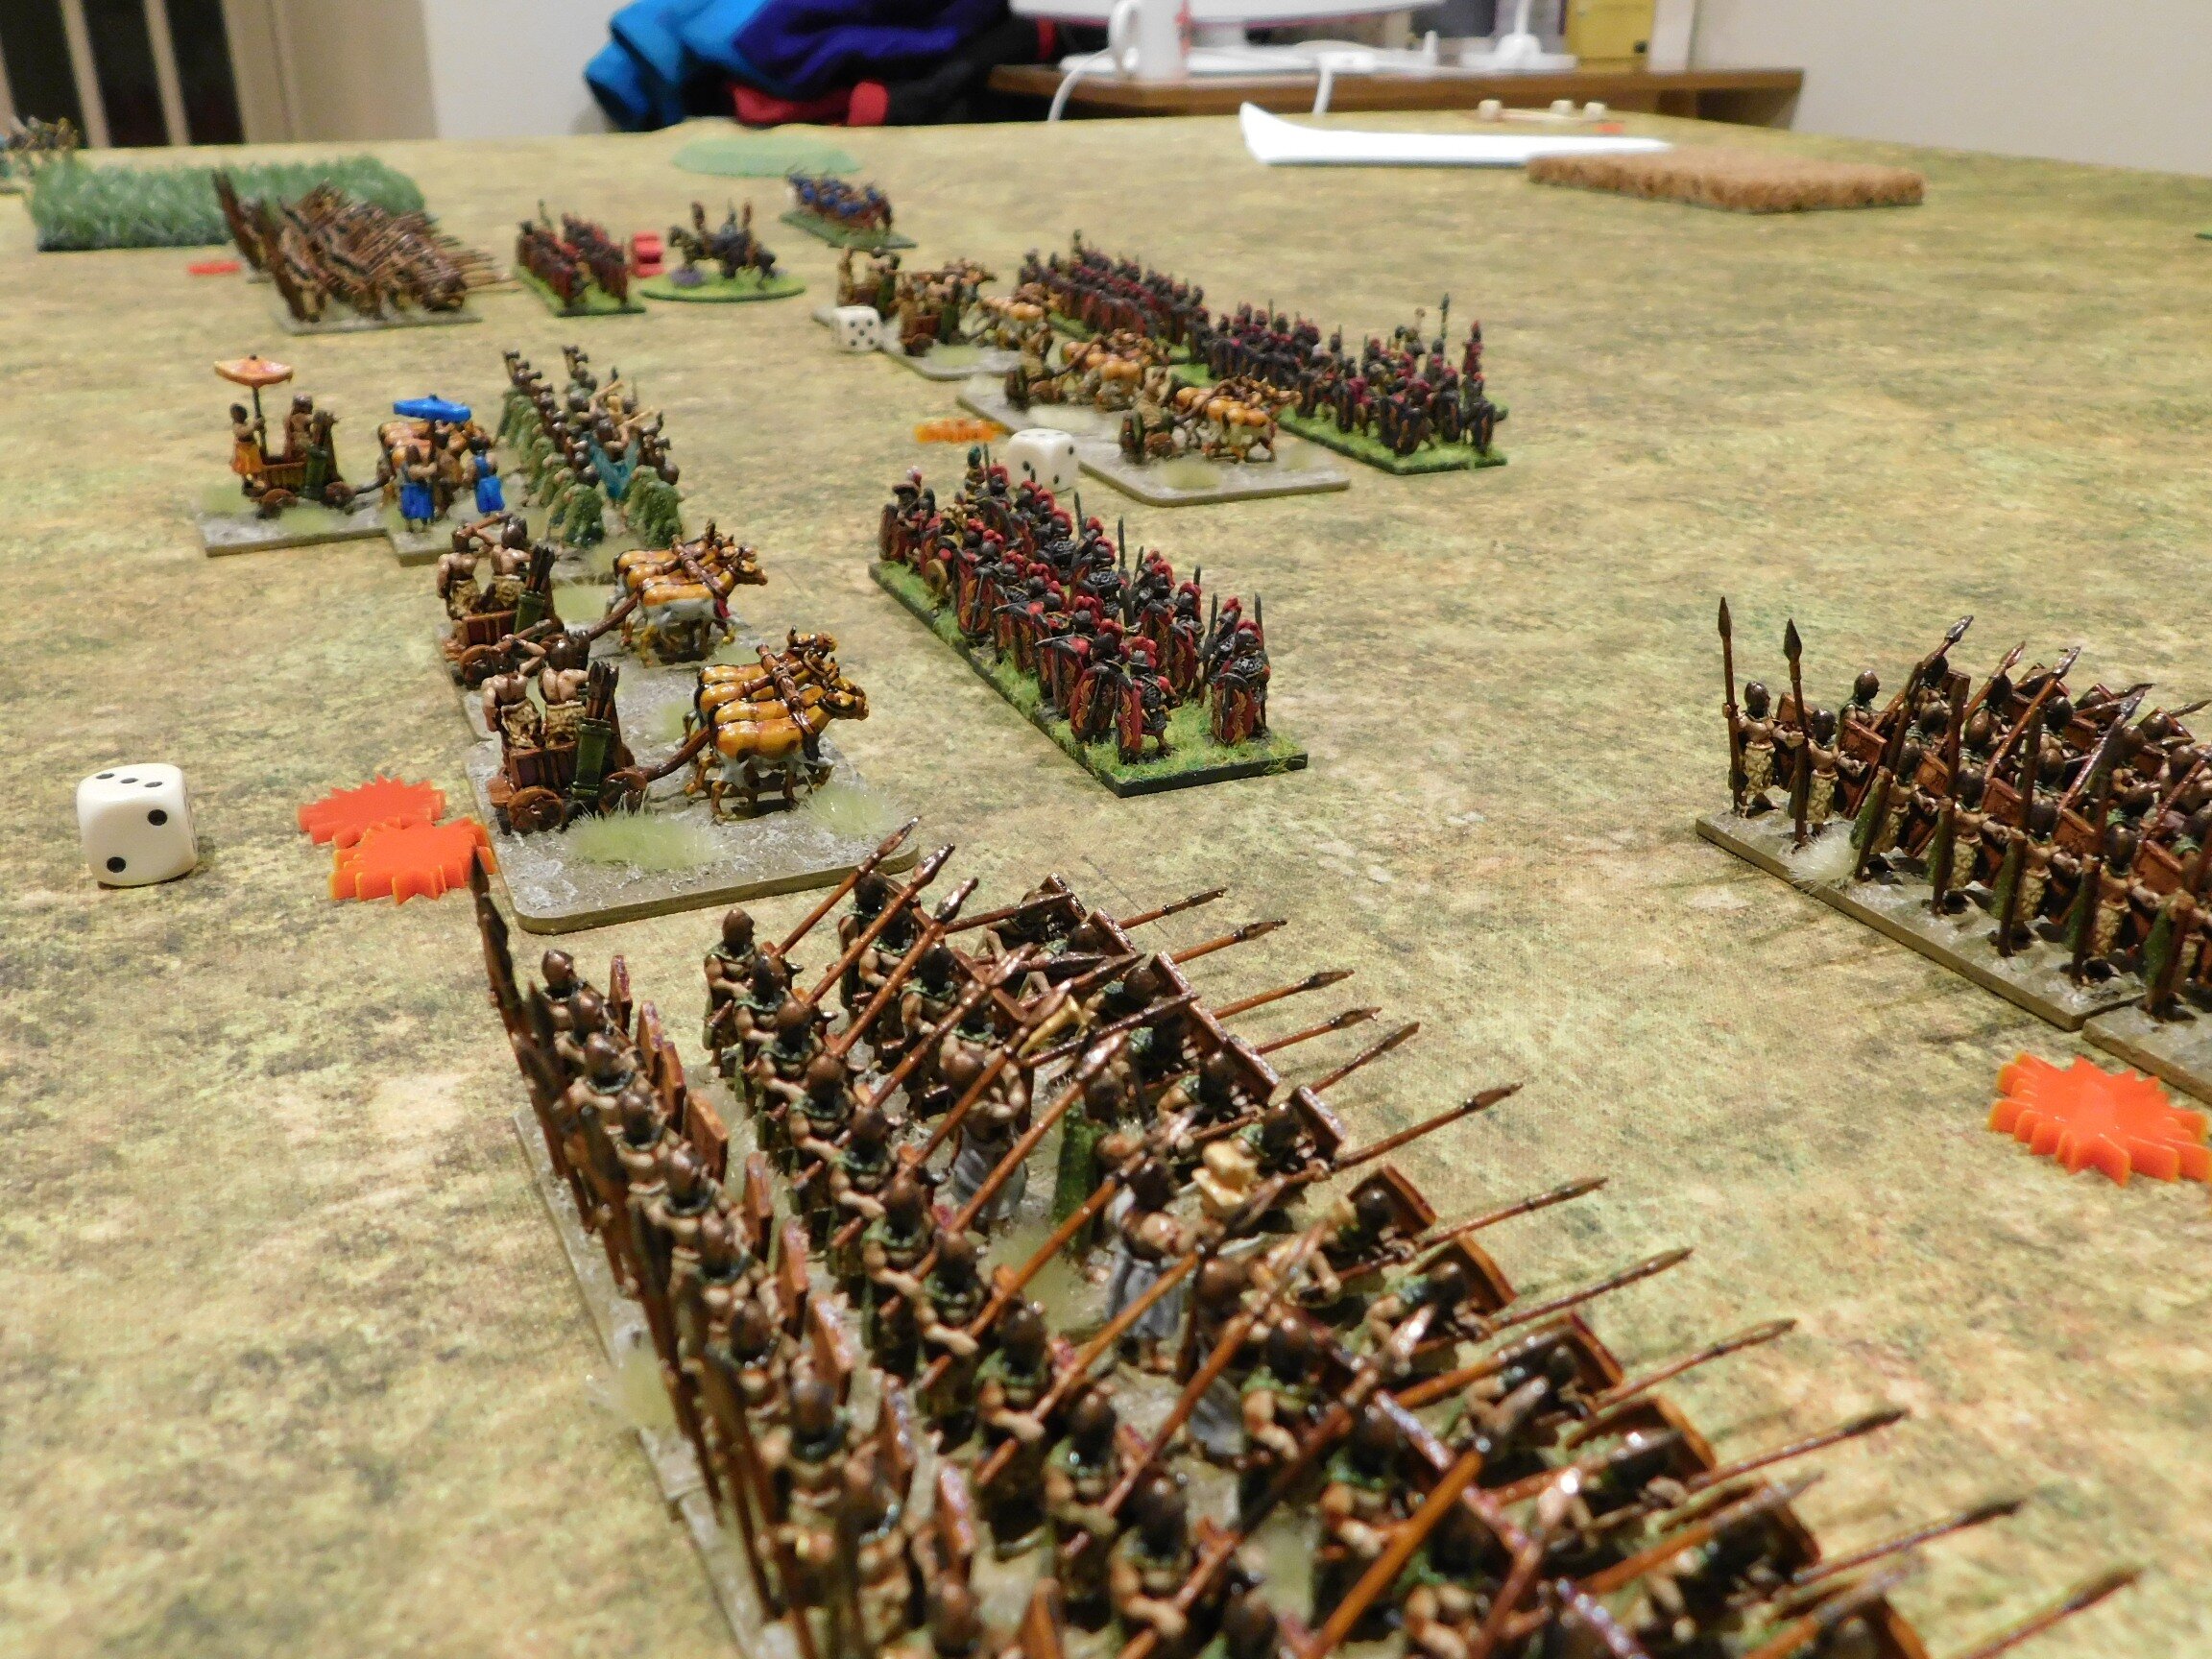
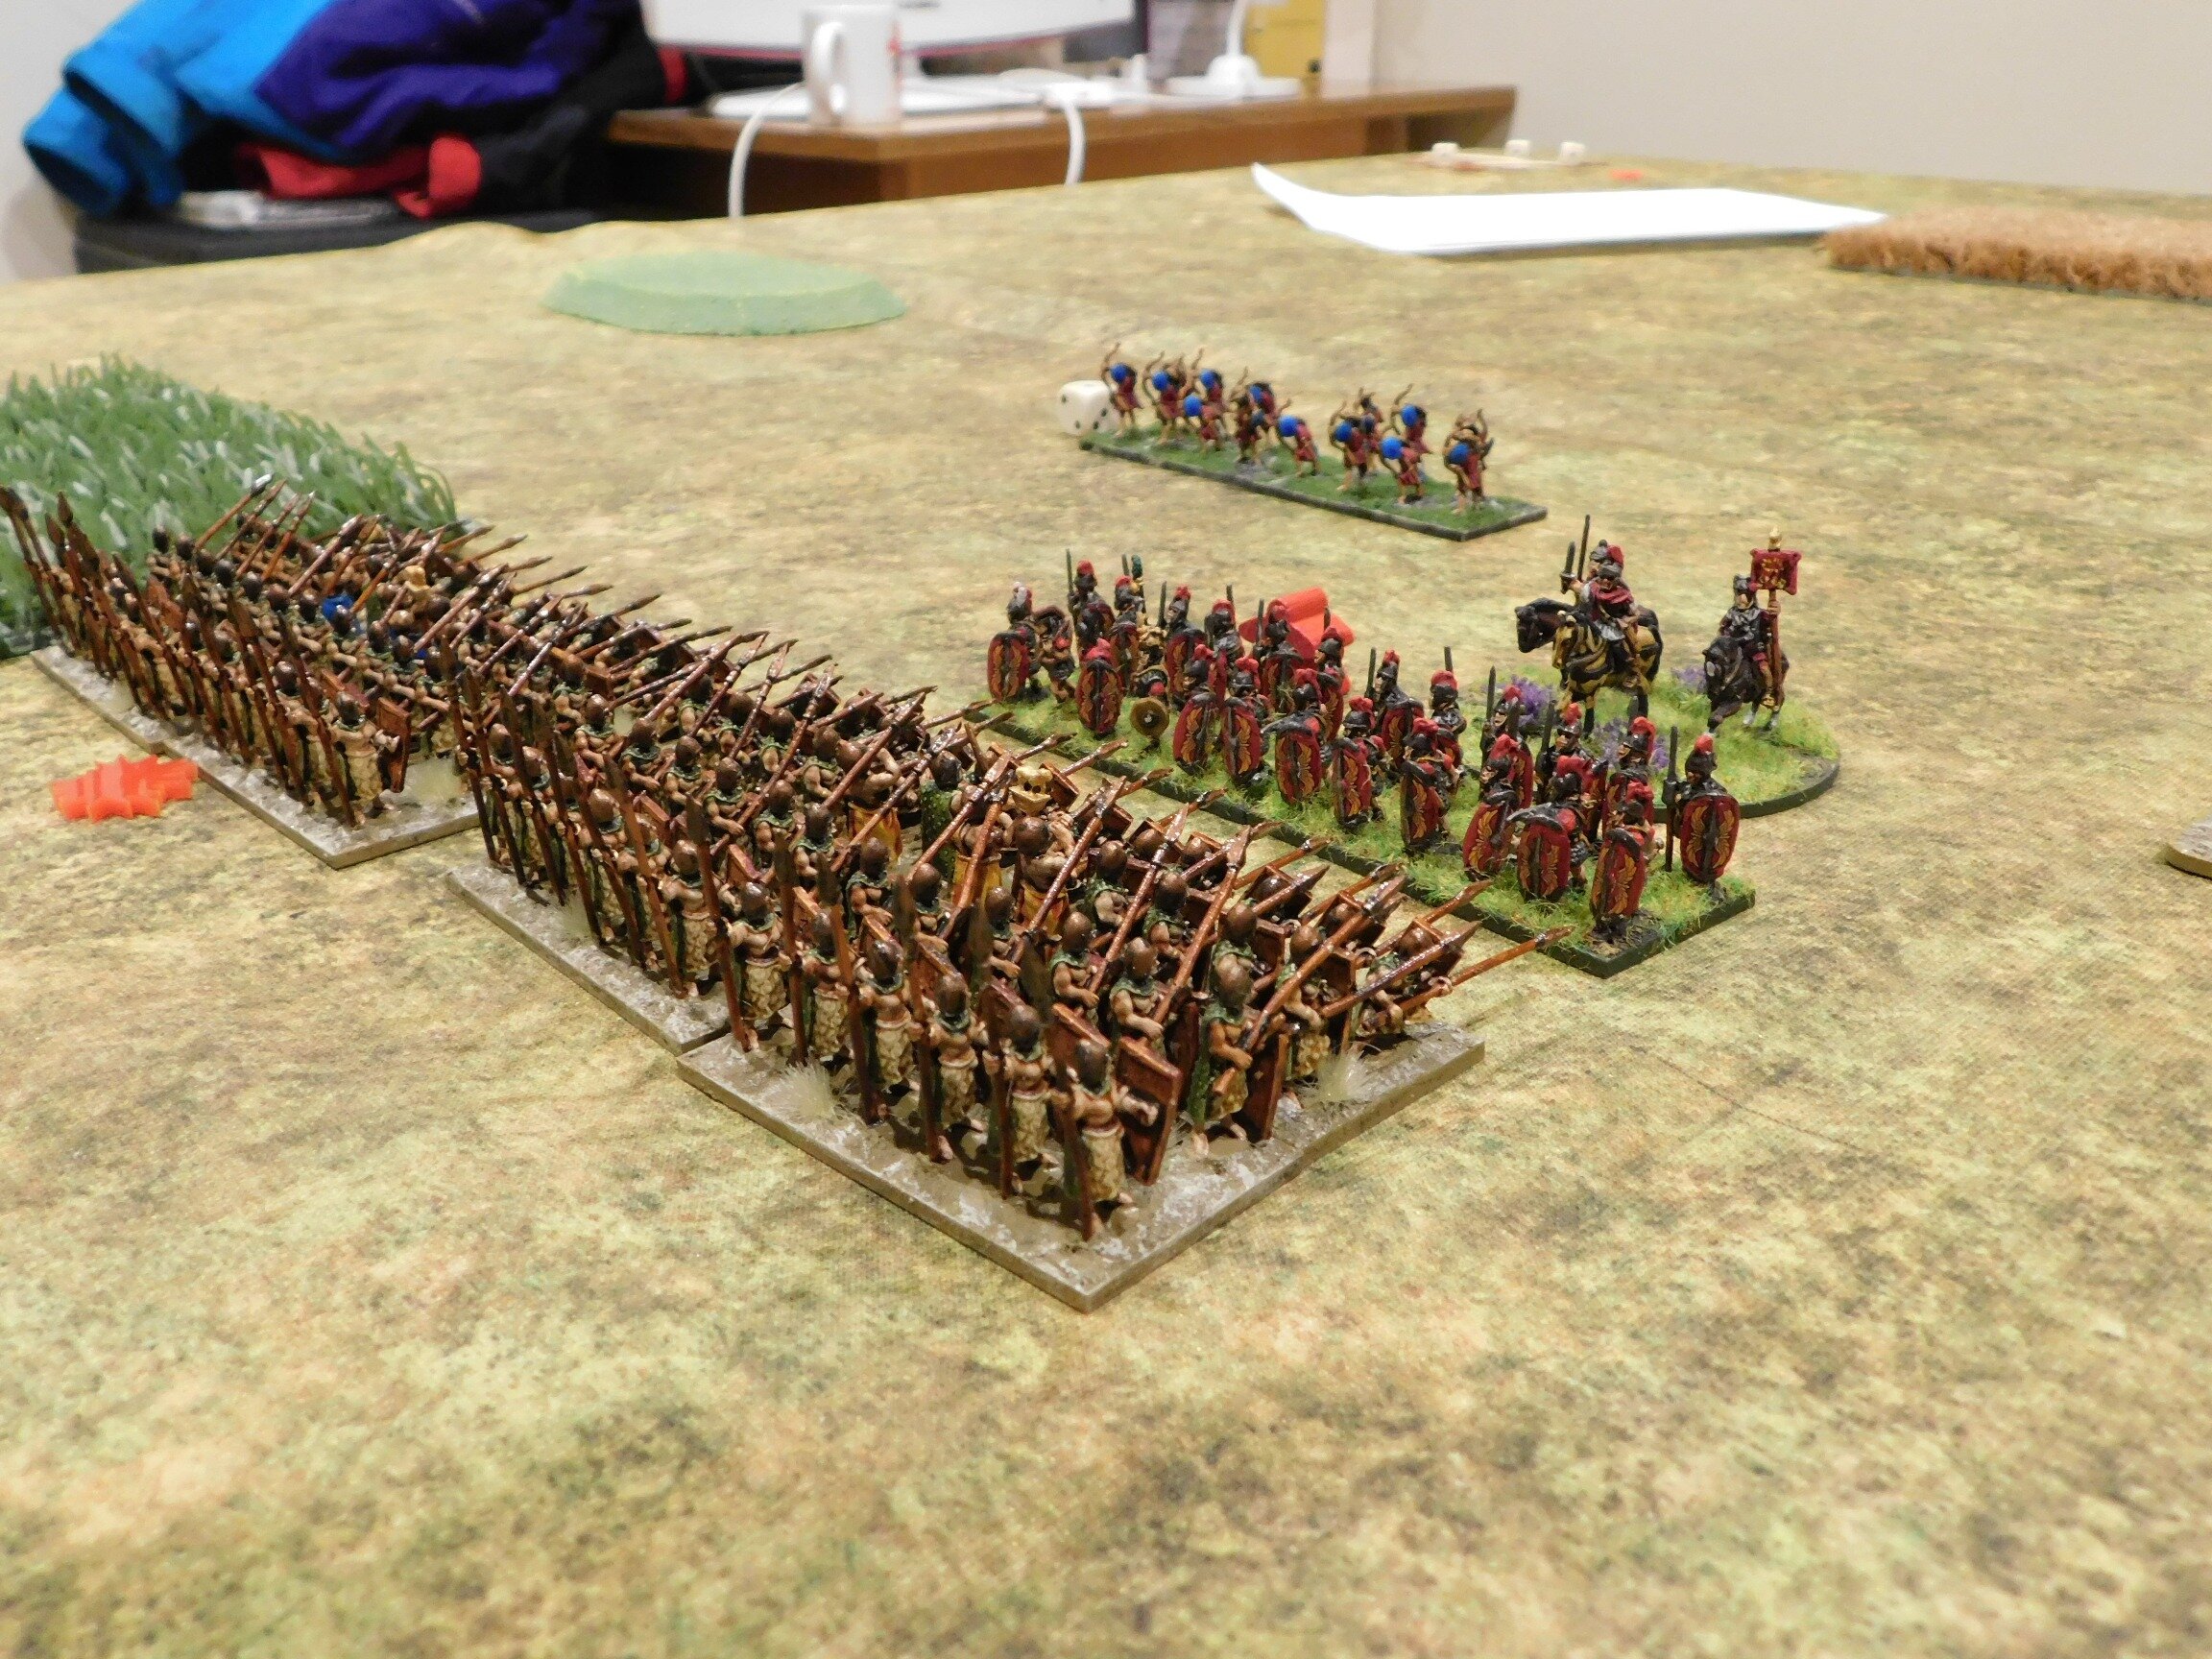
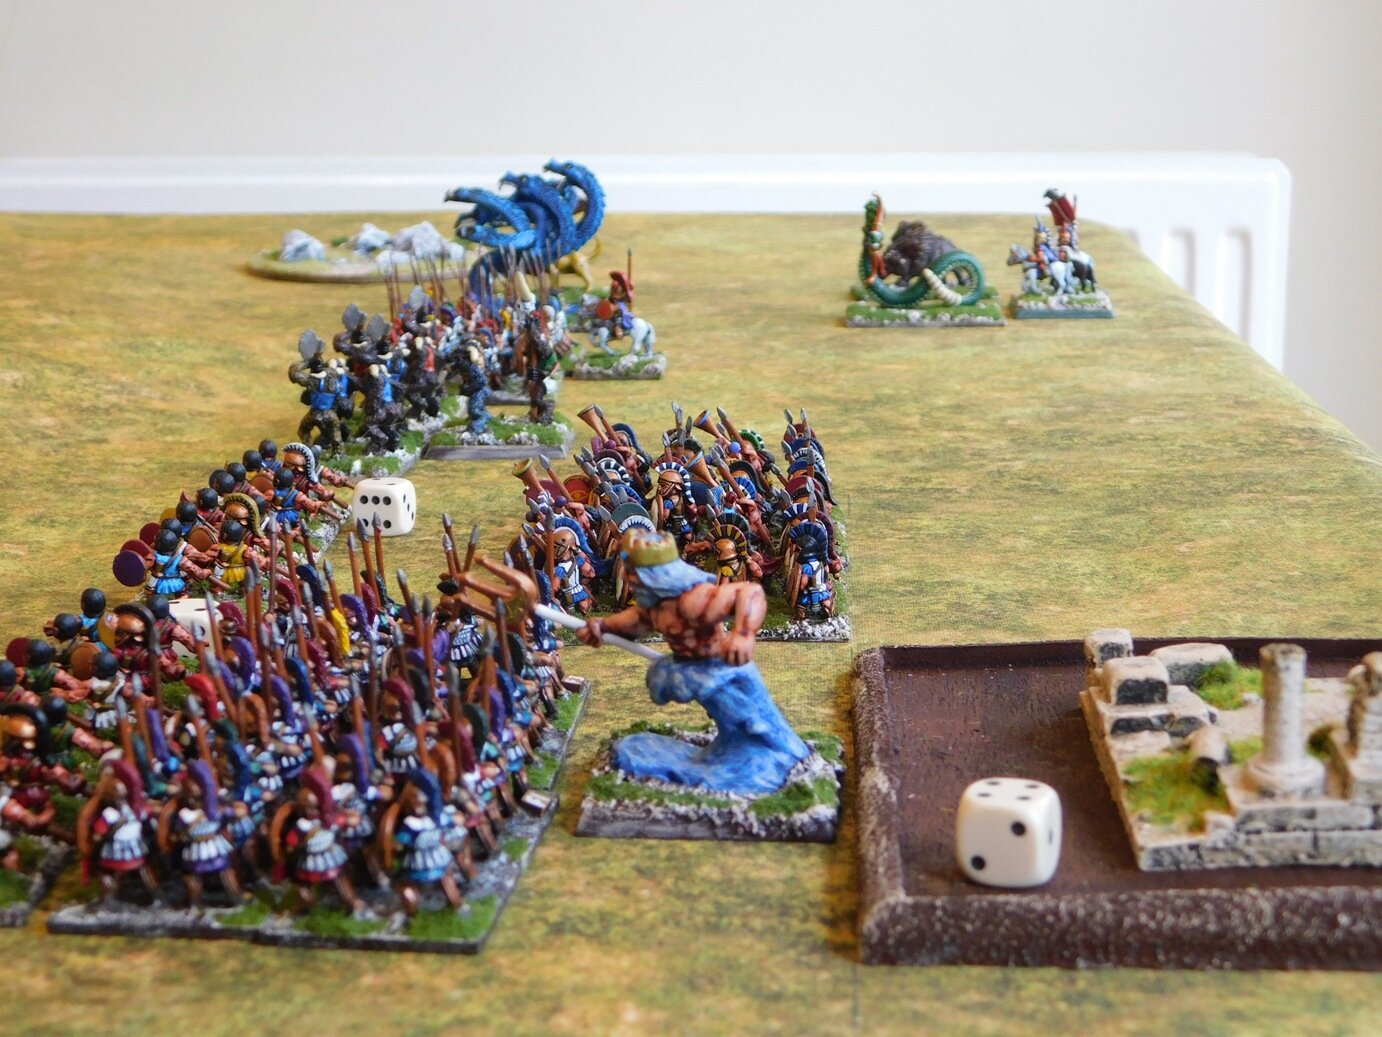
My Classical Indians would face off against a Hoplite Greek army fielded by Bevan…and what a Hoplite Greek army it was: ten units of Hoplites and one of light infantry. The rules used were To The Strongest, a grid-based game, so with my table being twelve squares wide, Bevan could form a space-invader like line of hoplite units and just advance forward, spearpoints out!

So many hoplites that I had to draft in some Summerians as proxies!

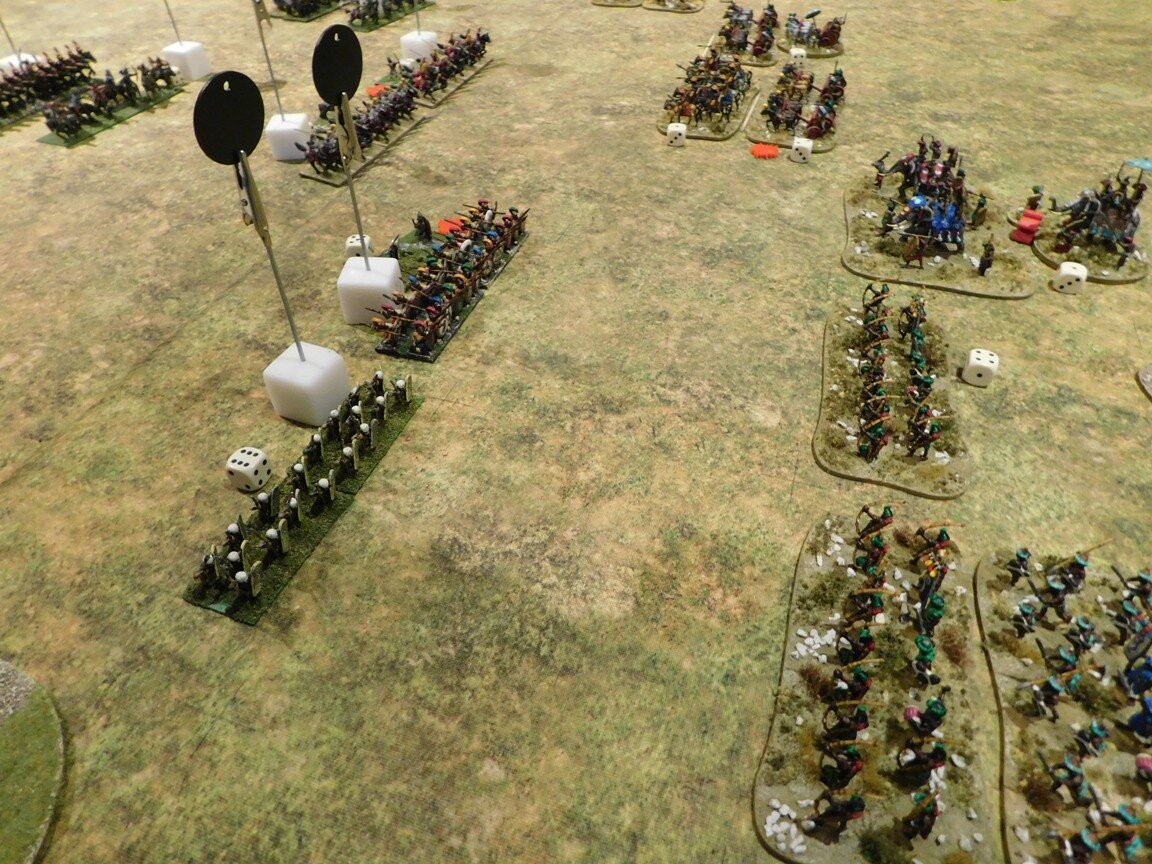
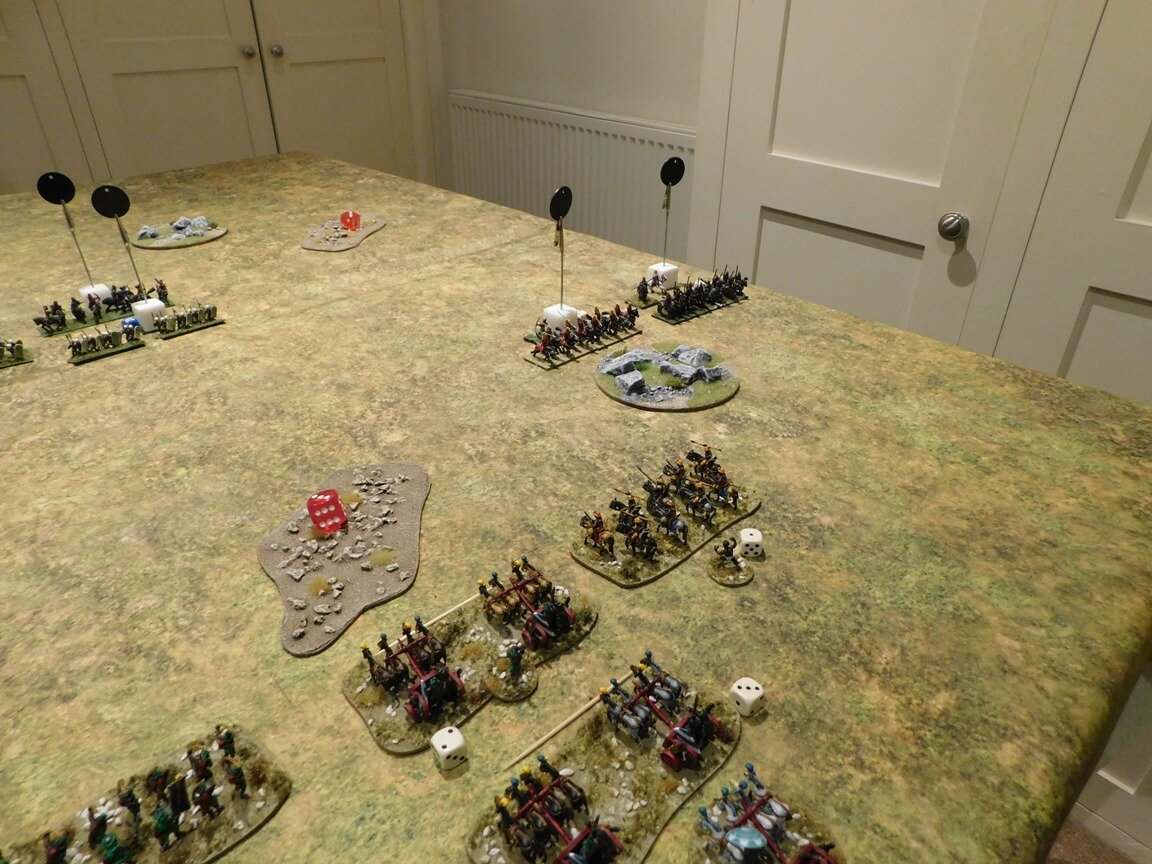
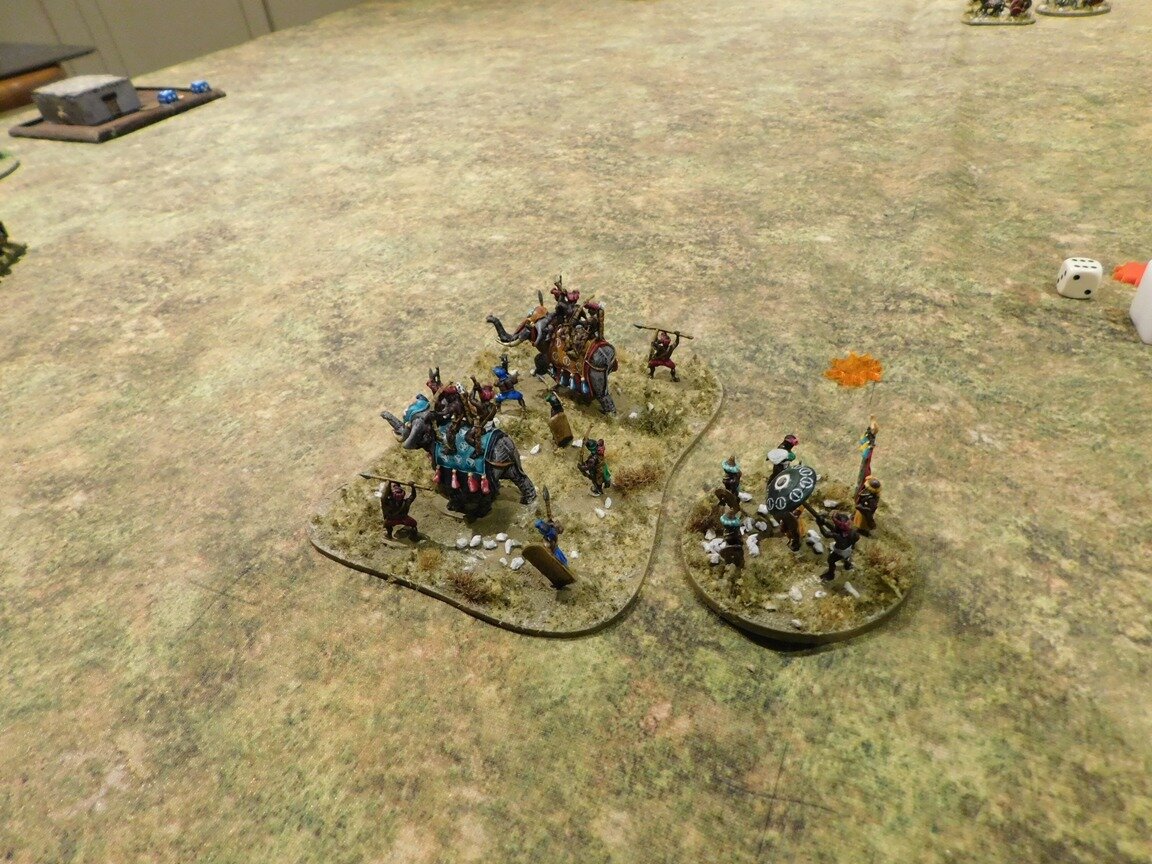
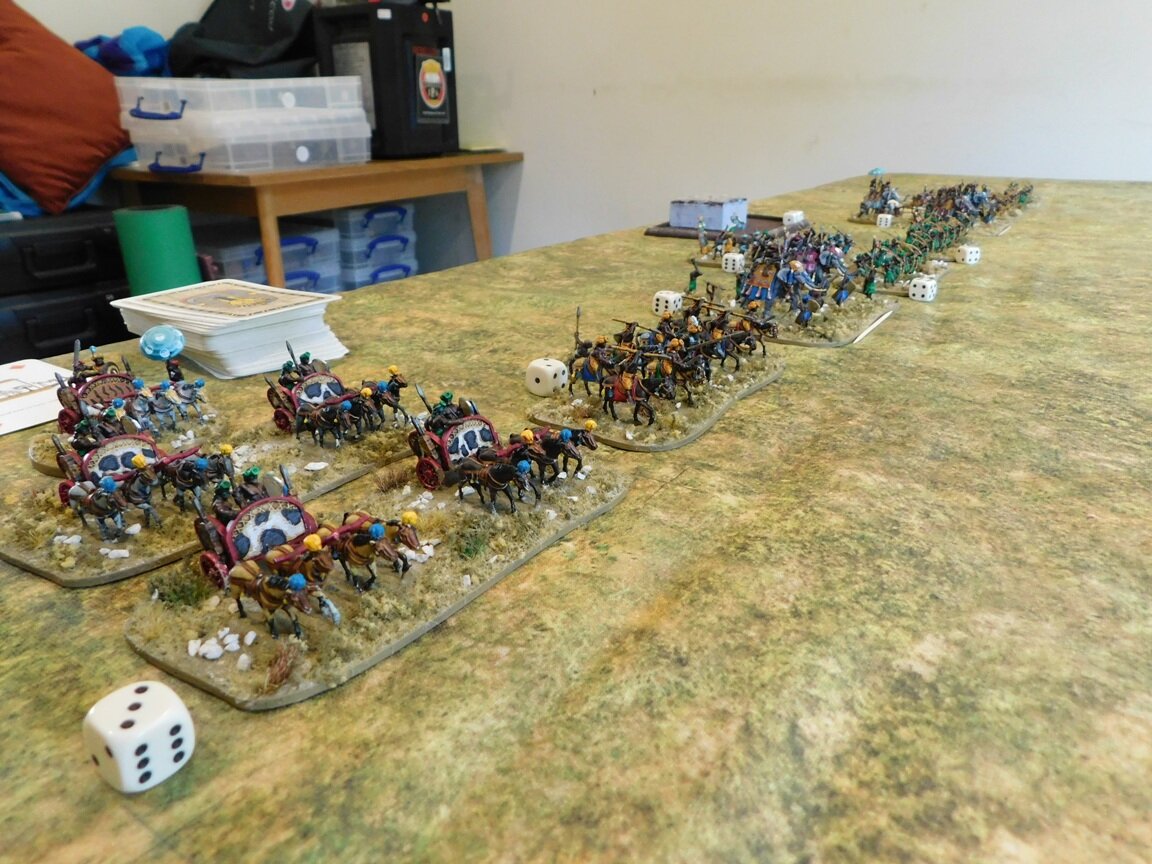
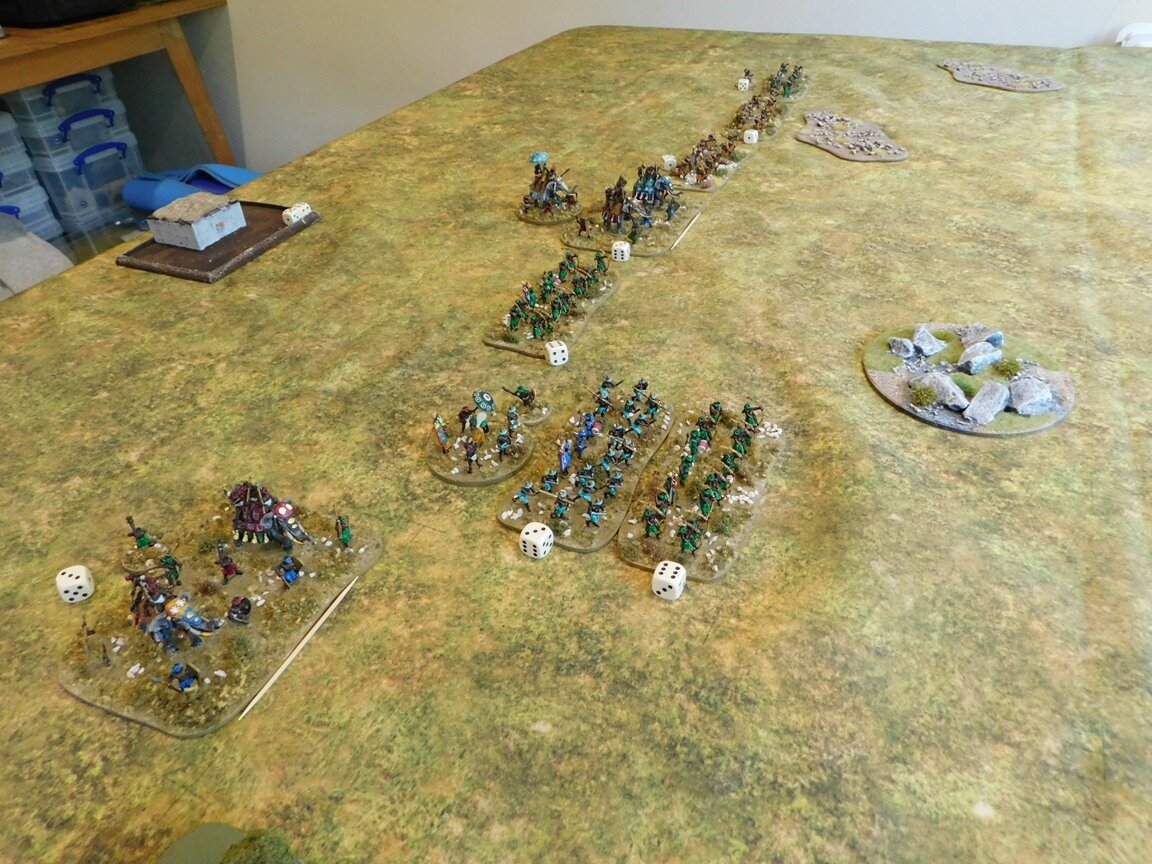
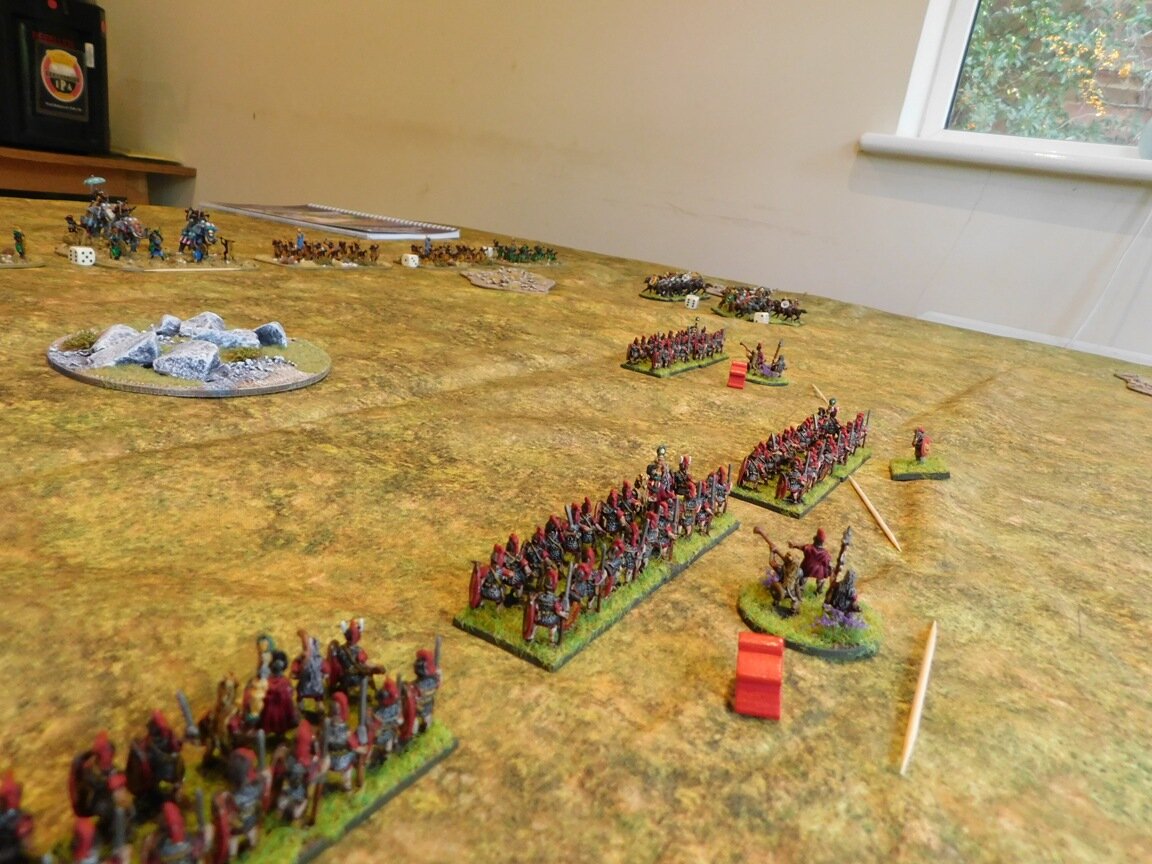
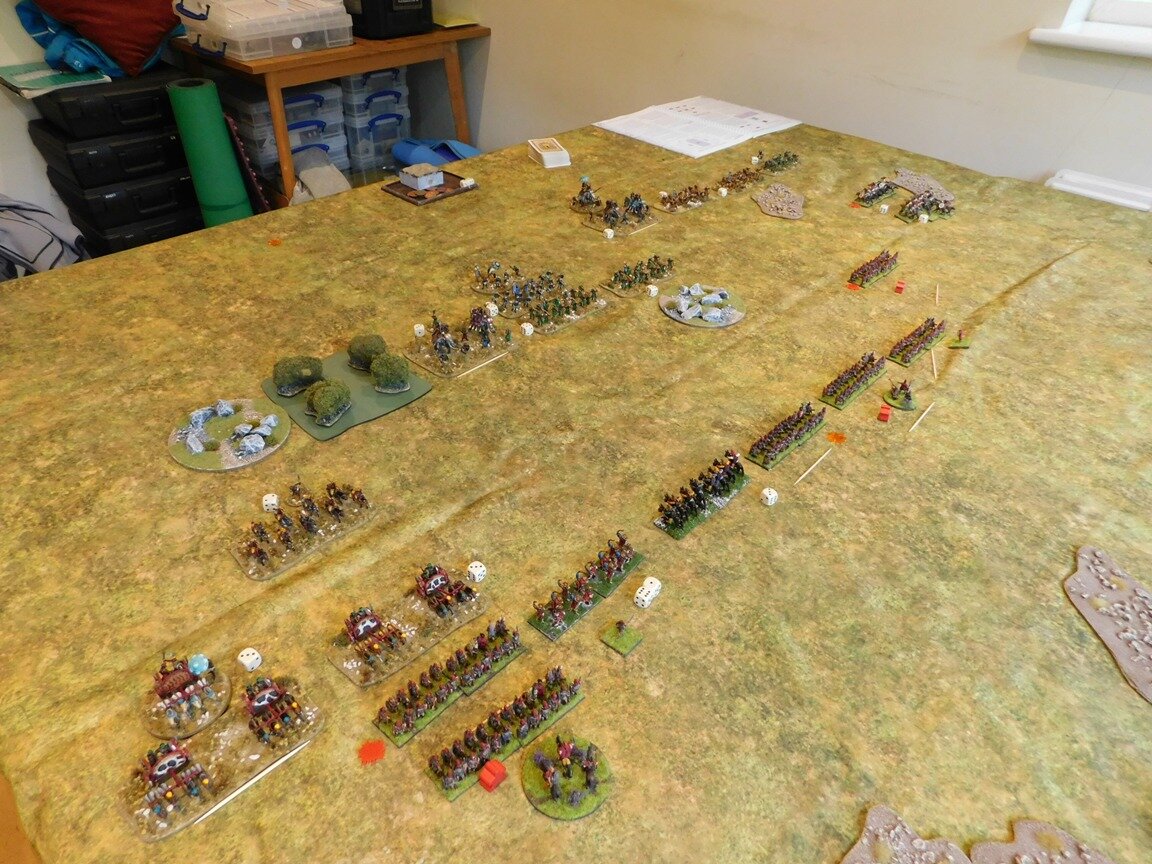
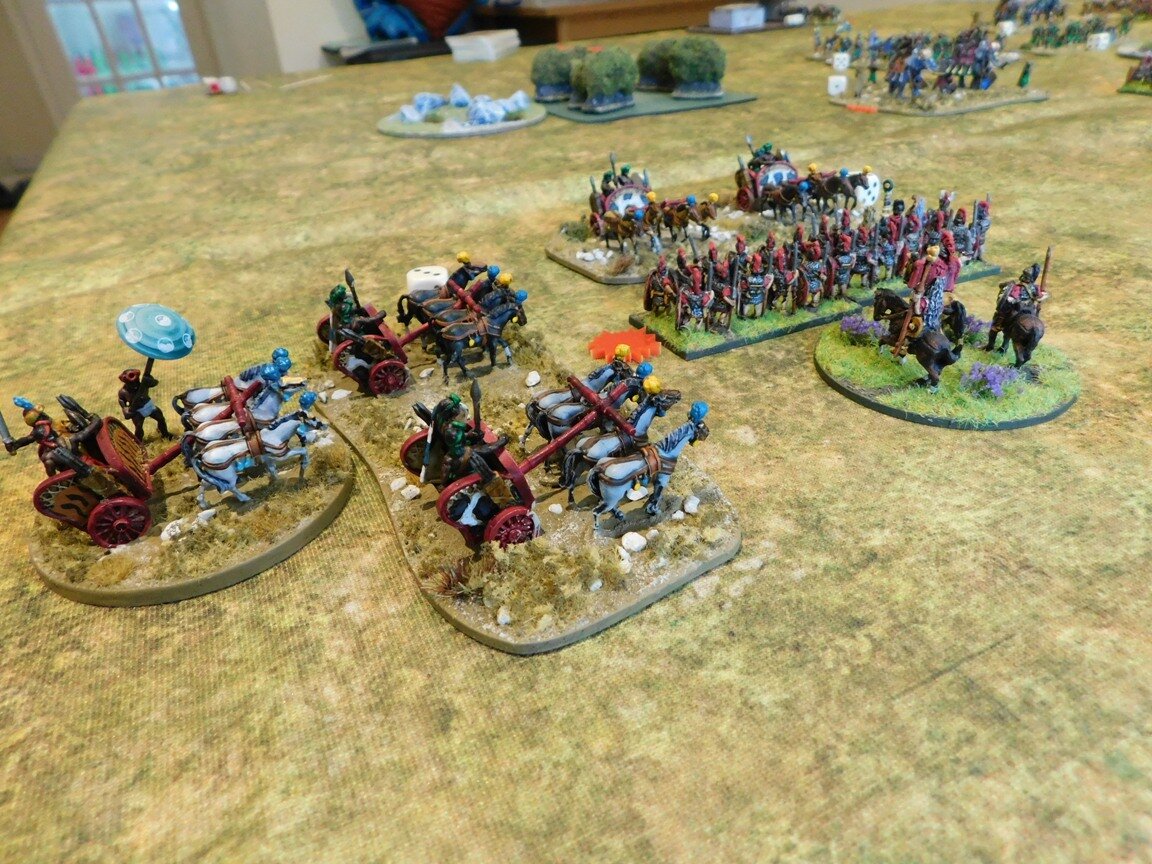
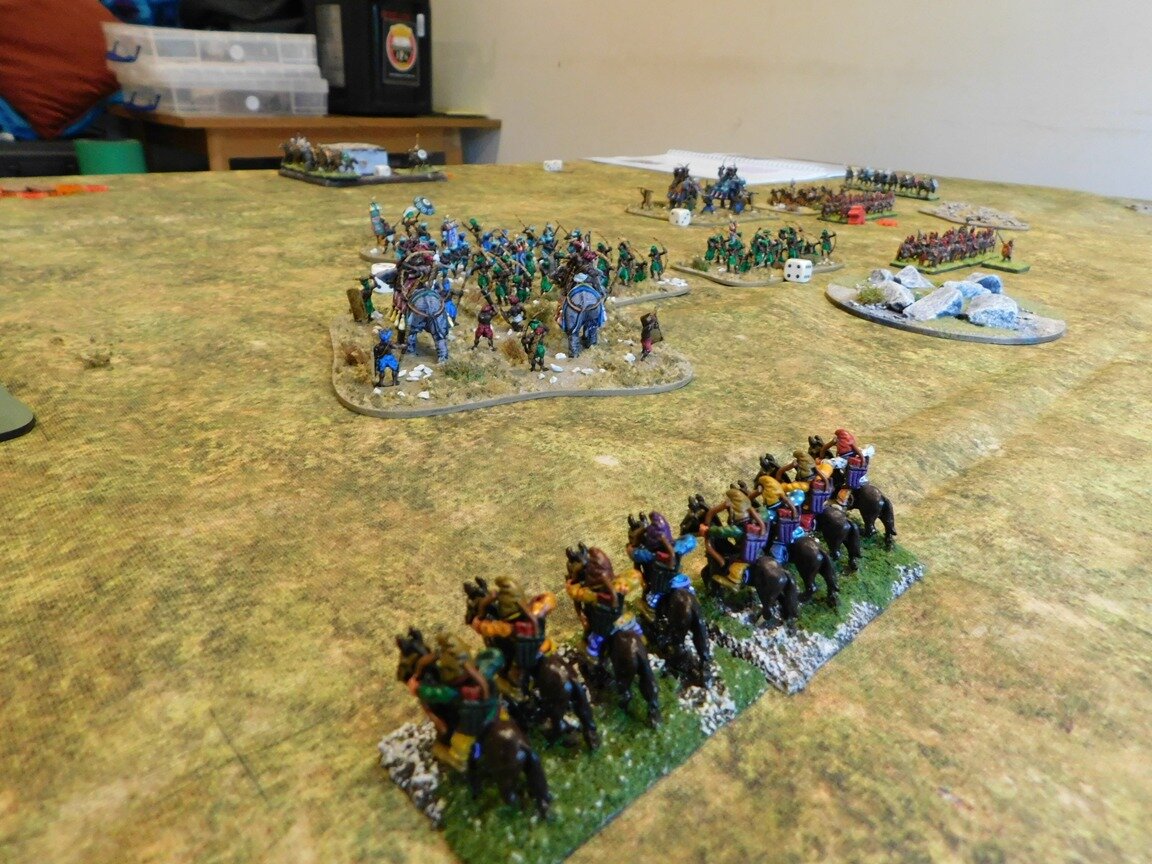
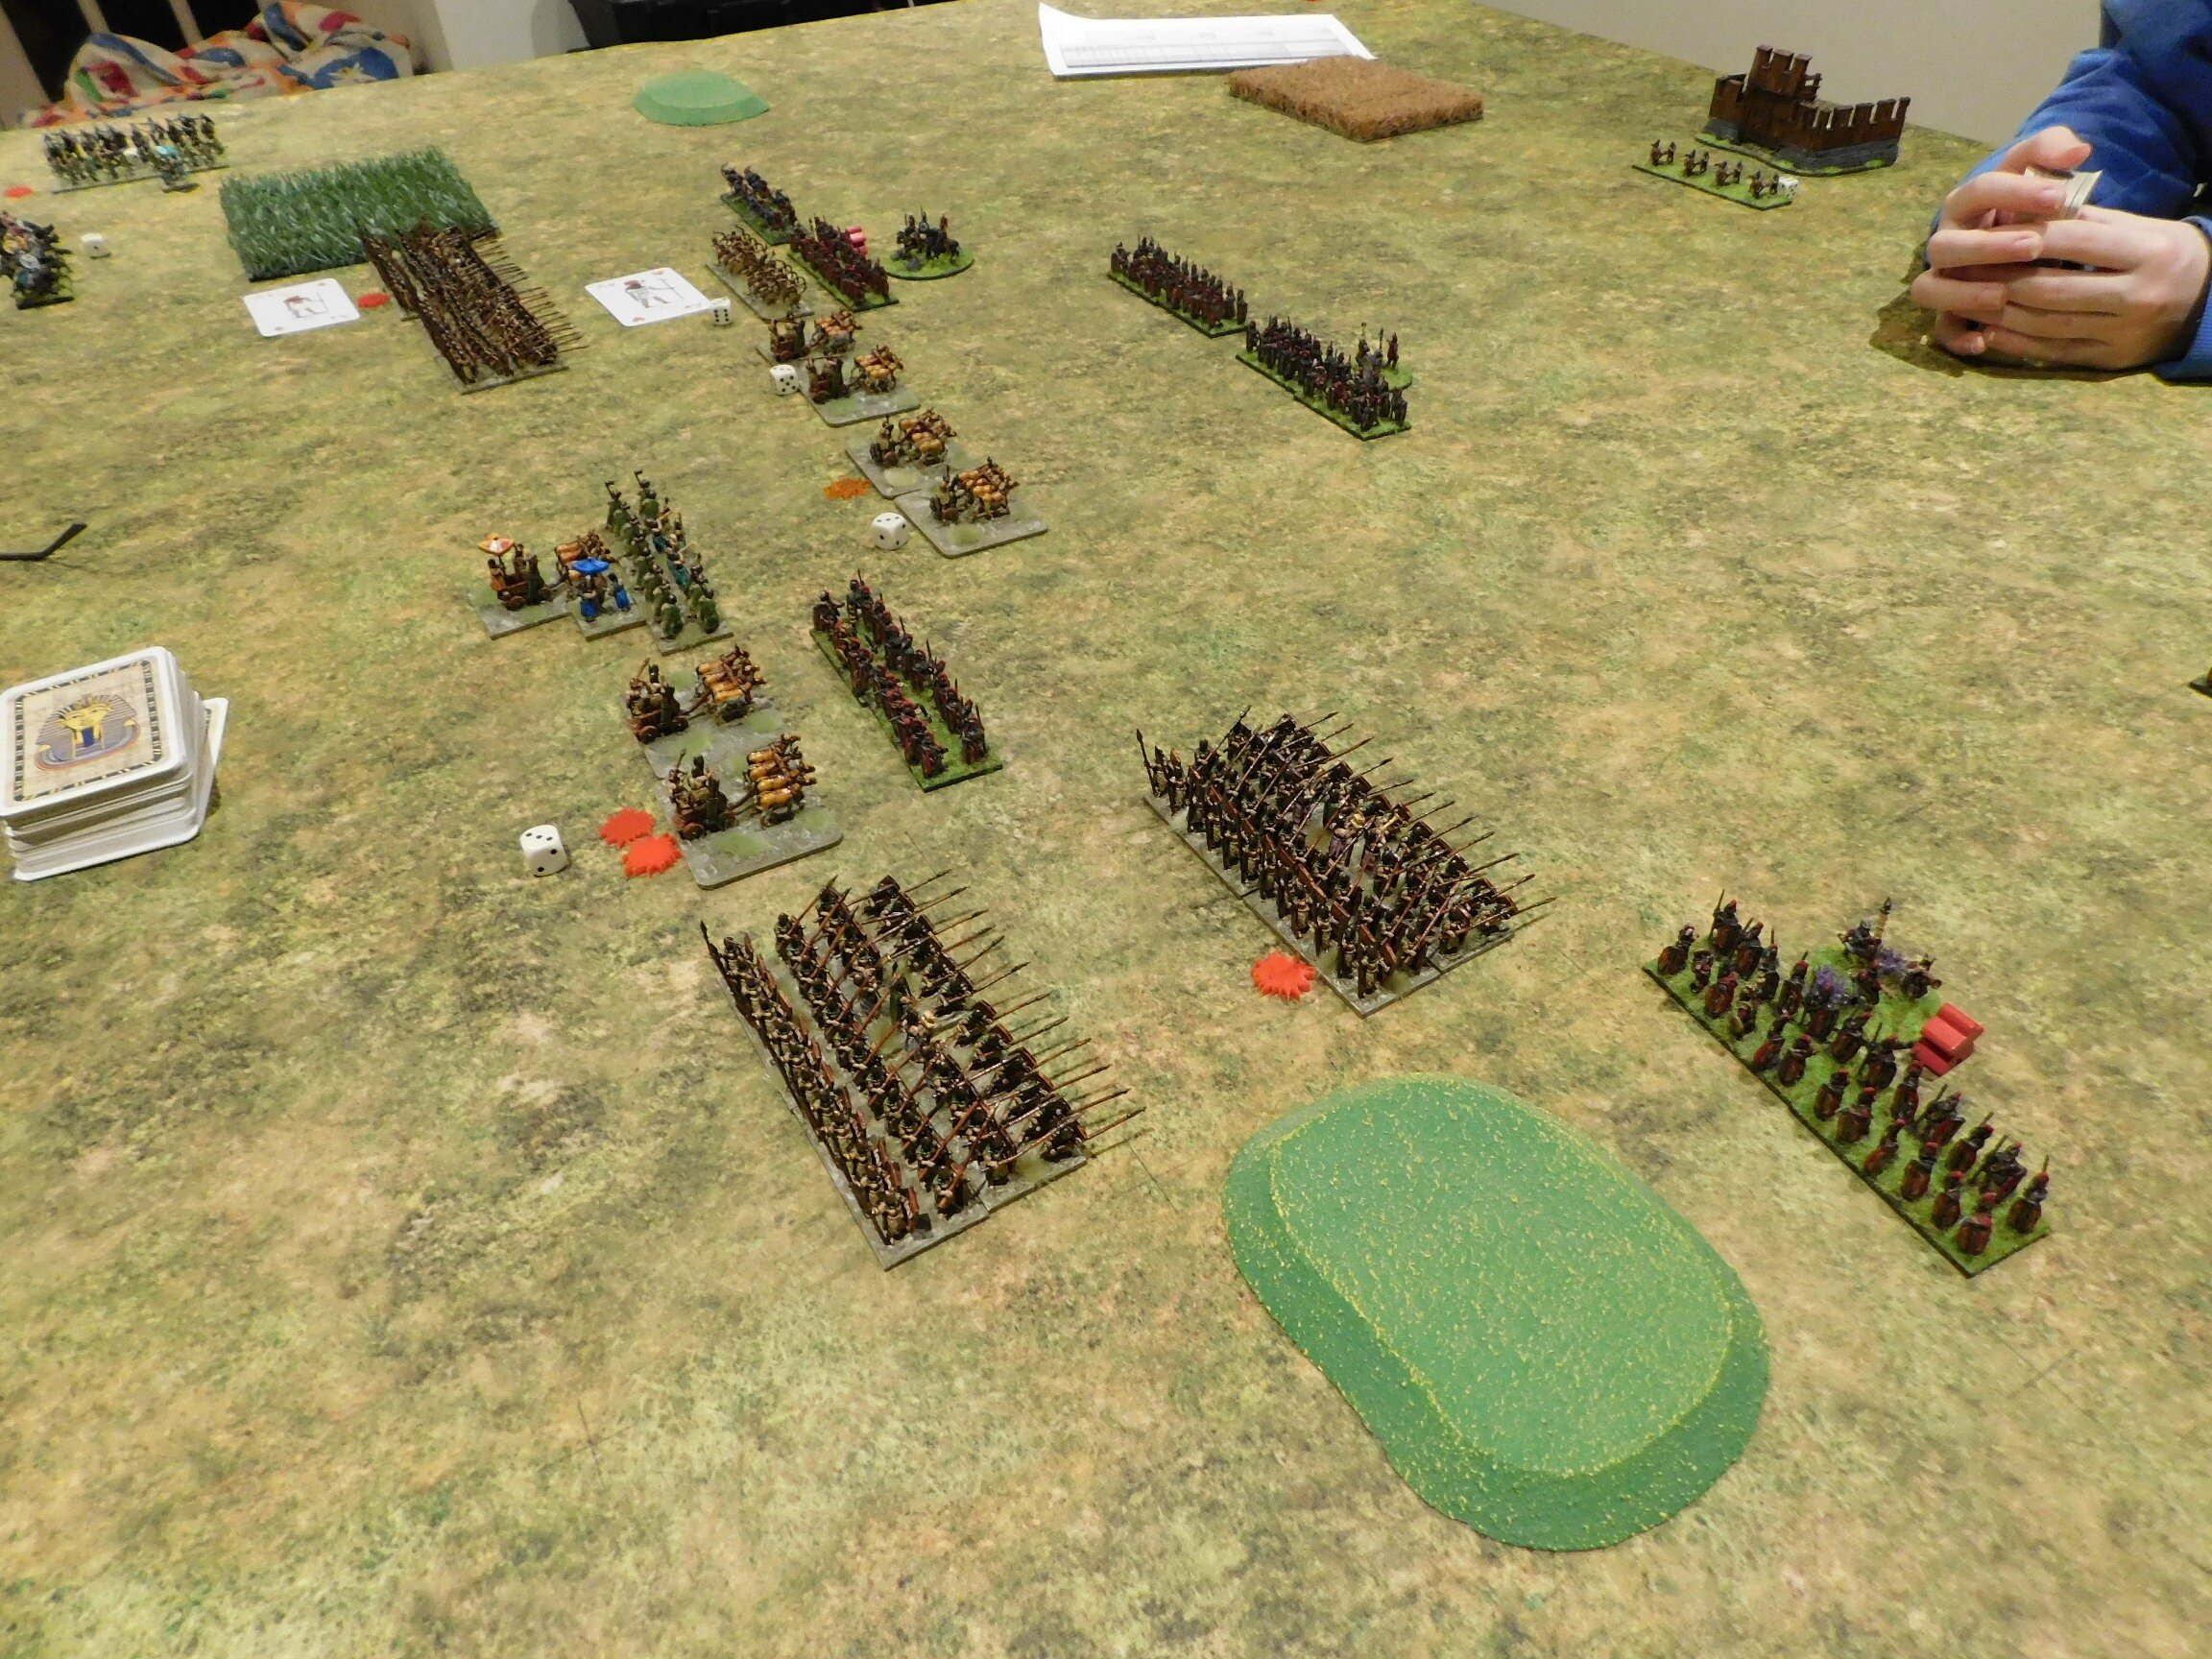
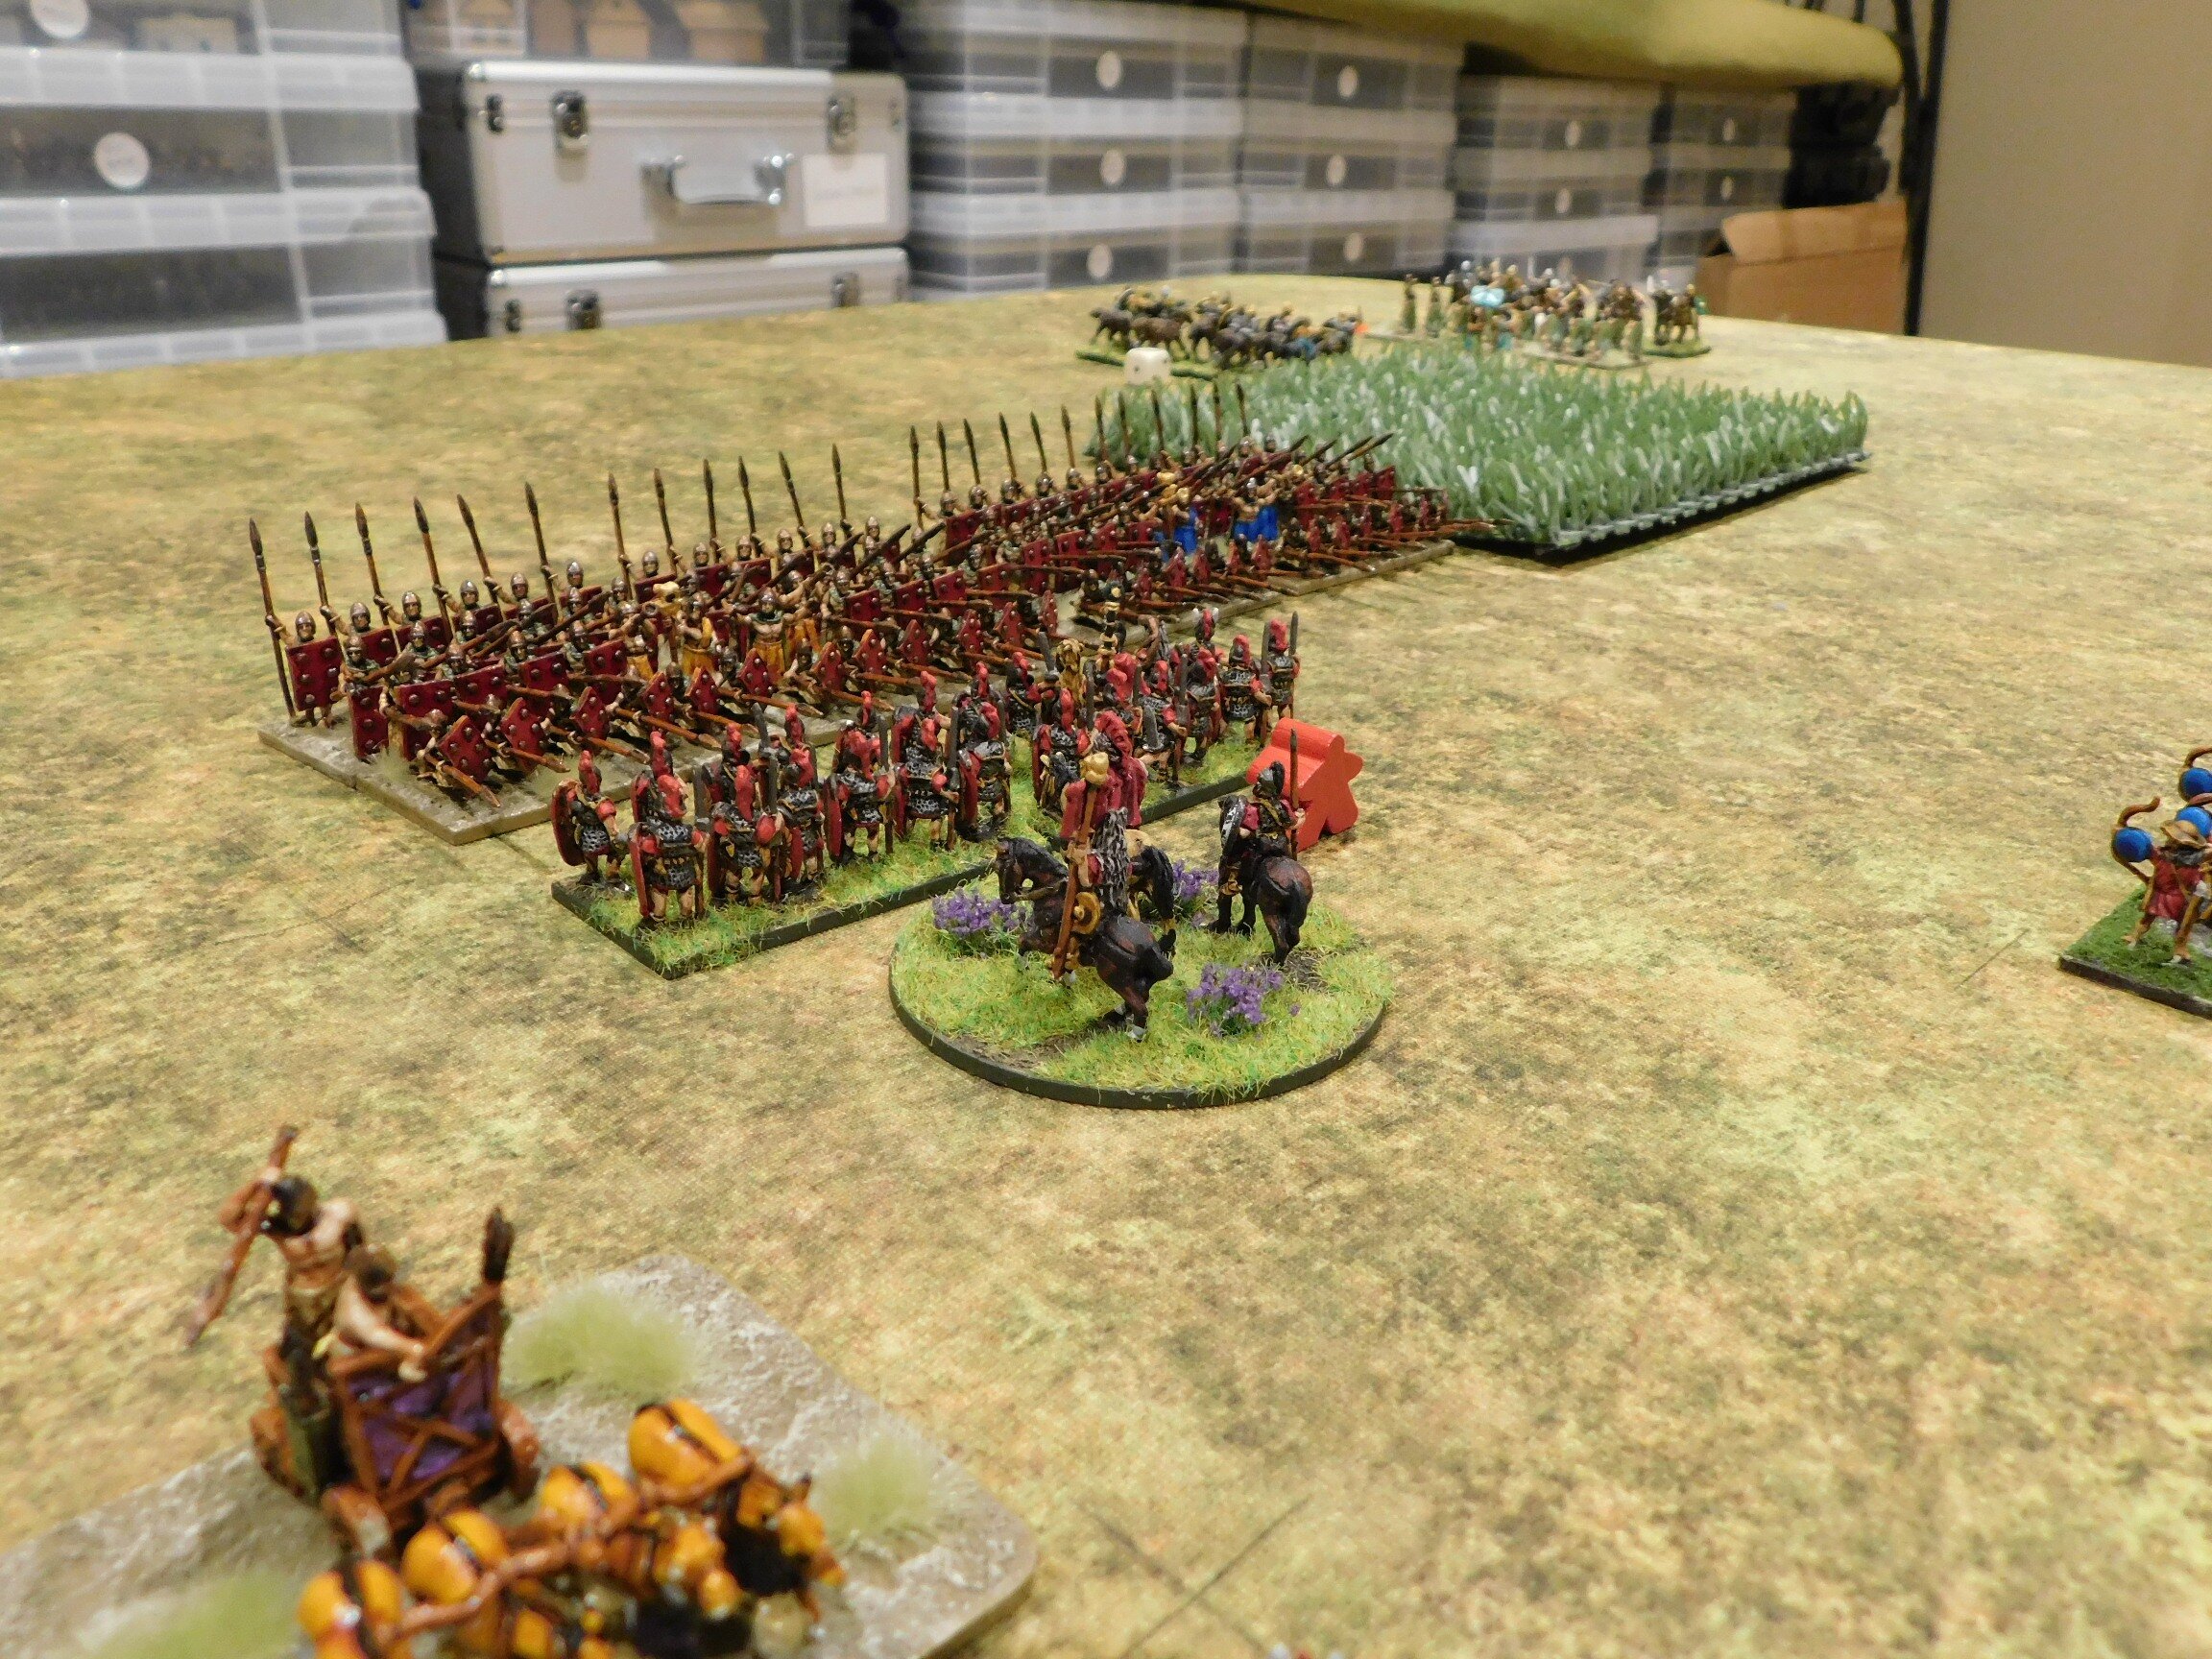
On the other side of the battlefield, my Classical Indians consisted of five units of longbowmen as the softening-up element, with a hard core of two escorted elephant units and two heavy chariot units as the “finishers”. Reserves were provided by the Maiden Guard.

Maiden Guards, Elephants, Longbowmen

The Game

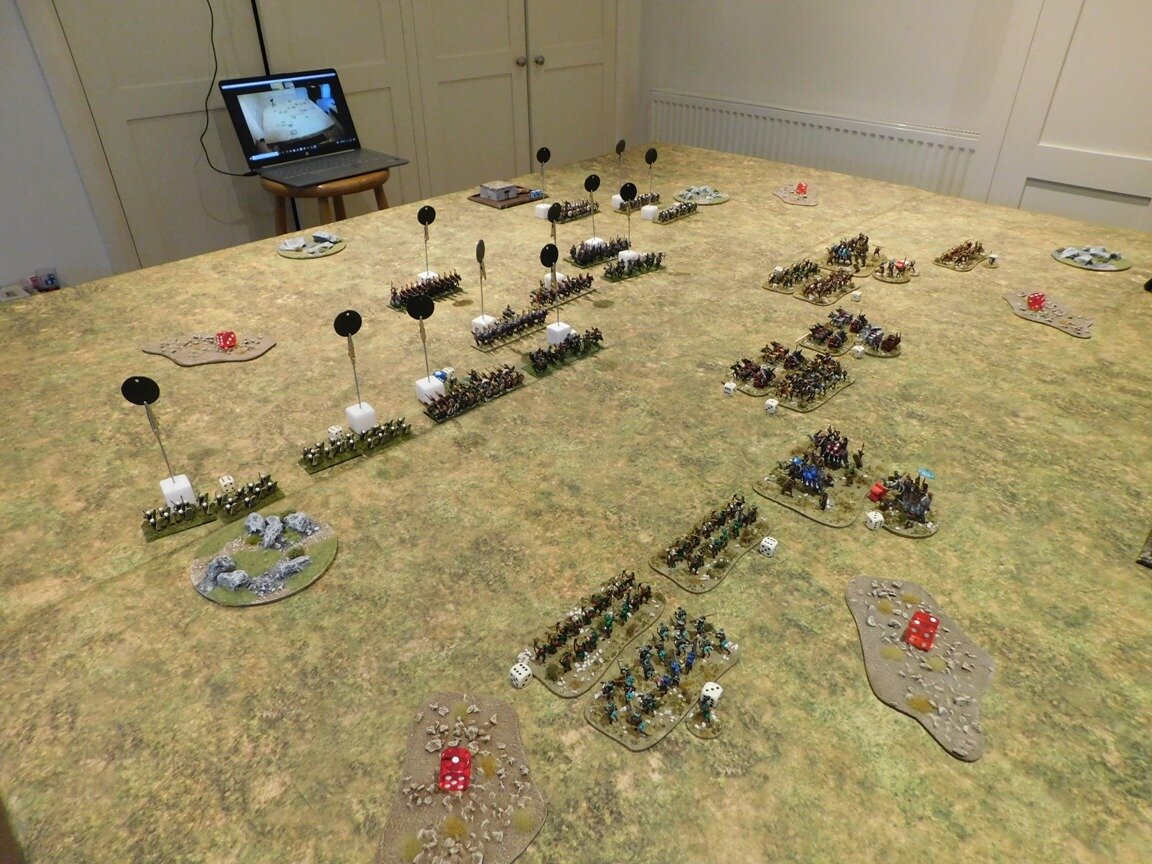
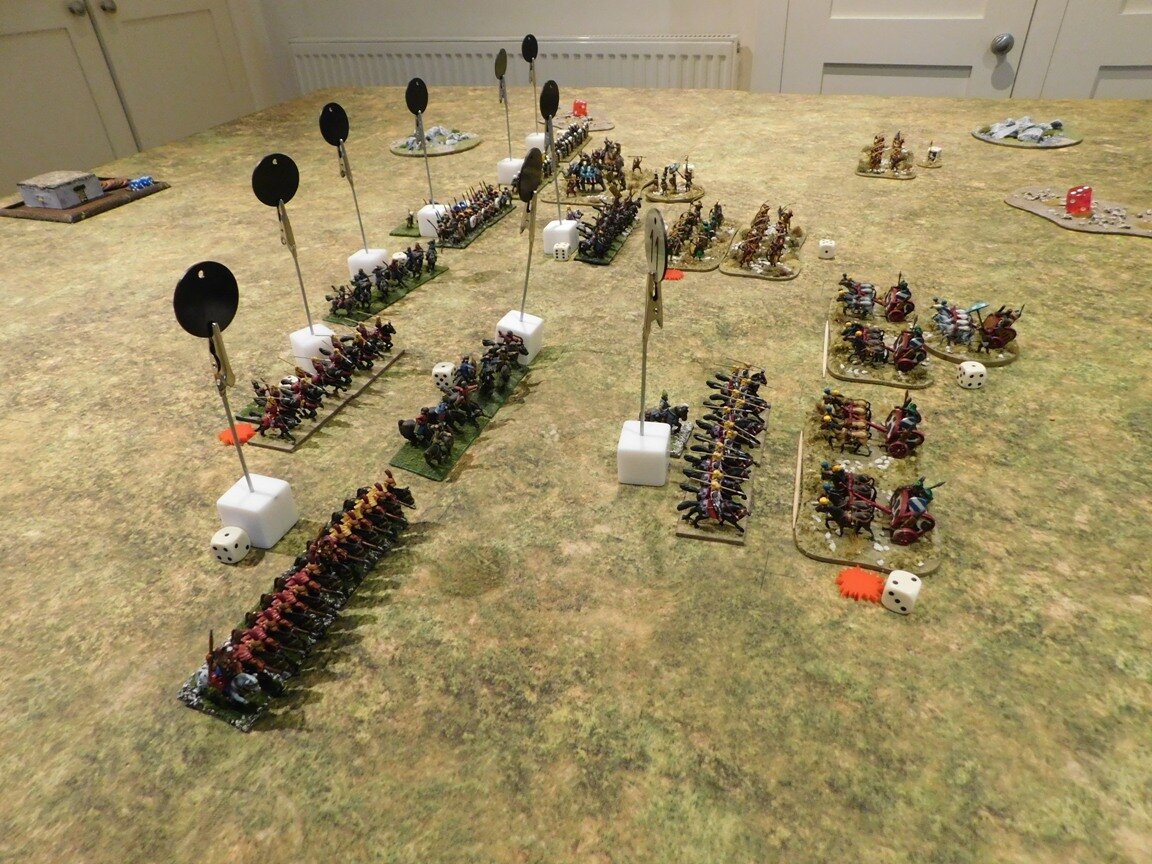
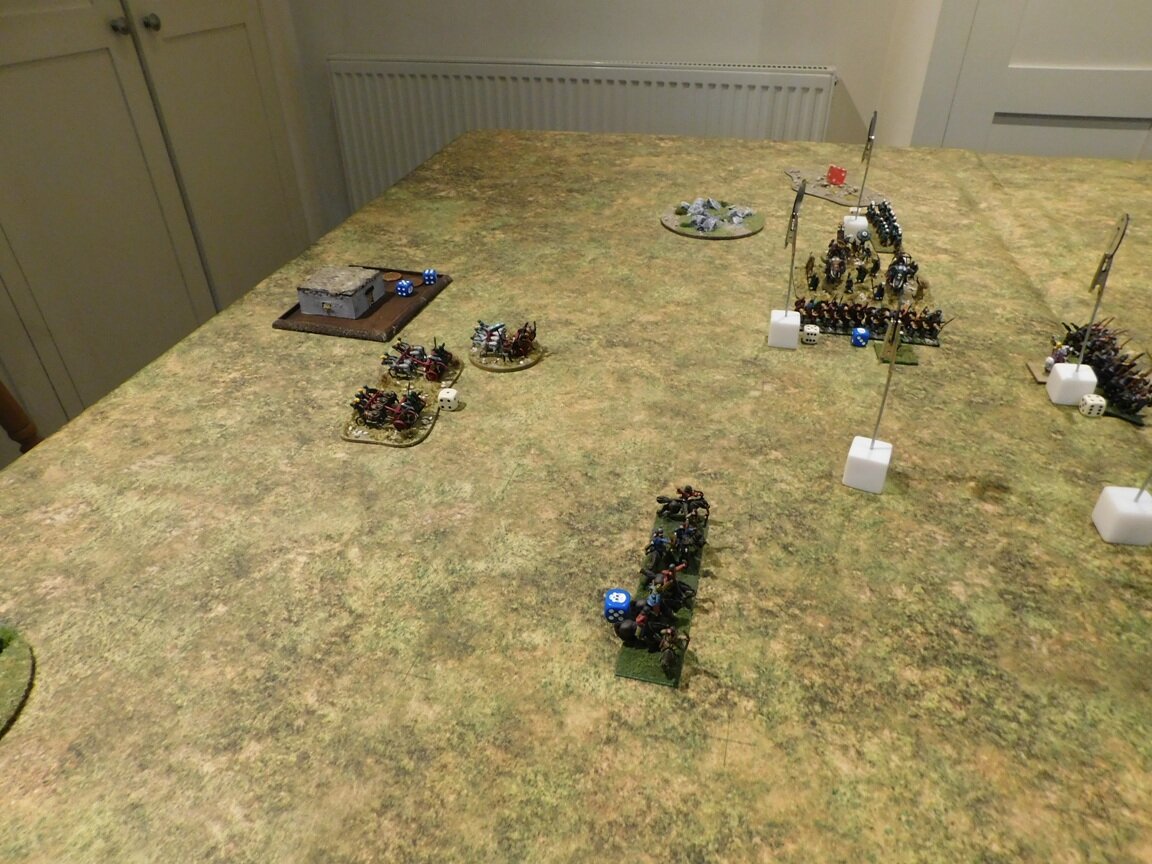
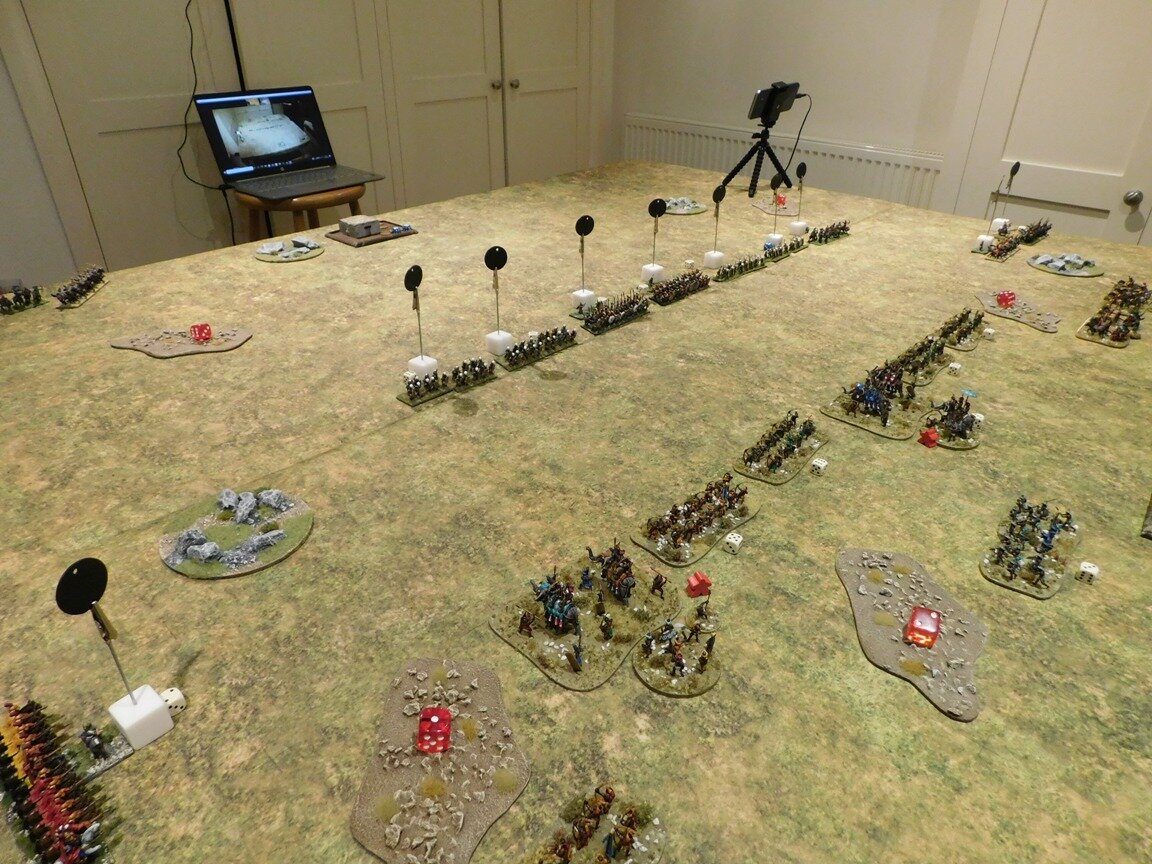
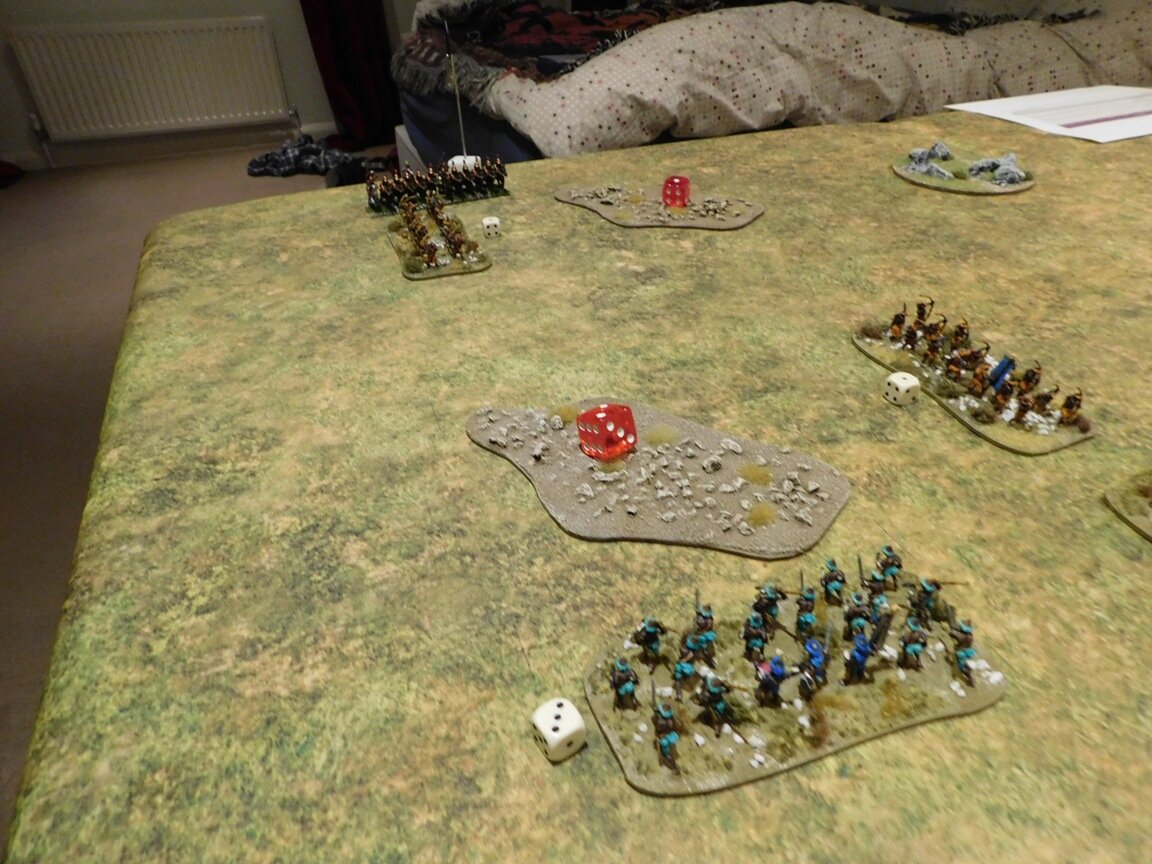
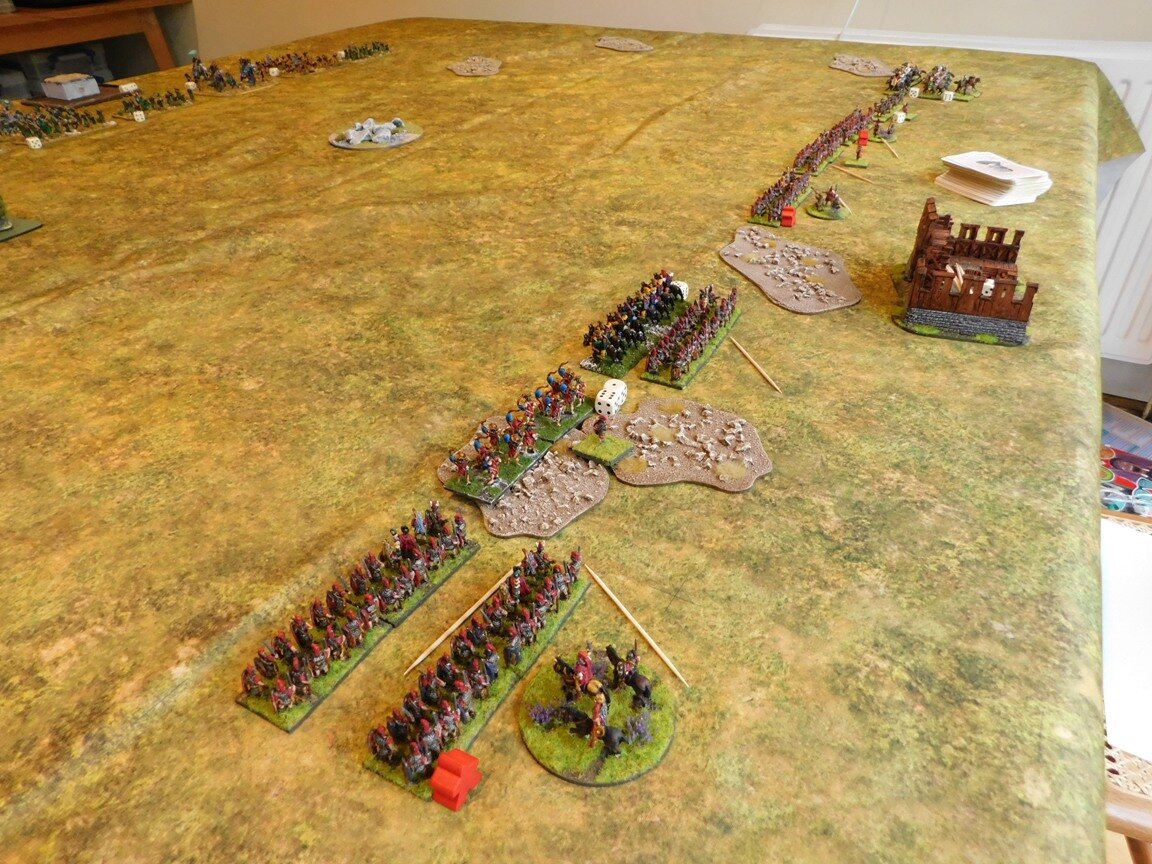
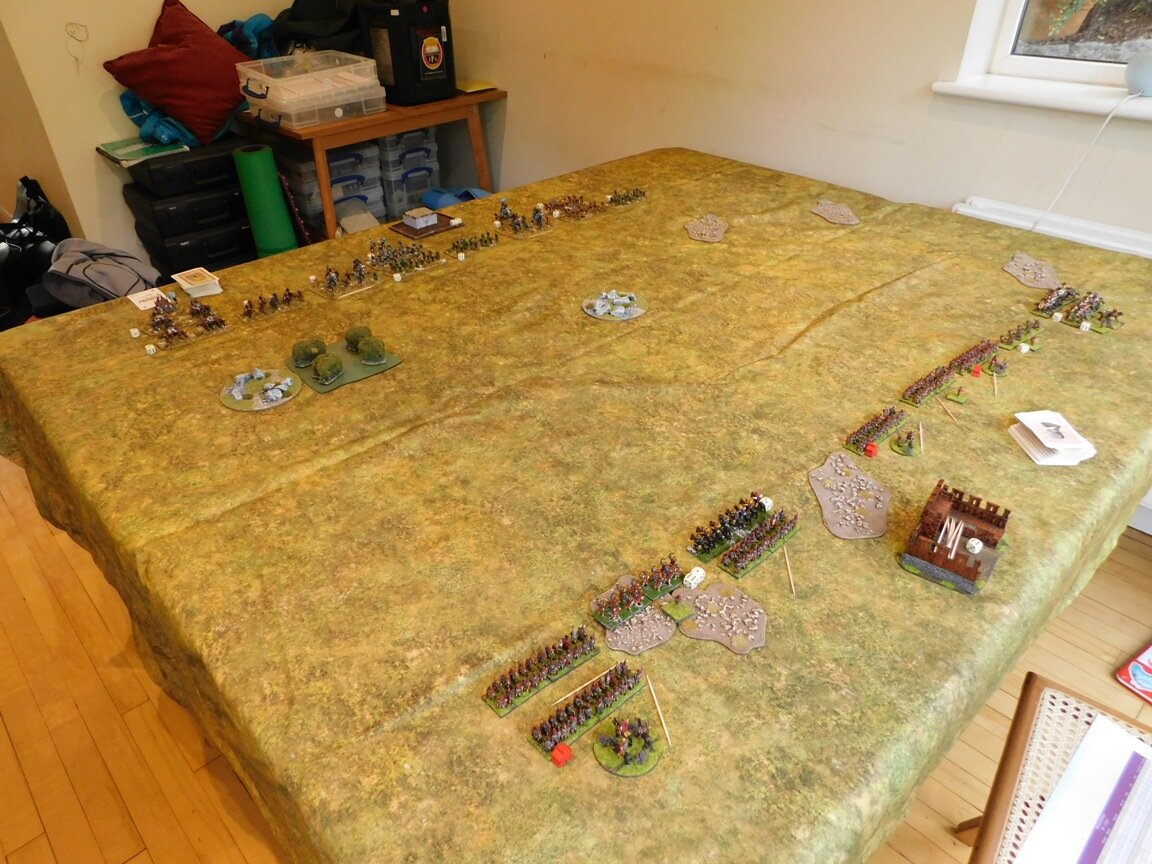
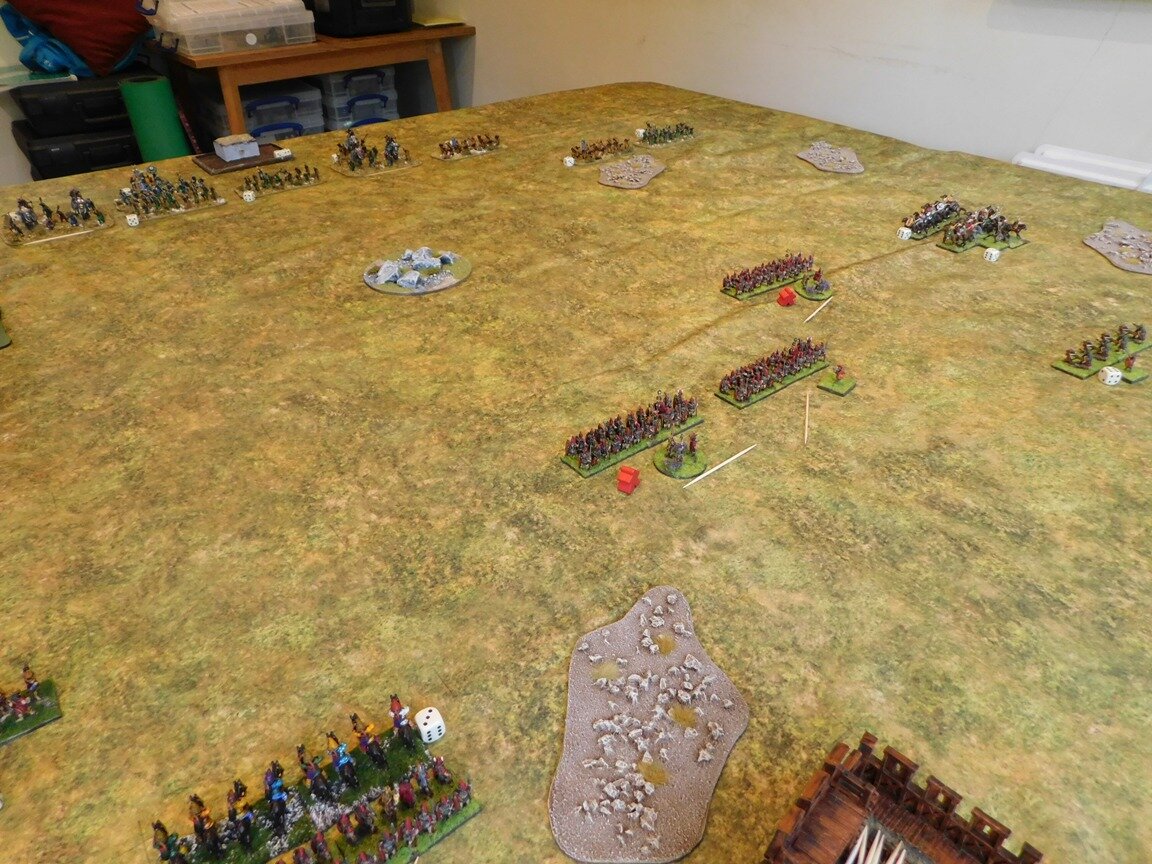
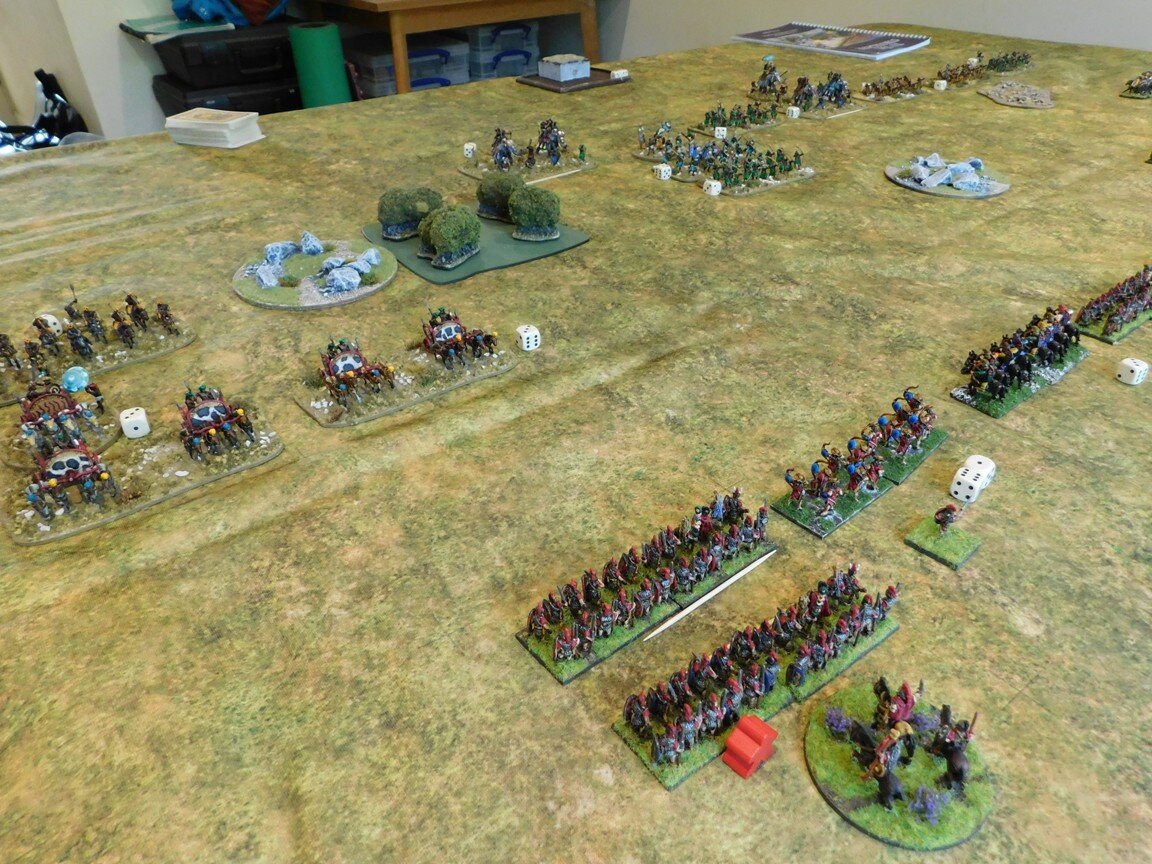
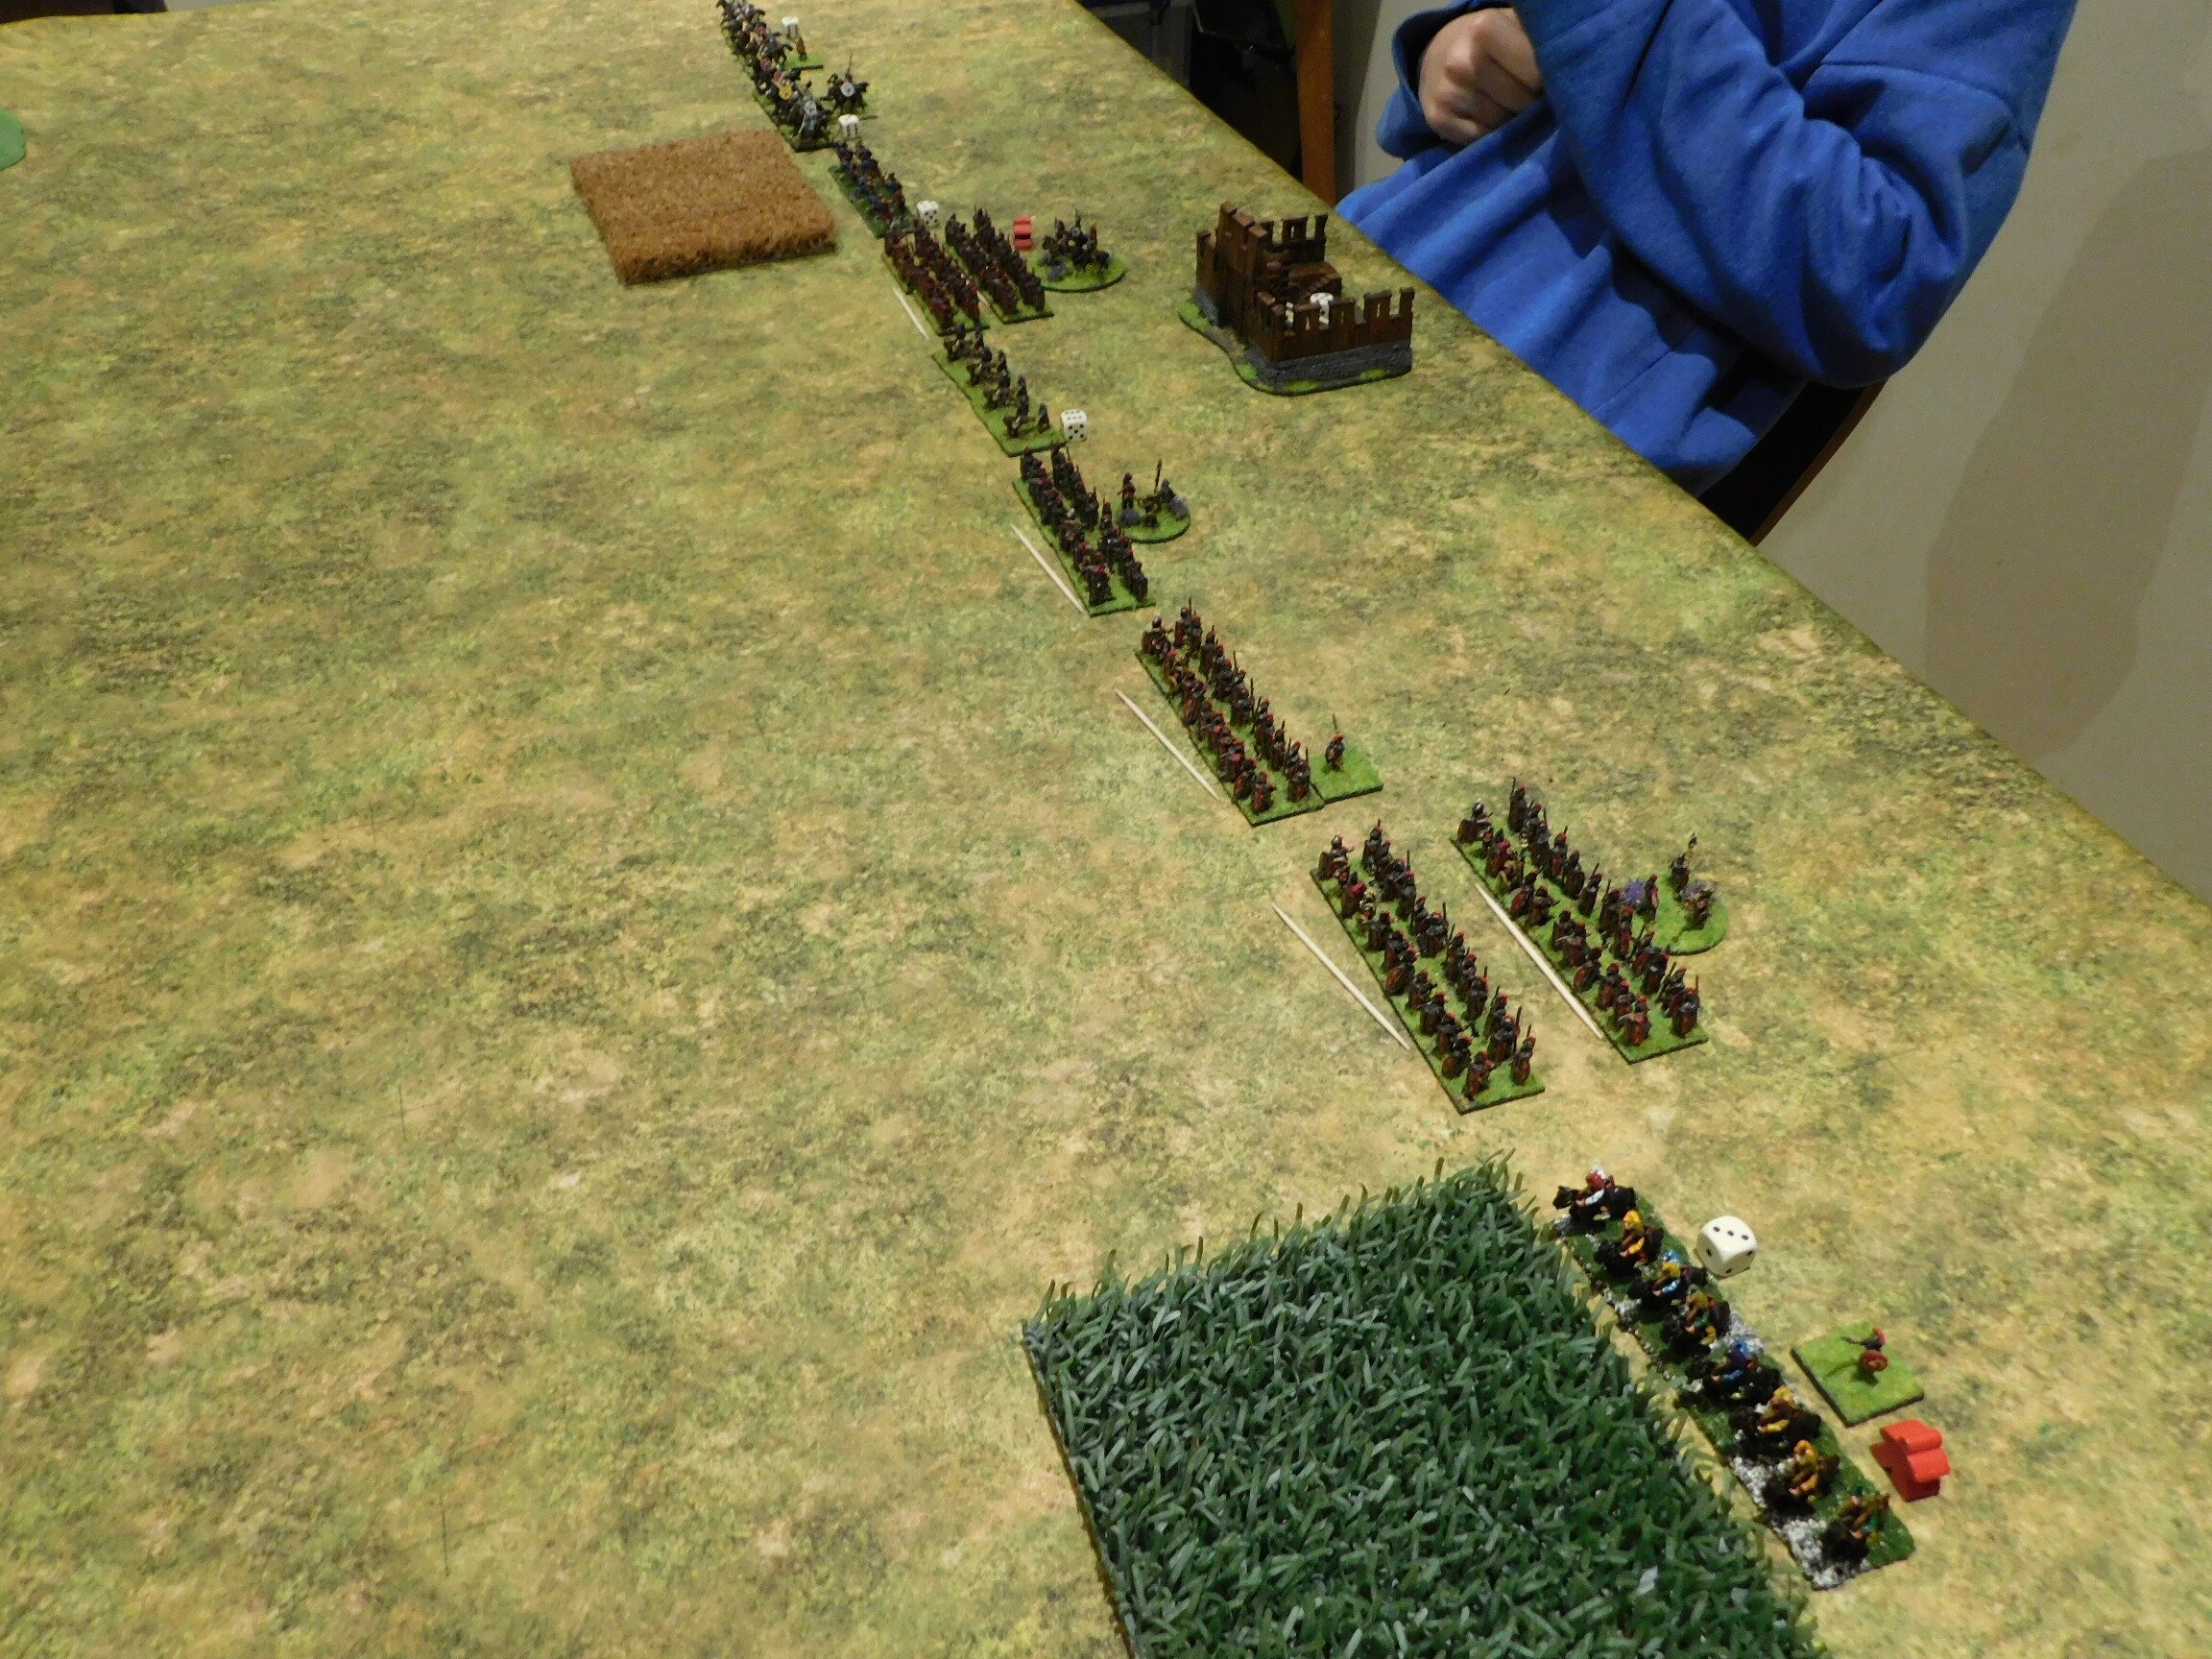
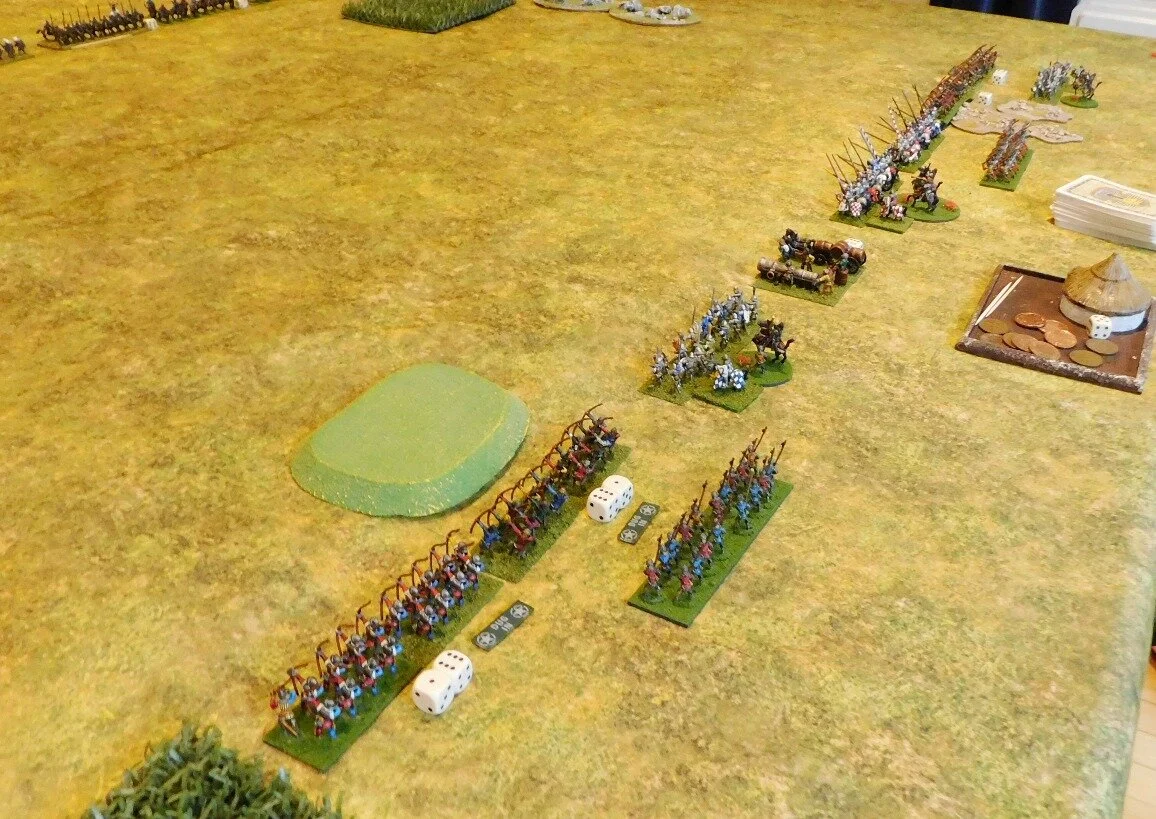
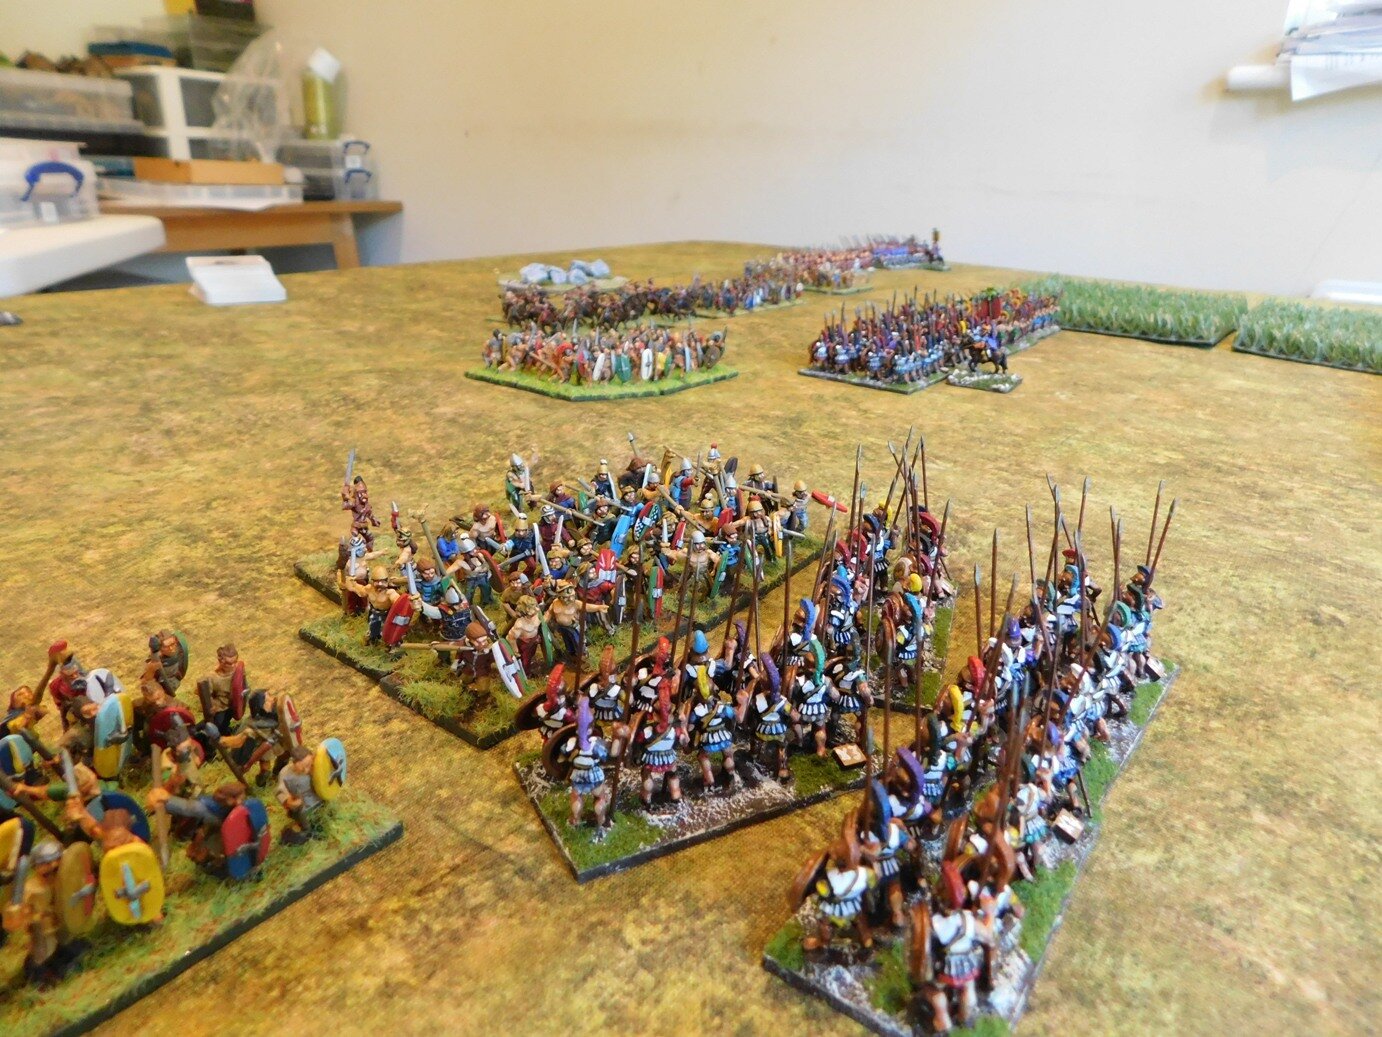
As predicted, the Greeks deployed in a largely straight line and spent the early stages of the battle manoeuvring around the patches of scrub and palm trees in order to keep their frontage solid as they came into longbow range.

opening stages

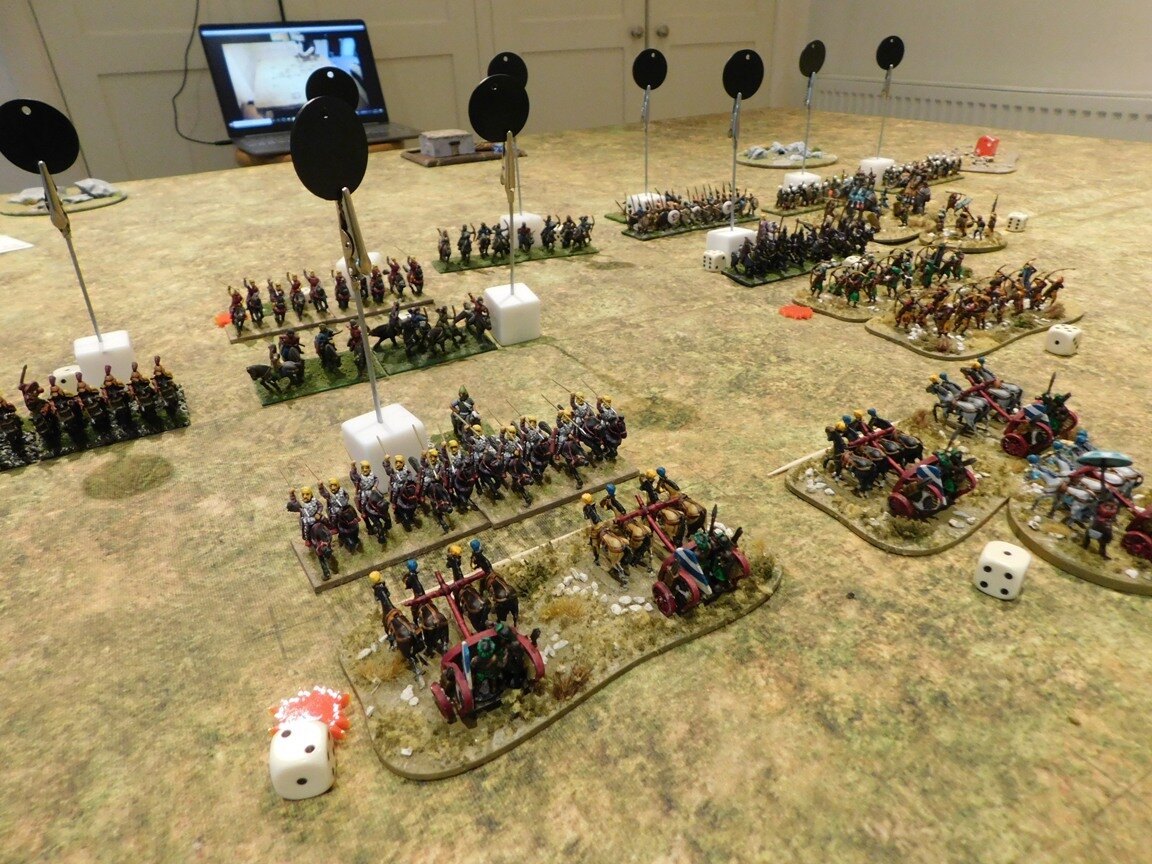
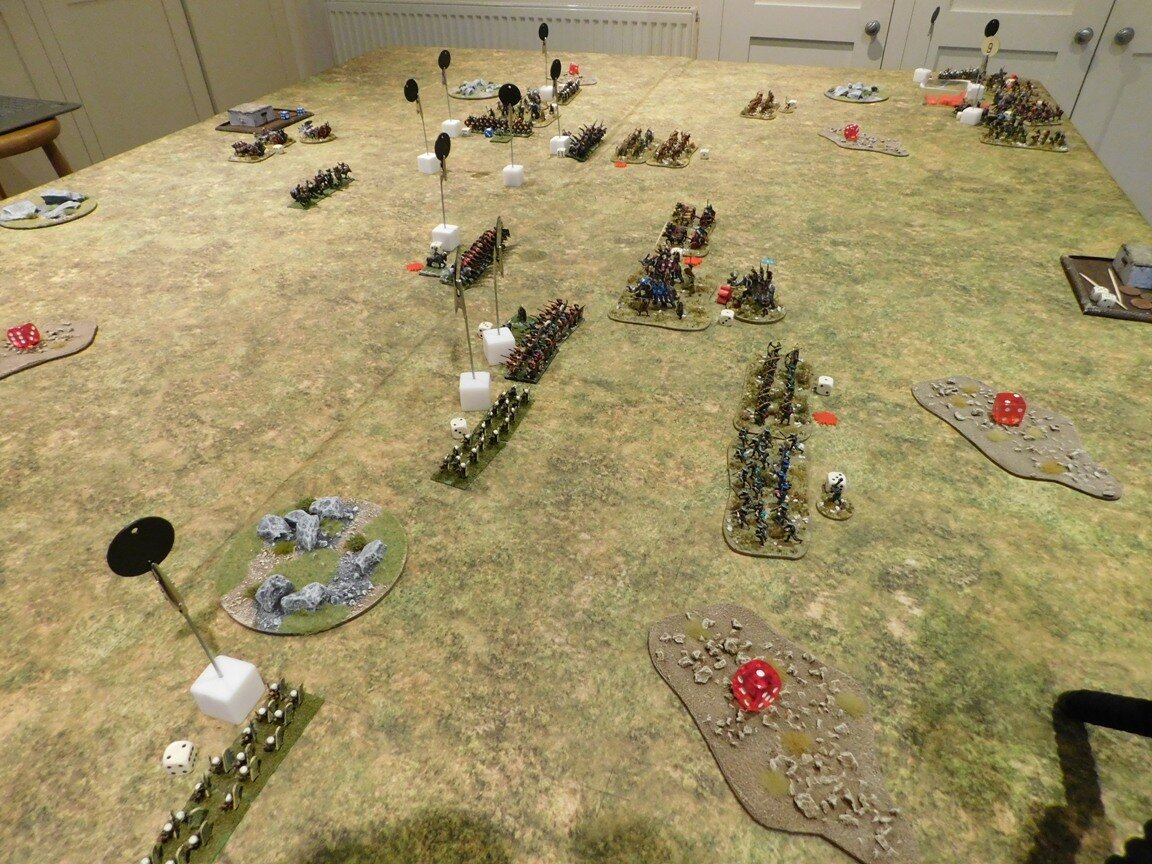
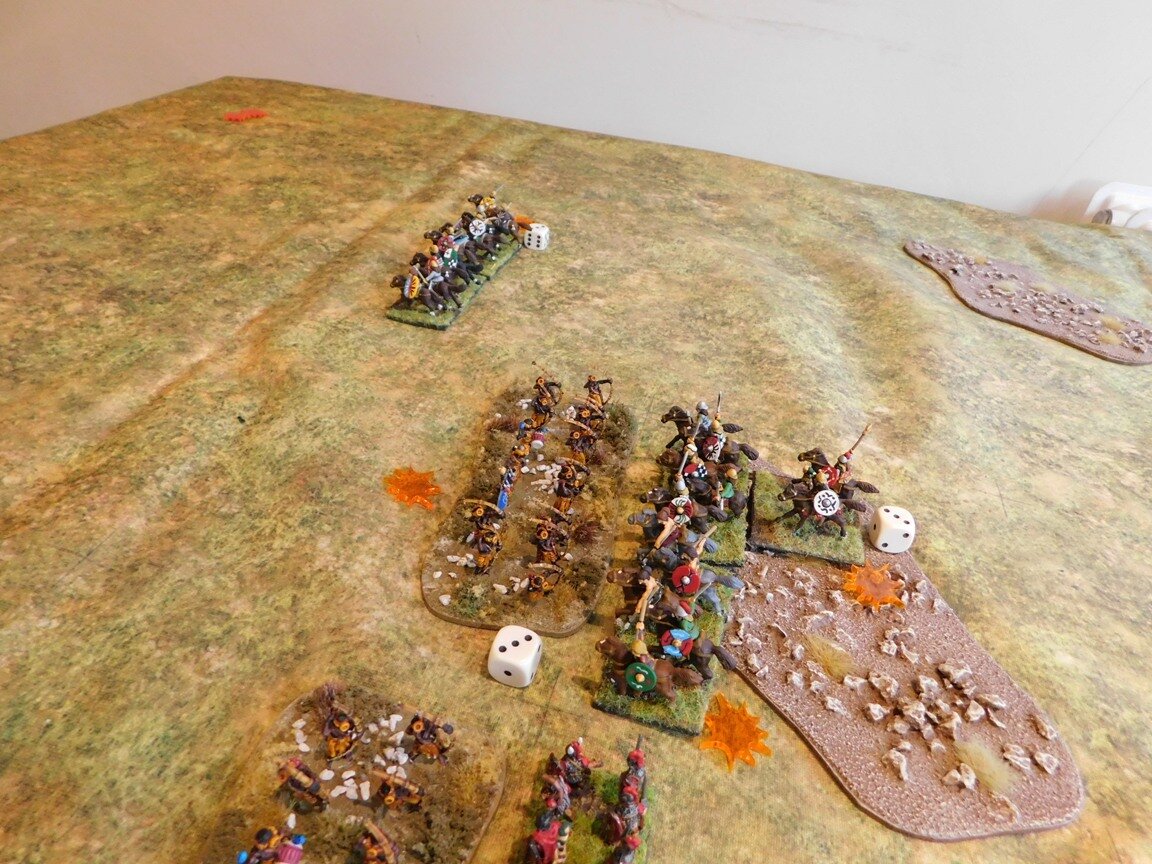
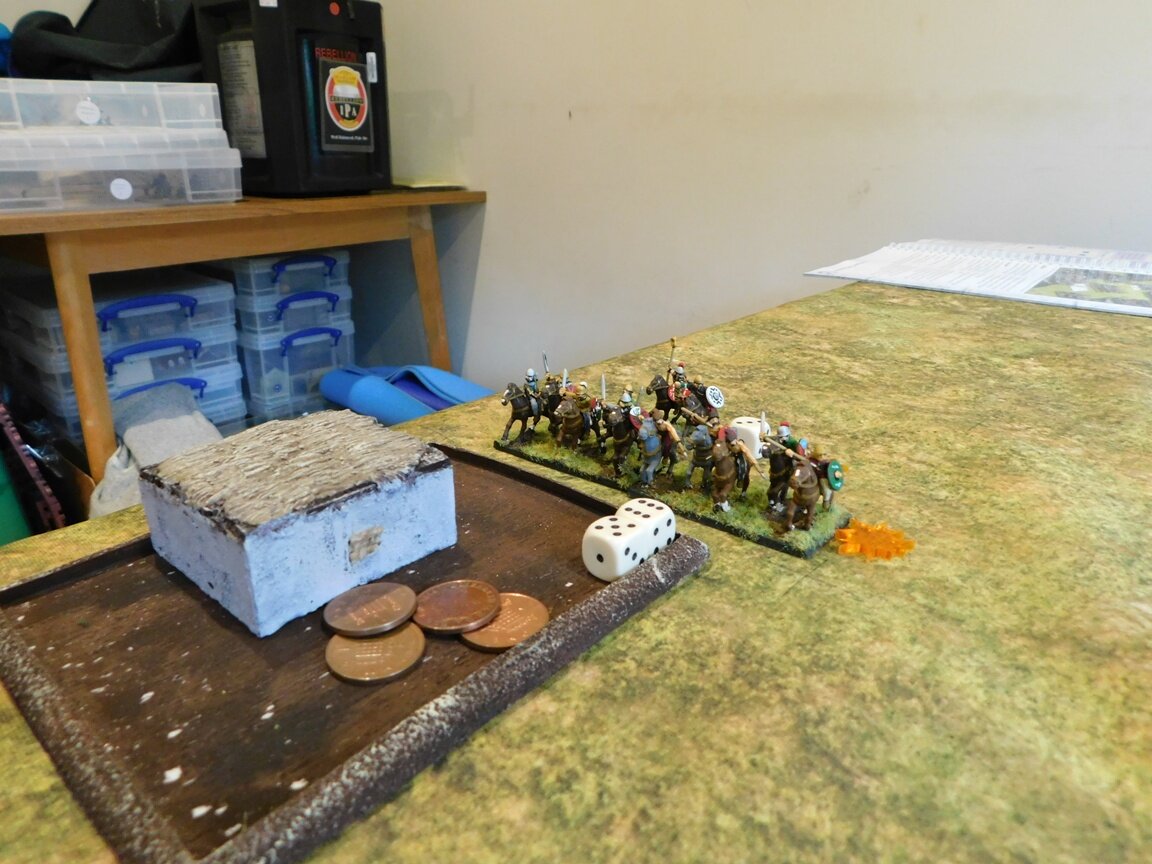
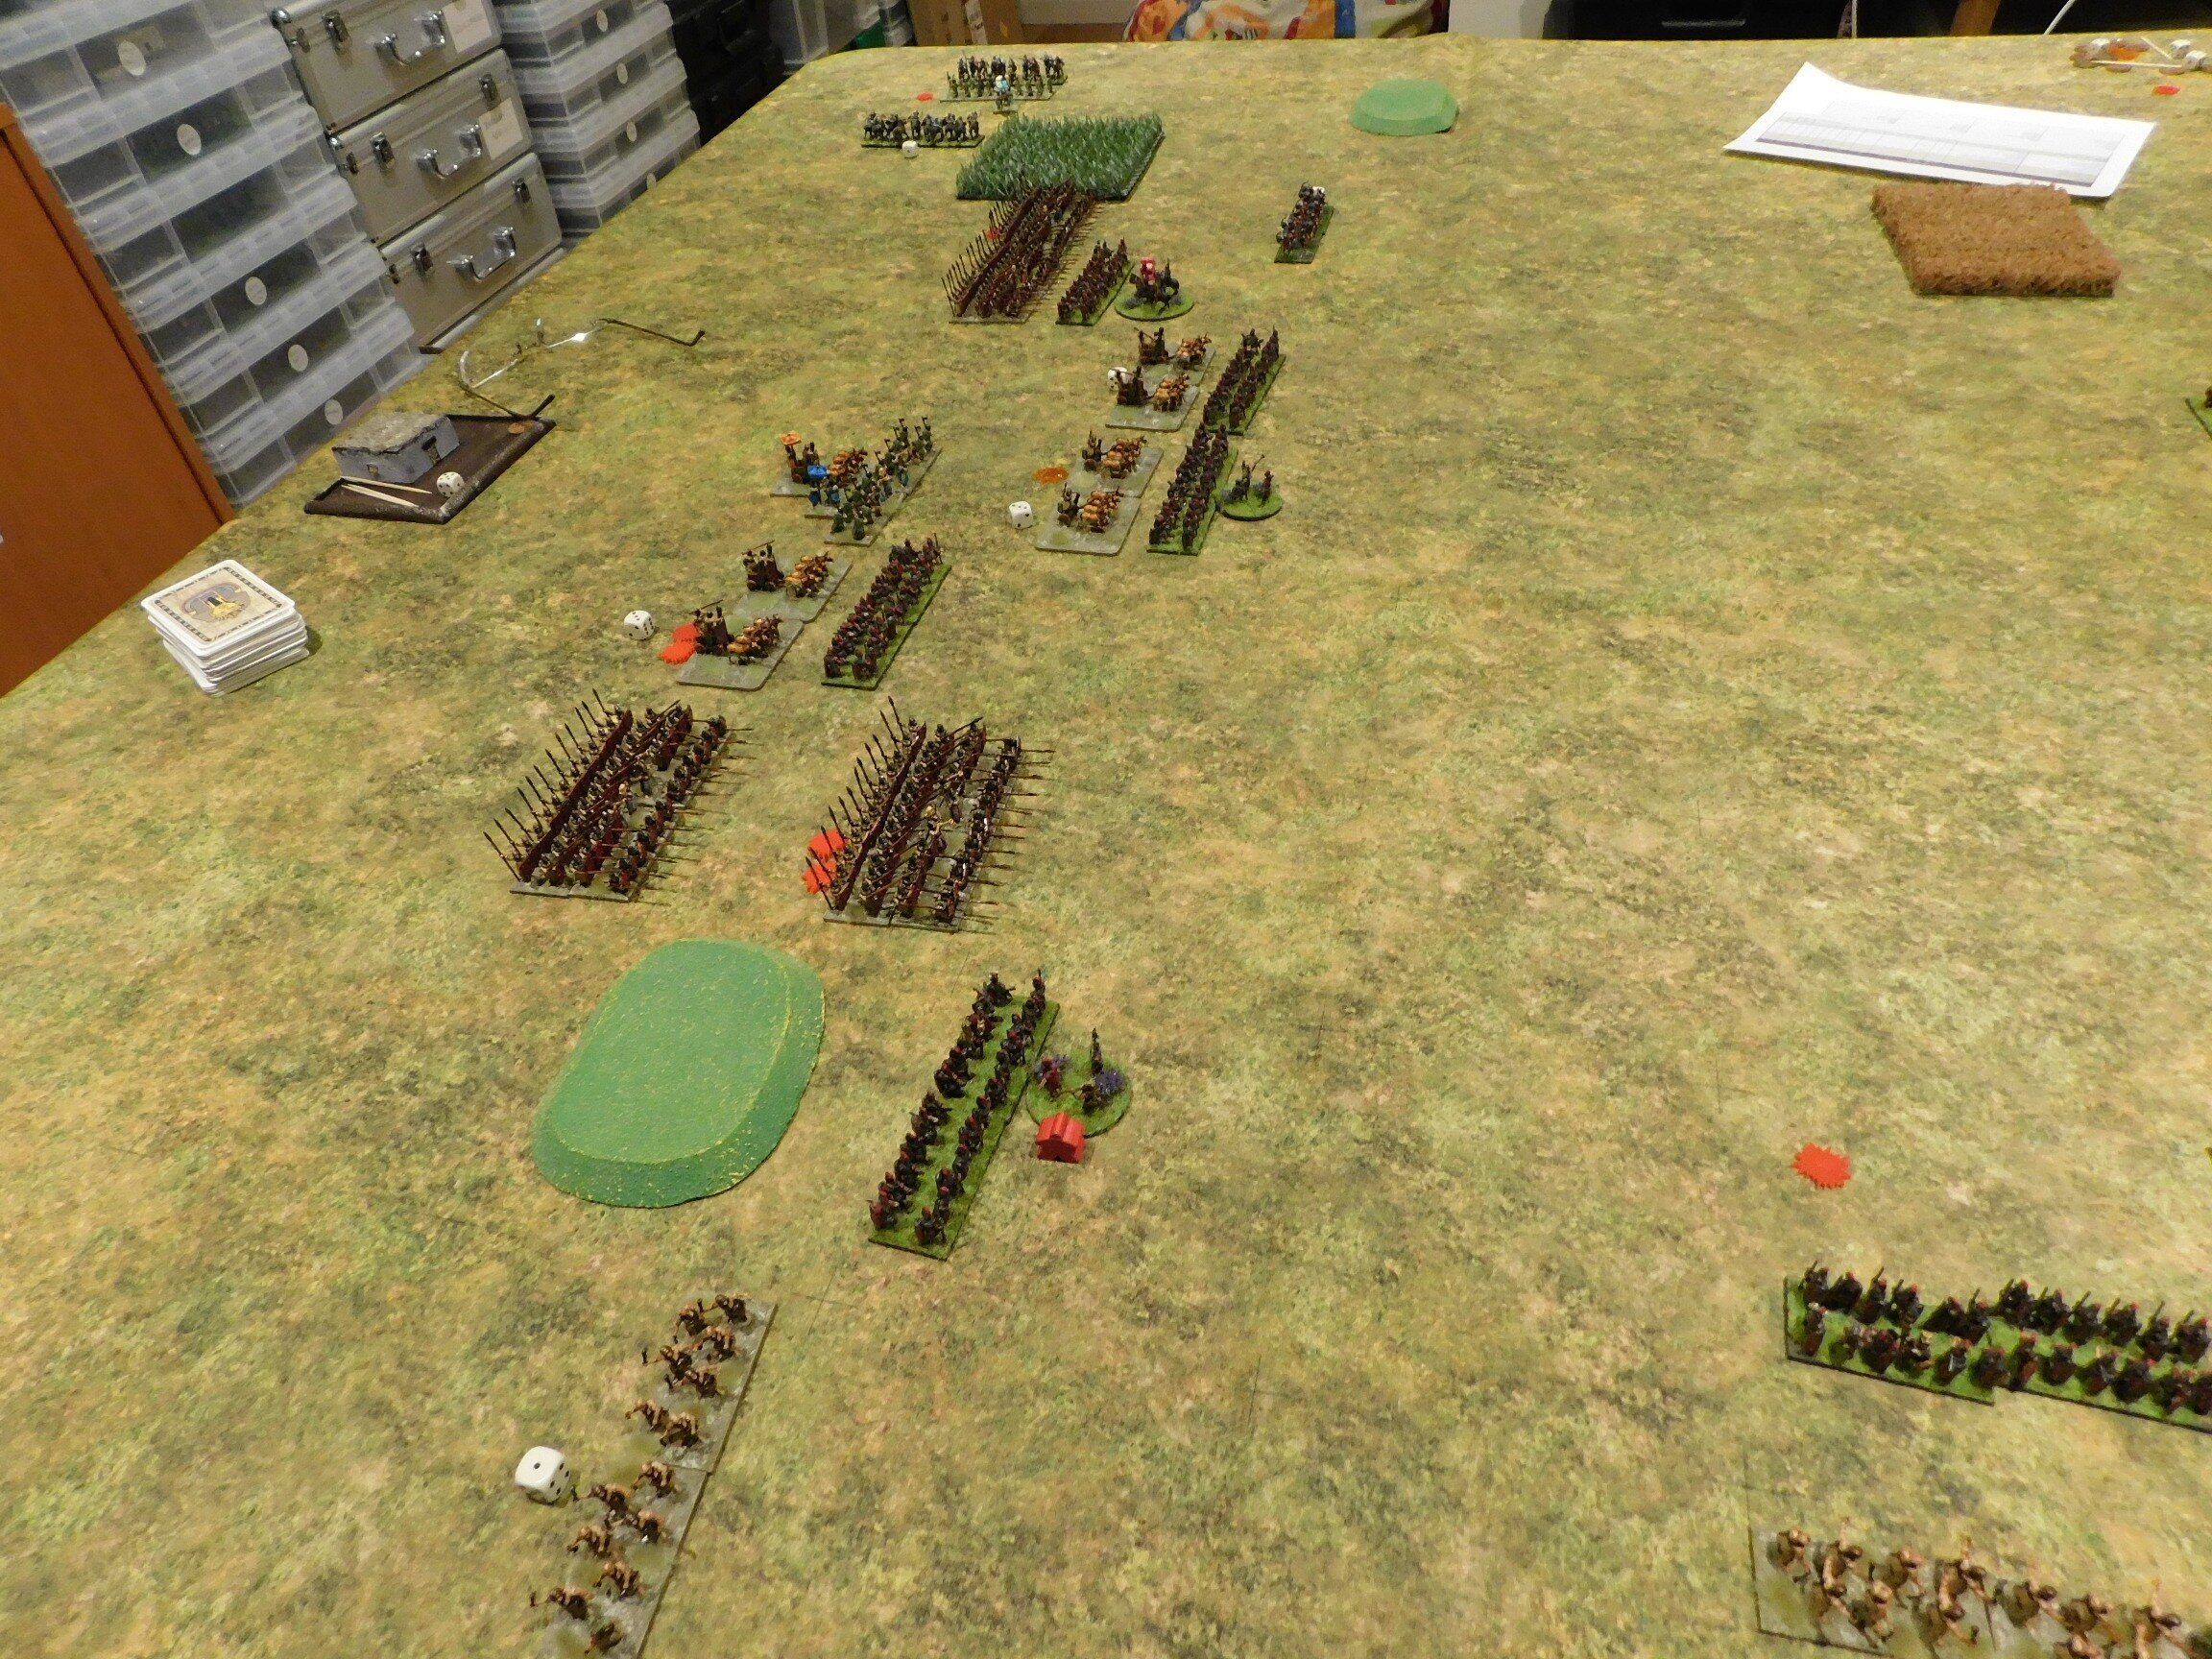
At one stage it did look as if the cards had opened up a couple of holes in the hoplite line and, given a little more lateral space and luck, I could perhaps have got one of my heavy chariot units through a gap and into his rear, but Bevan just managed to block my path on both occasions.

I really wanted to get through that gap!

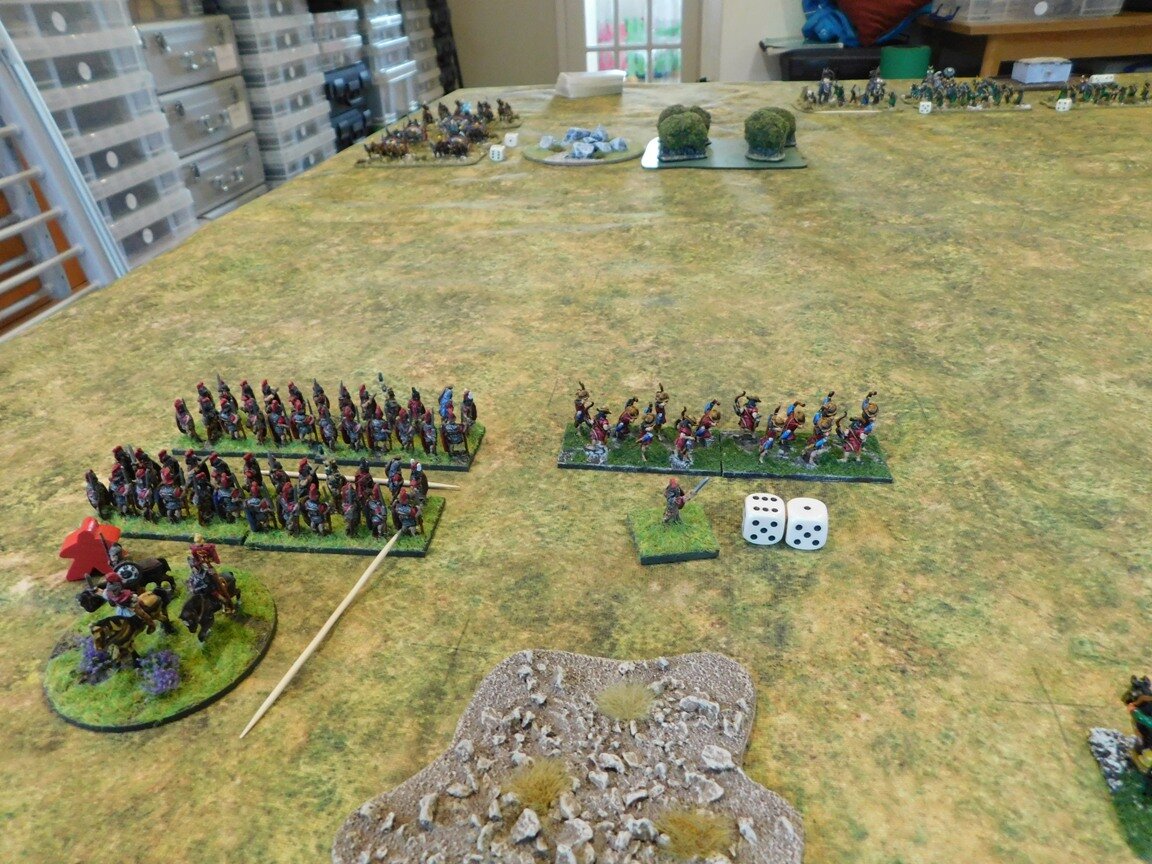
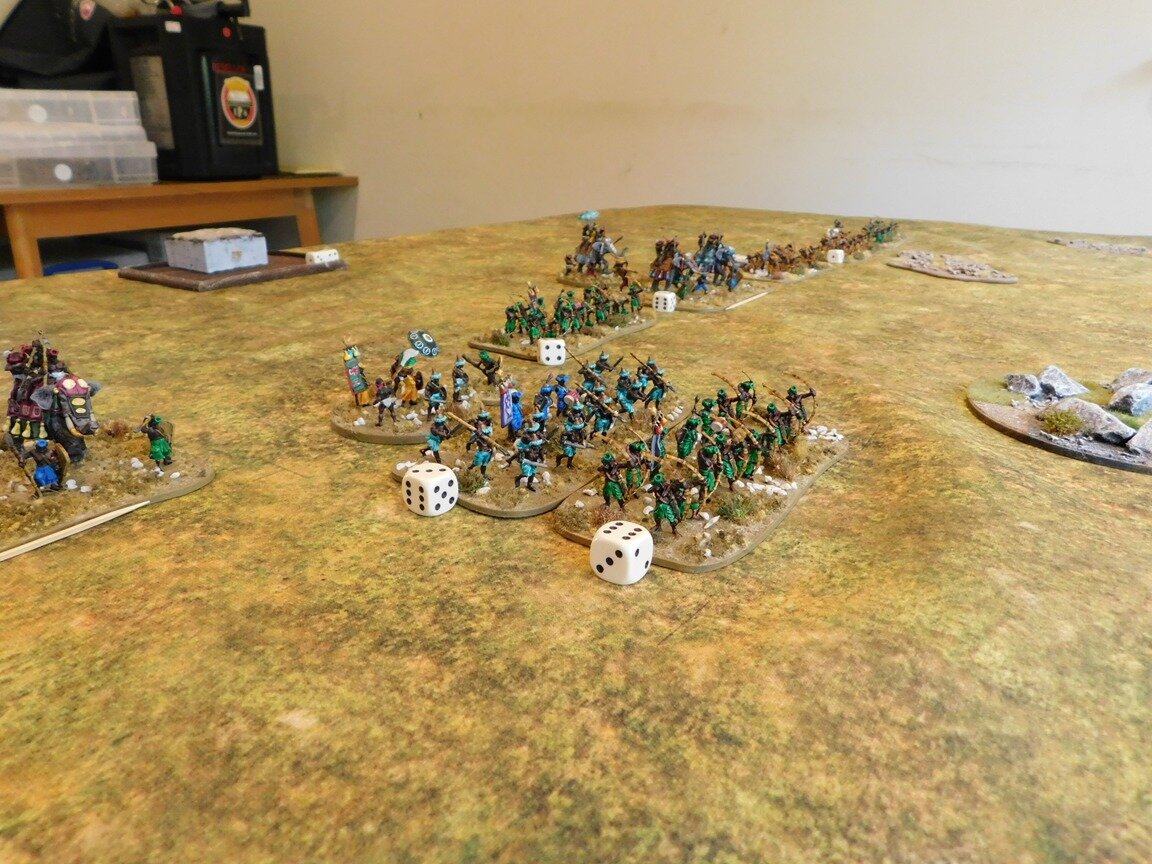
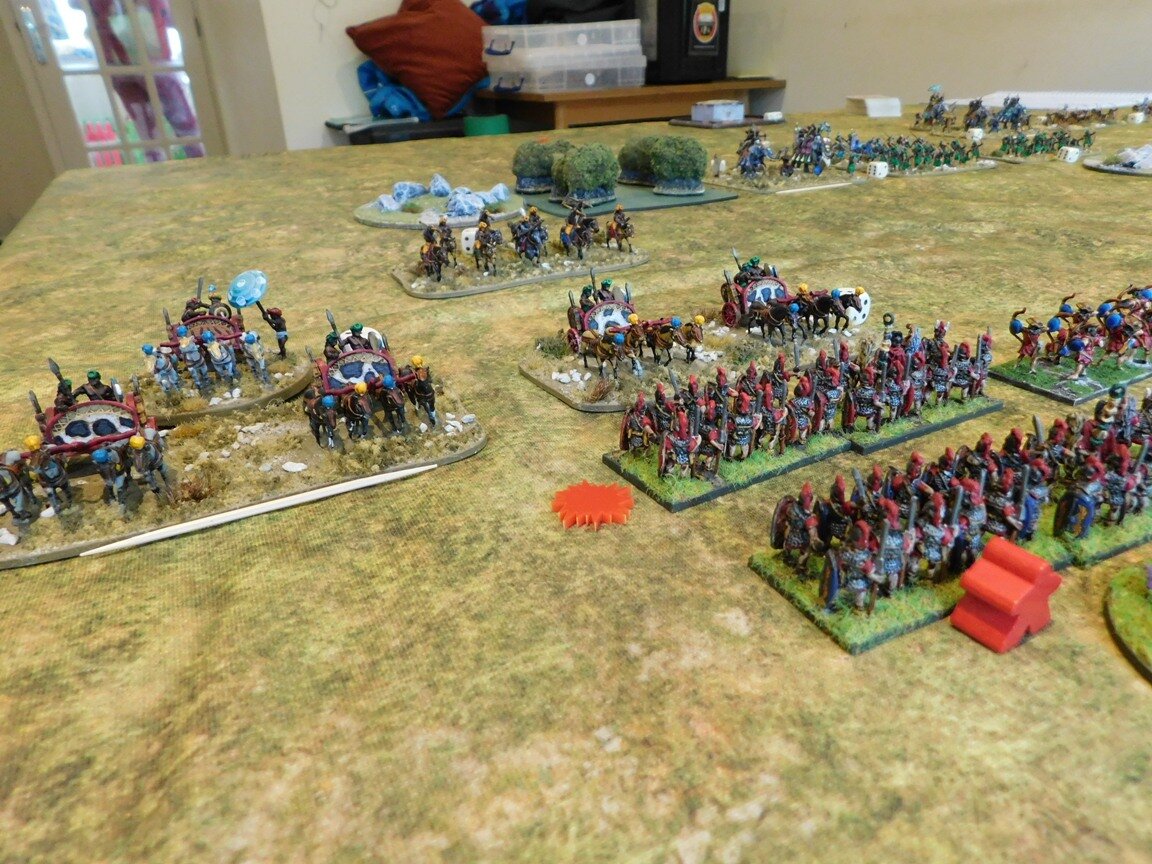
Finally the Greeks (and pseudo-Greeks!) arrived into longbow range, and my men opened fire. I was determined not to end the game with a camp-full of spare ammunition, so shot for all I was worth.

The Greeks staggered slightly, but came on. There were so many enemy units in an unbroken line that I couldn’t concentrate my fire, so although I could disorder or even double-disorder half his unit, I couldn’t quite break any.

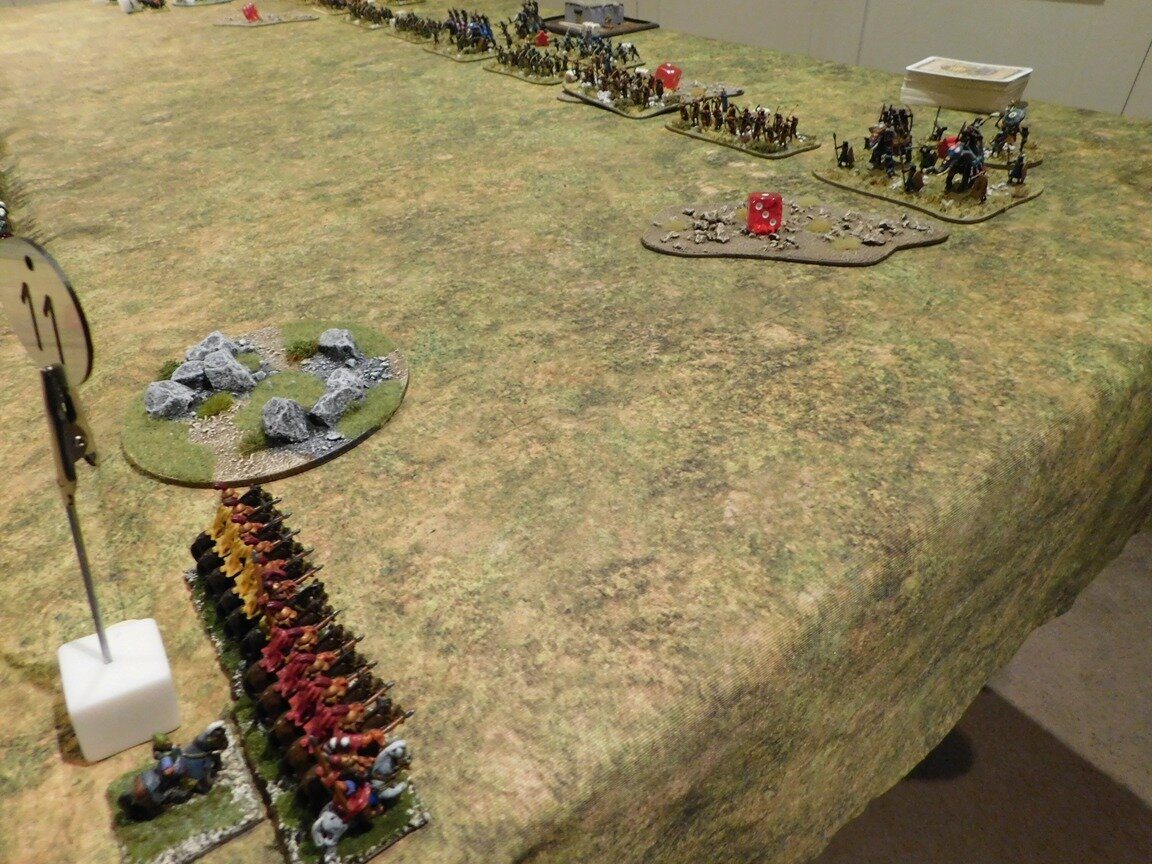
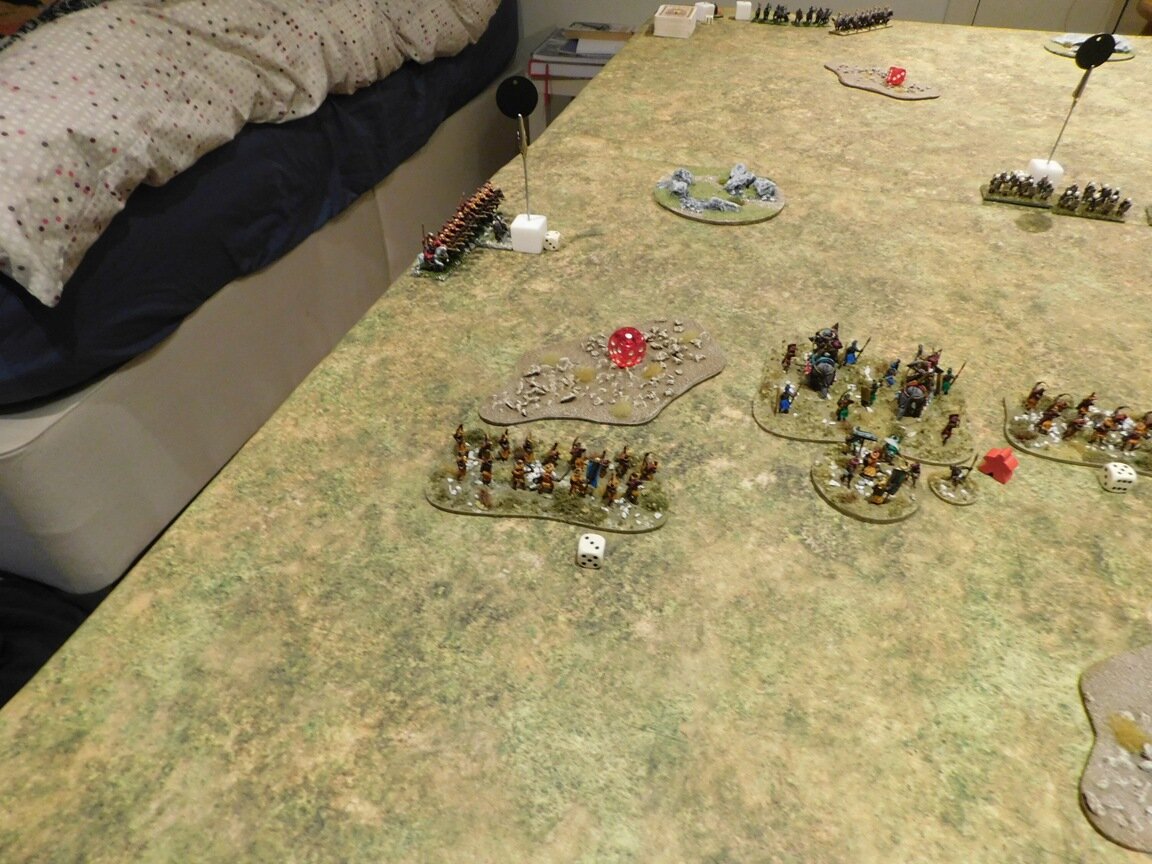
The View from the Other Side

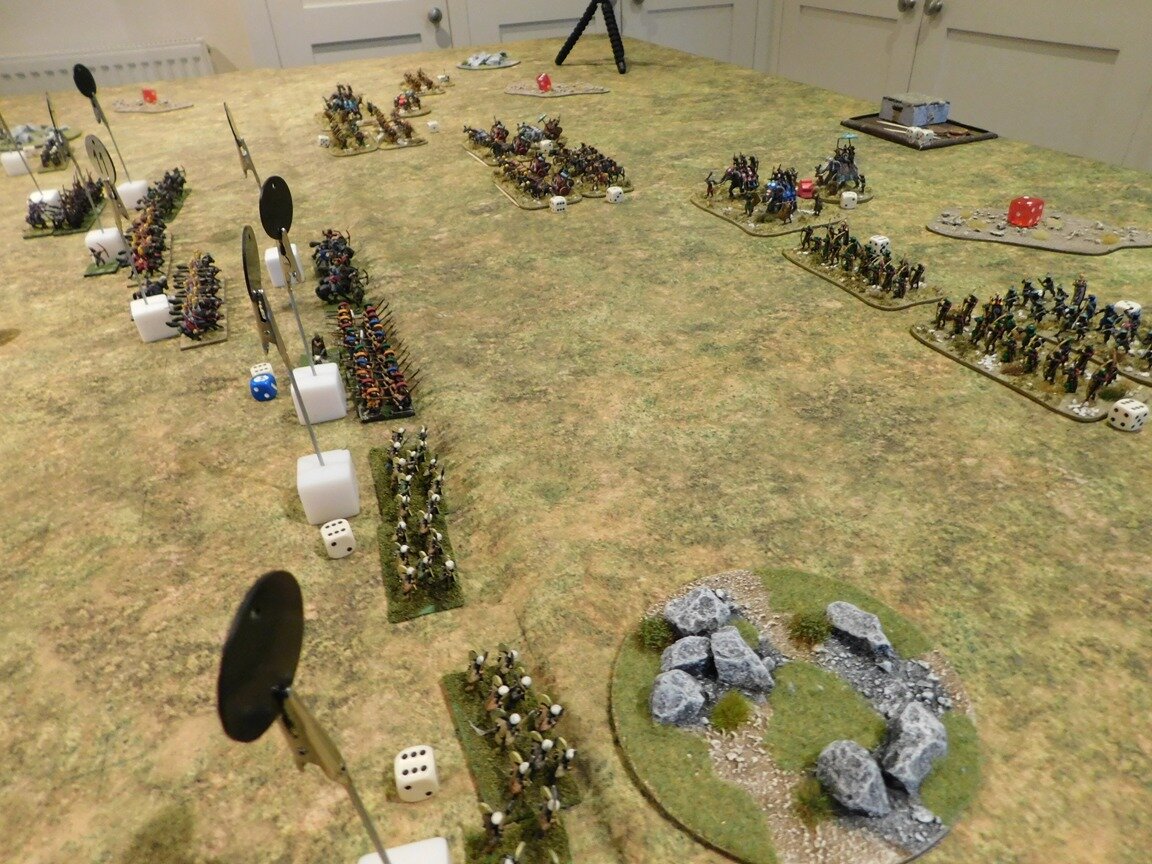
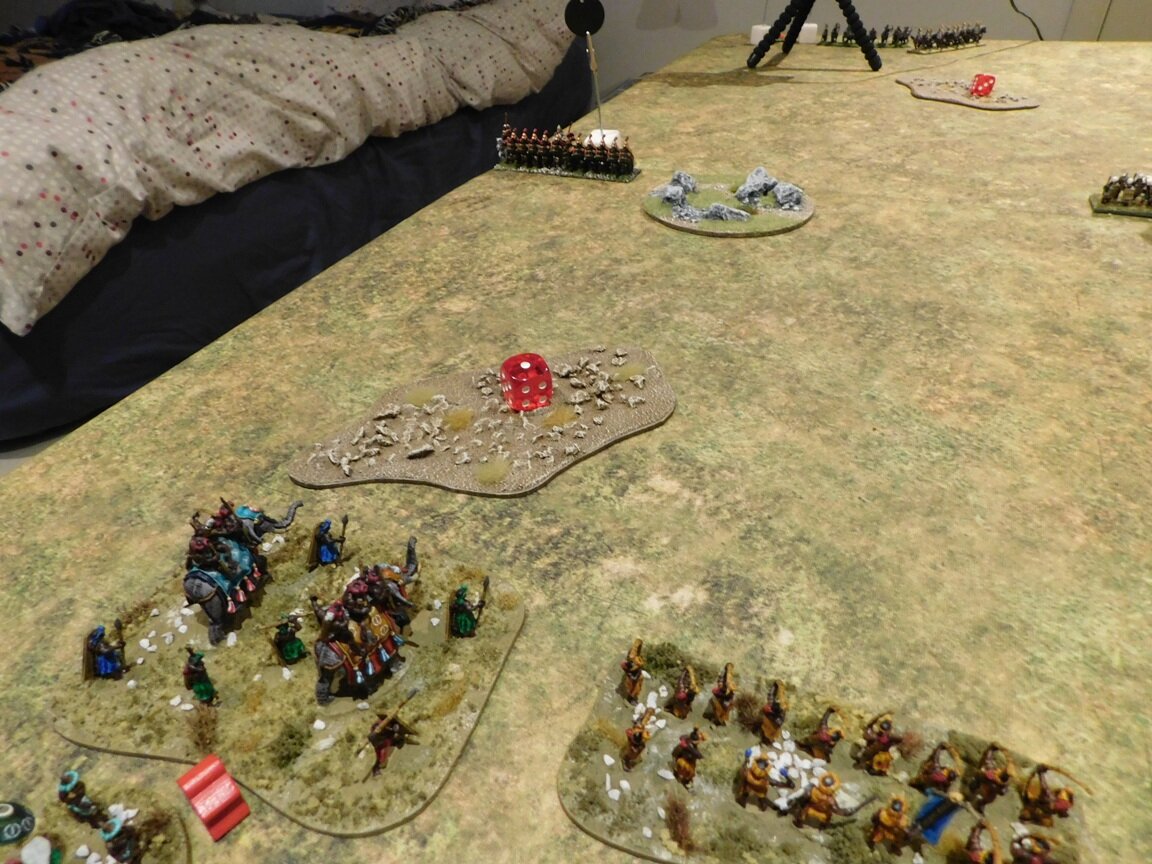
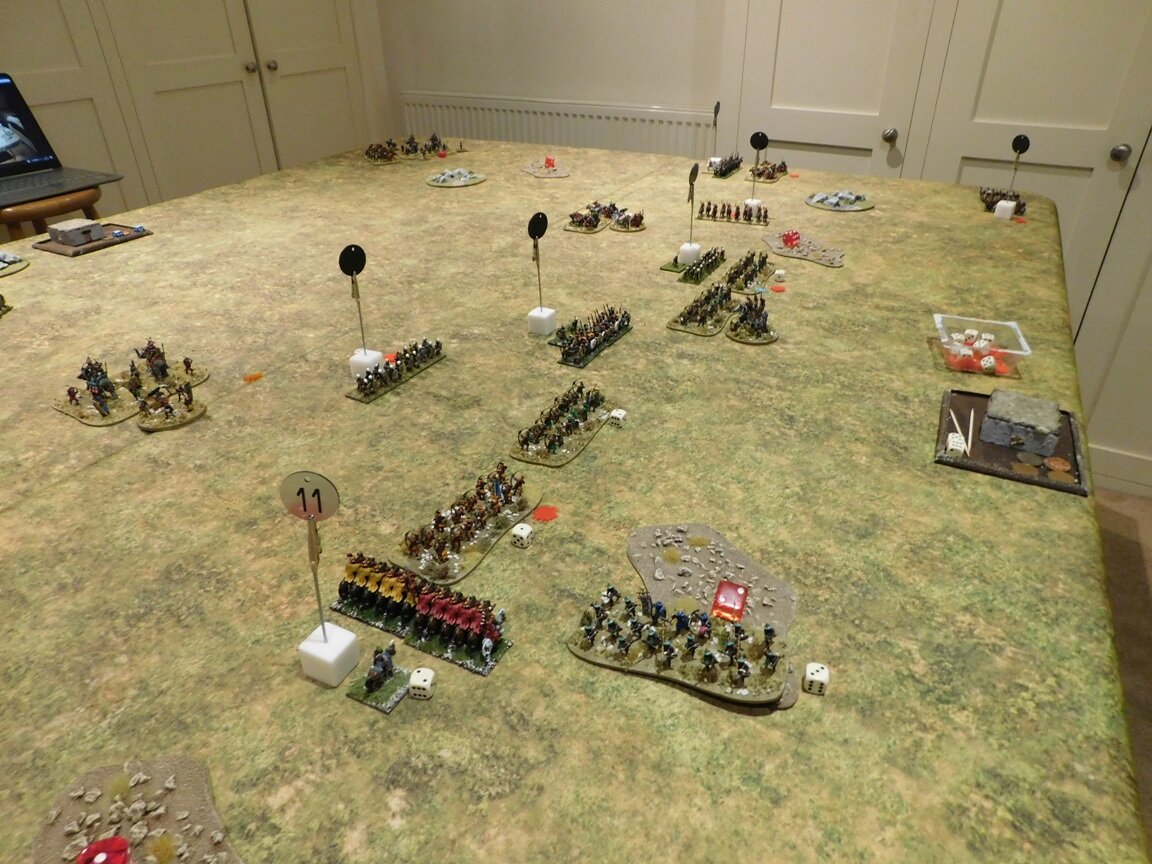
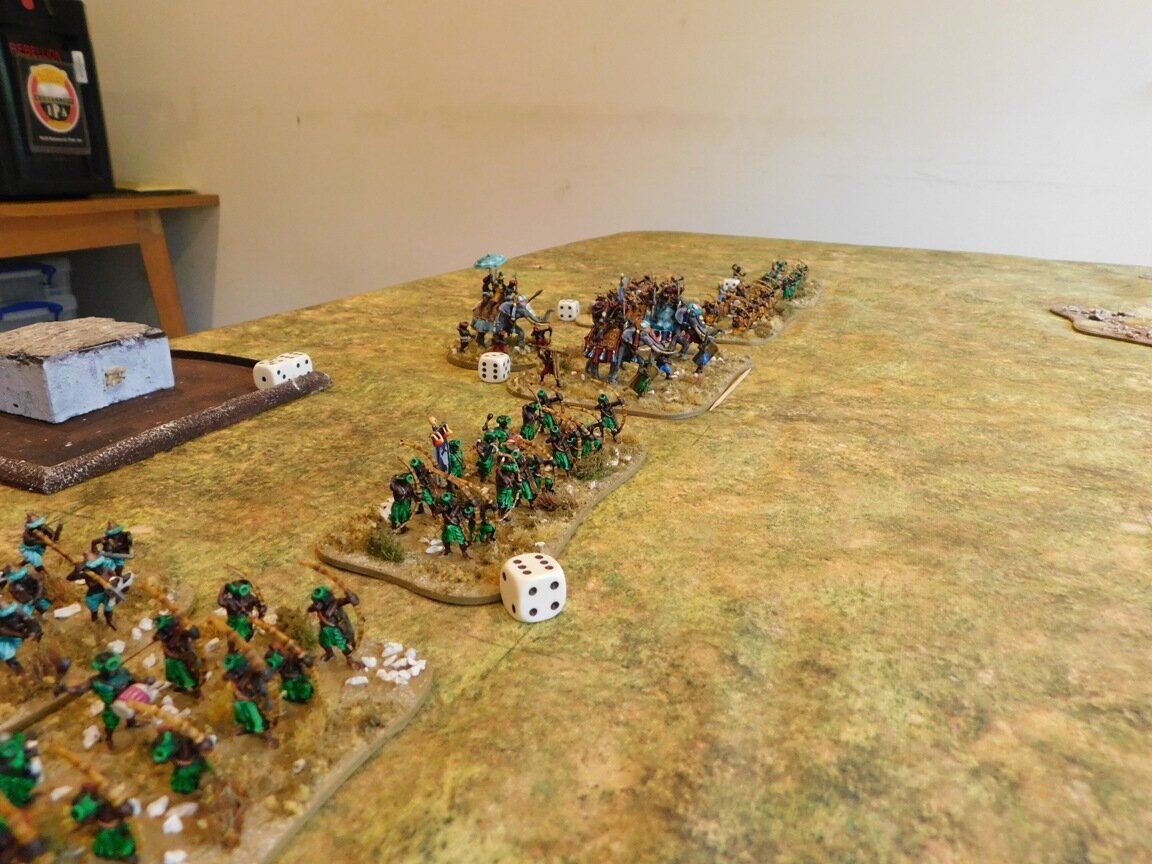
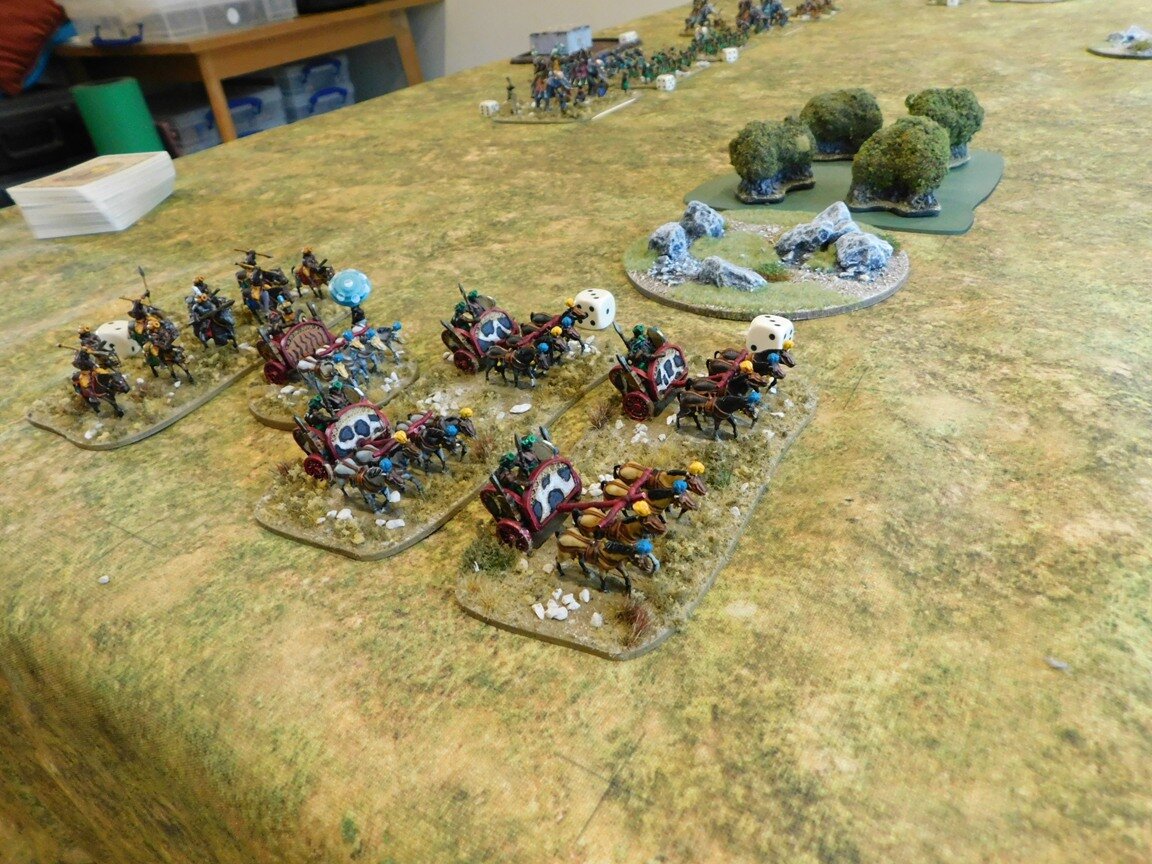
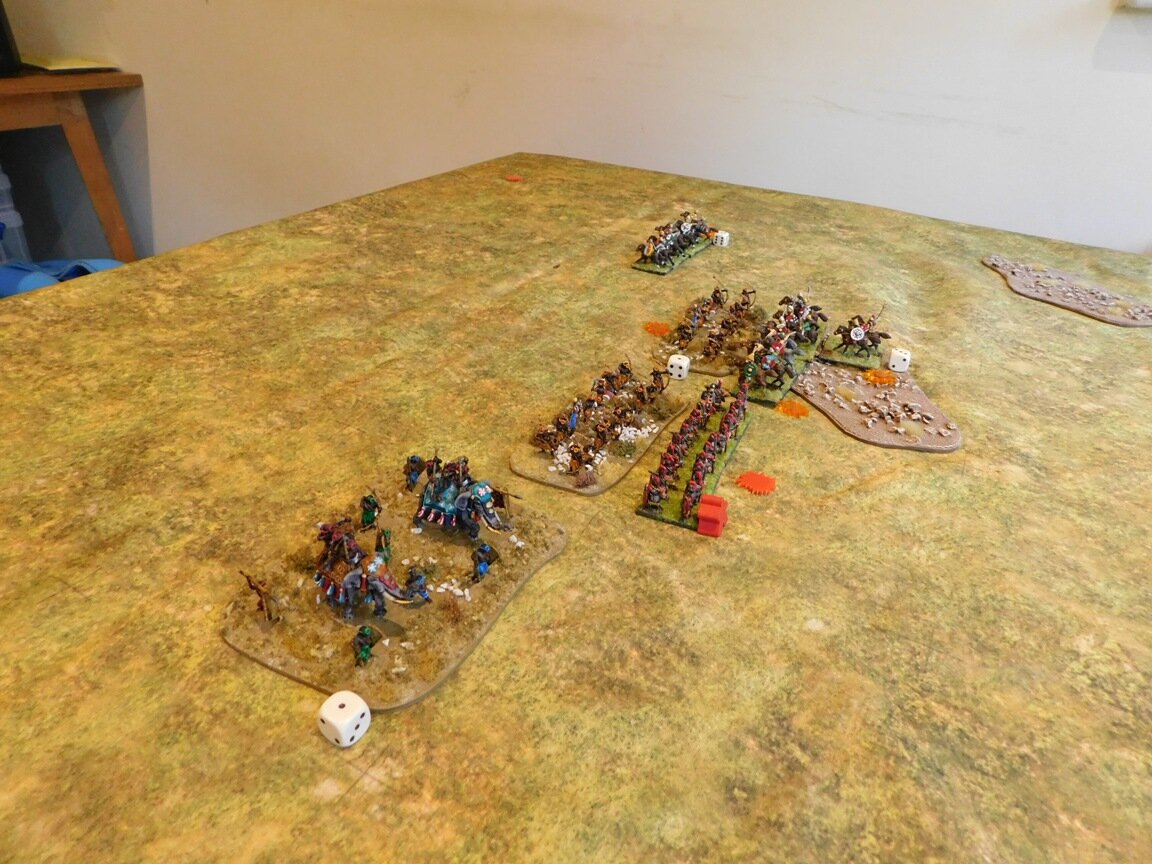
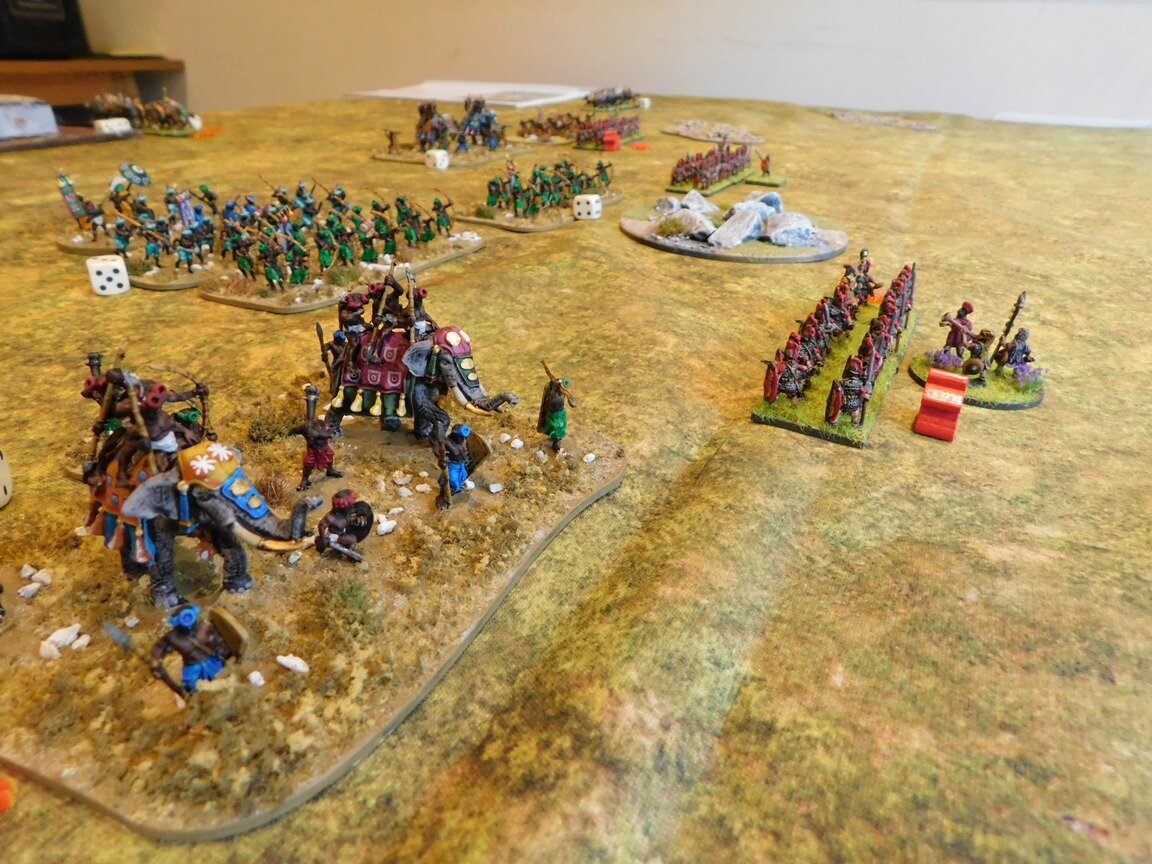
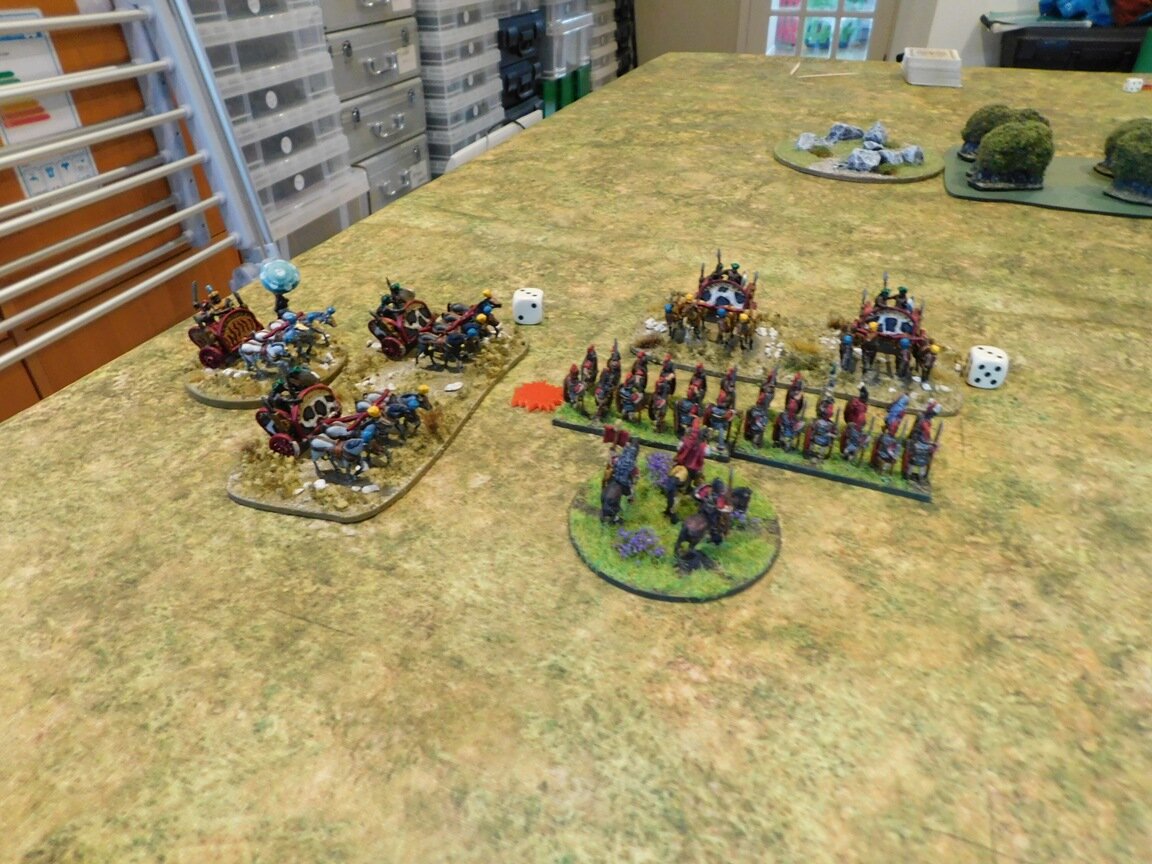
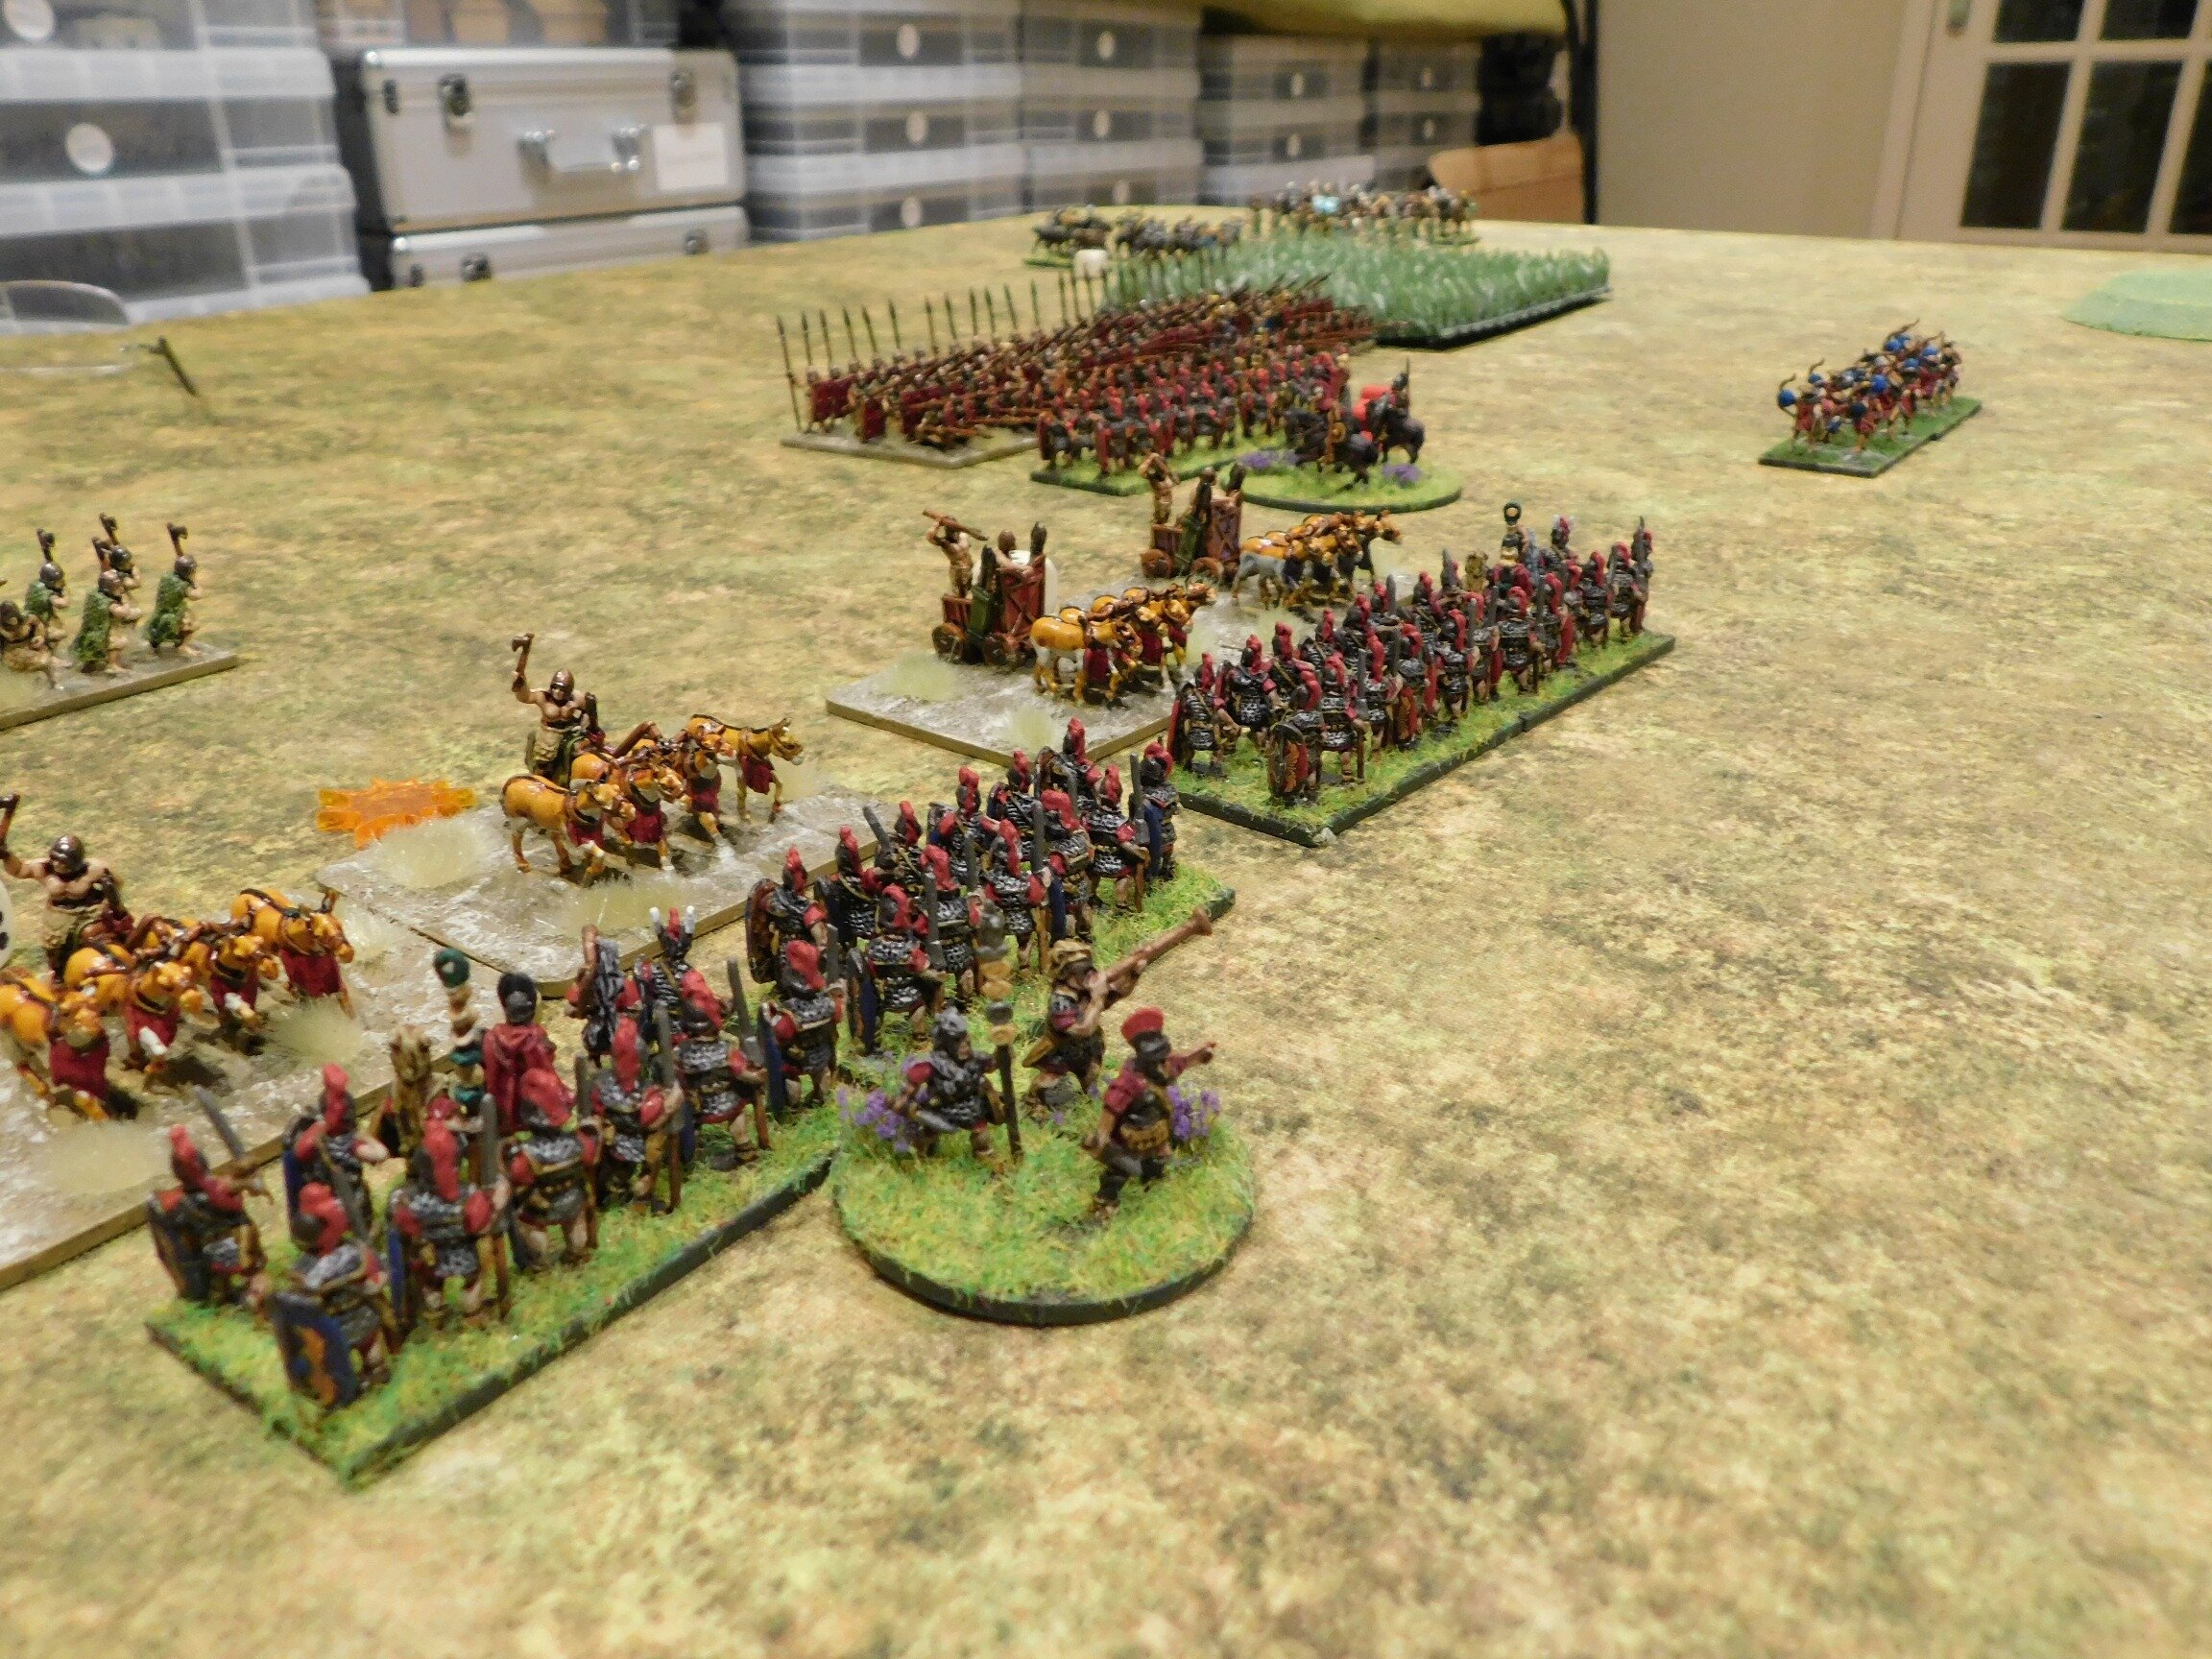
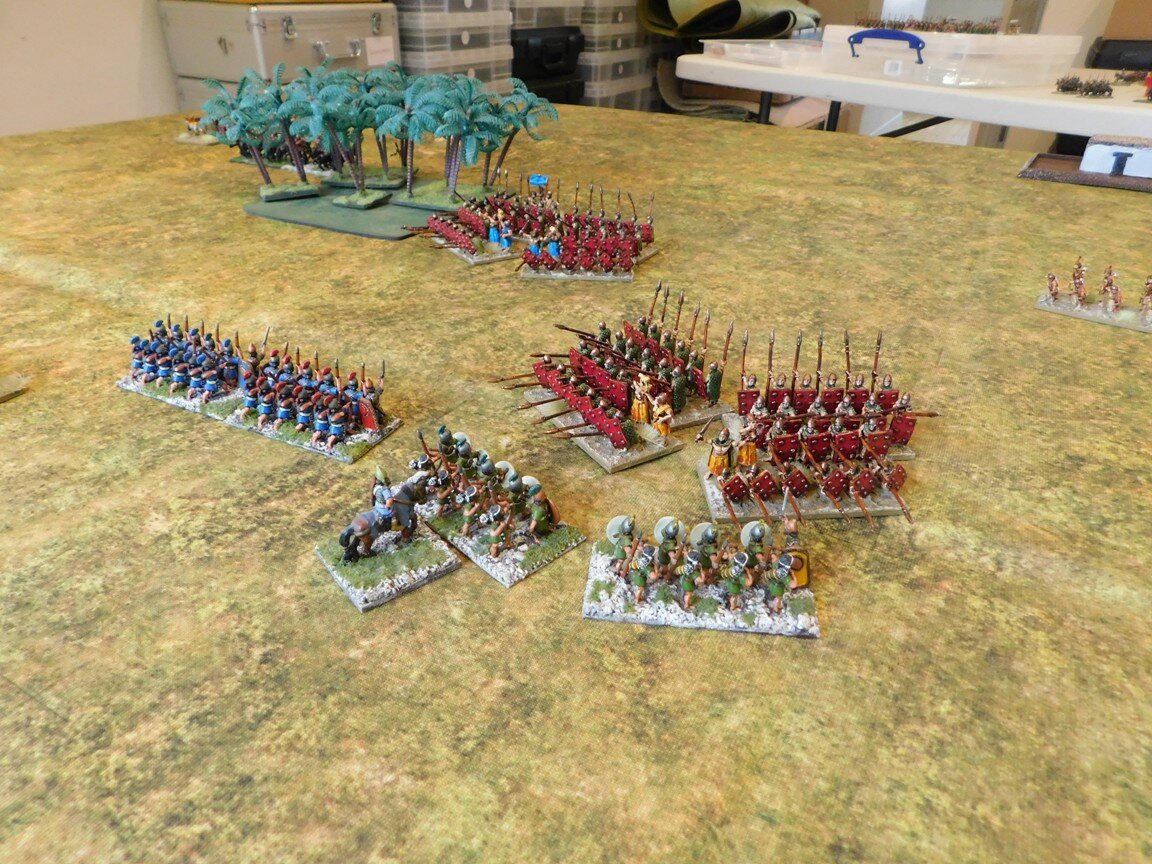
It was time to commit my melee troops, so forward trundled the elephants and chariots, wherever possible aiming at already-disordered enemy units.

Helicopter Viewpoint

Unfortunately, things followed the same pattern again: I disordered or double-disordered the four units I hit, but couldn’t quite manage the break, apart from one raw hoplite unit that did flee the field…but this was soon, space-invader like, replaced by another.

Damage, of course, was being done to both sides, but my troops only had two hits each as opposed to his three. I lost a unit of elephants (to what looked like the Spartans, no less), evening things up again, and the battle became one enormous melee.

Bye bye Nellies!

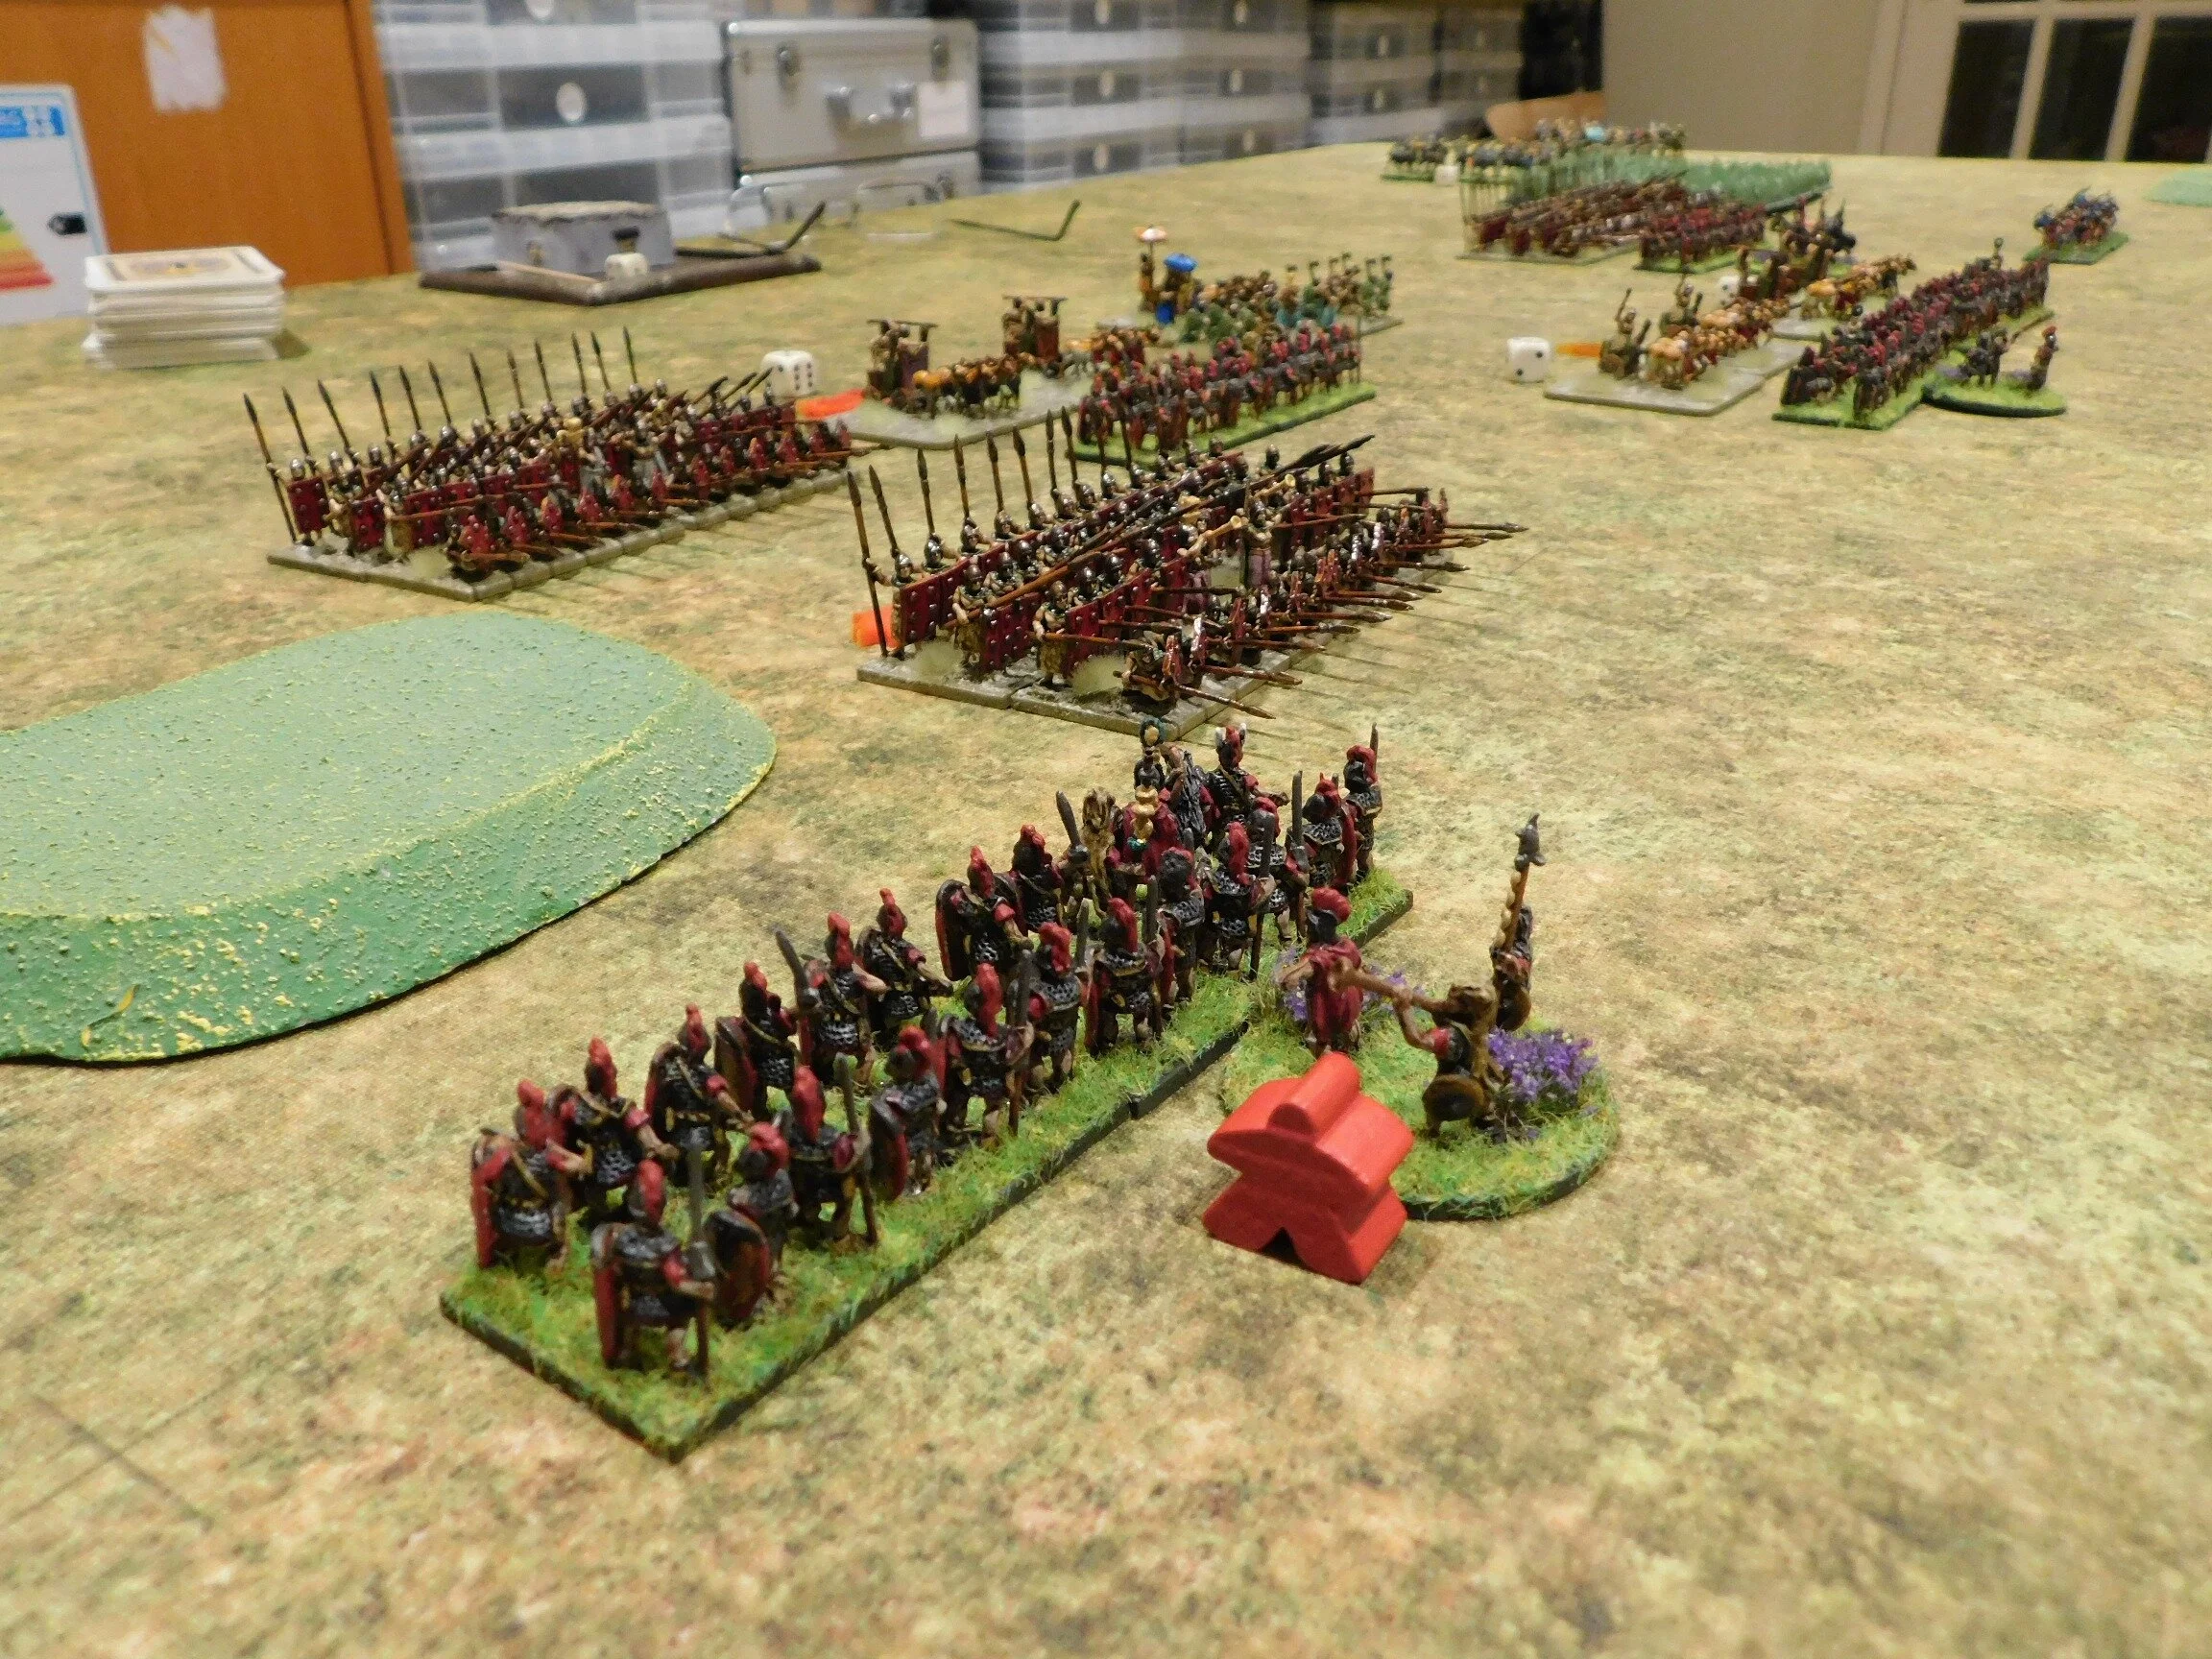
My men (and maidens) resisted bravely for a couple of rounds, another unit of hoplites was destroyed by one of my chariot units, but the writing was on the wall: I hadn’t done enough damage in the missile-fire stages of the game to win the grinding melee that followed.

I started steadily losing units, victory coins and eventually, the battle itself.

Aftermath

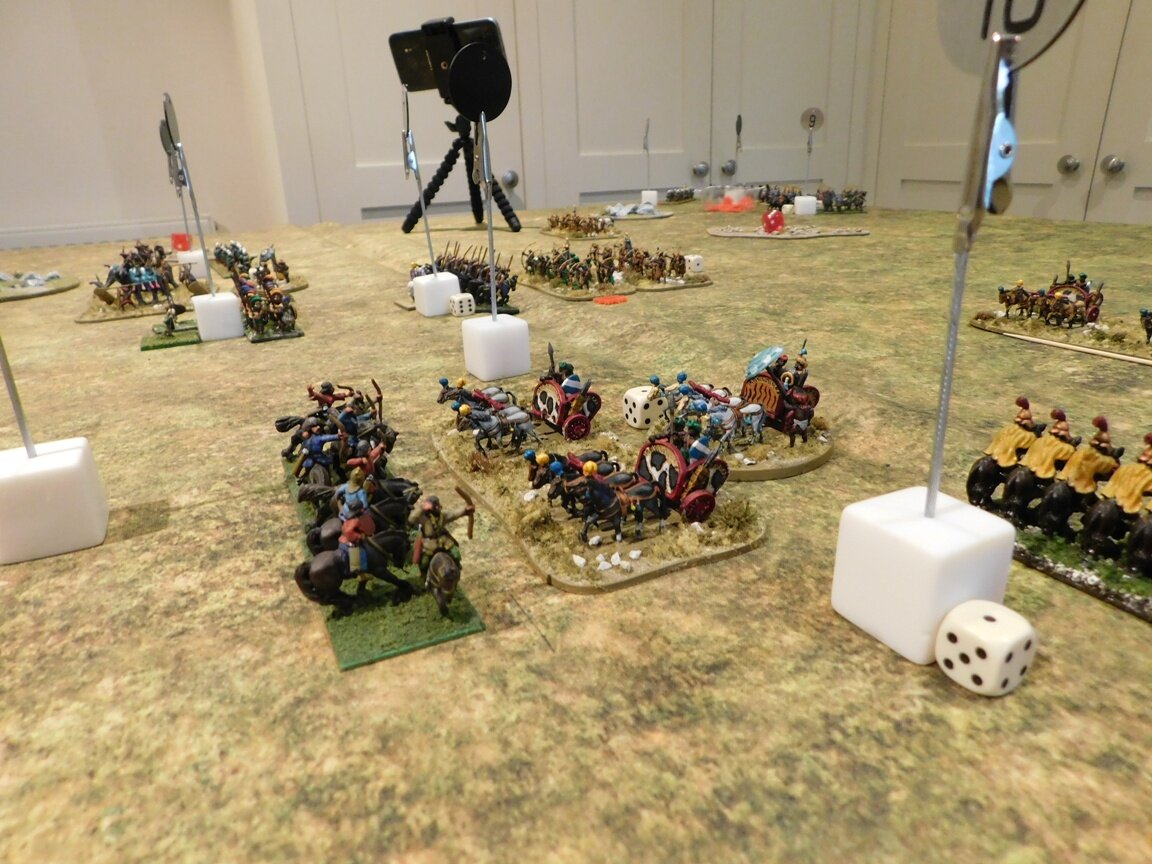
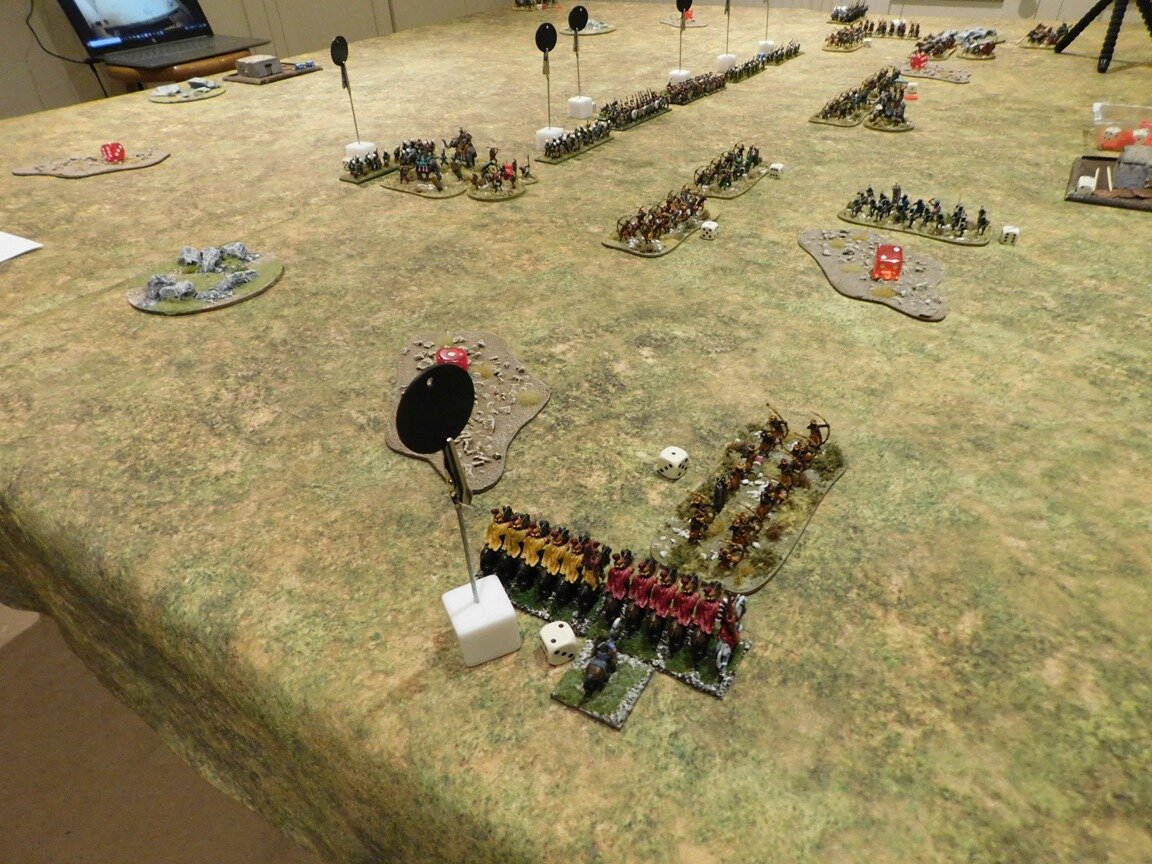
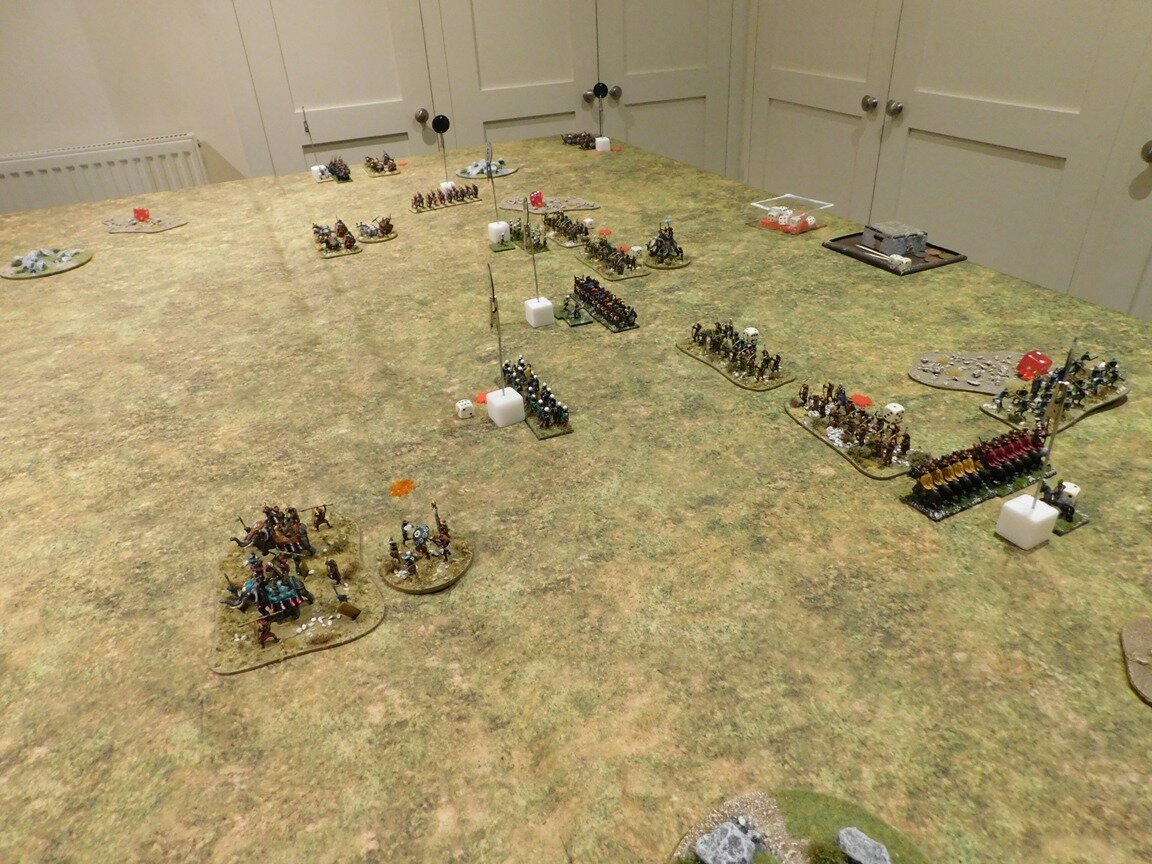
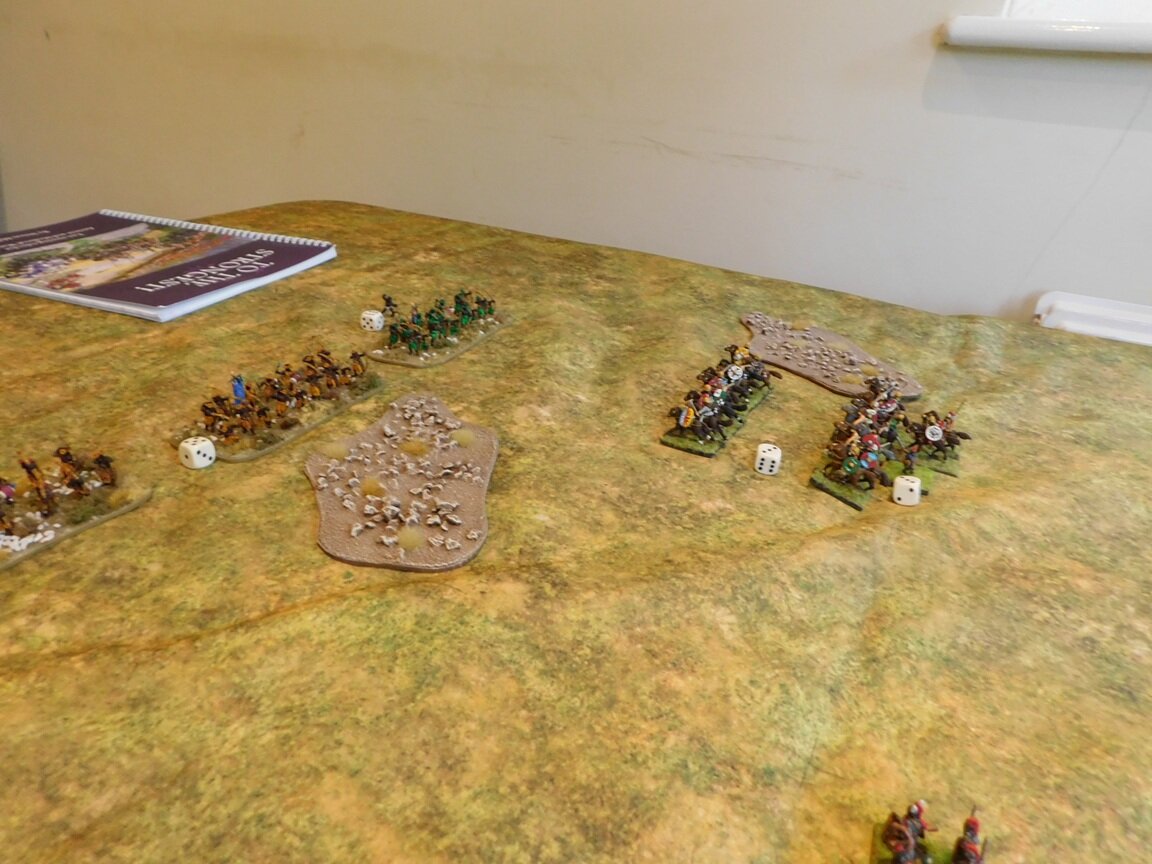
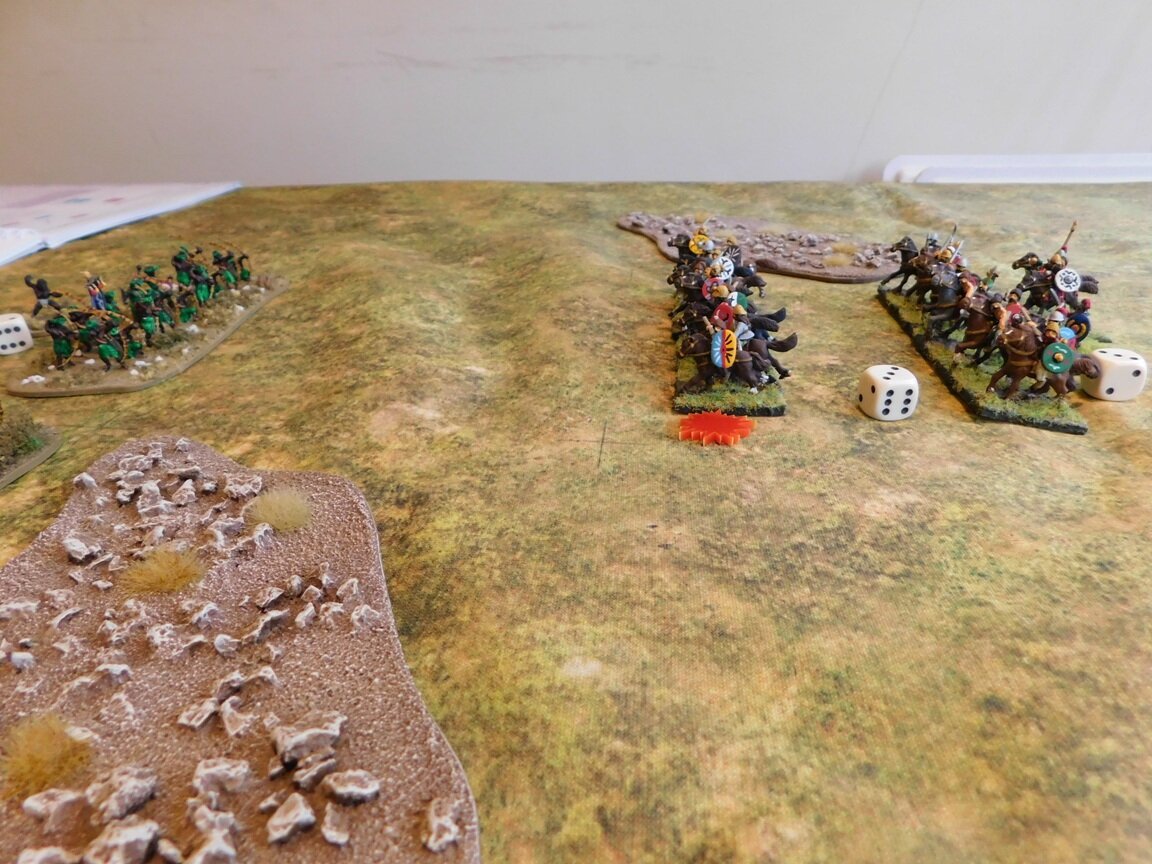
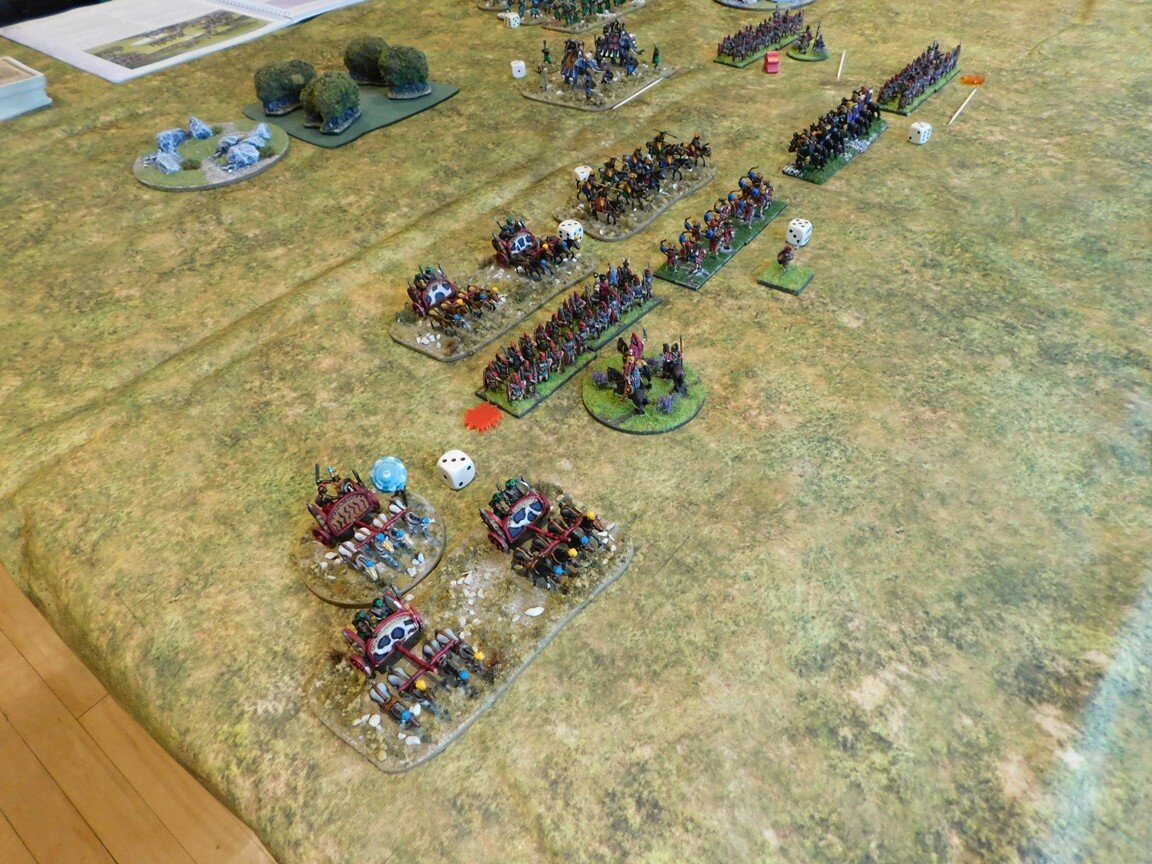
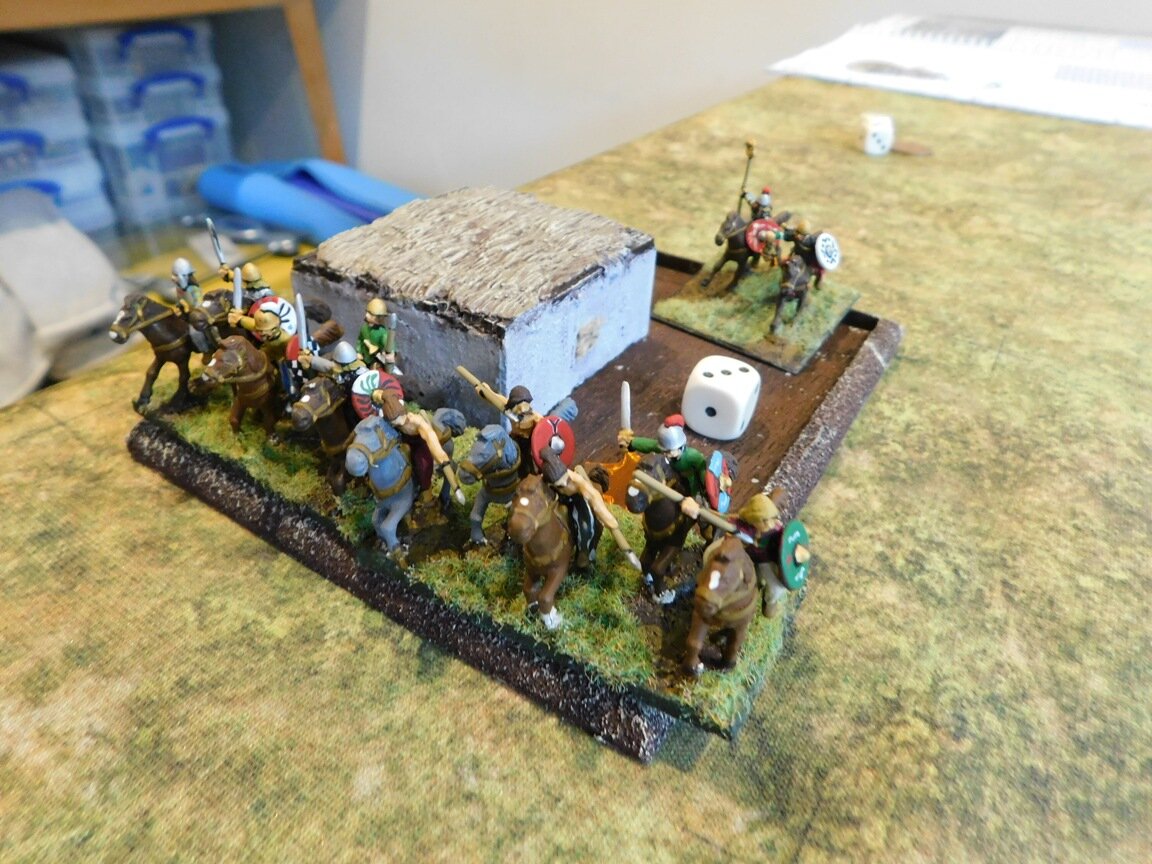
The game was actually a lot closer than the above implies. At one stage, I did actually manage to break his line with some chariots and had two more of his hoplite units on double-disorder. Unfortunately, the chariots couldn’t turn and get into the enemy rear in time, and I just couldn’t get the extra hit I needed to break the spearmen. I did use up all my spare ammunition though!

So a close run thing despite the apparent disparity in sides. My Classical Indians will lick their wounds and have another go in a few week’s time!

The far chariot unit has broken through, but too late to alter the outcome of the battle

Indian Cavalry Ride Out!

As mentioned in previous posts, I’m expanding my Classical Indians to embrace later Indian armies: the Graeco-Indians, Kushans and Indo-Scythians and so on.

A lot of the differences involve the decline of the chariot balanced by the ascent of the cavalryman leading, eventually, to the era of cataphract-like cavalry supported by lights.

Here then are a couple of units that allow me to begin to effect that change: two squadrons of Indian armoured horsemen:

As usual, these are the rather excellent Museum Miniatures CAD designed “Z” range of Classical Indians: very nice figures indeed. These were painted with a base coat of metallic paint washed with Agrax Earthshade and then highlighted. All non-metals are Contrast paints.

TTS AAR: The Last Zoom Battle

Regular visitors will know that last time I faced Bevan’s Galatians with my Marian Romans, things started well but finished very badly: one devastatingly bad turn (I blame the cards, my figures blame me) led to an absolute thumping for Caesar and his men. It was now time for the re-match in what, I hope, will be my last game over Zoom as we all return to face-to-face gaming.

The Galatians: eight warbands of deep, fanatical infantry and a couple of tasty cavalry units. More heroes than The Expendables.

The Marian Romans: six units of veteran legionaries, a unit of legionary cavalry, three units of lights.

Learnings

I had learnt three things from my last encounter.

Firstly, don’t fight right in front of your camps: you might need a bit of room to pull back and rally and the Galatians are bound to punch at least one hole in your line so you need to make sure that any (unwieldy) warbands that have got through the gap take a lot of time to take your victory-points-rich camps.

Secondly, don’t face your light cavalry off against their cavalry: use their comparative manoeuvrability to keep some of their warbands occupied.

Finally, use the comparative manoeuvrability of your legionary units to get a temporary two-to-one advantage wherever possible. You need to do three hits to break a warband, so to break a warband in one turn will need the attacks of at least two units.

Armed with these nuggets of undoubtedly game-winning information, I logged on to Zoom and prepared for battle.

The Game

I had the initiative so advanced my line forward as fast as possible. The Galatians did the same, but in a somewhat more raggedy manner: no nice, straight, Roman lines for these barbarians.

I protected my left flank against a cheeky cavalry lap around by keeping one of my legionary units back from the main line. This made it difficult for the extra cavalry unit (bottom, left in the left-hand picture above) to either get past the unit and into my rear or to threaten the flank of the main line.

On the other flank, my two light cavalry units (the Persian types with the sandy bases) faced off against the warbands positioned far out on the Galatian left, with my legionary cavalry bolstering the line of legionaries. I’ve no idea why one of my legionary units has hung back: perhaps I thought this might temp a charge from one of his and allow me a to-the-rescue flank attack!

The Two Lines Clash!

The two lines began to come together with a mighty clash!

Last game I had pussy-footed around with my legionaries and allowed the Galatians to recover from their advance and hit me in a nice straight line. This time, as you can see from the pictures above, I had advanced forward smartly myself and was in a situation where my main line could get an overlap on the (my) right hand side of the four warbands that had advanced slightly in front of the others i.e. I could get the 2:1 advantage I needed on one of his warbands.

This duly happened, and even better than I expected. My lagging legionary unit came forward and conformed with the main line, giving me six units: L/L/L/L/L/C. One of his central warbands came forward giving him a line of five units: C/W/W/W/W. I was, I admit, a bit lucky in that his other central warband hung back!

The five legionary units that matched up with a warband performed as expected, disordering but not breaking the Galatians in front of them, two being coming disordered in return, but the overlapping legionary cavalry then smashed the warband they overlapped from the field!

This punched a hole in the Galatian line which my cavalry then charged in to. Pausing only to eliminate a unit of light infantry with their javelins, they then charged forward and took the enemy camp. One turn and half the victory points I needed had been gained!

However, things weren’t going all my own way.

One of my legionary units was then broken by the Galatian warband in front of them; and another, as my cavalry couldn’t be in two places at once, had moved forward into open space. Now it was my three camps (a lot of VPs to lose) that was threatened. Fortunately, my light cavalry out on the right flank were keeping three warbands occupied, otherwise I was in danger of being swamped by numbers despite the fact that I had just broken another warband on the left.

Never fear: the legionary cavalry hadn’t finished their work yet!

Neatly reversing out of the Galatian camp, they headed back onto the battlefield and smashed into the back of another enemy warband. That shook the Galatian warriors badly enough so that a fast-manoeuvring legionary unit could also about face, hit them in the rear and send them fleeing from the field. Victory was mine!

It Worked!

Amazingly, my battle plan had worked!

I had managed to fight away from my camps, keep three of his warbands occupied with my light cavalry, and get a vital overlap at the initial point of impact. I had been lucky in that the Galatian advance had been a bit raggedy, but if I had hung back, as last time, then they would have had a chance to correct and hit me as one line.

Stars of the show were, undoubtedly, the Legionary Horse. Only the second time on the battlefield and a Companion-like performance. One warband destroyed, one light unit destroyed, the enemy camp taken, and then a rear charge to set up another warband for its almost immediate destruction. Laurel wreaths aplenty!

A great way to, hopefully, end my period of wargaming over Zoom. Not that it’s a bad way to game, but pushing lead face to face is always better!

TTS AAR: Marian Romans versus Galatians

Time for another game of To The Strongest over Zoom with regular opponent, Bevan.

Those of you who follow the site will know that our last game ended in a large victory for my Marian Romans over Bevan’s Gauls. This was obviously pretty galling to Mr B (did you see what I did there?) so in search of revenge he suggested that I might like to try the Romans against a Galatian army, and sent me his list.

There were so many galatian warbands that I had to draft in some ZULUS to proxy for two of them!

My immediate reaction was a comic-book double-take. Eight warbands of deep, fanatical, hero-accompanied warrior units plus two good cavalry units, one of which was veteran!

The tale of the tape says it all. Let’s look at the infantry first. My Romans have six veteran legionary units. They save on a 5+ (which is very good) and have two hits each; they hit on 6+ until they take one hit, whence they hit on 8+. The Galatians have eight units. They are fanatics, so save on only an 8+ (bad) but have three hits each and, more importantly, keep fighting at 6+ to hit until destroyed.

The Romans then have three units of cavalry, two light, versus two units of Galatian cavalry, neither light and one veteran.

On top of all the above, and probably the final nail in my coffin, I was using my newly painted legionary cavalry unit and my newly painted Roman army standard. This had the potential to be nasty, brutal and fast!

The Game

The sides lined up facing each other. My plan was to hold back my infantry and try and get some sort of advantage from my extra cavalry unit. I was hoping they could slip past his line and go for their camp, or at least get onto somebody’s flank. With that advantage in place, I could close to infantry combat hopefully surviving long enough to avoid a lap around from his extra foot units: my hyper-manoeuvrable legionaries being very good at rapid changes of direction.

The Galatians advanced as fast as they could whilst still maintaining a relatively unbroken line. I advanced my infantry a little bit forward, but concentrated on what I was doing with the cavalry. Try as I might, however, I couldn’t temp Bevan’s cavalry forward enough to give me the advantage I was after.

The calm before the storm

I refused my left flank slightly

The two infantry lines came together with an almighty crash!

Unusually, my pila were effective, and at the end of the first round of fighting two of his eight warbands were double disordered, with another four disordered, and no casualties taken on my side at all. I’d also wounded one of his commanders.

Meanwhile, just before the main action, my legionary cavalry, which had been charged by his veteran horse, were also doing well: disordering the opposition and allowing a unit of my light horse to get into a decent position for a flank charge.

This was great: another round like that and I’d have broken enough of his warbands (and perhaps his cavalry too) to win the game!

The Inevitable Reverse!

And then it all changed.

The next turn I had one of those passages of play that defy belief.

In the melee that followed the above, I didn’t score a single hit on any of his troops (not even those teetering on the edge of obliteration) but lost two generals including the CinC, one legionary unit and had another two disordered! So much for a 60% chance of saving a hit! Oh, and his cavalry retreated and re-ordered themselves.

Worse, I’d managed to get a unit of light cavalry onto the flank of one of his warbands that was already shaken to the point of being about to flee. If I could destroy them, and just one more hit would do it, then a rolling up could occur. The activation cards were kind: I had three chances to kill the unit, two attack cards per chance, 30% chance to hit with him having only a 30% chance to save if I did so.

Nothing. Just…nothing!

Now against some armies it would still be possible to make a comeback from the situation described above, but against a Galatian army with two warbands as yet uncommitted: not a chance. Bevan just steamrollered forward and that was that!

Here’s a shot of the end of the game. Just count the Galatian disorder markers! Nine of them…but eight of them had been inflicted in round one, and no warbands had been broken.

Aftermath

Well it had been a fun game, and revenge will doubtless be mine when the two sides meet again next week.

Here’s another few shots of the game:

More Classical Indians

Having painted enough Classical Indians to field a 130 point Monarchist army, it was time to start looking at what figures I needed to add in order to be able to field other armies from the Indian sub-continent.

First up was obviously to check that I could field the Republican variant of the classic Classical Indians. Hmmm…in order to do that, I needed to paint up another unit of horse.

These have sat, undercoated only, on my painting table for some time but, once I’d actually picked up a brush and got started, were actually quite fun to paint. It’s always that first brushstroke that’s the hardest!

These are more of the Museum Miniatures CAD-designed “Z Range”, and very lovely they are too. I particularly like the cataphract command figure in the middle: full of life and animation. Okay, so the guys with the swords don’t look too comfortable, but this is a Raw unit after all, and the spear-holding figures are nice.

Now on to see what I need to make my Classical Indians into Vedic or Tamil Indians, and then onto the Graeco-Indians after that!

TTS AAR: Roman Revenge!

Regular readers will know that I’ve recently suffered a series of defeats at the hands of the Marian Romans. One of my regular opponents, Peter, has crushed my Classical Indians twice and then the Sasanid Persians twice; my other regular opponent, Bevan, had beaten the Summerians twice. This despite the fact that I’m regularly told that the Marian Romans aren’t that good (too much heavy infantry, not enough cavalry) and certainly not a tournament army.

Well you could have fooled me!

It was obviously time for me to have a go with Caesar’s boys and see whether I had managed to learn anything from the somewhat painful lessons described above: for our next encounter, I would use the Marian Romans and Bevan would play the Gauls.

This was the second clash between the two, with Bevan winning the last game (I have been going through a bad patch lately!) fairly decisively.

At this point I must confess that rather than put together a list myself I used Peter’s Marian Roman army list: 130 points of veteran infantry with three camps, a standard, and three units of cavalry.

I set up as you can see, above, with my camps in one corner and my Roman infantry in a fairly tight block. That was lesson one: keep your legionaries where they can mutually support each other.

There did seem to be an awful lot of Gauls facing me: six warbands liberally sprinkled with heroes, and four good cavalry units.

As I suspected, the Gauls attempted to lap their cavalry around my main battle line. My cavalry were tasked with holding the right flank, with a unit of legionaries turned that way as a back up, whilst the rest of the army beat the Gauls in the centre. The Gallic cavalry on my left flank would have to be dealt with by the infantry.

The two sides advanced towards each other fairly smartly, with Bevan suffering some unlucky cards with his left flank cavalry meaning that they were delayed getting into the fight. This was excellent news, as I didn’t think my outnumbered and outclassed cavalry would be able to hold the opposition for long once battle was actually joined.

the legionaries form square!

My Shaky Right Flank

On my left flank, two units of Gauls had started lapping round, but my infantry snapped to face them and dealt with the flanking units fairly easily. His cavalry was still late to the party on my right, giving me the chance to disorder one of his warbands without breaking formation.

The Gallic cavalry and warband at the front of the picture are about to be mullered by my legionaries

The main battle lines were now joined, but the superior quality of my troops meant that in the centre I had now killed one warband, and disordered two more. One legionary unit had, however, been lost and, over on the right, another was being hit front and rear at the same time. I desperately needed to get my successful units on the left over into the centre.

rushing back to the centre! thank jupiter the romans manoeuvre well. note the legionary unit fighting front and back top right!

If there’s one thing the Romans do very well, it’s march: and before anything had had a chance to happen on my right flank, I had four legionary units pushing back warbands on the left and centre.

the left and centre legionary units are grinding down the opposition

Meanwhile the legionary unit on the right wing that had been attacked front and back had actually managed to repel both units: driving the warband back and destroying the cavalry: these Romans can fight as well as march!

Unbelievably, my cavalry were still holding their own: the lights kept evading and returning, and my one decent unit was still around despite being attacked in the front and flank at the same time.

the roman mincing machine in action

With the four main Gallic warbands now disordered and my legionaries almost unscathed, it was now just a matter of time. The cards fell evenly, but with me hitting on a 6+ and saving on a 5+, and the disordered Gauls hitting on an 8+ and saving on a 7+, the advantage was all mine. One warband after another broke and fled the table until all the Gallic victory coins were gone.

Aftermath

My losses amounted to one legionary unit and one light cavalry unit so a pretty colossal victory for the Romans

The tactics I’d employed, learnt the hard way, had worked, and Peter’s army list with it’s six veteran legionary units had proved its worth.

Now I need to prove that this wasn’t a fluke!

TTS AAR: The Sasanids Seek Revenge!

Regular visitors will know that my last two games of To The Strongest each involved my Classical Indians getting severely hammered by the Marian Romans. My opponent generously suggested that some of the reasons for my twin defeats were down to the relative strengths of the armies: the Marian Romans were made to kill an army like the Indians.

What might work against them, I asked, to be told that armies consisting of lance-armed cavalry supported by horse archers were very popular on the tournament circuit. Something like the Sasanids, I asked. Exactly, I was told…so this week’s game was to be my Sasanid Persians versus his Marian Romans. Revenge was to be mine!

As is now usual, for the moment, the battle would be played over Zoom, with my remote opponent able to see the table through a combination of helicopter-view webcam and on-table-on-tripod ‘phone camera. Each of his units was also marked with a number, helping with the transmission of orders: “unit 4 will move forward a square” etc

the set up

The Romans were unchanged from last week’s appearance: six units of veteran legionaries supported by some light and medium Gallic cavalry. The Sasanids sported six units of horse archers backing the hard punch of escorted elephants, cataphracts and four units of savaran lancers.

romans. Boo, hiss!

noble sasanids

The Plan

My plan was simple: pin the Romans frontally whilst hooking around their left wing. Horse archers to weaken and exploit flanks and rears; elephants, cataphracts and lancers to hammer into weakened legionary units.

Opening Moves

I had the initiative, so as the game began my right wing shot forward into the start position for their curl around the enemy left flank. Likewise, my left wing moved up to keep his left wing occupied.

the battle begins

You may have noticed that no mention has been made of my centre. This is because my central, most powerful brigade had decided that they hadn’t quite finished their breakfasts yet, and weren’t moving until all porridge (or whatever Sasanids have for breakfast) had been consumed!

The elephants and veteran savaran look on as the wings engage

Now what I should have done at this point was to wait for my centre to get moving before sending in my flanking forces…but I didn’t, and fully paid the price!

On my left flank, somewhat surprisingly and extremely annoyingly, my horse archers and lancers were seen off by the enemy cavalry backed up by legionaries. They moved forward very quickly, got their attacks in first, and soon I was left with cavalry around my left flank and nothing much to oppose them except what I could afford to commit from my centre. Hmmm…I’m sure that this was supposed to be the other way round!

One unit of horse archers lost to javelin-fire already; my savaran about to be defeated in combat with the gauls. my left flank is about to disintegrate.

On my right, I was perfectly positioned to curl in and hit the Romans in the flank. Unfortunately, they used their extreme manoeuvrability (well drilled, these Italians!) to not only turn to face me, but also to form an oblique line that effectively protected them from harrying flank attacks.

unit 4, in orbis (all round defence), protects the new roman right flank from my central command…not that that was doing anything even vaguely threatening anyway!

End Game

With my right flank attack effectively neutralised, the enemy right flank was now in the perfect position to curl around my left flank. I had to commit my centre to holding them off, who then got attacked by his centre: effectively he had done to me what I wanted to do to him!

romans outmanoeuvre me on the right

My right flank bravely tried to crack a few legionary skulls before disaster struck, but the truth of the matter was that I had been comprehensively outmanoeuvred. Game one went to the Romans!

romans to the front, romans to the left!

Game 2

As the above really hadn’t taken very long at all, there was time for a second game.

I was keen to have another go using the same tactics, and this time things seemed to be working much better for me: although the Romans had once again adopted their oblique line, this time my left flank was secure and my centre had kept up…so after the opening moves, the battlefield looked like this:

sasanids poised for victory!

Now, however, Lady Luck decided to intervene.

Really? I hear you cry: you were defeated by bad luck, were you? Not the enemy’s tactics and your own incompetence? Like in the last game?

No, really: it was bad luck.

For those of you who haven’t played To The Strongest, the mechanics work by the use of playing cards (or you can use D10 or chips) with higher cards being better than lower cards. Aces are low so, needless to say, drawing an Ace is generally a very bad thing.

We kept a pictorial record of the cards that I drew as the clash that would decide the game took place:

It was so ridiculous that even my opponent was suggesting that the only solution was a box of matches and some lighter fluid!

Anyway, I lost that game too, but still had a great morning’s gaming

To finish, here are a few more pictures of the game. You look at them whilst I go and get a good fire going…!

Indians Hammered, and then Hammered Again!

Another couple of games of To The Strongest, again on Zoom. This time it was to be my Classical Indians against the Marian Romans: a bit more of a challenge than the Achaemenid Persians!

As before, the set up was for my opponent to have a combination of a stationary overhead camera surveying the whole battlefield and a roving on-table ‘detail’ camera which could be moved to where the action was taking place.

I lost the scouting phase and, as can be seen in the picture above, ended up in a long line across the battlefield facing a Roman force who’s main contingent seemed to be skulking in one corner.

My plan was therefore to hold back my left wing and send forward my centre and right wings to destroy his two separated commands one by one, and then combine my forces again to attack his rather impressive looking camps. Hopefully my superior numbers and mass longbow fire would negate his heavily armoured veteran legionaries (gulp!).

Skulking, I tell you, skulking!

Brave, noble, well-painted!

As already mentioned, I had lost the scouting phase, so my opponent had the initiative and would move first. That should have got him a couple of squares forward, just out of longbow range, but perfectly in keeping with my plan.

Unfortunately not.

A combination of group moves, marches, good cards and, presumably, sheer Roman determination led to a line of annoyed looking Italians appearing right in front of me before my men had had a chance to even finish their breakfasts!

Two thirds of his legionaries are now in my face!

Worse, some of his hairy cavalry had got off the table to the left of my line and were threatening to re-appear and roll me up like a yoga mat!

Well, that was my plan out the window: time for a desperate scramble to retrieve the situation.

A desperate scramble

Most of my men are uninvolved!

The cards were not with me either: although my four-horse chariots managed to manoeuvre themselves into the right position for a flank charge (above left), there they halted to admire the scenery rather than getting stuck in; and my longbows seemed to be firing the wrong sort of arrows today: nerf guns would have been more effective!

Then it was the Romans to go again, and my left hand command just evaporated!

I’m sure I had a left flank around here somewhere!

The Romans were then able to “left turn” with their usual alacrity and, although I did manage to kill one unit of light cavalry, that was really that.

Well that was as comprehensive a mullering as I have ever had!

Game 2

The good news was, of course, that that left us time for a second game: every cloud, silver lining etc!

Things started well: I won the scouting phase this time and ended up in a much better position as the first card was about to be drawn.

Good, tight formation from the Indians this time!

A tough nut to crack!

A tough nut to crack!

The Roman commander looks down on my troops with disdain!

My plan was to quickly kill the cavalry in front of my right wing, then bring the chariots back into the centre for some flank attacks. Meanwhile, my other two commands would advance en masse and pepper his men with their longbows, weakening them in time for the elephants to go in from the front just as my heavy chariots hit them from the side.

Unfortunately, the Gods were against me again (despite me changing the pack of cards I was using in a desperate attempt to change my luck!) and my first turn ended with my men arrayed as shown in the picture above. Chariots: yes, good. Division One: yes, good. Division two…where on earth is Division Two!

If there was anything I’d learnt today about the Romans it’s that they can react really quickly to anything that happens and, sure enough, forward and sideways they came as they attempted to retrieve the situiation.

There was, however, an opportunity here. If I could get my chariots across the field and into the flank of the two legionary units in the centre of the table, then I reckon that I could hit one and then the other and roll them both up. After all, I’d have three attack cards on the first unit with a Hero and a General to get replays. That would put him a third of his main force down with no casualties to me:

I had, of course, neglected to factor in the fact that it was not my day!

Although my chariots flew across the field and got into a perfect charge position, they then stopped! I had had two chances to draw a seven or more (i.e. a 64% chance of success) and failed both times.

The Roman cavalry were thus able to come forward and hit my chariots in the flank (bye bye one unit of chariots and a general), then move the rest of their troops to begin rolling up my line.

Not as bad a mullering as last time, but definitely another hammering!

Aftermath

A couple of great games of TTS despite my ill-fortune. Some of you might be muttering that a good workman doesn’t blame his tools, but even my opponent agreed that it seemed as if every second card I drew was an Ace. For the final chariot combat, needing two 6’s for saves, I drew two Aces: a fitting end to the day!

Still, onwards and upwards, as they say: I’d like to fight the Marian Romans again, but might try one of the other Indian-style armies next time!

TTS AAR: Classicial Indians and the Achaemenids

Two remote games of To The Strongest played at the weekend: both featuring my newly painted Classical Indians against a cobbled together army of Achaemenid Persians.

I say cobbled together because I don’t have an Achaemenid Persian army, so what ended up on the tabletop were Assyrians as Persian cavalry, some Medes from an Alexandrian army, some Greek types as Ionians, some Scythian types as horse archers, then Sassanid Persian infantry as Sparabara and, embarrassingly and perhaps the most heinous crime, Greek Hoplites as the Immortals!

Due to lockdown, the game was played remotely i.e. the table and figures were set up at my house, with my opponent being able to see what was going on over Zoom from his house. After last week’s first attempt, I’d invested in a new webcam, so the picture was much improved:

I also bought a little tripod for my mobile ‘phone (you can see it in position, above) so it was also a lot easier to move the “battlefield reporter” camera around as well.

Game One

So a victory for the Indians: a couple of enemy units killed by missile fire, but the main damage was from the heavy chariots punching their way through the centre. After the game, Bevan mentioned that he wasn’t expecting to find “cavalry” in the centre of my line, and this discombobulated his battle plan!

I also feel honour bound to mention that the cards were most certainly not falling for the Achaemenids!

Game 2

So a second victory for the Persians, although things were a lot closer this time.

Massed longbow fire, and the elephants/heavy chariots at the schwerepunkt, proved a winning combination. Both sides had infantry with strong missile fire but weak melee skills supported by decent melee troops (his cavalry, my elephants and chariots) but I had the advantage in both areas: my longbows outranged his bows, and my elephants/chariots were a bit better than his cavalry. These two advantages gave me the win despite having less units (by one!) and less flexibility (three commands to his four).

Still, I suspect Bevan will have his revenge. Next encounter will see me fielding the Indians again, but against an Alexandrian army…gulp!

TTS Remotely: Marian Romans versus Gauls

Having now played in three remote games, I decided that I should try and run my own: seems only fair that I should host once in a while! I recruited a willing volunteer (thank you Bevan!) and set about, er, setting up.

DSCN2193.JPG

With the wargames room turned into a yoga studio until fitness clubs are open again, I had to set my tables up upstairs: plenty of room, but not as much light as usual. On the plus side, however, the wardrobe-like cupboard doors provided a useful place for the overall table camera to sit. This would give a bird’s-eye view of the battlefield whilst close up images were provided via a mobile ‘phone.

Connectivity was via Zoom. The laptop that you can see in the picture hosted the meeting, with the mobile ‘phone calling in as another participant. The overall camera gave a pretty rubbish picture, but it did at least allow Bevan to see everything that was happening, but his moves were mainly made based on the mobile ‘phone “roving camera” which I hovered over the table wherever the action was.

Testing the Set Up: this is what the remote player would see

Testing the Set Up: this is what the remote player would see

I had decided on To The Strongest as the grid-based system would mean no measuring and would be easier for Bevan to judge what to do. It would be a suitably un-anachronistic clash between my Marian Romans and Bevan’s Gauls.

In order to help Bevan keep track of his troops, I had bought a whole load of little stands to carry numbered tags. Although not really visible on the overall camera, they worked very well in close up, and allowed me to call out unit numbers rather than long explanations involving “this unit that’s near this thing” etc.

DSCN2176.JPG

The Sides

The Marian Romans consisted of four commands. The Proconsul commanded two legionary units (one veteran) and a unit of light archers. His first Legate also commanded two legionary units (one veteran) but with a unit of ballistae artillery. His second Legate once again commanded two legionary units (one veteran) but with a unit of eastern horse archers. Finally, he had an alae of two units of veteran auxiliary cavalry allegedly from Macedonia. I usually use Gauls as the auxiliary cavalry, but they were on the other side of the table so that I had to use some Persian-looking types instead.

Note the markers allowing Bevan to see which units were which

Note the markers allowing Bevan to see which units were which

Bevan’s Galling Gauls also had four commands. Two commands consisted of three deep warrior-warbands bristling with heroes; one command consisted of three cavalry units; and the final command was two units of iouantoues (youths) light infantry with javelins and another unit of cavalry.

There did seem to be an awful lot of Gauls!

The Battle

The battle opened with the entire Gallic line thundering forward, with the Romans advancing more cautiously towards them.

DSCN2179.JPG

The Gauls had their warbands on the left and centre, their light unit just to the left of the trees in the middle of the battlefield, and their cavalry on the far right.

The Romans had their Macedonian cavalry on the left, then a long line of legionary units with their associated light troops in front of them, except for the ballistae that were opposite the camp.

The Gauls come thundering forward

The Gauls come thundering forward

First action was on the Roman left, where the two cavalry forces clashed. The trees meant that the Gauls couldn’t use their superior numbers, and my horse was veteran, so I was hoping for some success here.

Regrettably, the Macedonians were obviously not enjoying the rather damper climes of Gaul, and were either pushed back in disorder or just disordered. Not a very good start!

Meanwhile, the two battle line drew together.

I quickly lost my light bowmen and horse archers to rampaging hairies, which meant that I would be one unit down in the main clash. On reflection, I should have sent my light bowmen into the trees on the right to threaten the left flank of the Gallic line, but unfortunately I didn’t think of that at the time!

Once the two lines clashed, it was actually all over pretty fast!

Although I held my own on either of the side combats you can see above, the warband in the centre moved forward towards the artillerymen (who were having a very bad day). I snapped one unit of legionaries backwards and left to plug the gap, which was quite impressive and shows the Romans’ manouevrability, but poor cards lost me a Legate and the nearest legionary unit.

Meanwhile, my left flank was crumbling. My usually impressive veteran horse were being very unimpressive, and the legionaries were getting surrounded. A foolish decision to help the cavalry didn’t help, and I lost the last of my coins to a charge from the rear!

Below is the position at the end of the battle. My left flank is just about gone: the legionaries having tried to help the cavalry out with, er, fatal results. My centre is holding, but Gauls have punched through and are about to engage the artillery hand-to-hand and then take my camp. My right could go either way.

Aftermath

All in all, a fairly conclusive drubbing for the Romans, but lessons learnt and I’m sure they will do better next time!

On the plus side, however, the “remote gaming” side of things worked nicely, and it is something I will run again…and I got to push some lead around a table for a change!

Robert Avery

TTS AAR: Classical Indians versus Caesarian Romans

After six weeks of hard painting, helped by Lockdown 2 and the Christmas holidays, the Classical Indians are ready to hit the tabletop, and what better occasion to test them out than what is almost certain to be the final battle of the year.

My usual wargaming opponents were again unavailable due to the lockdown (it’s about two degrees Centigrade, so a little cold to game outside) so I fell back on the ever-reliable Daughter #2. We decided to play a straight up, 130 points a side game of To The Strongest: I obviously wanted to play with my newly finished Indians, so she decided to fall back on her favourite Caesarian Romans, once again adopting the persona of the Beardless Proconsul.

So a loss for their first outing, but actually not as bad a loss as I had thought. My massed longbow fire did cause the Romans real problems in the initial stages of the battle, and had that unit of legionaries on my right not held out against overwhelming odds, then I think the day would have been mine.

Lots of lessons learnt: the most important one being to put a unit of elephants on the wing where the chariots aren’t: an elephants versus Gauls match up might well have gone my way as the Gallic horses don’t like pachyderms and suffer big penalties in combat.

Anyway, another cracking game of TTS, and a fitting end to a great year’s gaming.


TTS AAR: Romans vs Sumerians

With lockdown back upon us and Daughter #1’s boyfriend back at University, my only potential opponent for a battle was Daughter #2. A little bit of gentle arm-twisting persuaded her to abandon the questionable delights of K-Pop YouTube videos and join me in the wargaming room for a game of To The Strongest.

I wanted to use two of my newest armies: the Sumerians and the Marian Romans. I politely gave her the choice, thinking she was bound to go for the Sumerians with their exciting four-onager chariots, axemen etc, but instead she chose the more space-invader like Romans. I felt a little disappointed here, as I’d wanted to play them, especially as I know hoe good they are. Competitive Dad? Well, you have to take your victories where you can!

Both sides deployed. The Sumerians looked their usual impressive selves: the blocks of citizen spearmen supported by light infantry; the aforementioned chariots; and three units of axemen or archers.

The Romans, under the so-called Beardless Pro-Consul, looked a little ragged by comparison, which just shows that appearances can be deceptive:

DSCN2045.JPG

The Game

Both sides opened the battle by advancing forward smartly.

In the centre, my heavy chariots headed straight for the oncoming Romans, hoping to hit them whilst they were deployed with gaps in their battle line. Apparently not all my chariot units were equally keen on getting stuck in, so there were holes in my line too, but I didn’t think this was a problem as I reckoned that being mounted meant that any stragglers would catch up fast.

On my right flank, some equites saggiarii tried to sneak past my flank, but were blocked and eventually destroyed by my lights:

On my left, however, two units of Gallic Cavalry had a bit more room to play with, getting past my flank, and causing me (along with some Cretan archers) huge problems for the rest of the battle.

Note the Gallic horse right out on the right of the picture. They have got past my flank and forced me to deploy my reserve to face them.

Back to the centre, and the two lines came together with a mighty crash. Unfortunately, the mighty crash mostly involved smashing chariots as, using their excellent manoeuvrability, the Roman legionaries snapped into an unbroken and pilum-toting line of heavy infantry. Who new Daughter #2 knew what she was doing!

I pulled back in an attempt to re-organise but, of course, this just gave the Romans a chance to reorganise themselves and to then slam forward once more, again using their quality and agility to always be in the right place at the right time with the right units. I tell you, if you can’t get round the flank of the Romans (which I had singularly failed to do) then you are in big trouble: the Roman mincing machine makes, er, mincemeat out of anything it faces!

Here’s a series of pictures showing what happened in the centre:

I did have a couple of light units pushing past the Roman left flank but all that happened was that one double cohort of legionaries swung neatly sideways to face them, and without the help of the other light unit (who had been previously occupied in finishing off the horse archers) I was not going to get anywhere anytime soon.

But it was on my left flank that I was most in trouble.

I had managed to get my reserve into play in order to head off one lot of Gauls from rolling me up but, just at the critical moment, luck deserted me, and two of my brigades drew consecutive Aces at the start of their activations.

This left me unable to get anything done, and the Gauls closed in, hitting my blocking force from both front and back:

And that, really, was that: my left collapsed, my centre crumpled and I haemorrhaged coins faster than you can say “bloody Romans”!

Aftermath

A great game of To The Strongest despite my somewhat embarrassing defeat! Showcased how good the Romans can be in a straight up fight where their flanks are safe.

TTS AAR: Marian Romans' First Outing

With the varnish on the first two cohorts of blue-shield legionaries literally still drying, it was time to take the Marian Romans out for their first game of To The Strongest.

Looking at their list, the Romans have three basic options dependent on their commander: Caesar (Spain and Gaul); Pompeii (the East) and Sulla. My choice was to field a Caesarian army, mainly because I already have Gauls so wouldn’t need to paint any of them. My list was therefore as follows:

  • Proconsul

    • Two units of legionaries (one veteran)

  • Legate

    • Two units of legionaries (one veteran)

    • One unit of Cretan Archers

  • Legate

    • Two units of legionaries (one veteran)

    • One unit of legionary artillery

  • Allied Cavalry Leader

    • Two units of veteran Gallic cavalry

    • One unit of horse archers

I’m thinking that perhaps the Gallic cavalry should, if veteran, more properly be Germanic cavalry, as the Gauls fighting for Caesar didn’t seem to be very good whereas the Germans were very effective, but that’s something I can rectify in due course: for this battle they were hyped up on Getafix’s potion!

Kavan, my opponent, chose to field a Syracusan army. Not strictly speaking contemporary, but very much the sort of army the Romans had faced in the years leading up to the Marian period. His force consisted of:

  • Commander-in-Chief

    • One unit of Bodyguard Hoplites

    • One unit of Light Infantry

  • Commander

    • Two units of Gallic mercenaries

    • One unit of mercenary Greek cavalry

  • Commander

    • Two units of Syracusan Hoplites

    • Two units of light infantry

  • Commander

    • One unit of Syracusan Hoplites

    • One unit of Syracusan cavalry

    • One unit of light infantry

Initial Deployment

I deployed the Romans in a long line of Legionary bases, with the Gauls on the left wing.

The Roman Battle Line

A friend had warned me that being very much an infantry army, my flanks were very vulnerable, so although I felt my left was covered by the Gallic cavalry, I was very much aware that my right was somewhat ‘floating’, so just after the picture above was taken, I moved the legionary artillery onto the small hill behind the 9th/10th Cohorts.

Kavan also deployed in a long line but, obviously reading my mind, heavily weighted each flank i.e. his Gallic mercenaries were in the centre along with the bodyguard hoplites, but he had two hoplite units on his far right and one on his far left.

That’s an awful lot of syracusans

Battle is Joined

I opened proceedings by advancing slowly forward, holding my line. The Syracusan centre, on the other hand positively leapt forward. My Gallic cavalry annoyingly hung back, but this was countered by the fact thatb his right-flank hoplites were also slow to get going.

syracusan centre advances forward speedily

syracusan centre advances forward speedily

As the two centres approached each other, the action actually began on my right wing where, as predicted, the Syracusan cavalry attempted an outflanking manouevre, backed up by a unit of hoplites and some light infantry. The 9th/10th Cohorts turned to face them and the artillery opened fire.

The Syracusan cavalry were disposed of by the artillery (superb shooting!) and, for the rest of the game, the 9th/10th Cohorts would hold off the hoplites despite being attacked in their rear by more Syracusan light infantry. At one stage, the legionaries survived four consecutive rear attacks whilst disordering the hoplites in front of them. Plaudits and rewards all round!

cohorts IX and X hold the right flank against all comers

On the left wing, my Gallic cavalry were keeping the two enemy Hoplite units occupied, using their superior mobility to avoid a head-on clash and occasionally managing to threaten their flanks even if contact couldn’t be made. Two veteran cavalry units for two Hoplite units seemed a fair exchange to me, so it looked as if the action was going to be decided in the centre.

the two centres are about to clash

the two centres are about to clash

The legionaries and enemy Gallic mercenaries clashed first. I was expecting my pila to make a difference, but they didn’t really have much effect at all. The clash became a grinding melee where the quality of my legionaries was perfectly balanced by the size (and therefore extra hits) of the Gauls.

Slightly to the left of the above, my 1st/2nd and 3rd/4th Cohort unit were faced by two units of Syracusan light infantry. I just couldn’t get rid of these: every time I charged forward, they evaded, and I soon found my troops well in front of the rest of the centre. Kavan had done to me what I had done to his two Hoplite units on the far left!

cohorts I to IV distracted by light infantry

cohorts I to IV distracted by light infantry

Eventually, however, one of his light units were caught and disposed of, leaving my legionary unit to turn either for the enemy camp or back towards the centre to drive into the back of the enemy who were, bu now, hard pressing my men there.

the centres have now clashed!

I decided that the Roman thing to do was to go to the aid of the legion, so two cohorts of fresh Roman infantry drove into the back of the Celtic mercenaries, smashing them from the table.

This proved too much for the Syracusans, who had by now lost enough troops to force a retreat. It had been a narrow victory for the Marian Romans.

Aftermath

Lots of lessons learnt about the capabilities of the Marians. I was very pleasantly surprised by the effectiveness of the Roman artillery, although I do feel that that was down to the cards they turned rather than any innate ability. On the other hand, I was disappointed with the Roman pila: the extra attack card was useful, but not decisive.

What was without doubt the key to victory, however, was the manouevrability of the Roman cohorts along with their staying power, particularly the three veteran units. I foresee interesting times ahead, particularly as the next fight will be with the Sassanids.

TTS AAR: Three Games One Sunday

Three great games of To The Strongest this Sunday, all Sassanid Persians versus 100YW English. I took the Sassanids for Game One, Kavan for Game Two, and then it was back to me playing the Sassanids in Game Three.

Henry V versus the Persians!

Henry V versus the Persians!

The results? I think it fair to say that the Sassanids did very well indeed, winning all three games! Those of you who are paying attention will have worked out that that meant that the day was two-one to me.

The first game was a glorious victory for both me and the Sassanids, but one largely caused by Kavan’s terrible cards! I used standard tactics: horse archers on the wings keeping his men there occupied whilst the heavy horse and elephants punched their way through the middle.

The escorted elephants punch a hole

The second game was a similar affair, but this time it was me on the receiving end. I knew what was coming, so managed to deal with the initial horse archer advance on my right wing with mass longbow fire. In the centre, I had massed my heavies opposite his, but lost two of my three generals in the first round of combat. This effectively stuffed me command-wise, and I got overlapped on the left by those gosh-darned light horsemen as I just couldn’t get the units I needed to activate into action regularly enough. As my left began to crumble, Kavan punched a hole in my centre which he then flooded with the rest of his heavies: the coup de grace coming as he took my camp.

The English camp falls…again!

With both of us now very familiar with the strengths and weaknesses of both friendly and enemy troops, the third game was a neck-and-neck affair which either of us could have won. Each side had one camp each, and both fell: mine to mounted men-at-arms that three units of horse archers just couldn’t stop in time; his to another heavy cavalry punch through the middle. I won in the end, but it was a very close run thing.

All in all, an excellent afternoon’s gaming.

The Sassanid Heavies roll forward


TTS AAR: Assyrians and Egyptians Clash Twice

With lockdown restrictions easing, I was able to get in a couple of games of To The Strongest, with the width of the wargames table operating as an automatic social distancing device.

Friend Bevan and I decided to use the Egyptians and Assyrians: we’d have two games, keeping the terrain constant, swapping sides for the second game.

We opened with me commanding the Assyrians.

The Assyrian cavalry was massed on the right wing

I deployed in very much a traditional way: infantry in the centre, mounted troops on the wings. Wary of all the Egyptian light chariot units, my plan was to keep my line very much together and advance just into bowshot as one entity, aiming to concentrate fire from several units on any Egyptian lights that came into range and relying on the fact that one kill would knock one out.

The Egyptians massed all their chariots on their left wing, spreading their infantry across the battlefield from there. One thing I did immediately notice was that there were an awful lot of Egyptians on the table: a consequence of my smaller numbers of heavier, more veteran troops.

As the game began, the Egyptian chariots in front of my left wing faltered: apparently refusing to move until some bizarre religious rite had been fulfilled. This allowed me to advance forward so the flank of my line was protected by a piece of impassable ground.

The Egyptian chariots say “no”!

Eventually they did start to move forward. Well, some of them did. Bevan’s Guard Chariots turned smartly to their left and attempted the old switcheroo: heading for the other side of the battlefield. Although sometimes a successful ploy, this time it wasn’t. All that happened was that his elite troops spent the entire game shifting from right to left and never saw any action at all!

“Why not?” I hear you cry, “It can’t have taken that long to traverse the field!”. Correct, but in the meantime his other chariots had moved forward piecemeal and, as I had hoped, I was able to wipe them out with bowfire one by one. This left the Egyptian right wing hanging, with my veteran heavy chariots ready to pounce like the wolf upon the fold, to use an apt analogy. Bevan ordered a general retreat before this could happen!

The situation just before the end. Imagine the Egyptian chariots you can see at the top of the picture are no more, and my heavy chariots have swung round to flank the Egyptian line. The other Egyptian chariots are out of shot off to the right somewhere.

Game Two

For game two, I took the Egyptians. I deployed my chariots in a long line across the centre of the battlefield with my infantry in columns on either side. My plan was to advance together, shoot the enemy with my bows, and then have the infantry curl in from either side as he chased my evading light chariots.

Lure them into the centre, curl in from the sides.

What can I say except for the fact that it almost worked!

This was a terrific game that went on right to the point where both sides had only three victory coins left each. Both sides lost their camps, and both sides had many chances to finally polish the enemy off. In the end, Bevan gained the advantage, finishing me off by killing my last chariot unit with general attached.

My deployment was good, but I didn’t quite manage the infantry-curl-rounds correctly, being a little late on both sides i.e. I’d use this tactic again, but get the infantry into action a bit sooner.

Brilliant game, though!

Pharoah and the Shardana Royal Guard go into action

Robert Avery

Two Games of TTS...

…which almost never happened?

Why? I hear you ask. What could keep the man from his beloved wargaming?

An intruder, that’s what: an alien beast that has taken up residence in my wargaming room.

When I agreed that the family could get a dog, I made it clear that I wanted a good-sized, rough ‘n’ ready working dog. As you can see, I got exactly what I wanted. She’s a pedigree too, and one who delights in the name Irma Daydream Belle-ever, or Bella for short.

But back to wargaming…and with the space where my tables go filled with all sorts of doggy paraphernalia, I had to de-camp to the sitting room and go To The Strongest rather than my intended I Ain’t Been Shot, Mum.

With everything having to be shipped into the room as opposed to being immediately available , I decided to try my reconstructed 100YW English army: mounted knights, dismounted knights, longbows and billmen. K. would take the Sarmatians: neatly proxied by the Sassanid Persians.

For the first game, I made the classic “new army” mistake and forgot to consider how the army acted historically. As I’d rather foolishly put my cannon into the same brigade as the mounted knights, I placed them in the centre of the table, with battles consisting of a mix of dismounted knights, longbows and billmen on the flanks.

The Sarmatians took the initiative, swept forward, and basically defeated each battle as three separate encounters. Yes, I had plenty of missile-armed troops, but I just couldn’t get the concentration of fire I needed to halt the enemy heavy cavalry, who then swept in and lance-d my troops to death.

A foolish deployment!

I had learnt my lesson for game two, and set up in the traditional “Agincourt” fashion: archers in the middle, with the two battles next to each other for mutual support, with the melee troops on the flanks, and my mounted knights grouped on one side for a decisive flank attack.

This worked much better. As the Sarmatians advanced somewhat unevenly, I was able to target each unit in turn, hammering them with bow and cannon fire. By the time they had reached my line, they were already down three units, and natural attrition in melee, even on a one-for-one basis, gave me the victory, especially as the cannon had neatly taken the head off one of his generals!

A couple of good games (despite the change of location!) and a valuable lesson re-learnt: go historical with your tactics!

Two Games of To The Strongest

Another two lockdown games of To The Strongest with Daughter#1’s boyfriend, who is staying with us for the duration.

This time we ditched any pretense of involving the distaff side of the family: leaving them to watch The Queen’s Corgis on Netflix or Amazon or one of the other multiple streaming services that we seem to have adopted over the past few months, as we men got down to some serious gaming.

As this was our third session of TTS, I wanted K. to experience something a little different to the largely “deep units on both sides” games that we’d been playing so far. I therefore mocked up a Sarmatian army from my Sassanid Persians: four units of veteran heavy cavalry with lance and bow represented by cataphracts (represented by, not counting as!) and four units of standard heavy cavalry with lance and bow represented by clibinarii. There was also a unit of horse archers in there somewhere too.

K would take a Syracusan army: a core of four Hoplite units, one bodyguard; a mercenary command with a couple of units of Celts; and then a sprinkling of light infantry and raw cavalry to add flavour. It was, I explained, the first time that the Cretan Archers (see post from a couple of days ago) had been on the tabletop, so he was to expect them to perform extremely badly indeed!

“Why are all your men on that side of the battlefield?”

We deployed our troops, and K immediately noticed that I had heavily weighted my left flank, leaving many of his units with an open battlefield in front of them. He queried why I had done so, and I kindly explained that he would find out in a few minutes.

The reason, of course, was that I was going to try and smash his weak right flank to pieces and then wheel round and roll up his line like a yoga mat before his slow, left-flank units could get in on the action.

The first phase of my plan went, well, according to plan: one command of veterans and one command of standard cavalry did indeed clear K’s right flank from the table, leaving things looking like this:

Tough love!

Some of you might suggest that it was perhaps a little harsh of me to take advantage of the lad’s inexperience in this way, but I did explain exactly what I had planned and what I thought was going to happen as I did it: making sure that he would understand what was going on and be able to either counter or employ the same tactic in the future.

Back to the battle.

As a command of clibinarii duly held off his rampaging Celtic mercenaries, my cavalry duly wheeled round and, in text book fashion, slammed into his flank and, in one unit’s case, went for his camp.

Cretan Archers fulfilling their first-game destiny

Syracuse has fallen!

K began shedding victory coins right, left and centre, and the day was soon mine.

Game Two

As that game hadn’t taken very long, we swapped sides and prepared to do battle again.

I was expecting K to try and copy my refused flank tactic of last time, so determined that I would use an advance in echelon tactic to try and disrupt his plans. As it happened, K deployed his men evenly over his side of the table, so after I had made my first move, the battlefield looked like this:

On his right flank, K advanced his cavalry forward to meet the two units of Celts coming towards him over the hill. This left his horse archers to hold off the mercenary Greek cavalry coming through the pass.

This turned out to be a bit of a mistake as, admittedly with a bit of luck, my cavalry rapidly dispersed his light horse and found themselves in a fantastic position on the flank of one of his commands.

By rights, his horse should have been able to turn to face me, and then a normal face-to-face combat would have occurred, but K managed to draw not one, not two, but three Aces in succession for activation: his horse weren’t moving anywhere!

By rights, I should then have been able to crash into his flank and roll up both units rather pleasingly before going on to sack his camp: seven of his nine victory coins should have been mine. Again, however, a weird series of cards meant that his cavalry, although they wouldn’t turn to face me, were able to hold me off for the duration of all his Aces. I did eventually destroy both units, but not before events on the rest of the field decided the day.

Battle was then generally joined across the rest of both lines, with K’s lance armed cavalry attacks compensating for the depth of my foot units.

the first cut is always the deepest!

I kept expecting my horse to roll up his cavalry and win the game but, as I said above, it kept failing to happen, and gradually my foot units began to lose the day. A lost general sealed my fate, and the turn after my horse had finally rolled up those cavalry at the back, I lost one victory coin too many and the day was K’s: a grinding triumph for the Sarmations.

K was naturally chuffed to bits to get his first victory. The only thing that now puzzles me is where he’s going to sleep tonight…

AAR: Smash of the Titans!

So #1 Daughter’s boyfriend had been roped into cooking the Easter Roast, which left me no-one to play with except for #2 Daughter.

She felt that she could manage another battle, but only if it had “monsters and aliens and stuff” in it.

Not a problem my dearest fruit of my loins: time to make To The Strongest literally fantastic by breaking out my Legendary Greek figures.

I would play the Sumerians, #2 Daughter would take the part of Poseidon leading a contingent of Hoplite Greeks spiced up with few “monsters…” etc.

In effect, this meant that she fielded (nearest to furthest in the picture above) a unit of Pegasus horse that could ignore terrain penalties; two units of Centaur cavalry (one horse archers, one cavalry); a unit of Minotaurs counting as axemen; and two units of monsters: the Hydra, the Erymanthian Boar, the Chimera, and the Medusa (treated as elephants).

The Sumerians remained unphased by this display of divine horrors:

The Battle Begins

The game began with one of those weird series of multiple Aces appearing on each side, with the result that although the lines crept slightly closer together, the only interesting event was the Hydra and Chimera bounding forward to attach the Sumerian left flank.

Very sensibly, the slingers ran for it…and here #2 Daughter made a mistake. Instead of crashing through the poor terrain, or lurking in its lee, the Hydra and Chimera decided to go round it. Not being very manoeuverable, however, they got stuck with their rear ends sticking out!

This would prove to be a very inviting target for the, er, pink Sumerian spearblock, and they would eventually charge the two monsters in the rear and do enough damage to send them straight off the table, therefore negating the regenerative abilities that I had assigned to both (automatically regenerate from disordered when activated).

The two battlelines then got on with the business of smashing into each other, each advancing forward as fast as they could.

As Sumerian commander, I sent in my battlecars first: determined to soften the Legendary Greeks up a bit before committing my infantry.

This was all going nicely, with the Centaur horse archers eradicated when they failed to evade, but I had forgotten about the terrain-ignoring Pegasus cavalry: which snuck around my flank and threatened to roll up my entire line!

Fortunately, great Zeus was obviously determined to make sure that his somewhat soggy brother was humiliated, and the flank charge only managed to KO one unit of battlecars before a spear block managed to get forward fast enough to force the flying horses to evade beyond the trees.

Unfortunately, the other two units of battlecars believed in a different divine panoply, and were destroyed by the Hoplite unit backed by Poseidon himself and, a bit unexpectedly, the Centaur cavalry. Things were looking a bit dicey on my right flank, but I had the infantry brigade behind ready to stabilise the situation.

The action now swung to the other side of the field, where the Minotaurs had been easily dismissed: obviously their tales of martial prowess were complete bull! I had, however, lost my Axemen, so the situation looked like this:

Zeus intervened again, and somehow I managed to dispose of the Medusa and the Boar, and get my spearmen back across the field and into the rear of what had been the Minotaur-led Hoplites.

Their loss proved too much for the Legendary Greeks to take, and the field of glory was mine.

Aftermath

A most enjoyable game which, I must confess, that I won by sheer luck of the cards. #2 Daughter, who is not yet old enough to drive, made only one tactical error, at the beginning, and otherwise came close to annihilating an entire flank which would, I think have given her victory. As it was, I was only one coin behind her in terms of defeat.

I think I might actually make a serious attempt to define some characteristics for the Legendary Greeks, if only because it’s nice to get some unusual figures on the tabletop.

Right, off to the Temple of Zeus to give thanks…

A Second Lockdown Game of To The Strongest

We’re still in coronavirus lockdown in the UK: banned from leaving the house except for essential trips. For most people, that means no gaming or, at best, some kind of online get together. I, however, am lucky enough to have daughter number one’s boyfriend staying with us for the duration: lucky because (1) he likes to cook and (2) he has discovered that he enjoys wargaming.

Our second game was To The Strongest again: it’s grid-based tabletop and simple-yet-subtle mechanics make it ideal for a new gamer to pick up quickly.

This time, I would take a Gallic army consisting of large amounts of hairy-arsed Celtic warriors and face off against an Athenian Greek Hoplite army consisting of large amounts of, well, hoplites.

Gauls

Greeks

The Greeks set up first: heavily weighting their right flank. At this point I realised that perhaps I should have mentioned to my novice opponent that hoplites can’t move diagonally to the left, but decided to just ignore that rule for the moment.

My Gauls were fairly evenly spaced out, but my noble cavalry were on the left i.e. facing two unit of hoplites with very sharp pointy spears! This was no good, so I decided to try a switcheroo gambit and move my cavalry right over to the other side of the field, leaving behind the warband that accompanied them.

The Switcheroo Begins

This would hopefully isolate his two units of hoplites on the far side of the table.

Meanwhile, both battle lines lurched towards each other, the Greeks behind a protective screen of light infantry.

The game then developed into three different battles.

On my left flank, the single warband faced off against the two hoplite units who had actually managed to advance forward much faster than I had expected. Although my warband did achieve one flank attack, this was largely unsuccessful, and I was soon under a lot of pressure as the Greeks got themselves sorted out and threatened to overwhelm me with the two-on-one advantage that they had.

In the centre, meanwhile, the main bodies of the two armies came together in a series of thumping clashes: deep unit versus deep unit. The Greeks took full advantage of their light infantry: using them either to soften the Celts up before contact, or to retreat behind if they suffered a disorder. The advantage would swing backwards and forwards between the two sides throughout the rest of the battle.

On my right flank, my light infantry had managed to see off his horse archers, but a warband was having real difficulty dispatching the rubbish Greek cavalry. Fortunately, my cavalry arrived after their pell-mell gallop across the back of the battlefield, and prepared to sweep all before them as they rounded the corner of some rocks and lined up on the Greek battle line’s flanks.

All that stood between them and certain victory was the lone unit of Greek peltasts that, so far, had hung back and stayed out of trouble.

Cavalry, bottom right, lined up to roll up the Greek line. Only the peltasts are in the way.

Could I get through the peltasts? Not in a month of Sundays! My grand plan blocked by a unit of men who only thought they weren’t light infantry!

Anyhow, that meant that although I had won the right flank, I was losing the left flank, and honours were just about even in the centre. A Greek hoplite unit finally broke through my line and captured my camp, one of my warbands threatened to do the same to the Athenian camp. Units were breaking on either side until we both had just two coins left: the next unit to break would decide the game.

It was the Greeks who had the initiative. I was in real trouble on my left flank, with a couple of double-disordered warbands who would go with one more hit. My opponent reached for his pack of cards: all he needed to do was to send his men in diagonally to hit me: 2+ to activate becomes 3+ for a difficult move becomes 4+ because your hoplite units are deep.

So that was the end of the Greek offensive and, on my subsequent turn, I managed to finally kill the peltasts and win the game!

Aftermath

Another great game of TTS, with the daughter’s boyfriend coming within Ames Ace of beating me.

Here’s a complete gallery of the game:

Robert Avery

A Right Result!

So here we all are stuck under lockdown and unable to go out. No wargaming clubs are open, no wargaming friends can come round: what on earth is one to do.

Well I have had a right result.

Daughter number one came back from university just before lockdown and brought her boyfriend with him as a house guest for a couple of months (he lives abroad normally, but can’t get home at the moment). This is not a bad thing: we have plenty of room and he, unlike me, likes cooking. Even better, the kids were so desperate for entertainment yesterday that they agreed to have a battle: daughter number one and boyfriend on one side; daughter number two and I on the other.

I chose the To The Strongest rules for Ancients as it’s probably the easiest introduction to wargaming for beginners: no measuring, no dice, simple grid-based movement and combat rules etc. D2 and I took the Neo-Sumerians, D1 and BF took the Assyrians.

Neo-Sumerian Battle Line

This was an interesting clash: lots of slow-moving, poor quality Sumerians versus small numbers of deadly, fast-moving Assyrians.

Each side chose to put their heavy chariots on the right flank, so we rapidly got to a situation where the centre was a tie and each side’s right flank was winning and left flank was losing.

The advantage then swung back and forth with both sides ending up with only two coins each i.e. one more unit lost would mean an overall loss. As it happens, one of the Sumerian heavy onager units managed to knock out an Assyrian cavalry unit and the game was ours!

And the right result?

Not the win, funnily enough, but the fact that D1’s boyfriend really enjoyed himself and declared an interest in playing more battles. Well, if we’re stuck together for another ten weeks, his wishes are going to be more than fulfilled! A convert!

Here are some more pictures of the game: