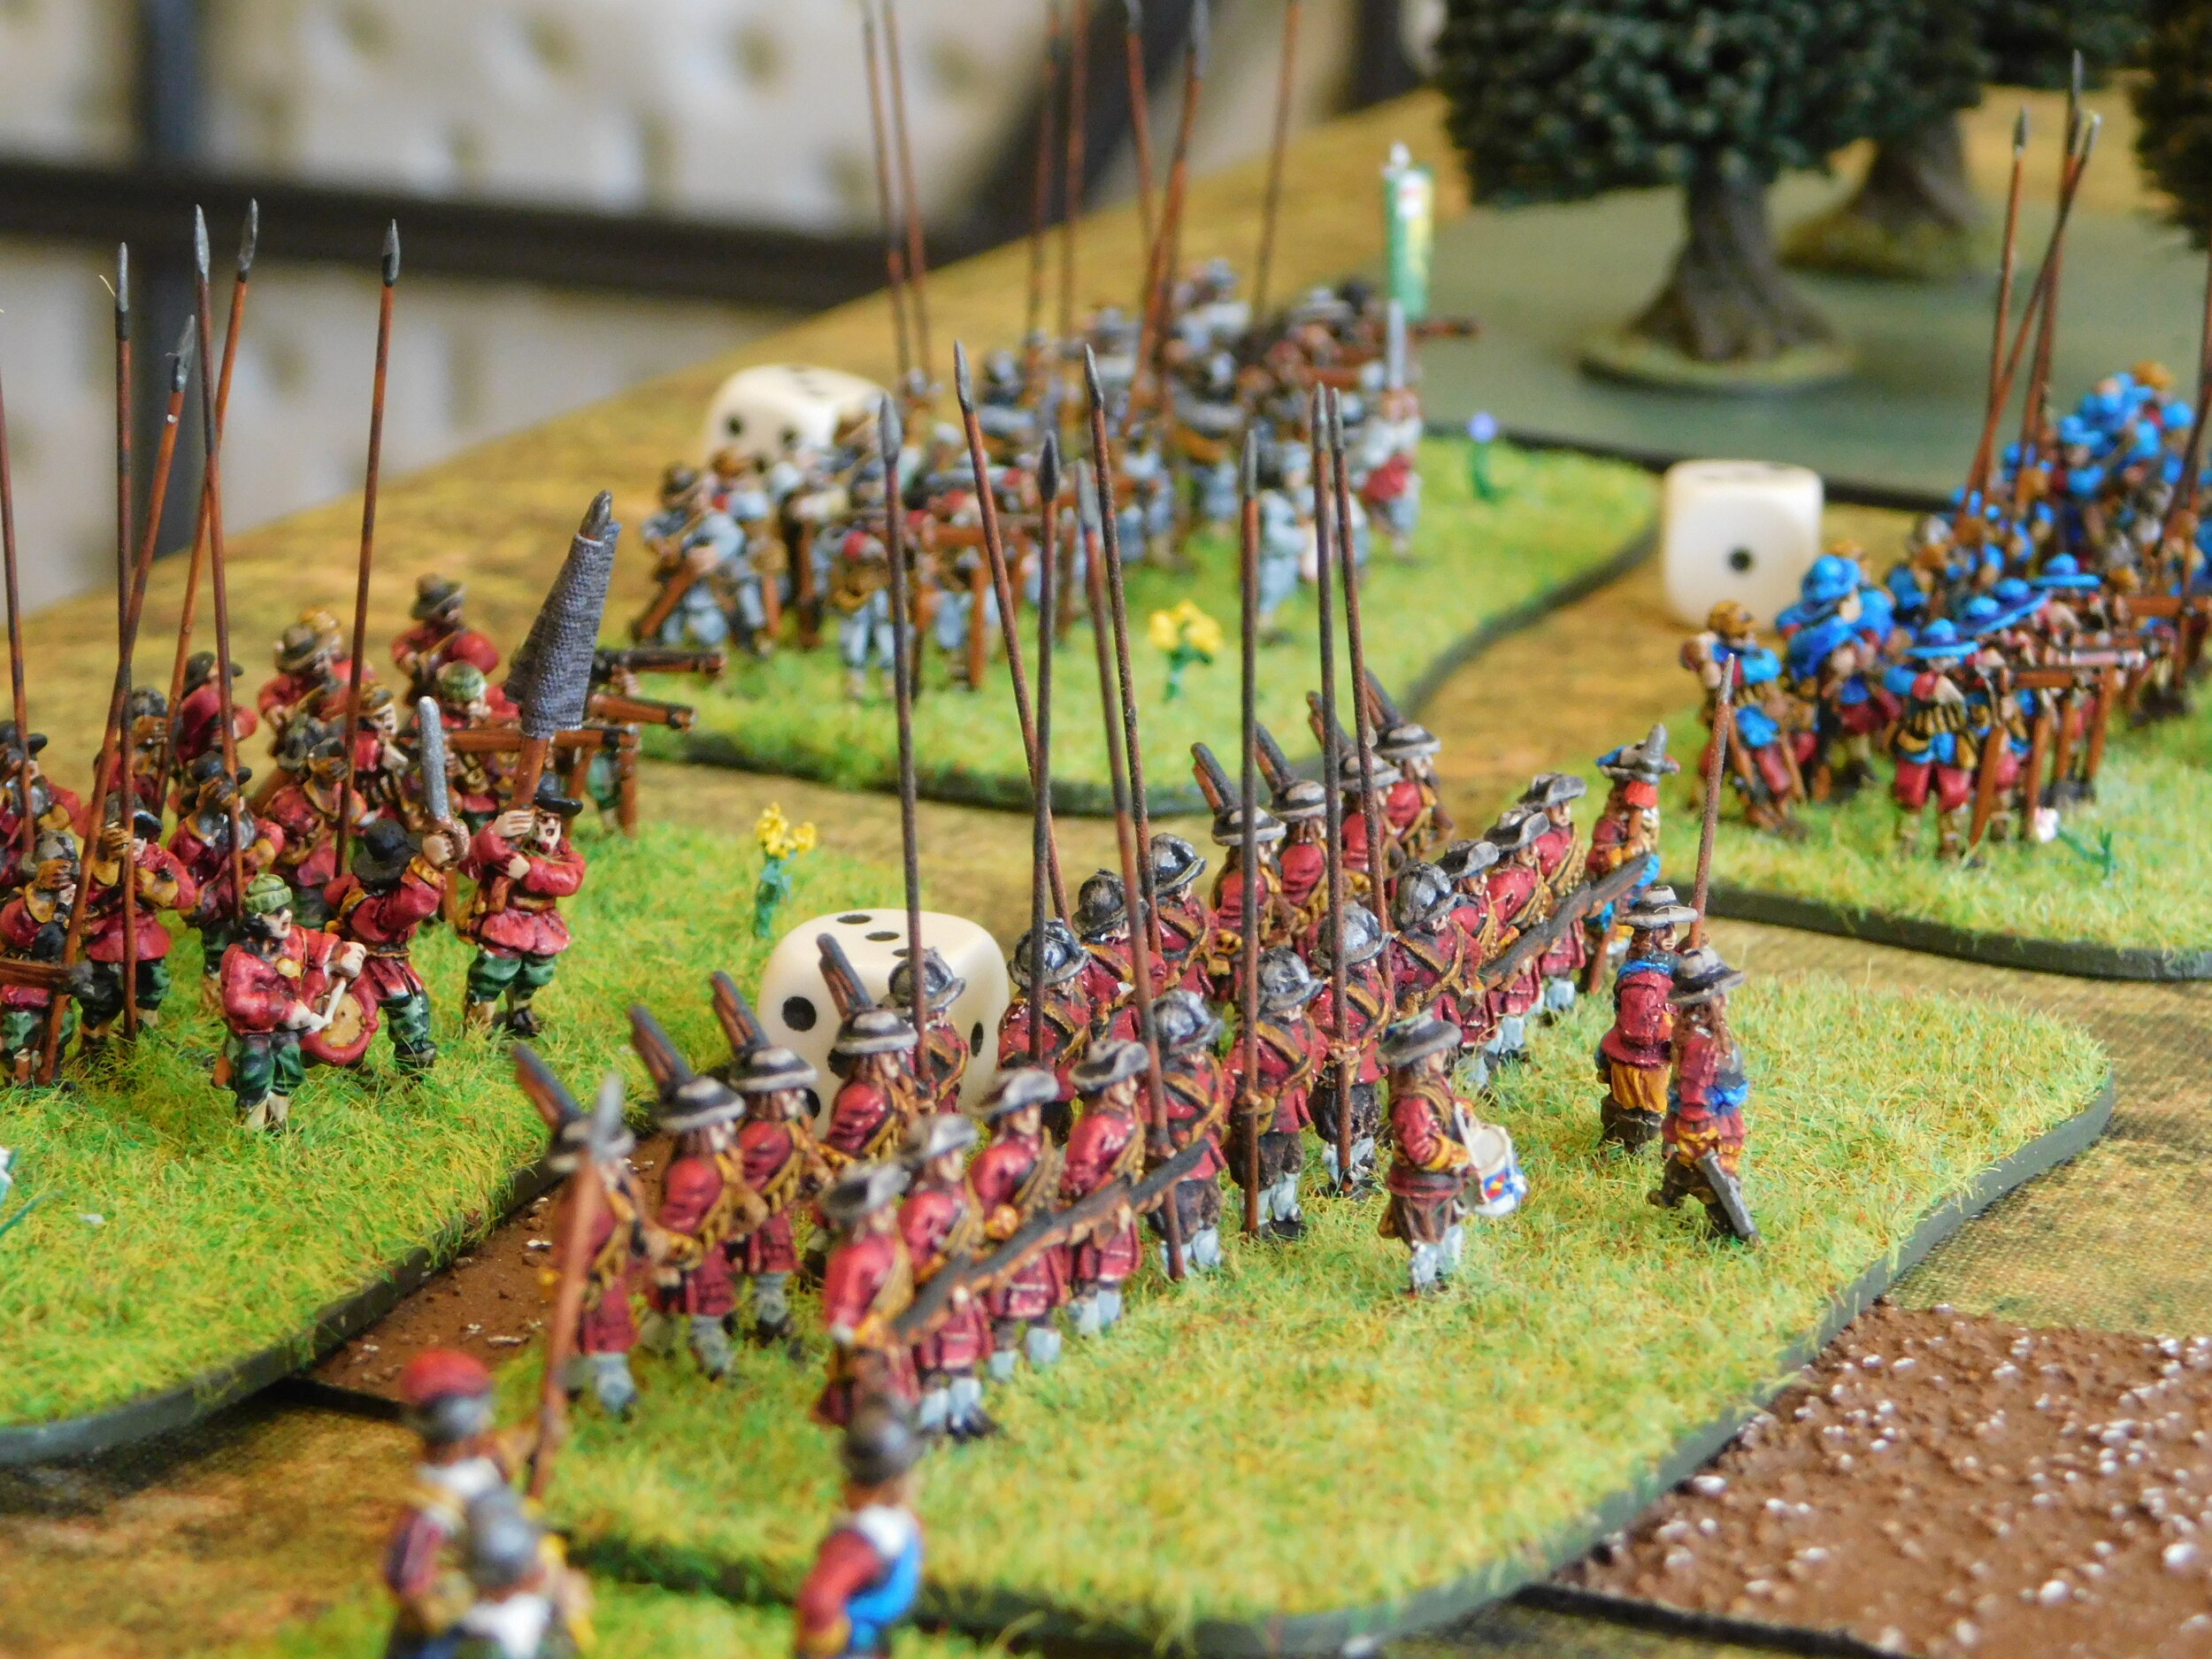
Scottish Pikes

Here’s another battalia of lowland Scottish pikemen for my English Civil War collection:

The figures are from Khurasan’s Irish/Scottish ECW range. They are 15mm and size nicely with the Peter Pig and Hallmark (from Magister Militum) ranges that I am already using. They are very cleanly sculpted and an absolute pleasure to paint. Those of you in the UK might be interested to note that they arrived with me only five days after ordering them from the US: the GZG teleport device is obviously now working in both directions!

They are painted mainly with GW Contrast paints and are mounted on a Warbases vehicle base, giving a very nicely sized element for use with the For King & Parliament ruleset. The flowers/heather is from Boontown.

I’ve taken a pragmatic approach to painting tartan. Rather than spend hours and hours trying to actually reproduce a genuine tartan pattern, I’ve made do with something that doesn’t take too long and looks good at a wargames distance of three feet or so. In effect, all I did was add stripes of a different colour to a heavily shaded sash. This worked for these guys, but the highlanders that I’m currently painting need a little more work as they have a lot more tartan, but more on that in a later post.

Another Scots Battalia

Enthused by how the first Scots battalia came out, I leapt into painting the second one and polished it off in no time at all.

As a reminder, these are Khurasan Miniatures’ 15mm English Civil War Scots infantry: a mixture of their pikemen, musketeers and infantry command packs. They were painted using GW Contrast Paints, and mounted on a Warbases Vehicle base. The purple heather is from Boontown.

When I first started the Scots, I was a bit worried about painting tartan, but I seem to have found a way of getting the various sashes looking at least tartan-esque, certainly from usual wargaming distance. To be honest, all I did was paint each sash a basecoat red, then drew lines of various different colours (mainly green) against the grain of the sash. I think they have come out quite well, but the real test will be when I move on to the Highlanders!

DSCN1858.JPG

There will now be a short interval whilst I paint the one remaining legionary unit I need to actually field the Marian Romans…

The First of the ECW Scots

I still needed some more foot for my ECW armies, but was a little bored of painting up another straight pike and shot battalia (I have seven units of about 26 figures each, or 182 foot figures) so decided I’d add a Scots element.

Most of my ECW figures so far have been Peter Pig or Hallmark (via Magister Militum), so I decided to look elsewhere for the Scots: two changes presumably being as good as two rests!

The figures I settled on in the end were Khurasan’s fairly new range of ECW Scots and Irish. I must admit I was strongly influenced by how good the painted up examples on the website looked (other manufacturers take note!) and the fact that I could send a message via FB to check if the pikemen were open handed (they are) and get a response within a couple of hours.

Even more impressive was that after I’d ordered my usual fairly large amount (three foot battalia, three horse units, two units of Highlanders, and a couple of artillery pieces) the figures arrived from the US only five days later. Five days!

This meant they headed straight to the front of the painting queue, so here’s the first battalia finished:

What I like about these figures is the obvious contrast with the English battalia: all dressed very plainly as compared to the bright colours down South…but with several of the figures having tartan sashes just to liven things up a little.

These paint up very easily (as usual, I mostly used Contrast Paints) and are highly recommended.

A Few Odds & Ends from the Painting Table

Very busy at work this last week, so only time to complete a few odds and ends for the two projects I’m currently working on: English Civil War and Marian Romans.

I always find that having two projects on the go at any one time is better than having just one. If, like I do, you only collect in one scale (15mm for me) I also find that it’s best to use different manufacturers as well: alleviates the boredom factor.

First up, a couple of command stands for my English Civil War armies. Here I’ve used a couple of gentleman officers from Hallmark (via Magister Militum) as a random Colonel-type, and then a couple of spare figures from Peter Pig - one command, one artilleryman - as a Colonel of artillery. The mini-gabions are Hama beads filled with basing material!

The Hallmark figures are really exquisite and, if you use Contrast Paints like I do, really easy to paint.

On top of the above, I’ve now painted up the five Hero figures I need for my Marian Roman army. Representing Heroes is always difficult, as you need a figure that stands out a bit and yet is not being used for the rest of the army.

What I chose to do was to add a set of Peter Pig Centurion figures to my Baueda Marian Roman army.

One of the great things about Peter Pig (in addition to the huge range and lovely, very paintable sculpts that they do) is that you can ask them to give you a custom built pack of just one sculpt. So here I looked at one of their mixed command packs, chose one figure, and had a pack of eight of just that figure sent to me. Very handy indeed.

FK&P AAR: Burchett's Green

I had a chance to get my new English Civil War siege gun bases onto the tabletop as I played out the latest scenario in my North Wessex campaign using the For King & Parliament campaign.

Both sides have withdrawn from the field of their last encounter at Pinkney’s Court, with the Royalists now looping round to try and outflank the Parliamentarians. As a desperate excuse to justify the use of siege artillery, the Royalists receive a couple of huge cannon as a gift from the King. Keen to try them out, they set them up across open fields and prepare to fire off a coupe of shots. As they do so, the Roundheads appear on the other side of the field and battle is joined.

Here’s what happened:

This was a tricky battle for the Royalists as they start the game in a very awkward position. In addition, their siege guns just couldn’t hit anything and, when they did, my units saved time and time again.

A workmanlike Parliamentarian victory.

FK&P AAR: Pinkney's Court Again

I’ve now had a chance to play the Pinkney’s Court scenario another three times.

The first game, versus Bevan, was a complete disaster. The more nimble Swedish-style Royalist cavalry sliced and diced their Parliamentarian opponents, destroying all three units for the loss of only one of their own. That meant that I had to divert troops to shore up the position, leaving me short of infantry (and victory coins!) for the clash on the other flank. A crushing defeat!

The other two games, against Kavan, however, went much better. The first was a close run thing, but I eventually prevailed. The second was a glorious, overwhelming victory caused, I hasten to add, by the most amazing run of luck at the cards. In each of the initial three clashes, I hit three times out of five: not bad when you’re needing an 8+ on a 1-10 evens chance. Much like my men in the game described above, Kavan’s troops never really recovered.

Here are some pictures of the game I lost:

Siege Guns

Having equipped my ECW armies with light guns and field artillery, it was time to add the big boys: a couple of Siege Gun elements.

The guns themselves were no problem: many years ago I was at an English Heritage site (or similar) and came across a tub of artillery models that have, over the years, proved ideal for siege gun-sized artillery pieces. I still have a handful left, so two of them would form the centrepiece of the elements.

I wanted the siege gun elements to look immobile, so rather than having the guns “naked” on a base, I bought a couple of resin gabion pieces from Peter Pig to serve as dressing. This also meant I didn’t have to have any sort of limber and team in the vicinity: they always take ages to do!

The crews initially came from Peter Pig, who do six different poses. Six men per gun didn’t seem enough, however, so I added a couple of Hallmark officer/sergeant types to each to bulk things out. Hallmark (available through Magister Militum) and Peter Pig size very well together.

I then discovered that the guns, gabions and crews didn’t really fit depth-wise on the standard element bases I’m using for my ECW troops. My standard bases are Warbases Vehicle Bases that fit up to about thirty foot or half as many horse figures without difficulty, and sit very nicely on my FK&P grided battlemat…but the combination of crew, gun and gabion stuck out over the end. Fortunately Warbases were able to supply customised “double depth” vehicle bases that exactly did the trick. I can even use the spares I ordered for TTS camps.

So that’s two siege gun elements now completed. More Romans on the way…

FK&P AAR: The Battle for Pinkney's Court

With Sir John Boulters seriously wounded as he led his Cuirassier bodyguard in a desperate, but ultimately futile, attempt to shore up his left flank at the battle of Widbrooke Common, his son, “Little John” Boulters, has taken command of Royalist forces around Maidenhythe.

This is not a moment too soon, as the Parliamentarians seek to take advantage of Sir John’s injury by striking for Pinkney’s Court, the manor house that sits on the edge of Pinkney’s Green, north-east of the town itself. Taking the manor will give them a fitting place from which to plan and direct the rest of their campaign.

The two sides will therefore fight it out at the Battle for Pinkney’s Court.

The Royalists (on the far side of the field, above) have positioned themselves around the court: infantry and gun in the centre and on the left, and most of their cavalry on the right.

The Roundheads have placed their strong Dutch horse contingent on the left, aiming to sweep across the open ground of the Green. Their infantry are on the right, and will need to cross fields in order to get at the opposition.

Both sides must defend their building. The Royalists lose three victory coins if the Court falls; the Parliamentarians have their train in the yards of the Golden Ball tavern, so will also lose three victory coins if the building top right is taken by the enemy.

Opening Moves

The action began with the cavalry on the Parliamentarian left wing. As the Roundhead Horse swept forward, one Squadron of Royalist horse headed left thinking to move up the road and take the enemy guns.

The Royalist commander (me!) had, however, misjudged things, and the right-hand unit of enemy Horse managed to get forward and charge them in the rear, smashing the Cavaliers from the field.

This success drove the Roundhead cavalry into a frenzy and, without thinking, they charged after the retreating Royalists, heading straight for the hedge behind which one of the Cookham Militia battalia waited.

This proved a foolish thing to do, and they were sent crashing backwards, and would spend the rest of the game lurking in the woods trying desperately to rally.

In the meantime, the rest of the Royalist horse would take advantage of their superior number of units and defeat the rest of the Parliamentarian cavalry. This wasn’t enough to break the whole Roundhead army so, as the Royalist horse promptly disappeared off table in pursuit, the game would be decided by the infantry.

The Other Side of the Field

The Roundheads advanced smartly up the field, but let one of their battalia get too far forward and become an isolated target for what little Royalist cavalry had been put on this flank.

I was sure that my two units of horse could take the Parliamentarian battalia: one to pin from the front, the other to hit if from the side.

Unfortunately, the rebels were made of stronger stuff than I had expected, and I ended up losing both units of horse to fire and melee. In particular, the Roundhead Gallant Gentleman (in blue on the front of the pike unit’s base) intervened at a crucial moment: the extra hit being just enough to finish me off.

Not a good start!

The main lines then clashed, but it was going to take something fairly miraculous to save the day now: I was outnumbered five battalia to two!

Miracles were in short supply on the Royalist side, so although my lone pike block lasted far longer than anyone expected, the Oxfordshire commanded shot were soon sent flying backwards, which was enough to finish the game in the Roundhead’s favour.

Aftermath

This was the narrowest of defeats. For about two turns, whoever lost the next unit would lose the game: my outnumbered infantry balanced by the lost Roundhead cavalry.

Another great game of For King & Parliament

Robert Avery

FK&P AAR: Widbrooke Common Replayed

I had a chance to re-play the Widbrooke Common ECW scenario using For King & Parliament. I posted a long AAR from the first game so will limit myself to describing a couple of highlights this time.

wid1.JPG

For those who haven’t read the first report, the battle involves a Parliamentarian force emerging from a road through hedges to engage a Royalist force waiting for them on the other side of the eponymous common.

The game played in quite a similar way to last time, with both sides’ cavalry on the Parliamentarian right flank (i.e. right side in the picture above) coming together a few turns before the infantry met in the centre.

Once again, the Parliamentarian Dutch horse won the encounter overall, but lost a unit to pursuit. The other, however, crashed in to the left side of the Royalist infantry line in what turned out to be the coup de grace.

One unit of Royalist cavalry did break through, and went on to wipe out the Parliamentarian dragoons despite the fact that the latter were in cover behind a sizeable hedge. The Cavaliers then also disappeared off the battlefield: again showing how effective cavalry are in FK&P…but only once!

Another interesting incident was the way that the Royalist cavalry managed to bottle up the Parliamentarian reinforcements in a field. Ultimately, it didn’t have any effect on the result of the battle, but interesting anyway.

So another Parliamentarian victory, and it’s on to the battle for Pinkney’s Court next time.

FK&P AAR: Widbrooke Common

With lockdown easing, K. (daughter #1’s boyfriend, trapped with us for the duration, now a keen wargamer) was able to travel back to his native Ireland, so it was with a heavy heart that I took the news that he was going to visit his mother for three weeks. This was serious stuff: who was going to do the cooking and, obviously more importantly, who was I going to wargame with?

We decided to see him off with the next For King & Parliament English Civil War scenario in my North Wessex campaign.

For this encounter, the Parliamentarians under Sir Christopher Grey have discovered that the well-drilled and armed Royalist foot that did them so much damage last battle have been requisitioned by the King and sent to fight further west. This leaves Sir John Boulters, Royalist commander around Maidenhythe, very short of infantry: he must now rely on hastily recruited farmworkers from the Cookham area. Sir Christopher now leads his men towards Maidenhythe, seeking to take advantage of his erstwhile friend’s shortage of good quality foot. Grey’s men are strengthened both by reinforcements and a supply of arms and ammunition, including a couple of cannon. The two forces will meet half way between Cookham and Maidenhythe, at Widbrooke Common.

The set-up from the Parliamentarian side

And from the Royalist side

The Royalists have their back to a small splash-across stream. They have brigades of seasoned horse on either flank, and their untried, pike-heavv foot in the centre. Finally, they have a Forlorn Hope in the farmhouse on the right hand side of the field.

The Royalist infantry (the smoke markers represent an Untried unit yet to test for first-time nerves)

The Parliamentarians are just coming on to the common from the farmland immediately south of Cookham. Their Dutch horse has secured their right flank, half their foot is busy deploying in the centre, with the other half still in the process of arriving on the left flank. Their cannon have set up on or near the road: the common looks a bit soft for the guns!

The Parliamentarian Horse

The Parliamentarian Centre

The Battle Begins

One unit of Parliamentarian horse advanced forward quickly, the other two inexplicably lagging behind. This advanced unit was met by the three squadrons of Cavalier cavalry, also advancing strongly. In the resultant clash, the Parliamentarian horse was swept from the field, but one unit of Royalist horse had been lost, and another had set off in hot pursuit of their fleeing foe.

Note that the lost Parliamentarian cavalry squadron was my newly painted Dutch Horse unit, thus proving the adage that a unit never performs well on its first outing on the tabletop!

Meanwhile, the Royalist infantry advanced forward strongly, and the Parliamentarian foot on the left flank joined battle with the Royalist Forlorn Hope in the farmhouse.

Opening Stages

The main action continued with the cavalry. The pursuing Royalists ran over the Parliamentarian Dragoons, who had inexplicably pushed their way through the hedge in front of them rather than hiding behind it. This left the Royalists still in pursuit, jumping the hedge themselves as they headed off table to the Roundhead rear.

“That Be a big hedge, Jethro!”

Meanwhile, the other Parliamentarian horse had finally worked out how to get their steeds to go forward, and crashed in to the other remaining Royalist squadron. Honours were even in this fight, with each side losing a squadron, but that left one unit of Roundhead cavalry in a superb position behind the main Royalist infantry line.

Big problem for the Royalists!

Fortunately the Royalists had a reserve in the form of Sir John himself at the head of his Cuirassier Bodyguard. As the two infantry lines came together, Sir John led his loyal lobsters forward: outnumbered two-to-one.

This was actually an epic encounter, as Sir Christopher Grey was also at the head of his Cavalerie. The two commanders were therefore leading their horse directly against each other!

This proved a good move tactically, but a disaster for Sir John himself: seriously wounded in the clash that followed, he was carried from field, close to death, his Cuirassiers fleeing around him pursued by the Roundhead cavalry. History, unfortunately, does not record whether the two former friends actually met each other in the melee.

Worse was to follow. Although on the other side of the field the other Royalist horse had managed to flank charge a battalia of Untried Parliamentarian militia, the boys from Medmenham proved a tough nut to crack: quite frankly refusing to break no matter what the Royalists did.

The first flank charge goes in!

And worse! In the centre, the Untried Royalist foot wavered at the sight of the Roundhead foot in front of them, doubtless also unnerved by the fall of Sir John. Gradually the Royalist line began to bow backwards, and then suddenly broke: all victory coins gone. The Roundheads had won the day!

Just before the Royalist line broke

Aftermath

A great battle, and a suitable victory for K. as he heads off home.

The Untried Royalist foot proved no match for the seasoned Parliamentarian battalia, but it was really the two cavalry actions that decided the day. On the Royalist left, honours proved even with both sides losing the same number of units, but the Royalist horse left the field in pursuit whereas the Roundheads managed to rally and found themselves nicely behind the Cavalier line. On the Royalist right, the cavalry should have KO’d at least one of the infantry battalia they hit in the flank, but just couldn’t quite break them: they breed them tough in Medmenham.

But it was the wounding of Sir John and the dispatch of his Bodyguard that really did for the Royalists. It was an encounter that could have gone either way - a small but veteran Cuirassier unit versus a much larger but less protected Dutch horse squadron - but, as it was, the clash, and therefore the battle as a whole, went to Parliament.

Robert Avery

More ECW Dutch Horse

Having painted up three units of Republican Romans, I needed a break from things Latin, so dipped into one of the more recent outcrops from the lead mountain: another unit of Dutch horse for my English Civil War collection.

These are more from the excellent 15mm Hallmark range, available from Magister Militum. They are painted with GW Contrast Paints, with the flag from Maverick. The base is a large vehicle base from Warbases.

ECW Artillery Bases

Managed to find time to paint up a couple of ECW artillery bases for For King & Parliament. Guns and figures are all 15mm from Peter Pig and, as usual, they’re painted with GW Contrast Paints.

These have come out quite nicely, and will form the centrepiece of the next scenario in my fictional North Wessex campaign.

FK&P AAR: The Attack on Marlowe Again

Having written the scenario and got the table all set up, it seemed a shame not to play the Attack on Marlowe battle again, but this time swapping sides.

A full background to the game can be found in my original battle report (where I played the attacking Royalists), so here’s a summary and photographic report of the second run through (where I played the defending Parliamentarians).

This was a very different affair to our last game, as we both had a better idea of how things worked.

It was a grinding clash which, once my horse had returned from their pursuit off table, really came down to a whoever loses the next unit loses the game situation.

As it happened, that was me!

A great game, and I’m really looking forward to writing and playing the next scenario in the series.

FK&P AAR: The Attack on Marlowe

Now that I had enough figures to field two decent sized English Civil War armies, it was time to get them onto the tabletop.

As I didn’t have enough of the right sort of figures for any of the published scenarios, I settled down to write my own and, just in case long-term inspiration struck, came up with the background for a potential campaign.

The Background

It’s the fictional county of North Wessex sometime in the middle of 1644. Two landowners, previously great friends, have found themselves on opposite sides in the war. Passionate discussions over dinners have turned into bitter arguments have turned into armed dispute!

On the Royalist side is Sir John Boulters, whose series of mills around the town of Maidenhythe provide a ready source of troops. With a commission from the King to restore order in the area, Boulters’ force is balanced and well-equipped.

kavan’s foot

On the Parliamentarian side, Sir Christopher Grey has a less balanced force more suited to defence than attack: he is short on horse, but does have plenty of foot . Sir Christopher’s troops are…well, old-fashioned is a phrase that suits: what horse he has fights in the Dutch style rather than the more progressive Swedish formations, and his infantry are pike-heavy. He has, however, received reinforcements from London: a brigade of commanded shot.

The Battlefield

Key to control over North Wessex is control of the bridges over the Thames: one at Maidenhythe, and one at Marlowe. Boulters already holds Maidenhythe, and has determined to force his former friend to operate north of the river only by taking Marlowe as well.

Approaching from the east, his scouts report that the Parliamentarians are drawn up just in front of the outskirts of Marlowe, obviously determined to do battle.

The battlefield from the Parliamentarian side

The Royalists

As has already been mentioned, Boulters’ Royalists are a balanced force drawn up in three brigades.

the royalists

Stafferton’s Right wing Horse Brigade (Boulters and his lifeguard in the background)

Sir William Ray’s central foot brigade

Colonel Derek Derrick’s left wing horse brigade

The Parliamentarians

Drawn up with defence initially in mind, the Parliamentarian forces under Sir Christopher Grey await them.

dutch horse and dismounted dragoons on the left wing

the foreigners from london in the centre

pike heavy battalia on the right wing

More Shots of the Troops, Now With Markers Down

The Battle Begins

As the sun rose over Marlowe, the two sides prepared to do battle:

view from the right flank

The Royalists opened proceedings by advancing all three of their brigades. Assuming that the Parliamentarians would stay fairly static in their defence, their plan was to control the centre as each wing swept around the enemy flank.

They were therefore somewhat surprised when a Parliamentarian Forlorn Hope left its blocking position on the road and charged towards where Sir Boulters sat surveying the field behind his cuirassier lifeguard. Boulters had obviously forgotten Nicholas Seymour’s daughter, but it seems that Nicholas Seymour had not!

Faced with such paltry opposition, Sir John ordered his lifeguard to charge. Well, it was either that or face an ignominious withdrawal before the action had even begun!

It was no contest: the cuirassiers literally rode over the Parliamentarian Forlorn Hope, leaving Seymour coughing his lifeblood into the muddy ground.

seymour’s demise

Unfortunately, a charge like that cannot easily be stopped, and Boulters and his cuirassiers completely lost control: charging forward right up to the battalia of enemy commanded shot sheltering behind a hedgerow.

this looks like a good way to lose your commanding general!

Meanwhile, the Parliamentarian Dutch horse and Dragoons moved forward and a general melee broke out. Much to my surprise, the Dragoons initially repulsed the untried Nicholson’s Horse attack, sending their charge back disordered.

Nicholson’s Horse were, however, made of stern stuff, and with their commander shouting what can only be described as vile imprecations they closed with the Dragoons again, this time sending them flying from the field.

General Melee

General Melee

In the other part of the melee, however, the 1st Grey’s Cavalerie swept Stafferton’s horse from the field, then set off in pursuit of the broken survivors.

This, however, led them vulnerable to a flank charge from the Royalist Braywicke horse, a small Swedish-style unit raised and led by Simon Braywicke, a landowner on the western edge of Maidenhythe.

our flank charge must surely win the day!

Unfortunately, the charge had no effect on the Parliamentarian horse: they ignored Braywicke and his men and disappeared off east after the remains of Stafferton’s men.

Ed.’s Note: I think we did that bit wrong. The Cavalerie should have stopped their pursuit and turned to fight the Royalists.

This reverse left Braywicke a bit surprised, but his surprise only lasted long enough for his men to be hit by the 2nd Grey’s Cavalerie squadron: hit and smashed from the field!

perhaps not!

Meanwhile…

Meanwhile, on the other side of the field, the Parliamentarian foot had formed a line, and were nervously watching Royalist cavalry start to threaten their flank.

This they countered by sending one of the Kavan’s foot battalia forward to meet the nearest enemy cavalry squadron, and turning another to face the threat on their flank.

At the same time, the Londoner commanded shot units in a surprising display of martial fervor, left the shelter of their hedgerows and moved forward to bring the enemy under fire.

martial fervor from the londoners!

Although the Royalist cuirassiers chose to fall back, the 1st Maidenhythe Foot Battalia lowered their pikes and sent the foreigners scurrying back to (presumably) the slums that they had come from.

This coincided with the two last remaining horse units on that flank - Nicholson’s Horse for the Royalists and 2nd Grey’s Cavalerie for the Parliamentarians - coming together with a mighty smash: both squadrons becoming disordered. They clashed again, and although Colonel Stafferton was lightly wounded, the Royalists eventually won the encounter.

Perhaps due to the impetuosity of the Londoners, this flank had been decided firmly in favour of the Royalists. They had lost only two squadrons of cavalry, but had done for five enemy units: two Forlorn Hope, one Dutch Horse and one Commanded Shot.

Back to the Other Flank

Back on the other side of the field, the 1st Battalia of Kavan’s Foot were still holding off the Derrick’s Horse, and had managed to inflict a light wound on Colonel Derrick himself.

Pike Heavy Foot versus Swedish Horse

In the centre, however, the Royalist foot was pushing forward, and had made the start of the enclosures in front of the town.

The way into marlowe is now clear!

This enabled one Battalia to bring the Parliamentarian foot under fire, meaning that the Roundhead’s days were probably numbered.

the Mill Workers Coming to Colonel Derrick’s assistance

Meanwhile, the 3rd Battalia of Kavan’s Foot had been solidly repulsing charge after charge from the Woodhurst Horse. Although at one stage they were double-disordered, they actually managed to rally back to good order, and were obviously going to be very hard to shift.

Endgame

Looking at the battlefield, however, it was obvious that the Royalists had won the day. All that remained of the Parliamentarians were two battalia of Kavan’s foot on the right flank, and one of the Londoner commanded shot units in the centre. There was a squadron of Dutch horse floating somewhere off-table, but there was no sign of it returning just yet.

the situation at the end of the battle

The game had probably been decided by the impetuosity of the Parliamentarians. Time and time again their troops left the comparative safety of the hedgerows and charged into close range or contact with the Royalists.

As this was only the second time I’d played the rules, I’m not sure I got everything right, but it seemed to give a very good game anyway.

Next we shall swap sides and play this game the other way around, and after that I shall be designing an encounter where both sides get a consignment of artillery.

Excellent fun, and another good lockdown battle!

Robert Avery

Here there be Dragoons!

More for my ECW armies: a unit of Dragoons.

In For King & Parliament, my chosen ruleset for the period, Dragoons are small unit compared to a standard infantry battalia: effectively a cavalry unit dismounted less a few chaps to hold the horses. I’ve already decided a Forlorn Hope as being eight figures strong, so given your standard battalia is 24 figures strong, the Dragoons are somewhere in the middle at 12 figures strong.

I’m not actually going to paint up mounted versions or horse-holders because, as I understand it, there was only one encounter where Dragoons fought mounted, so best to avoid ahistorical fielding by not having any on horseback. That’s my excuse anyway!

These are 15mm Peter Pig figures painted (quickly) with GW Contrast Paints. Note the chap next to the purple flower in the picture above. He’s a good example of something you have to watch out for with Contrast Paints: missing a bit! Because the paints flow like a wash, it’s often easy to forget to use a proper brush (i.e. not a wash brush) and work the paint into the relief (the creases) in a figure. If you just dab the paint on like a wash, sometimes it will run away from where you’ve dabbed it a few seconds after you’ve done the dabbing, which if you’re painting multiple figures on a lolly-stick can mean that you miss what’s happened because you’ve moved on to the next figure. I shall have to re-open the box and fix him!

Incidentally, I had started thinking that I’ll never finish this English Civil War project, but then I realised that the reason it was taking me so long to complete, the reason why I had painted so many figures compared to other armies, was that I was painting enough of the same sort of figure (as the sides are relatively homogeneous) for to field both sides in a game…so painting two armies or one double-sized army. Doh!

Finally, today, regular visitors will know that I’ve set myself a task of interspersing my new project painting with clearing some of my rather sizable lead mountain. Here’s what I did - to do my duty! - just before painting the Dragoons:

It’s one of those objective markers the size of a Battlefront large base. Don’t know why I had it, or what I’ll use it for, but that (tiny) corner of the lead mountain is now flattened!

More for the ECW Collection

Lockdown does definitely mean more time for painting, and I’m adding units to the 15mm ECW collection almost as fast as I can buy the raw lead!

Today’s offering consists of two parts.

First up is a standard infantry battalia but, for the first time, with the figures from Hallmark rather than Peter Pig:

These were actually easier to paint than Peter Pig: they are very un-fussy figures, with everything that needs to be painted clearly defined. As per usual, I used GW Contrast Paints, apart from the metalwork, painting eight figures of the same type at the same time.

I like to swap between ranges, provided the sizes match: a change is as good as a rest, as they say.

I like the way the Contrast red has left all the buttons a much lighter shade than the surrounding cloth: I can’t imagine what it would be like to hand-finish every one. Well, I can actually: very tedious!

Next up is a few of the offs and ends that you need to play the game itself: two Light Gun markers and one officer (a Colonel). I haven’t positioned the officer figure very well in the photograph: you can only see half his profile!

The gun markers are Peter Pig; the officer himself is from Hallmark, with his mounted flag bearer from Essex.

Dun Coloured Dutch Horse

As regular visitors will know, I’m trying to take advantage of the extra painting time available during lockdown by interspersing my main projects with clearing a bit of the lead mountain.

After having completed the platoon of Hawkmen from The Scene, who had been perched on the lead mountain’s upper slopes for some time (see post last Friday), it was time to get back to my English Civil War armies with another unit of Dutch-style horse.

Like the last unit painted, these are 15mm Hallmark figures from Magister Militum: a close match in size to the Peter Pig figures which, so far, have formed the bulk of the collection.

I decided to try and paint dun-coloured horses this time: using the GW Contrast Aggaros Dunes colour straight from the bottle and then blacking the legs, manes and tails. It seems to have worked quite well, turning out a bay dun or buckskin dun colour.

As an experiment, I also undercoated in the ‘official’ grey undercoat as opposed to the usual white. That worked quite well, as the grey doesn’t show through so much if you miss a bit. Didn’t really notice much difference to the colours though.

One thing I did notice, however, was that the Contrast Black colour is quite fragile i.e. the least scrape across the tails would take some of it off, leaving said undercoat showing through on the most raised bits. In the end I gave each horse a quick stroke of normal black paint straight down the tail which solved the problem. A pity, though, as the hair on dun coloured horses is rarely pure black: it tends to have medium dark brown strands as well, and the pure Contrast black simulated a non-block-black quite well.

The rest of the figures were also painted with Contrast Paints, except for the sleeves in white. I had to use normal acrylic white over the grey undercoat as the Contrast white didn’t really do anything: just came out a bit dingy. Contrast white over Warithbone white in future, I think.

Right, with another “main project” unit done, off to the lead mountain to see what I can find to paint up next.

Commanded Shot

Here is the first of the two Commanded Shot battalia that I have planned for my ECW collection.

These are 15mm figures from Peter Pig, painted with my now usual Contrast Paints from GW.

One more battalia of these to go, and then I’ve broken the back of the infantry that I need. I’ll probably paint up another couple of standard battalia to allow for the odd bigger game, but the main hurdle still to come is the Dutch Horse: 4-5 units of nineteen cavalry each. Other than that, it’s the fun stuff that gives you quick gratification as it doesn’t take long to finish a piece: artillery, officers, attachments and the like.

I need Dragoons as well, but can’t decide whether to paint up the entire mounted-horseholder-foot mixture required for a full representation, as I read that in the ECW, Dragoons only ever fought mounted once. I shall have to see how keen I am on painting up even more ECW when I get to that point.

First of the Dutch Horse

Regular visitors will know that I am currently building a collection of 15mm ECW figures with which to play For King & Parliament.

In FK&P, cavalry generally comes in one of two formations: the more modern, single-line Swedish style; or the more archaic, double-line Dutch style. So far I have painted up quite a few units of Swedish horse, but no Dutch.

All my ECW troops are based in big elements: bases that are roughly 12cms wide and 6cms deep, with a foot battalia being 24 figures (plus command). A Swedish style unit of horse is 9 figures (plus command) strong, a Dutch style unit therefore 16 figures (plus command) strong.

Big bases!

I was worried that differentiating between Dutch and Swedish styles needed more than just figures on a base, so wanted to try a different manufacturer as well. I also needed a break from painting Peter Pig figures (the vast majority of the army so far): not because I don’t like them any more, quite the opposite, but just to get a bit of variety in the brushwork.

The first manufacturer I tried was Blue Moon: lovely figures, so I ordered some cavalry, but when they came, they were distinctly larger than the Peter Pig cavalry that I already had. I mean grossly larger: they just would not do. I’m all for mixing and matching (people are different sizes after all) but this was ridiculous.

Off to the Internet, and I discovered this excellent blog post from the charmingly-named Madaxeman in which he posts pictures of all the different types of pike and shot infantry figures available. This was very useful, so I carefully scrolled down to where the Peter Pig figures started to appear and checked out which other manufacturer matched them for size.

There were some real horrors on the sizing and quality of figures front, but the two potential matches were with the Naismith line and/or the Hallmark line from Magister Militum. I couldn’t work out whether the Naismith line was still available to buy, which left MM’s Hallmark line as the range of choice.

And the winners are…Peter Pig on the left, Hallmark on the right.

An order and some nice prompt delivery later, and I had the figures for a unit of Dutch horse to paint up. The figures looked quite ornate to me, so I decided to make this first unit very much a unit of gentleman cavalry:

I’m very happy with these, so another order has gone off to Magister Militum (I can remember the first show they were ever at, just after they opened) for more horse and, this time, some infantry as well.

Looking at the MM website, you can ignore a lot of the detail and paint the cavalry in plainer colours, so that’s what I’m going to with this next unit.

And how do they compare with the Swedish horse. Here’s how:

Very good: exactly the effect I was after. I’m now off to wait for the postman…

More ECW Foot Figures

My ECW collection is coming along nicely: today’s addition is a third battalia of pike-heavy foot.

As usual, these are 15mm Peter Pig figures painted with GW Contrast Paints and mounted as one element on a Warbases’ Vehicle Base. The flowers are from Boontown.

I’m intending to use these for For King & Parliament, the ECW version of To The Strongest, hence why they will work well as a single base of figures.

What I need to do now is to swap my efforts onto the units of Dutch-style horse that my collection requires.

The main difficulty is that I would like to make the Dutch horse even more distinctively different to the Swedish-style horse I already have, so have been looking around for a different manufacturer to try.

I did try Blue Moon, who have some very nice figures, but they are distinctly bigger than the Peter Pig ones, especially the horses, so don’t really fit. I’m usually pretty tolerant about different figures sizes (after all, you do get a variety of sizes in real life), but these are really very much bigger. So if anyone wants a few packs of unpainted, untouched Blue Moon ECW horse, I’m happy to look at swapping them for something. E-mail me at the usual address (right hand column gives it).

Off to the Internet to see what I can find…