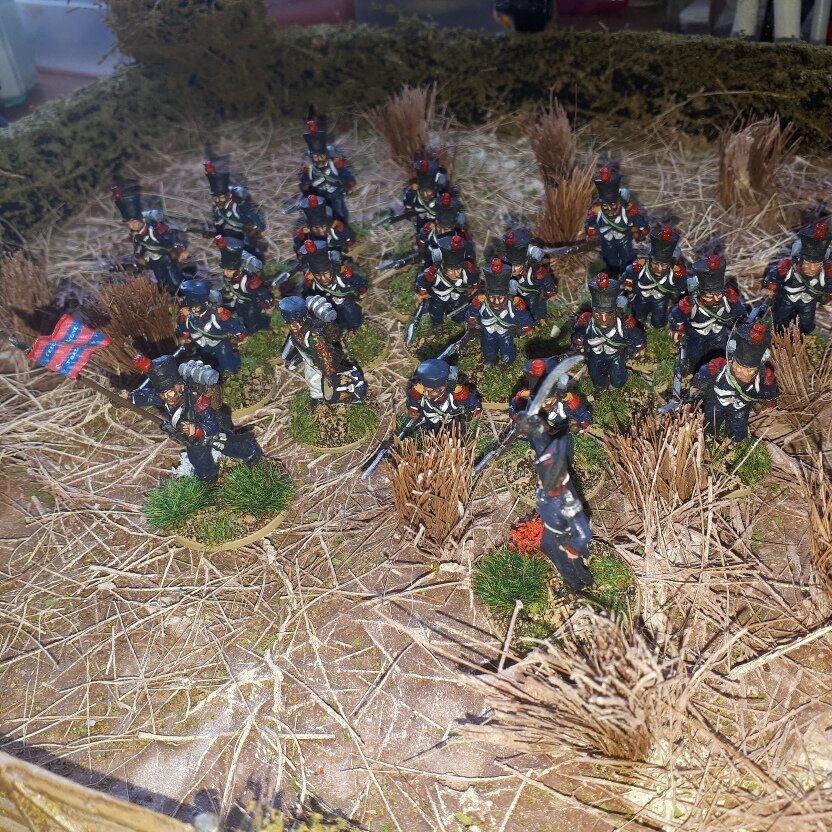
Hawkmen from The Scene

I am trying to reduce the lead mountain a little bit during this lockdown period, but it’s very hard when you have two to three active projects on the go and Battlefront are doing daily deals at 40% off,

The tactic I’ve decided to use is to paint one “new project” unit then one “lead mountain” unit in turn…and it’s amazing what you find at the back of the cupboard. Today’s treat is a platoon of 15mm Hawkmen - think Flash Gordon - from The Scene.

Onward my brave Hawkmen! Let this be known forever as Flash Gordon's Day!

I bought these as relatively low-tech allies for my Hauk force from Khurasan Miniatures to be used for Quadrant 13, the sci-fi adaptation of IABSM.

I undercoated them, painted two, then just fell out of love with them. I think it was something to do with the work needed on the wings to get them to look good…because, let’s face it, get the wings right and the rest of the figure doesn’t really matter!

Step forward GW’s Contrast Paints. One coat and the wings pop beautifully. I finished off the whole platoon in a matter of hours. Apologies for the crappy pictures, btw.

All I need now is to convert a spare into Mr Blessed’s Vultan himself and I’m good to go.

IABSM AAR: The September War #01: Chojnice

It was time for the first lockdown game of I Ain’t Been Shot, Mum!

The daughter’s boyfriend K (trapped here for the duration) had tried and enjoyed To The Strongest, it was now time to introduce him to WW2 gaming, and what better place to start than with a game of IABSM set in Poland on 1st September 1939.

The scenario is taken from the first September War scenario pack, and involves the fighting around Chojnice, an important Polish communications hub where, during the first day of the invasion, the Poles fought a delaying action, only withdrawing in late afternoon.

The game itself centered around a railway bridge that the Poles must hold, rig with explosives, and then blow up before the Germans can take the bridge and defuse the charges.

Click on the picture below to see all…

Matching Figures

As previously mentioned, I’m bringing my Vis Bellica 100YW English army up to To The Strongest strength: which means doubling the size of some of the units.

The big problem, of course, is how do you match the new elements to the old: especially when you painted the old elements at least a decade or so ago?

The first problem is sourcing the right figures. I’d used Museum Miniatures first time around and, doubtless because of their continuing quality of product and excellent service, they are still around and actually going from strength to strength with their Z Ranges. Their 100YW range was still available, so I was easily able to match up my existing unit of Household Archers in terms of the raw lead.

The second problem is the colour scheme to use. Yes, I can see what colours the existing figures are, but I haven’t always kept a record of exactly which paints I used. I do for many of my armies, especially for WW2 and later periods, but not for the 100YW one.

The new element is on the left, furthest from the camera

Fortunately I had painted the existing archers very simply: red and blue and metal, so I wasn’t too worried that the old and the new would differ too much.

Far more important was the development of my painting style. As you can sort of see in the picture above, my old way of painting was a simple two-shade approach over a black undercoat. So undercoat in black, paint a dark version of the colour you want, highlight with a light version. This was very effective, and looks good, but quite time consuming: you are actually painting each figure twice. These days, however, I tend to use GW Contrast Paints over their Wraithbone undercoat: an entirely different method.

And from behind (the new element is now on the right)

Here is where the pleasure of using Contrast Paints comes in to play: the results are almost identical to the shading, and half the effort. You can also get some very nice depth on things like the axeman’s hauberk and the belt around it.

Okay, so I’m only painting to good wargames standard, but you can achieve some incredible things with Contrast Paints. I was, for example, very pleased with my ECW command figures (Essex 15mm).

So you now have the right figures painted to a good approximation of the existing element: all you have to do next is base them.

This is where I came more of a cropper. Firstly, for my existing army I had used thin metal bases, but had now run out. I could have sourced some, I suppose, but in the end decided to take the easy option and use my now-standard Warbases premium mdf versions.

I also had no paint that matched the existing bases (a very oddly light green) and had no note of where I had got in from. Worse, I had totally run out of the flock that I had used previously and, again, had no idea of where I had got it from. In the end, I bit the bullet and just went for the closest thing I could find in my flock collection: it doesn’t match, but it’s not too bad.

So there’s what you have to do to match old and new units:

  • the figures

  • the colours

  • the painting style

  • the bases

  • finishing the bases

I’m pretty happy with the match, and I’m sure that under “battle conditions” I’ll stop noticing any differences within minutes.

Post Script

I also painted up a unit of what Museum call Brigandines and I’m using as Billmen:

Missed Four Entries

Whoops! Missed four entries off yesterday’s Challenge entries: some lovely terrain from Carole, ECW from Mr Helliwell, more Gangs of Rome from Chris Kay, and more re-basing from Stumpy. All galleries and the Scorecard now updated, and here’s a special four-person gallery of some of what I missed:

Lockdown Painting Challenge Update 3

Well it seems as if I am not the only one taking full advantage of lockdown to paint little soldiers: a huge number of entries into the Challenge since the last update a week or so ago.

I encourage you all to visit the galleries to see what people are producing, but here’s a sample from everyone who sent something in:

More Painting

Not commuting every day has certainly increased my painting output, so it was time to start a project that’s been on my mind since before Christmas.

Regular visitors will know that I play the Ancients game To The Strongest using 15mm figures on a 15cm grid. This way, I can use the armies that I originally put together for Vis Bellica on 6cm frontages by using two VB units for one TTS unit. This has meant a lot of investment in my old VB armies: effectively doubling the size of each or, where “deep” units such as Hoplites and Warbands are concerned, quadrupling the number of bases needed.

One of the last armies to need the TTS expansion treatment is my 100YW English army: knights, longbows and billmen. The trick here was going to be matching the figures and paint schemes that I had used before.

Figures weren’t so much of a problem…once, that is, I’d remembered (i.e. searched the Internet until I got a match) that I’d used Museum Miniatures for the core of the VB army. Paints would have to be as close as I could get with the originals using Contrast Paints.

Here’s the first two contributions: a command stand and an element of longbows:

I also managed to find time to complete a second unit of Commanded Shot for my ECW armies. As with the other, these were Peter Pig figures in 15mm.

I’ve also just had another delivery of Hallmark figures so (once the wife has wiped the package down with Dettol!) it’ll be on to more Dutch Horse.

Two Games of To The Strongest

Another two lockdown games of To The Strongest with Daughter#1’s boyfriend, who is staying with us for the duration.

This time we ditched any pretense of involving the distaff side of the family: leaving them to watch The Queen’s Corgis on Netflix or Amazon or one of the other multiple streaming services that we seem to have adopted over the past few months, as we men got down to some serious gaming.

As this was our third session of TTS, I wanted K. to experience something a little different to the largely “deep units on both sides” games that we’d been playing so far. I therefore mocked up a Sarmatian army from my Sassanid Persians: four units of veteran heavy cavalry with lance and bow represented by cataphracts (represented by, not counting as!) and four units of standard heavy cavalry with lance and bow represented by clibinarii. There was also a unit of horse archers in there somewhere too.

K would take a Syracusan army: a core of four Hoplite units, one bodyguard; a mercenary command with a couple of units of Celts; and then a sprinkling of light infantry and raw cavalry to add flavour. It was, I explained, the first time that the Cretan Archers (see post from a couple of days ago) had been on the tabletop, so he was to expect them to perform extremely badly indeed!

“Why are all your men on that side of the battlefield?”

We deployed our troops, and K immediately noticed that I had heavily weighted my left flank, leaving many of his units with an open battlefield in front of them. He queried why I had done so, and I kindly explained that he would find out in a few minutes.

The reason, of course, was that I was going to try and smash his weak right flank to pieces and then wheel round and roll up his line like a yoga mat before his slow, left-flank units could get in on the action.

The first phase of my plan went, well, according to plan: one command of veterans and one command of standard cavalry did indeed clear K’s right flank from the table, leaving things looking like this:

Tough love!

Some of you might suggest that it was perhaps a little harsh of me to take advantage of the lad’s inexperience in this way, but I did explain exactly what I had planned and what I thought was going to happen as I did it: making sure that he would understand what was going on and be able to either counter or employ the same tactic in the future.

Back to the battle.

As a command of clibinarii duly held off his rampaging Celtic mercenaries, my cavalry duly wheeled round and, in text book fashion, slammed into his flank and, in one unit’s case, went for his camp.

Cretan Archers fulfilling their first-game destiny

Syracuse has fallen!

K began shedding victory coins right, left and centre, and the day was soon mine.

Game Two

As that game hadn’t taken very long, we swapped sides and prepared to do battle again.

I was expecting K to try and copy my refused flank tactic of last time, so determined that I would use an advance in echelon tactic to try and disrupt his plans. As it happened, K deployed his men evenly over his side of the table, so after I had made my first move, the battlefield looked like this:

On his right flank, K advanced his cavalry forward to meet the two units of Celts coming towards him over the hill. This left his horse archers to hold off the mercenary Greek cavalry coming through the pass.

This turned out to be a bit of a mistake as, admittedly with a bit of luck, my cavalry rapidly dispersed his light horse and found themselves in a fantastic position on the flank of one of his commands.

By rights, his horse should have been able to turn to face me, and then a normal face-to-face combat would have occurred, but K managed to draw not one, not two, but three Aces in succession for activation: his horse weren’t moving anywhere!

By rights, I should then have been able to crash into his flank and roll up both units rather pleasingly before going on to sack his camp: seven of his nine victory coins should have been mine. Again, however, a weird series of cards meant that his cavalry, although they wouldn’t turn to face me, were able to hold me off for the duration of all his Aces. I did eventually destroy both units, but not before events on the rest of the field decided the day.

Battle was then generally joined across the rest of both lines, with K’s lance armed cavalry attacks compensating for the depth of my foot units.

the first cut is always the deepest!

I kept expecting my horse to roll up his cavalry and win the game but, as I said above, it kept failing to happen, and gradually my foot units began to lose the day. A lost general sealed my fate, and the turn after my horse had finally rolled up those cavalry at the back, I lost one victory coin too many and the day was K’s: a grinding triumph for the Sarmations.

K was naturally chuffed to bits to get his first victory. The only thing that now puzzles me is where he’s going to sleep tonight…

Commanded Shot

Here is the first of the two Commanded Shot battalia that I have planned for my ECW collection.

These are 15mm figures from Peter Pig, painted with my now usual Contrast Paints from GW.

One more battalia of these to go, and then I’ve broken the back of the infantry that I need. I’ll probably paint up another couple of standard battalia to allow for the odd bigger game, but the main hurdle still to come is the Dutch Horse: 4-5 units of nineteen cavalry each. Other than that, it’s the fun stuff that gives you quick gratification as it doesn’t take long to finish a piece: artillery, officers, attachments and the like.

I need Dragoons as well, but can’t decide whether to paint up the entire mounted-horseholder-foot mixture required for a full representation, as I read that in the ECW, Dragoons only ever fought mounted once. I shall have to see how keen I am on painting up even more ECW when I get to that point.

IABSM AAR: Campaign for Greece #13: Glider Assault

Another amazing-looking 6mm game of I Ain’t Been Shot, Mum from Mark Luther: his second, played-remotely, lockdown special.

This time he has used scenario #13 from the Campaign for Greece scenario pack, entitled Glider Assault.

Click on the picture below to see all:

A Bit of Bank Holiday Painting

I managed to get a bit more painting done over the bank holiday weekend: just a few bits and pieces rather than anything major.

First up, a unit of Cretan Archers for my Greek and Macedonian armies:

These are from Museum Miniatures’ excellent Z Range of CAD figures. Really nice and highly recommended.

Then there are a couple of officer stands for For King & Parliament: a General and a Colonel.

These are the always-dependable Essex figures in 15mm. I think I went bit over the top with the costume on the Colonel’s flag-bearer, but have compensated by making the General’s costume quite muted.

AAR: Smash of the Titans!

So #1 Daughter’s boyfriend had been roped into cooking the Easter Roast, which left me no-one to play with except for #2 Daughter.

She felt that she could manage another battle, but only if it had “monsters and aliens and stuff” in it.

Not a problem my dearest fruit of my loins: time to make To The Strongest literally fantastic by breaking out my Legendary Greek figures.

I would play the Sumerians, #2 Daughter would take the part of Poseidon leading a contingent of Hoplite Greeks spiced up with few “monsters…” etc.

In effect, this meant that she fielded (nearest to furthest in the picture above) a unit of Pegasus horse that could ignore terrain penalties; two units of Centaur cavalry (one horse archers, one cavalry); a unit of Minotaurs counting as axemen; and two units of monsters: the Hydra, the Erymanthian Boar, the Chimera, and the Medusa (treated as elephants).

The Sumerians remained unphased by this display of divine horrors:

The Battle Begins

The game began with one of those weird series of multiple Aces appearing on each side, with the result that although the lines crept slightly closer together, the only interesting event was the Hydra and Chimera bounding forward to attach the Sumerian left flank.

Very sensibly, the slingers ran for it…and here #2 Daughter made a mistake. Instead of crashing through the poor terrain, or lurking in its lee, the Hydra and Chimera decided to go round it. Not being very manoeuverable, however, they got stuck with their rear ends sticking out!

This would prove to be a very inviting target for the, er, pink Sumerian spearblock, and they would eventually charge the two monsters in the rear and do enough damage to send them straight off the table, therefore negating the regenerative abilities that I had assigned to both (automatically regenerate from disordered when activated).

The two battlelines then got on with the business of smashing into each other, each advancing forward as fast as they could.

As Sumerian commander, I sent in my battlecars first: determined to soften the Legendary Greeks up a bit before committing my infantry.

This was all going nicely, with the Centaur horse archers eradicated when they failed to evade, but I had forgotten about the terrain-ignoring Pegasus cavalry: which snuck around my flank and threatened to roll up my entire line!

Fortunately, great Zeus was obviously determined to make sure that his somewhat soggy brother was humiliated, and the flank charge only managed to KO one unit of battlecars before a spear block managed to get forward fast enough to force the flying horses to evade beyond the trees.

Unfortunately, the other two units of battlecars believed in a different divine panoply, and were destroyed by the Hoplite unit backed by Poseidon himself and, a bit unexpectedly, the Centaur cavalry. Things were looking a bit dicey on my right flank, but I had the infantry brigade behind ready to stabilise the situation.

The action now swung to the other side of the field, where the Minotaurs had been easily dismissed: obviously their tales of martial prowess were complete bull! I had, however, lost my Axemen, so the situation looked like this:

Zeus intervened again, and somehow I managed to dispose of the Medusa and the Boar, and get my spearmen back across the field and into the rear of what had been the Minotaur-led Hoplites.

Their loss proved too much for the Legendary Greeks to take, and the field of glory was mine.

Aftermath

A most enjoyable game which, I must confess, that I won by sheer luck of the cards. #2 Daughter, who is not yet old enough to drive, made only one tactical error, at the beginning, and otherwise came close to annihilating an entire flank which would, I think have given her victory. As it was, I was only one coin behind her in terms of defeat.

I think I might actually make a serious attempt to define some characteristics for the Legendary Greeks, if only because it’s nice to get some unusual figures on the tabletop.

Right, off to the Temple of Zeus to give thanks…

First of the Dutch Horse

Regular visitors will know that I am currently building a collection of 15mm ECW figures with which to play For King & Parliament.

In FK&P, cavalry generally comes in one of two formations: the more modern, single-line Swedish style; or the more archaic, double-line Dutch style. So far I have painted up quite a few units of Swedish horse, but no Dutch.

All my ECW troops are based in big elements: bases that are roughly 12cms wide and 6cms deep, with a foot battalia being 24 figures (plus command). A Swedish style unit of horse is 9 figures (plus command) strong, a Dutch style unit therefore 16 figures (plus command) strong.

Big bases!

I was worried that differentiating between Dutch and Swedish styles needed more than just figures on a base, so wanted to try a different manufacturer as well. I also needed a break from painting Peter Pig figures (the vast majority of the army so far): not because I don’t like them any more, quite the opposite, but just to get a bit of variety in the brushwork.

The first manufacturer I tried was Blue Moon: lovely figures, so I ordered some cavalry, but when they came, they were distinctly larger than the Peter Pig cavalry that I already had. I mean grossly larger: they just would not do. I’m all for mixing and matching (people are different sizes after all) but this was ridiculous.

Off to the Internet, and I discovered this excellent blog post from the charmingly-named Madaxeman in which he posts pictures of all the different types of pike and shot infantry figures available. This was very useful, so I carefully scrolled down to where the Peter Pig figures started to appear and checked out which other manufacturer matched them for size.

There were some real horrors on the sizing and quality of figures front, but the two potential matches were with the Naismith line and/or the Hallmark line from Magister Militum. I couldn’t work out whether the Naismith line was still available to buy, which left MM’s Hallmark line as the range of choice.

And the winners are…Peter Pig on the left, Hallmark on the right.

An order and some nice prompt delivery later, and I had the figures for a unit of Dutch horse to paint up. The figures looked quite ornate to me, so I decided to make this first unit very much a unit of gentleman cavalry:

I’m very happy with these, so another order has gone off to Magister Militum (I can remember the first show they were ever at, just after they opened) for more horse and, this time, some infantry as well.

Looking at the MM website, you can ignore a lot of the detail and paint the cavalry in plainer colours, so that’s what I’m going to with this next unit.

And how do they compare with the Swedish horse. Here’s how:

Very good: exactly the effect I was after. I’m now off to wait for the postman…

New Daily Deals from Battlefront and a Grave Situation!

I lied: I did look. All the above for £259: 31% off and free shipping.

In between painting up newly bought figures, I am trying to take advantage of the lockdown (and resultant lack of time spent commuting) by eating into the lead mountain.

Getting through it completely is, of course, a ridiculous idea: particularly with the current Battlefront Daily Deals promotion.

Every day Battlefront are putting a selection of different units at 40% off and free shipping for a 24 hour period only. Yesterday was Day One, and I picked up a company of T-62 tanks for £36; nothing I fancied today, however, but I can foresee a lot of expenditure over the coming weeks!

They are also discounting a lot of their pre-painted Battlefield in a Box buildings, but I haven’t dared look at the offers there yet!

Anyhow, more tanks and buildings aside, one thing that has been sitting on the painting table for ages is a 15mm walled graveyard that I built out of things from the bits box and a gravestone set.

I’m actually rather pleased with it, even if the walls and gates have little gaps in between each section!

Everything is painted with GW Contrast paints: a dark grey for the walls and main cenotaph, a lighter grey for most of the gravestones themselves, Snakebite Leather for the newly-turned piles of earth, and a darker brown for the shed and gates. Here’s a shot with, randomly, some archers standing inside.

Big Painting Challenge Update

Well it seems as if many of you are getting into your lockdown painting stride, with loads of entries into the Painting Challenge.

In today’s batch we have the following:

There are many more photos to see in the individual galleries, so make sure you take a peak there as well.

Right: off to the painting table myself now!

IABSM AAR: War of the Rats

Over a few days earlier this month, fellow-Lardy Alex Sotheran played a solo game of IABSM set in Stalingrad, where the 6th Army are attempting to batter their way to the Volga but the Soviet defence line is proving tenacious.

Alex has posted both a YouTube video of the game and some absolutely cracking pictures.

To watch on YouTube, click the video link below. It’s 2.5 hours long, but well worth a watch.

To see the pictorial report, click on the picture below:

A Second Lockdown Game of To The Strongest

We’re still in coronavirus lockdown in the UK: banned from leaving the house except for essential trips. For most people, that means no gaming or, at best, some kind of online get together. I, however, am lucky enough to have daughter number one’s boyfriend staying with us for the duration: lucky because (1) he likes to cook and (2) he has discovered that he enjoys wargaming.

Our second game was To The Strongest again: it’s grid-based tabletop and simple-yet-subtle mechanics make it ideal for a new gamer to pick up quickly.

This time, I would take a Gallic army consisting of large amounts of hairy-arsed Celtic warriors and face off against an Athenian Greek Hoplite army consisting of large amounts of, well, hoplites.

Gauls

Greeks

The Greeks set up first: heavily weighting their right flank. At this point I realised that perhaps I should have mentioned to my novice opponent that hoplites can’t move diagonally to the left, but decided to just ignore that rule for the moment.

My Gauls were fairly evenly spaced out, but my noble cavalry were on the left i.e. facing two unit of hoplites with very sharp pointy spears! This was no good, so I decided to try a switcheroo gambit and move my cavalry right over to the other side of the field, leaving behind the warband that accompanied them.

The Switcheroo Begins

This would hopefully isolate his two units of hoplites on the far side of the table.

Meanwhile, both battle lines lurched towards each other, the Greeks behind a protective screen of light infantry.

The game then developed into three different battles.

On my left flank, the single warband faced off against the two hoplite units who had actually managed to advance forward much faster than I had expected. Although my warband did achieve one flank attack, this was largely unsuccessful, and I was soon under a lot of pressure as the Greeks got themselves sorted out and threatened to overwhelm me with the two-on-one advantage that they had.

In the centre, meanwhile, the main bodies of the two armies came together in a series of thumping clashes: deep unit versus deep unit. The Greeks took full advantage of their light infantry: using them either to soften the Celts up before contact, or to retreat behind if they suffered a disorder. The advantage would swing backwards and forwards between the two sides throughout the rest of the battle.

On my right flank, my light infantry had managed to see off his horse archers, but a warband was having real difficulty dispatching the rubbish Greek cavalry. Fortunately, my cavalry arrived after their pell-mell gallop across the back of the battlefield, and prepared to sweep all before them as they rounded the corner of some rocks and lined up on the Greek battle line’s flanks.

All that stood between them and certain victory was the lone unit of Greek peltasts that, so far, had hung back and stayed out of trouble.

Cavalry, bottom right, lined up to roll up the Greek line. Only the peltasts are in the way.

Could I get through the peltasts? Not in a month of Sundays! My grand plan blocked by a unit of men who only thought they weren’t light infantry!

Anyhow, that meant that although I had won the right flank, I was losing the left flank, and honours were just about even in the centre. A Greek hoplite unit finally broke through my line and captured my camp, one of my warbands threatened to do the same to the Athenian camp. Units were breaking on either side until we both had just two coins left: the next unit to break would decide the game.

It was the Greeks who had the initiative. I was in real trouble on my left flank, with a couple of double-disordered warbands who would go with one more hit. My opponent reached for his pack of cards: all he needed to do was to send his men in diagonally to hit me: 2+ to activate becomes 3+ for a difficult move becomes 4+ because your hoplite units are deep.

So that was the end of the Greek offensive and, on my subsequent turn, I managed to finally kill the peltasts and win the game!

Aftermath

Another great game of TTS, with the daughter’s boyfriend coming within Ames Ace of beating me.

Here’s a complete gallery of the game:

Robert Avery

More ECW Foot Figures

My ECW collection is coming along nicely: today’s addition is a third battalia of pike-heavy foot.

As usual, these are 15mm Peter Pig figures painted with GW Contrast Paints and mounted as one element on a Warbases’ Vehicle Base. The flowers are from Boontown.

I’m intending to use these for For King & Parliament, the ECW version of To The Strongest, hence why they will work well as a single base of figures.

What I need to do now is to swap my efforts onto the units of Dutch-style horse that my collection requires.

The main difficulty is that I would like to make the Dutch horse even more distinctively different to the Swedish-style horse I already have, so have been looking around for a different manufacturer to try.

I did try Blue Moon, who have some very nice figures, but they are distinctly bigger than the Peter Pig ones, especially the horses, so don’t really fit. I’m usually pretty tolerant about different figures sizes (after all, you do get a variety of sizes in real life), but these are really very much bigger. So if anyone wants a few packs of unpainted, untouched Blue Moon ECW horse, I’m happy to look at swapping them for something. E-mail me at the usual address (right hand column gives it).

Off to the Internet to see what I can find…

IABSM AAR: Fallschirmjaegers on the Neva

Mark Luther set himself a real challenge when he decided to run a COVID-19 lockdown game of I Ain’t Been Shot, Mum remotely.

This game was played over two days using photographs of the table and texts: a great effort from all concerned. It’s a cracking battle report as well, so click on the picture below to see all…

Ed.’s Note: I expect you all to read this as it took me absolutely ages to load and caption all the pictures in the right order. Amazing set up, but the terrain does make everything blur into one when viewed in thumbnail size!

Brunt Herd Mercenaries for Q13

Not commuting does seem to have freed up extra time for painting, although this is countered by all the extra work I’m having to do to cope with keeping the business I work for going during the crisis.

Up to now, however, I haven’t really dug into the lead mountain: I’ve just cleared some of the scree from the lower slopes!

Yesterday, however, I finally finished a unit that has been sitting on my painting table for literally a couple of years. Put it this way, before I could start work on them, I had to get all the dust off the models first!

Khurasan Miniatures are a firm that produce a huge range of 15mm sci-fi and historical figures. Usually the sci-fi ranges are grouped into races or empires, each with a background and a story that gives a bit of life to the lead. On top of these collective ranges, however, Khurasan sometimes produce a stand alone individual unit, and one of these were the Brunt Herd Mercenaries.

(R to L) Big Men, a Nutter with a staff, and a spare heavy weapon

If I recall correctly, these are based on a prehistoric rhino-type with a soft, bifurcated snout. They are large, designed to stand well above your average 15mm human, with the models ending up 20-25mm tall.

As you'd expect from Khurasan, the Brunt are full of life, with some really nice poses that provide a fair amount of variety. I will use these to augment a lesser force, or just to provide some bad guys for the good guys to fight!

1st Squad (to give an idea of scale, the figures are mounted on UK 2p pieces)

All the figures that I had previously painted (or started) are undercoated in white, then painted with a two-step shade-then-light method. For example, the tool belts are a base dark brown and then a light leather colour on top.

The figures that I painted now from scratch - effectively just the three command figures - are painted with GW Contrast Paints: so much easier to use than the method above.

2nd Squad

I’m not generally a fan of outsize 15mm figures, hence the reason it took so long for me to finish the unit, but the Brunt aren’t too bad. They are, however and as far as I know, so old - and didn’t take off as Khurasan hoped - that they are OOP…so apologies to anyone who got excited by the above and wanted to buy some of their own!

3rd Squad

A Right Result!

So here we all are stuck under lockdown and unable to go out. No wargaming clubs are open, no wargaming friends can come round: what on earth is one to do.

Well I have had a right result.

Daughter number one came back from university just before lockdown and brought her boyfriend with him as a house guest for a couple of months (he lives abroad normally, but can’t get home at the moment). This is not a bad thing: we have plenty of room and he, unlike me, likes cooking. Even better, the kids were so desperate for entertainment yesterday that they agreed to have a battle: daughter number one and boyfriend on one side; daughter number two and I on the other.

I chose the To The Strongest rules for Ancients as it’s probably the easiest introduction to wargaming for beginners: no measuring, no dice, simple grid-based movement and combat rules etc. D2 and I took the Neo-Sumerians, D1 and BF took the Assyrians.

Neo-Sumerian Battle Line

This was an interesting clash: lots of slow-moving, poor quality Sumerians versus small numbers of deadly, fast-moving Assyrians.

Each side chose to put their heavy chariots on the right flank, so we rapidly got to a situation where the centre was a tie and each side’s right flank was winning and left flank was losing.

The advantage then swung back and forth with both sides ending up with only two coins each i.e. one more unit lost would mean an overall loss. As it happens, one of the Sumerian heavy onager units managed to knock out an Assyrian cavalry unit and the game was ours!

And the right result?

Not the win, funnily enough, but the fact that D1’s boyfriend really enjoyed himself and declared an interest in playing more battles. Well, if we’re stuck together for another ten weeks, his wishes are going to be more than fulfilled! A convert!

Here are some more pictures of the game: