Roman Artillery

I’m just finishing off a few more bits and pieces for my 15mm Marian Roman army before starting on the second legion (another 120 legionaries!). One of the units I need is the legionary ballistae or bolt-throwers.

Those of you who have been following this site will know that I am using Baueda figures for my Marian Romans, but Baueda don’t do any artillery yet, so it was back to the ever-reliable Peter Pig to pick up a couple of packets. That’s one of the things I like about the Pig: you can buy a big army, or you can buy a small packet or two to fill a gap.

The Pig don’t do Marian Romans, but they do have a very nice range of Early Imperial types. Yes these chaps would therefore be in lorica segmentia rather than mail, but maybe they were testing the prototypes of the new armour being introduced. As I understand it, the ballistae were manned by odds and sods from the 10th Cohort, so why shouldn’t they be dressed slightly differently!

The packs duly arrived and, on first glance, looked a bit small compared to the Baueda figures. This was, however, an illusion caused by pose and lack of helmet crest. They go together pretty well: certainly not badly enough to make a difference on the tabletop. I’ve just double checked the case I store them in, where they are next to Baueda figures: no real difference except, as mentioned, the helmet crest effect.

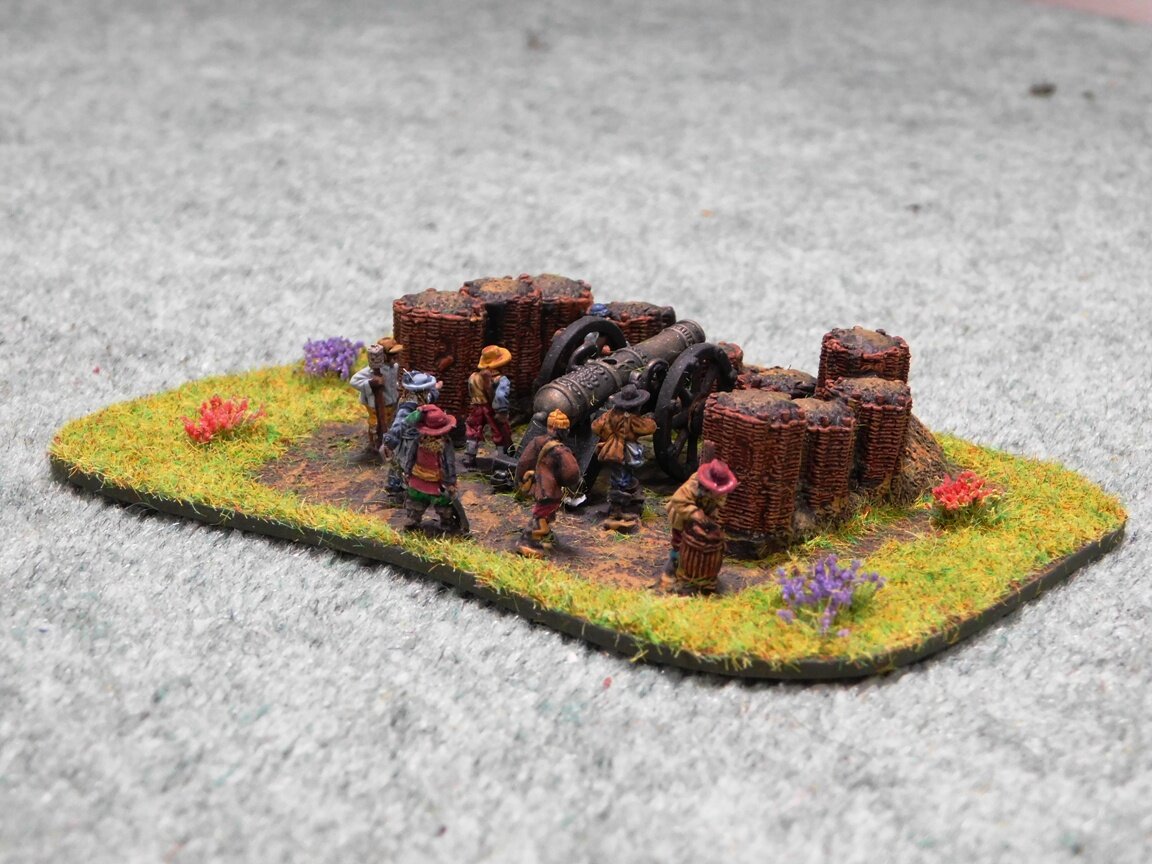
The figures are very nice: well up to Peter Pig’s usual high standards. I liked the ballistae themselves as well: simple, but with enough detail to make them look like what they are.

In fact, the only problem is that they now make me wish I’d gone a different route and gone for an Early Imperial army instead of the Marians, but then there’s always time to rectify that in the future…!


The First of the ECW Scots

I still needed some more foot for my ECW armies, but was a little bored of painting up another straight pike and shot battalia (I have seven units of about 26 figures each, or 182 foot figures) so decided I’d add a Scots element.

Most of my ECW figures so far have been Peter Pig or Hallmark (via Magister Militum), so I decided to look elsewhere for the Scots: two changes presumably being as good as two rests!

The figures I settled on in the end were Khurasan’s fairly new range of ECW Scots and Irish. I must admit I was strongly influenced by how good the painted up examples on the website looked (other manufacturers take note!) and the fact that I could send a message via FB to check if the pikemen were open handed (they are) and get a response within a couple of hours.

Even more impressive was that after I’d ordered my usual fairly large amount (three foot battalia, three horse units, two units of Highlanders, and a couple of artillery pieces) the figures arrived from the US only five days later. Five days!

This meant they headed straight to the front of the painting queue, so here’s the first battalia finished:

What I like about these figures is the obvious contrast with the English battalia: all dressed very plainly as compared to the bright colours down South…but with several of the figures having tartan sashes just to liven things up a little.

These paint up very easily (as usual, I mostly used Contrast Paints) and are highly recommended.

A Few Odds & Ends from the Painting Table

Very busy at work this last week, so only time to complete a few odds and ends for the two projects I’m currently working on: English Civil War and Marian Romans.

I always find that having two projects on the go at any one time is better than having just one. If, like I do, you only collect in one scale (15mm for me) I also find that it’s best to use different manufacturers as well: alleviates the boredom factor.

First up, a couple of command stands for my English Civil War armies. Here I’ve used a couple of gentleman officers from Hallmark (via Magister Militum) as a random Colonel-type, and then a couple of spare figures from Peter Pig - one command, one artilleryman - as a Colonel of artillery. The mini-gabions are Hama beads filled with basing material!

The Hallmark figures are really exquisite and, if you use Contrast Paints like I do, really easy to paint.

On top of the above, I’ve now painted up the five Hero figures I need for my Marian Roman army. Representing Heroes is always difficult, as you need a figure that stands out a bit and yet is not being used for the rest of the army.

What I chose to do was to add a set of Peter Pig Centurion figures to my Baueda Marian Roman army.

One of the great things about Peter Pig (in addition to the huge range and lovely, very paintable sculpts that they do) is that you can ask them to give you a custom built pack of just one sculpt. So here I looked at one of their mixed command packs, chose one figure, and had a pack of eight of just that figure sent to me. Very handy indeed.

FK&P AAR: Burchett's Green

I had a chance to get my new English Civil War siege gun bases onto the tabletop as I played out the latest scenario in my North Wessex campaign using the For King & Parliament campaign.

Both sides have withdrawn from the field of their last encounter at Pinkney’s Court, with the Royalists now looping round to try and outflank the Parliamentarians. As a desperate excuse to justify the use of siege artillery, the Royalists receive a couple of huge cannon as a gift from the King. Keen to try them out, they set them up across open fields and prepare to fire off a coupe of shots. As they do so, the Roundheads appear on the other side of the field and battle is joined.

Here’s what happened:

This was a tricky battle for the Royalists as they start the game in a very awkward position. In addition, their siege guns just couldn’t hit anything and, when they did, my units saved time and time again.

A workmanlike Parliamentarian victory.

More Romans

Just a couple of pieces today. First up is the Legatus Legionis or commander of the Legion: just a simple command base for my TTS Marian Romans. Figures are Baueda 15mm sourced from Magister Militum.

What is slightly odd is that with the Baueda Marian Roman cohort command, the chap holding the standard (the Aquilifer) is dressed in a lion skin and the signaller (the cornicen) is wearing a wolf skin, whereas here, for the legion command, it’s the other way around.

Next up is a Baueda Semi-Permanent Legionary Marching Fort that I will use as a TTS camp. Now this model was quite complicated to put together well, and I have a horrible feeling that the Primus Pilus would take one look and order the thing taken down and put up again.

The gates are particularly wonky, mainly because after I’d built it I realised that I had stuck the gates on upside down! This gave me a huge gap at the bottom of the gates (plenty of room for a barbarian to crawl through) which I then had to fill with Hama Beads!

But it is a lovely model, and I’m going to get the somewhat smaller Marching Camp as well.

IABSM AAR: Anzio #14: North of Carroceto

Lovely little battle report from Dan Albrecht and buddies, taken from the I Ain’t Been Shot, Mum Facebook page.

They used Scenario #14 from the Anzio: Wildcat to Whale scenario pack, North of Carroceto. The scenario focuses on the German attack on the Right Flank Company of the Scots Guards holding the area of Carroceto railway station during the late evening and night of 9th/10th February 1944.

What is particularly interesting about this game is that it features the use of a sand table, something that you rarely see these days. Click on the picture below to see all.

TFL Painting Challenge: Latest Update

It’s another sweltering hot day today in the UK: going outside is like walking into a wall of heat.

Unusual distribution of entries into the Painting Challenge this week: lots of entries but from a small number of entrants. Must be the weather!

Here’s a sample of the work of everyone who submitted something this week. Make sure you check out their full galleries: some inspirational content there.

IABSM AAR: A Canadian VC Luther-Style!

Here’s another great battle report from Mark Luther, this time using the A Canadian VC scenario from the main I Ain’t Been Shot, Mum v3 rulebook. Mark played this game remotely with four players scattered around Atlanta area and in Florida.

The game is based on the August 19, 1944 Canadian advance into St Lambert where the Allies are trying to plug the Falaise Gap.

Click on the picture below to see all:

Final Two Cohorts Now Done

The 15mm Marian Romans for To The Strongest are coming along nicely: about two thirds of what I need to field the army are now done.

I’m representing a legion with five TTS units, with each unit therefore representing two cohorts (these are the days before the Augustan super-strength first cohort). As I like to minimise the number of markers on the table, each unit is two bases (neatly making one base represent one cohort) with a formed unit being the two bases neatly in line with each other and a disordered unit represented by the two bases being separated and at an angle to each other. Latest off the production line are the final two cohorts (or one TTS unit) for the first legion I’m going to field.

In keeping with how the legions operated in Gaul under Caesar, I’m intending the core of the army to be six or seven legionary units: four or five from one legion, two or three from another. Naturally I’ll therefore be painting up two full legions (240 legionaries in all!) which will also allow me to play out the civil war battles that followed the Gallic wars.

The figures are from Baueda, bought in the UK via Magister Militum, painted using GW Contrast paints. The shield transfers are the Baueda-specific designs from Little Big Man Studios. Bases are from Warbases.

Next up will be the Legate Legionis in charge as a command stand, and a semi-permanent camp for the chaps to rest in after each battle!

TTS AAR: Three Games One Sunday

Three great games of To The Strongest this Sunday, all Sassanid Persians versus 100YW English. I took the Sassanids for Game One, Kavan for Game Two, and then it was back to me playing the Sassanids in Game Three.

Henry V versus the Persians!

Henry V versus the Persians!

The results? I think it fair to say that the Sassanids did very well indeed, winning all three games! Those of you who are paying attention will have worked out that that meant that the day was two-one to me.

The first game was a glorious victory for both me and the Sassanids, but one largely caused by Kavan’s terrible cards! I used standard tactics: horse archers on the wings keeping his men there occupied whilst the heavy horse and elephants punched their way through the middle.

The escorted elephants punch a hole

The second game was a similar affair, but this time it was me on the receiving end. I knew what was coming, so managed to deal with the initial horse archer advance on my right wing with mass longbow fire. In the centre, I had massed my heavies opposite his, but lost two of my three generals in the first round of combat. This effectively stuffed me command-wise, and I got overlapped on the left by those gosh-darned light horsemen as I just couldn’t get the units I needed to activate into action regularly enough. As my left began to crumble, Kavan punched a hole in my centre which he then flooded with the rest of his heavies: the coup de grace coming as he took my camp.

The English camp falls…again!

With both of us now very familiar with the strengths and weaknesses of both friendly and enemy troops, the third game was a neck-and-neck affair which either of us could have won. Each side had one camp each, and both fell: mine to mounted men-at-arms that three units of horse archers just couldn’t stop in time; his to another heavy cavalry punch through the middle. I won in the end, but it was a very close run thing.

All in all, an excellent afternoon’s gaming.

The Sassanid Heavies roll forward


FK&P AAR: Pinkney's Court Again

I’ve now had a chance to play the Pinkney’s Court scenario another three times.

The first game, versus Bevan, was a complete disaster. The more nimble Swedish-style Royalist cavalry sliced and diced their Parliamentarian opponents, destroying all three units for the loss of only one of their own. That meant that I had to divert troops to shore up the position, leaving me short of infantry (and victory coins!) for the clash on the other flank. A crushing defeat!

The other two games, against Kavan, however, went much better. The first was a close run thing, but I eventually prevailed. The second was a glorious, overwhelming victory caused, I hasten to add, by the most amazing run of luck at the cards. In each of the initial three clashes, I hit three times out of five: not bad when you’re needing an 8+ on a 1-10 evens chance. Much like my men in the game described above, Kavan’s troops never really recovered.

Here are some pictures of the game I lost:

IABSM AAR: Virtual Lard 2

One of the things that has been going on during lockdown is a series of virtual Lardy Days where people who are not lucky enough to be able to push lead with a member of their “bubble” can game remotely.

Mike Whitaker ran a game of I Ain’t Been Shot, Mum at the recent Virtual Lard 2. Here’s a quick AAR of the action taken from his excellent blog Trouble At T’Mill. Click on the picture below to see all:

Siege Guns

Having equipped my ECW armies with light guns and field artillery, it was time to add the big boys: a couple of Siege Gun elements.

The guns themselves were no problem: many years ago I was at an English Heritage site (or similar) and came across a tub of artillery models that have, over the years, proved ideal for siege gun-sized artillery pieces. I still have a handful left, so two of them would form the centrepiece of the elements.

I wanted the siege gun elements to look immobile, so rather than having the guns “naked” on a base, I bought a couple of resin gabion pieces from Peter Pig to serve as dressing. This also meant I didn’t have to have any sort of limber and team in the vicinity: they always take ages to do!

The crews initially came from Peter Pig, who do six different poses. Six men per gun didn’t seem enough, however, so I added a couple of Hallmark officer/sergeant types to each to bulk things out. Hallmark (available through Magister Militum) and Peter Pig size very well together.

I then discovered that the guns, gabions and crews didn’t really fit depth-wise on the standard element bases I’m using for my ECW troops. My standard bases are Warbases Vehicle Bases that fit up to about thirty foot or half as many horse figures without difficulty, and sit very nicely on my FK&P grided battlemat…but the combination of crew, gun and gabion stuck out over the end. Fortunately Warbases were able to supply customised “double depth” vehicle bases that exactly did the trick. I can even use the spares I ordered for TTS camps.

So that’s two siege gun elements now completed. More Romans on the way…

Painting Challenge: Post-Holiday Round Up

109837448_10163704097730062_5856398449183563298_o.jpg

As some of you may have gathered from the recent lack of posts, I have been on holiday for a week. Surfing in Cornwall, in Polzeath to be exact.

A very pleasant week: although the waves were only good on two days, it was glorious weather throughout, so plenty of fresh air and sea, with some fantastic meals in the evenings.

I like Polzeath: very poor ‘phone signal so unlikely to get bothered by work in the few hours that I’m not in a wetsuit, small enough to lack any sort of night life (except for a couple of restaurants) and we’re lucky enough to stay somewhere that’s only a five minute walk from the beach.

And lovely to get back to a Painting Challenge inbox packed full of entries. I highly recommend everyone visits the individual galleries, and here’s a selection of work from this week’s entrants to encourage you to do so:

Painting Challenge: Post Weekend Update

Rather than get overwhelmed by the backlog of entries that always seem to mount up against me, I’ve had a chance to process this weekend’s latest batch of entries to the Painting Challenge.

Please do visit each person’s individual gallery, but here’s a selection:

FK&P AAR: The Battle for Pinkney's Court

With Sir John Boulters seriously wounded as he led his Cuirassier bodyguard in a desperate, but ultimately futile, attempt to shore up his left flank at the battle of Widbrooke Common, his son, “Little John” Boulters, has taken command of Royalist forces around Maidenhythe.

This is not a moment too soon, as the Parliamentarians seek to take advantage of Sir John’s injury by striking for Pinkney’s Court, the manor house that sits on the edge of Pinkney’s Green, north-east of the town itself. Taking the manor will give them a fitting place from which to plan and direct the rest of their campaign.

The two sides will therefore fight it out at the Battle for Pinkney’s Court.

The Royalists (on the far side of the field, above) have positioned themselves around the court: infantry and gun in the centre and on the left, and most of their cavalry on the right.

The Roundheads have placed their strong Dutch horse contingent on the left, aiming to sweep across the open ground of the Green. Their infantry are on the right, and will need to cross fields in order to get at the opposition.

Both sides must defend their building. The Royalists lose three victory coins if the Court falls; the Parliamentarians have their train in the yards of the Golden Ball tavern, so will also lose three victory coins if the building top right is taken by the enemy.

Opening Moves

The action began with the cavalry on the Parliamentarian left wing. As the Roundhead Horse swept forward, one Squadron of Royalist horse headed left thinking to move up the road and take the enemy guns.

The Royalist commander (me!) had, however, misjudged things, and the right-hand unit of enemy Horse managed to get forward and charge them in the rear, smashing the Cavaliers from the field.

This success drove the Roundhead cavalry into a frenzy and, without thinking, they charged after the retreating Royalists, heading straight for the hedge behind which one of the Cookham Militia battalia waited.

This proved a foolish thing to do, and they were sent crashing backwards, and would spend the rest of the game lurking in the woods trying desperately to rally.

In the meantime, the rest of the Royalist horse would take advantage of their superior number of units and defeat the rest of the Parliamentarian cavalry. This wasn’t enough to break the whole Roundhead army so, as the Royalist horse promptly disappeared off table in pursuit, the game would be decided by the infantry.

The Other Side of the Field

The Roundheads advanced smartly up the field, but let one of their battalia get too far forward and become an isolated target for what little Royalist cavalry had been put on this flank.

I was sure that my two units of horse could take the Parliamentarian battalia: one to pin from the front, the other to hit if from the side.

Unfortunately, the rebels were made of stronger stuff than I had expected, and I ended up losing both units of horse to fire and melee. In particular, the Roundhead Gallant Gentleman (in blue on the front of the pike unit’s base) intervened at a crucial moment: the extra hit being just enough to finish me off.

Not a good start!

The main lines then clashed, but it was going to take something fairly miraculous to save the day now: I was outnumbered five battalia to two!

Miracles were in short supply on the Royalist side, so although my lone pike block lasted far longer than anyone expected, the Oxfordshire commanded shot were soon sent flying backwards, which was enough to finish the game in the Roundhead’s favour.

Aftermath

This was the narrowest of defeats. For about two turns, whoever lost the next unit would lose the game: my outnumbered infantry balanced by the lost Roundhead cavalry.

Another great game of For King & Parliament

Robert Avery

More Marian Romans

After leaving the painting table alone for a week, it was back to work on my 15mm Marian Romans. This army needs seven units each comprising 24 legionaries i.e. 168 legionaries in all. That’s a lot of quite repetitious painting!

Four of seven now done

I’m using Baueda figures, sourced through Magister Militum in the UK. They each come as one piece, so no hassle attaching shields or spears and, as you can hopefully see, have plenty of character and some variety.

These are painted using GW Contrast Paints. I began by undercoating in the Grey Seer undercoat rather than the Wraithbone White that I usually use. Running out of Wraithbone on another project made me try the single can of Grey Seer that I’d bought intending to experiment, and I was glad it did: I find the grey undercoat very much more forgiving than Wraithbone, and I don’t feel there’s really any difference in the colour you end up with. I will go grey (oh, in so many ways!) from now on, I think.

The shield transfers are from Little Big Man Studios: excellent but a session or two on its own to do them. As the shield has a heavy metal boss down its middle, the transfers come in two halves, each of which have to be carefully cut out. That’s 44 transfer halves to cut out (two figures don’t carry a scutum) and mount.

As usual, I need to remember to clean the excess flock off the figures before I photograph them. Just a question of brushing them down with a soft brush, but somehow I never remember. It all comes off anyway when you start using them!

So four down, three to go…and only one more unit with red shields and plumes. Onwards!

Painting Challenge Special: Matt Slade Catch Up

Those of you who follow the Painting Challenge regularly will know that this year super-painter Matt Slade has so far been conspicuous in his absence: Real Life interfering with Wargaming Life.

Well now he’s back with a bang, with a catch up of his work over the last six months. Visit his gallery to see the full extent of his work, but Matt has knocked up just over 2,200 points already. Here’s a selection of what you’ll see there: