First Marlowe to Maidenhythe AAR!

One of the nice things about writing scenario packs (in addition to having a little bit of extra cash to buy more figures) is seeing that people are actually playing games based on your work.

Marlowe to Maidenhythe, my English Civil War scenario pack for For King & Parliament was only published about two weeks ago, so it’s really pleasing to be able to report that I’ve seen the first AAR based on the first encounter of the campaign.

It’s posted on FB, in the 6mm Miniatures & Wargames Group which, as it is Private, you might not be able to immediately see from this link…but it is there, let me assure you!

I hope the author doesn’t mind, but here’s a quick pic of the initial stage of the battle:

If anyone’s interested, you can buy your own copy of Marlowe to Maidenhythe by clicking here or on the picture below.


FK&P AAR: McCleod's Odyssey

With my Rabble bases now painted, it was time to have go at scenario #10 from the Marlowe to Maidenhythe scenario pack: McCleod’s Odyssey.

In summary, the Scots who have featured as mercenaries in previous scenarios in the campaign are making their way home, but run into a force of Militia backed up by locals who want a word, shall we say, about the Scots’ behaviour as they went south.

It’s a standard encounter battle, with both sides directed to get stuck in as soon as possible.

The Scots, to the right, approach the village of the Gappe, held by the Militia and local folk

Deployment

The Scots placed their Highlanders on the left, opposite the rough and more enclosed terrain, their artillery and pike only units in the centre, and their standard battalia on the right. In reserve were their horse: a unit of poorly mounted pistoliers and a unit of poorly mounted lancers.

The Militia occupied the Gappe: infantry battalia in the centre, Swedish horse on the left and Dutch horse on the right. The three units of Rabble were on the far right, facing the Highlanders.

The Battle Begins

My plan was for my Highlanders to deal with the Rabble then sweep in to the Gappe from the flank. Bevan, my opponent, however, was up to all my tricks, and moved his Dutch horse to the right of the village, threatening the Highlanders’ flanks.

At the same time, the enemy Swedish horse moved out to their left. Not wanting my day ruined by the sudden arrival of cavalry on my right flank, I moved the Scots horse to counter: you can see them top left in the picture below.

Finally, my main infantry units moved forward…but my pike-armed battalia decided that they had walked far enough and just about refused to move.

Everything then seemed to happen at once.

On the left, two of my Highlander units were charged, as predicted, by the enemy Dutch horse, with both surviving the charge but becoming disordered in the process. I struck back and, incredibly, one unit of Dutch horse was double-disordered and had their Colonel wounded.


This was a great opportunity for a game-winning opening clash but, try as I might, I just couldn’t find a way to break the enemy horse and would now have to suffer the fate of all loose infantry attacked by large numbers of close formation horse!

Meanwhile, on the other flank, my horse and the enemy Swedish horse now faced each across one of the fields outside the village.

A victory for the Scottish horse, despite their manky mounts, but now they would Pursue their fleeing enemies from the field unless they stopped and rallied.

As these actions were happening on the flanks, my centre moved forward, me seeking an advantage by overlapping his left wing.

Mid Game

After the initial clash, I had won the right flank but was about to lose my left flank: the Highlanders were outnumbered 5:3 and could do nothing except take the charges from the Dutch horse.

One unit of Highlanders crumbled and fled, leaving a gap through which one unit of Dutch horse could pour. The enemy horse pursued for a bit, then rallied and headed into the big open space behind my centre. All that was in front of them was my guns, and although I managed to disorder the horse and wound the General with them with some startlingly accurate artillery fire, I was soon overrun.

Meanwhile, another of my Highlander units had gone, leaving the third in a dire situation.

Meanwhile, the two centres were fighting it out but, despite having superior numbers, a bit of bad luck meant I was losing.

If my cavalry didn’t return soon, I was going to be out of victory medals!

End Game

The left side of my centre was now beginning to crumble as well as his successful right wing started to curl in on me.

We were both down to a handful of victory medals, with enough units at double-disorder to settle the matter one way or the other if they broke.

My pistolier horse quite their pursuit and crashed into the left side of the enemy battalia in the right hand building. That pike unit broke, and the advantage was momentarily mine, but then my pike-only unit in the centre of the field (bottom left in the pic above) went, and we were evens again.

It was down to whoever lost the next unit and, finally, my last unit of Highlanders could take no more: they had been fighting front and flank for three turns now, somehow hanging on…and that was the last of my coins gone!

The day was lost: but it had been an epic battle that, once again, had come down to a could-go-either-way climax.

Afterword

My big mistake was to let my Highlanders get into combat with Dutch horse: I should have retreated to cover if I could. That would have meant I went into the more successful clashes on the right and centre without having haemorrhaged victory coins on the left.

A great game, however, whatever the result.

First of the Napoleonics

it’s all your faulT, mate!

it’s all your faulT, mate!

Regular visitors will know that I’ve been looking for a new project to work on. My choice was the bottomless pit of Napoleonics: not a period I’ve ever collected figures for before.

After a bit of research, I decided to get some early-period French: the uniforms are less ornate than later on and one might as well start at the beginning! The next choice was what figures to use. The rest of my collection is all 15mm, so it had to be 15mm, but I had heard good things about AB’s range of 18mm models: 18mm/15mm: surely not that much difference, so I decided on them!

Next choice was size of units and basing.

I found the rather excellent Napoleonistyka website which gave me the sizes of the various units, so I decided to start by building a battalion of early war French infantry i.e. nine companies: one grenadier company of 80-90 men, seven fusilier companies of 120 men, and one company that was either another fusilier company (pre-1805) or a voltigeur/light company. About 1,000 men in all.

I then looked at basing. This was an absolute ‘mare, as I didn’t have a particular set of rules in mind. I investigated as much as I was able, and eventually settled on a 32-man battalion of 1 x grenadier base (4 figs), 1 x voltigeur base (4 figs), then two double company fusilier bases (each 8 figs, one with the 4 command figures in it) and two single company fusilier bases (each 4 figs).

That gave me a nice approximately square unit eight figures wide and four figures deep which seemed to be able to be used for most major rules systems. It could form an attack column eight wide, four deep; a march column four wide, eight deep; a square with each side being four figures facing, two figures turned away; or a line sixteen men wide and 2 deep.

That made each figure equal 30 men, and the only annoying thing was that the battalion was therefore technically eight companies strong, not nine…but my solution if the rules demand nine 4-figure companies is to have enough battalions to always be able to split one into spare companies if necessary!

I could have gone with six 6-figure bases, but couldn’t see how that would improve things in terms of portraying the companies correctly: logic would say that if you wanted to use 6-figure bases, you should drop the figure ratio to 20 men per figure and have nine 6-figure bases per battalion, which seems like an awful lot of figures!

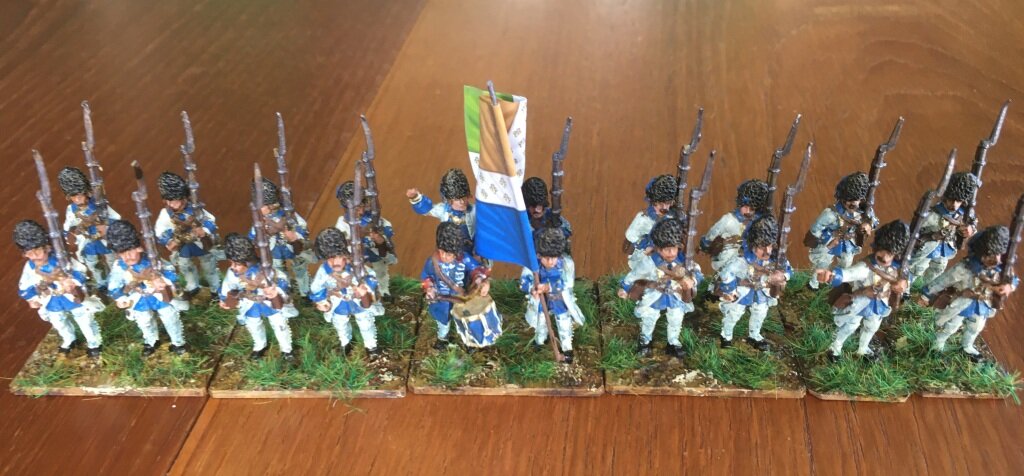
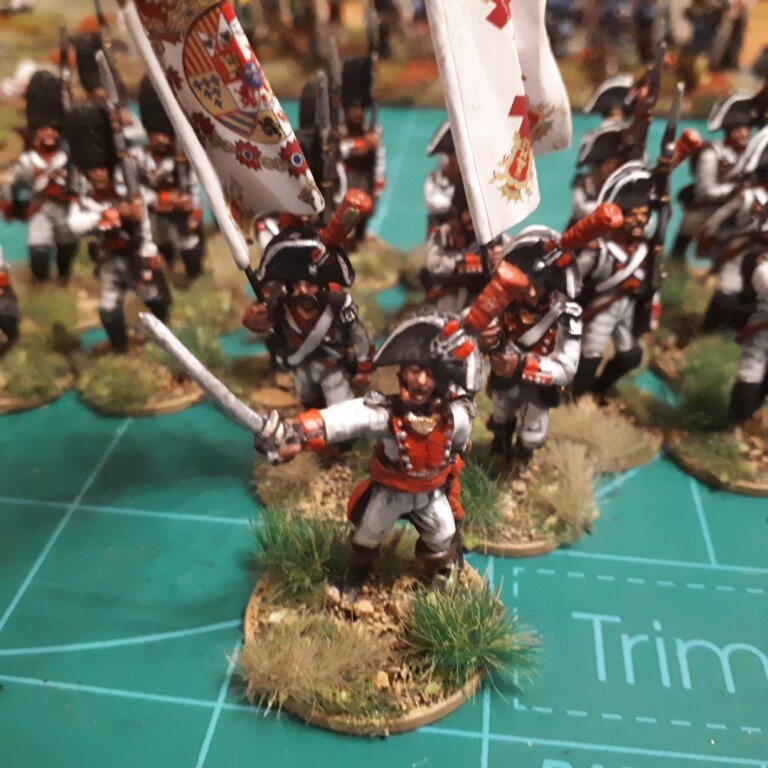
The figures for my battalion arrived from Eureka UK quite quickly. Interestingly, you choose and buy the figures individually: time consuming but quite fun. They did look a bit big, but I decided to crack on and paint them anyway. GW Contrast paints for the most part, with colour choices via research into what other people had used.

So how did they turn out?

Well they are very nice figures and have painted up well despite my rudimentary skills. The faces, in particular, look good, and the Contrast white is ideal for their main uniforms. The blue is stronger than it looks in the picture, and the only weak point is perhaps the black for the hats…but re-watching Sharpe last night most of the hats were faded anyway.

One thing: I’m not very good at painting the rosettes on their hats!

DSCN2522.jpg

There is only one teensy-tiny problem.

Their size.

It seems that 18mm is very different to 15mm! Which I should have known!

Here’s a comparison with my ECW figures from Hallmark/Peter Pig:

I’m now trying to work out if this is a problem for me. As I mentioned above, all the rest of my collection is 15mm…so can I count these as big 15’s, or have I started a new scale?

I just can’t decide. I haven’t really got any 18th/19th Century European terrain, but most of my trees and other 15mm buildings are big enough to work…

I need to decide quickly, however, as I have another two battalions on order. What do you think? Let me know via the comments, below.

FK&P AAR: Return to Widbrooke Common

This being the second game in my latest run-through of Marlowe to Maidenhythe, my just-published scenario pack for For King & Parliament.

I had lost the first game quite badly (down ten victory medals) so was keen that this one went my way. The scenario is an encounter battle, with the Parliamentarians (played by Peter, boo, hiss!) facing the Royalists (played by me, huzzah!) across Widbrooke and Battlemead Commons: the open land between Cookham and Maidenhythe down near the river.

Roundheads to the left, skulking in the hedgerows!

The Royalists face a couple of problems. Number one, the enemy has hedges to hide behind meaning that if they didn’t attack I would have to assault troops in cover with an even number of points; and number two, my main infantry brigade is all untried, meaning the danger of disorder in any first clash is high.

On the other hand, my opponent, Peter, was absolutely paranoid about the large numbers of “Swedish” horse that I was fielding. He was convinced that they would make mincemeat of his “Dutch” horse (a fair assumption, but one that had been firmly shown not to be a surety in our first game last week*) to the point that I am fairly certain that he had lain awake at night moaning “the Swedes, the Swedes: what do I do about the Swedes”!

This worry would actually be the major factor that decided the outcome of the game.

*Dutch horse fight deep and slow, Swedish horse fight fast and thin. They tend to lap around the flanks of Dutch horse and thus get a substantial advantage in an initial melee.

The Battle Begins

I opened the proceedings by sweeping forward on either wing with, you guessed it, my Swedish horse. My infantry I advanced cautiously in the centre.

Peter replied by opening fire with his artillery, which actually did me a favour, as the units targeted had to check for disorder due to their untried status: which both failed, but so early on in the game that I had the chance to re-order them before any enemy was encountered. My men had now had their first taste of battle and survived unscathed: they would act normally from now on.

As my Swedish horse on my left approached his Dutch horse, they retreated behind the hedgerows to their rear. This suited me just fine as Dutch horse, despite their deficiencies, are worth more points that Swedish horse (they are strong against almost everything else) so I was happy to have his cavalry bottled up in a corner ‘guarded’ by units worth half the cost.

The Roundhead Dutch horse bottled up in one corner by their own fear of my Swedish horse

Meanwhile on my Right

Meanwhile on my right, my other brigade of Swedish horse was attempting to turn the Parliamentarian flank.

This looked difficult to do at first, as there were a couple of infantry battalia there who turned to face me, but my infantry were coming forward as well, meaning that the Roundhead foot would potentially have to fight in two directions at once.

Scene from behind the Parliamentarian lines. Units 9, 11 and 12 are about to retreat to their right, leaving my horse free to curl in from the flank

The Roundheads attempted to consolidate their position by pulling back and to the right as much as possible, but this manoeuvre, whilst sensible in some ways, let me bring my cavalry around in a proper outflanking movement.

Once my cavalry were around his flank, with my infantry coming forward, the Parliamentarians were in some difficulties. I used a battalia of infantry to clear his guns (by this time out of ammunition) and then sent them in through the gap opened up to attack the right hand side (from my point of view) of his line.

A bit of bad luck saw me lose the battalia, so I was forced to commit my reserve (my commanding general’s Cuirassier bodyguard) into the attack, but by this time my cavalry were in position for their flank attack.

The Royalist cavalry are round the flank!

With commanded shot to their front and Swedish horse to their flank, the grey-suited Roundhead battalia quickly crumbled, exposing the flank of the untried infantry battalia next to them.

This followed suit, and the rest of his line quickly followed them off the table: pinned from the front and rolled up from the right.

The Roundhead cavalry were, eventually, thrown forward but, by this time, it was too late to have any real effect: the day was mine.

Aftermath

A solid victory that netted me 10 victory medals (I had lost a couple of units early on) and evened up the campaign to date.

Next we will fight for Pinkneys Court, but here are some more pictures of today’s encounter:

TTS AAR: Roman Revenge!

Regular readers will know that I’ve recently suffered a series of defeats at the hands of the Marian Romans. One of my regular opponents, Peter, has crushed my Classical Indians twice and then the Sasanid Persians twice; my other regular opponent, Bevan, had beaten the Summerians twice. This despite the fact that I’m regularly told that the Marian Romans aren’t that good (too much heavy infantry, not enough cavalry) and certainly not a tournament army.

Well you could have fooled me!

It was obviously time for me to have a go with Caesar’s boys and see whether I had managed to learn anything from the somewhat painful lessons described above: for our next encounter, I would use the Marian Romans and Bevan would play the Gauls.

This was the second clash between the two, with Bevan winning the last game (I have been going through a bad patch lately!) fairly decisively.

At this point I must confess that rather than put together a list myself I used Peter’s Marian Roman army list: 130 points of veteran infantry with three camps, a standard, and three units of cavalry.

I set up as you can see, above, with my camps in one corner and my Roman infantry in a fairly tight block. That was lesson one: keep your legionaries where they can mutually support each other.

There did seem to be an awful lot of Gauls facing me: six warbands liberally sprinkled with heroes, and four good cavalry units.

As I suspected, the Gauls attempted to lap their cavalry around my main battle line. My cavalry were tasked with holding the right flank, with a unit of legionaries turned that way as a back up, whilst the rest of the army beat the Gauls in the centre. The Gallic cavalry on my left flank would have to be dealt with by the infantry.

The two sides advanced towards each other fairly smartly, with Bevan suffering some unlucky cards with his left flank cavalry meaning that they were delayed getting into the fight. This was excellent news, as I didn’t think my outnumbered and outclassed cavalry would be able to hold the opposition for long once battle was actually joined.

the legionaries form square!

My Shaky Right Flank

On my left flank, two units of Gauls had started lapping round, but my infantry snapped to face them and dealt with the flanking units fairly easily. His cavalry was still late to the party on my right, giving me the chance to disorder one of his warbands without breaking formation.

The Gallic cavalry and warband at the front of the picture are about to be mullered by my legionaries

The main battle lines were now joined, but the superior quality of my troops meant that in the centre I had now killed one warband, and disordered two more. One legionary unit had, however, been lost and, over on the right, another was being hit front and rear at the same time. I desperately needed to get my successful units on the left over into the centre.

rushing back to the centre! thank jupiter the romans manoeuvre well. note the legionary unit fighting front and back top right!

If there’s one thing the Romans do very well, it’s march: and before anything had had a chance to happen on my right flank, I had four legionary units pushing back warbands on the left and centre.

the left and centre legionary units are grinding down the opposition

Meanwhile the legionary unit on the right wing that had been attacked front and back had actually managed to repel both units: driving the warband back and destroying the cavalry: these Romans can fight as well as march!

Unbelievably, my cavalry were still holding their own: the lights kept evading and returning, and my one decent unit was still around despite being attacked in the front and flank at the same time.

the roman mincing machine in action

With the four main Gallic warbands now disordered and my legionaries almost unscathed, it was now just a matter of time. The cards fell evenly, but with me hitting on a 6+ and saving on a 5+, and the disordered Gauls hitting on an 8+ and saving on a 7+, the advantage was all mine. One warband after another broke and fled the table until all the Gallic victory coins were gone.

Aftermath

My losses amounted to one legionary unit and one light cavalry unit so a pretty colossal victory for the Romans

The tactics I’d employed, learnt the hard way, had worked, and Peter’s army list with it’s six veteran legionary units had proved its worth.

Now I need to prove that this wasn’t a fluke!

TFL Painting Challenge: First April Update

A large numbers of entries from a small number of people today: definitely a monthly catch-up for some people.

Do go to the individual galleries, but here’s a selection of today’s submissions:

FK&P AAR: Attack on Marlowe Again

One of my regular To The Strongest Ancients opponents wanted a go at For King & Parliament, so I suggested we play through the new Marlowe to Maidenhythe campaign.

I have recently been playing the Parliamentarians a lot, so we agreed that I would play the Royalists, and he would play the Roundheads. With that decided, it was on to scenario #01: The Attack on Marlowe.

The battlefield from the Royalist side. We were playing by Zoom.

This first, introductory, scenario is quite small (only 90 points per side) and features a Royalist attack on Parliamentarian forces drawn up waiting for them.

My plan was simple: use my superior horse to dispose of his cavalry, and then harry his flanks as my infantry took the centre.

Well, that was the plan…but it didn’t work. Despite the fact that my horse were fighting in the superior “Swedish” style and his were fighting in the old-fashioned “Dutch” style, my cavalry on my right flank were swept from the field!

The battle has begun: the field from the Parliamentarian side. Note the unit markers used to help my opponent keep track of his troops over Zoom.

Worse than that, on my left I manoeuvred my two units of cavalry to face and flank one of his pike units only to fall victim to some amazing shooting from both the unit and its accompanying light gun.

The opening stages of the game therefore left me down five units!

Although the outcome was now something of a foregone conclusion, I had no choice but to battle on: each game in the campaign is scored on how many victory medals the winner had left at the end of the game, so although I was fairly sure I was now going to lose, I needed to make it as painful as possible for my opponent to finish me off!

“‘Ware Horse to our right!”

Unfortunately this proved no very painful at all!

As my line moved forward, the Roundhead Dutch horse returned from having disposed of my cavalry and lined up to roll up my main battle line (as shown in the pic above).

I committed my reserve battalia to stopping them, but they were soon overwhelmed by a combination of infantry and cavalry attacks. I managed to blow away a couple of enemy Forlorn Hope units away, but soon my last victory medal was gone and I had suffered a pretty devastating defeat: down 10 victory medals after only the first game!

Revenge had better be mine in Game 2!

ECW: The Mob!

Finally managed to actually finish some painting: four bases of Rabble for my ECW armies and a coach & horses model to provide an objective or battlefield colour.

Let’s start with the coach:

This an Essex Miniatures model, with outriders from Peter Pig. It is a lovely, chunky bit of kit, and not too complicated to build.

That’s not to say it was easy (it wasn’t, and there was a lot of Superglue involved, most of which ended up on my fingers) but it was easier than the Magister Militum version that I bought at the same time. That arrived with no wheels, and had so many teeny-tiny fiddly bits that I eventually gave up trying to build it at all!

The problem for both is the way that the coach part is supposed to “float” above the carriage bit, hanging from the suspension springs that attach to uprights from the carriage. If you look at the picture above, that odd bit of blue above the rear wheels (don’t understand how that ended up there: there’s no blue on the model!) is where the suspension spring attaches to the upright. On this model, the suspension springs are very cleverly part of the main coach body, bending out from it at whatever angle you need them to. On the MM version, you had to build each part bit by bit i.e. tiny bit attached to tiny bit attached to tiny bit. I’m sure a better modeler than I would have coped, but it was too much for me.

As you’ll see, I based the model to fit with how I’m going to use it when playing the grid-based For King & Parliament rules. The team is separate from the coach, so when the coach is in a square on its own or with nothing in front of it, I shall put the team on the table; and if there’s no room, I won’t. It seems a bit odd, but works without having to use one of my double-deep bases to fit the coach and team on in one, which would then prevent me putting another unit into the same square.

The Mob

You need some Rabble bases for three of the scenarios in my newly published Marlowe to Maidenhead ECW scenario book, so I thought that I’d better finish the ones that I’ve had part-finished for some time.

The figures are a real mixture. There are all the civilian figures I could find from Magister Militum’s Hallmark range; there are the Peter Pig clubmen and peasants; there are the Peter Pig plague doctors (I had to find a use for them somehow!) and then there are a few carefully chosen “specials” from Minifigs’ ECW range. All in all, a wide variety of poses that look properly mob-like.

I always think that it’s difficult to get a good looking Rabble base, and I’m still sure of that now. These are okay, and will do, but they don’t look at good as, say, the equally-mob-like Highlanders that I painted for my Scottish ECW army. On reflection, rather than going for a wide variety of colours, I should have decided on a very simple colour scheme and used that for all the figures, making allowances only for what they are wearing.

Well, looking at them again in the picture above, maybe they don’t look as bad as I thought. Let me know what you think via the comments.

Oh, and that is a single Minifigs Highlander out front: a Gallant Gentleman for the Scots.

AAR: Virtual Lard V

One of the few good things to come out of lockdown has been how people have found ways of gaming remotely.

The Virtual Lard Games Days are an excellent example of this. Using the Lardy Discord server to co-ordinate, vast numbers of games run simultaneously all around the world, with a virtual pub also available for those all-important post-game discussions. The Virtual Lards are, in effect, online conventions.

Virtual Lard V took place last weekend, and I was lucky enough to get a place on two games: one in the morning and one in the afternoon (this isn’t guaranteed: the sessions are often over-subscribed).

Sharpe Practice in the AM

The morning’s session was a terrific game of Sharp Practice Napoleonics with Col Murray running a session that involved the French (commanded by the two Bobs: Lucky Bob C and myself) attempting to stop some Austrians (commanded by Andrew and Grizzlymc) making away with some items that had best remain nameless.

I won’t detail the step-by-step action, but suffice to say that my masterful mismanagement of the French Grenadiers kept a large proportion of the Austrians so busy shooting them to bits that the rest of our force (Bob’s Line and my Skirmishers) were able to drive the rest of the enemy off the table, so reducing their Force Morale to zero and giving us the game.

It was very exciting. At one stage it looked like being a certain Austrian victory as their Dragoons headed off-table with “the items”…but their movement rolls were poor, giving Bob and I (well, mainly Bob) time to hammer the Hungarians with musket fire again and again until they broke and fled. The last turn could have gone either way, but the draw of the cards, for once, favoured the French, and victory was ours.

Here are some pictures:

As an afterthought, one of the amusing things about Virtual Lard is the way that it brings people from different time zones together. Grizzlymc was actually in Sydney, Australia, and sipping whisky at what, for us, was early morning!

IABSM in PM

My afternoon game was I Ain’t Been Shot, Mum!, with Jim Catchpole running a scenario set in France in 1944. Dan Albrecht and I were commanding a company of British infantry moving forward to clear a village that may or may not have been in German hands. A pleasant chap called Michael was playing the Germans: he hadn’t played IABSM before.

All went well for the British until we hit a major chokepoint: a bridge that proved to be the single crossing point over a fast-flowing river right outside the village in question.

We began by doing everything right: probing over the bridge with out recon carriers, laying down smoke to cover a German MMG, but then the cards turned against us and the German artillery came hammering down.

An abortive attempt to break out of our “beachhead” by the carriers failed dismally (my fault entirely, Dan!) and then we just couldn’t get out of the artillery kill zone. If we moved forward, the waiting Germans shot us; if we stayed where we were we got hit by shells from above.

We lasted a couple of turns then ordered a retreat!

It was a difficult scenario, but we could have done a whole lot better. Which was a pity, as our leapfrogging advance to the bridge was a speedy thing of beauty! What we should then have done was to take the time to spot properly, lay down smoke properly etc but the arrival of the German artillery mucked up our plans.

Well played Michael, well umpired Jim, and I think Dan and I both agreed that our solution was to pull back and call in the artillery. Or, to put it another way: I say we take off and nuke the entire site from orbit...it's the only way to be sure!

Here a few shots of the game right up to the point where the German artillery arrived:

Afterword

All in all, another great Virtual Lard. My thanks to the organisers and game-runners, and can’t wait until the next one.

New Scenario Pack Now Available!

Exciting news: my new English Civil War scenario pack for the For King & Parliament set of rules is now available!

In the UK:

Buy it from BigRedBat

In Europe/the USA:

Buy it from Wargames Vault

Here’s the marketing blurb:

Marlowe to Maidenhythe is a supplement for TtS! For King & Parliament that contains twelve free-standing, fictional scenarios: nine in a loose chronological order and three bonus scenarios following the fortunes of the main participants after the campaign ends.

The pack is deliberately designed to give players who don’t have enough time to write their own scenarios a number of games that they can play with little or no preparation at all. All you have to do is print out the game and player briefings, set up the table according to the map, break out the figures and cards, and start the first turn. You don’t even need to print the pack out in full: just the pages you need for the scenario you’re going to play.

Marlowe to Maidenhythe tells the story of the clash between Sir John Boulters (for the Royalists) and Sir Christopher Grey (Parliamentarian): erstwhile friends now separated by their different loyalties. The same officers and units are used throughout the campaign, and it is hoped that the players will come to adopt and recognise them as their own or the enemy.

The games can be played either as a series of linked games or as a collection of one-off battles. To emphasise: each scenario is free standing and they do not have to be played in any particular order…but it is anticipated that players will play them in order as a campaign, keeping a running total of each sides’ score as they go along. The pack provides a Campaign Record Sheet as an easy way of doing so.

Finally, although specifically designed for FK&P, with a little work the scenarios can be adapted for any set of English Civil War/Renaissance rules: the basic elements of why, where and with what each side is fighting being largely common to all systems.

So whether you’re for the King or for Parliament, Marlowe to Maidenhythe gives you everything you need for many hours of joyful gaming!

TFL Painting Challenge: An Overdue Update

Apologies all, as it’s been a a couple of week’s since the last update and a few days since my last post: real world getting in the way of sensible things like gaming!

Actually, that’s not entirely true: a lot of my spare time has been spent finishing off my next scenario pack. Not one for a Lardy set of rules, but for For King & Parliament, the English Civil War version of To The Strongest.

Regular visitors will have seen all the ECW battle reports I’ve been posting on this site: they have been the playtest games for the supplement. A few details: 12 free-standing fictional scenarios for FK&P loosely grouped into a chronological campaign; similar format to my Lardy scenario packs; should be out later this week or perhaps next; price will be about a tenner.

Anyway, back to the Challenge. As usual, a good set of entries with some inspirational work. Check out the individual galleries (use the NavBar, above) but here’s a selection to whet your whistle:

FK&P AAR: Return to Cookham Moor

After last week’s defeat, there was nothing for it but to play the next game in the campaign: Cookham Moor.

The Moor is a fun battle where both sides start the game facing each other across a stretch of open land:

My right flank consisted of a brigade of Dutch horse. They are good, solid troops, but the Royalists in front of them were in Swedish formation: more agile and, most importantly, able to counter-charge. That has led to defeat in previous battles, so I decided to try something new: I would advance up to the hedgerow and wait for them to come to me. The Commanded Shot from the nearest infantry brigade would move slightly forward into the woods, threatening the flank of any Royalist advance. At the same time, the guns would deploy and the Scots on my left flank would move up to the hedgerow in front of them. For once, the cards fell my way:

The Royalists advanced forward across their line, and soon the battlefield looked like this:

DSCN2349.JPG

The Royalists then moved their central infantry to their right to face up against the Scots, uncovering the cavalry that had moved over from the right. This cavalry then charged straight forward: right at the Parliamentarian guns just over the bridge!

This was a disaster, as the Royalist cavalry swept the guns from the field, then heading off table in pursuit. There was now a massive hole in my line.

A general melee then broke out across the entire line. My Scottish pikemen did well, forcing the Royalist Commanded Shot to intervene; but my Highlanders, as usual, proved ineffectually weak.

With the infantry locked into combat, the focus changed to the cavalry clash on the right.

Here, my decision to hold the hedgerow proved a very good one, as after a couple of turns all his cavalry was dispersed.

This made up for the disaster in my centre, but both sides were now looking very battered indeed: so battered, in fact, that whichever side next lost a unit would lose the game.

If that was not exciting enough, on my far right the Royalist CinC at the head of his small-unit bodyguard cuirassiers was faced off against my CinC at the head of some Dutch horse!

It all came down to this combat. Could I do the single hit I needed to break the bodyguard and win the game?

Well, you can see from the picture above that I didn’t manage to hit the enemy in my turn. No matter, I thought, he needs two hits on me to break me.

Unbelievably, however, the two hits were done, my cavalry broke, leaving Sir Christopher all on his tod! I had lost the combat and lost the battle!

Aftermath

Phew! What a game!

I had managed to retrieve the situation in the centre and everything had all come down to one final combat that I had really lost on the luck of the cards…but at least I had played the Dutch horse well!

FK&P AAR: Return to Whyteladyes Lane

I had another play through of the Whyteladyes Lane scenario last weekend, hoping to put my previous defeat (to John) behind me as I sent Bevan’s Royalists running from the field. As is now usual, the game was played over Zoom, with markers showing the number of each unit so that Bevan could more easily work out which of his troops were where.

The game is a tough one for the Roundheads, as they begin the game in an extended column against ready-for-them Cavaliers in a more sensible formation.

Last time, I had pushed forward right from the start, and been chewed up piecemeal. This time I decided that I would form approximately on the head of my column and work from there.

This definitely seemed to work much better, and although I still had one unit (the one at the head of the column) isolated, I now had a bit of a battle line formed to hold the front whilst the rest of my troops deployed. As you can see in the photo below, the Royalists spotted my isolated Highlanders and charged them with a small unit of “bodyguard” Cuirassiers.

All my cavalry were on my right flank, so I advanced them forward to block his cavalry moving down behind a hedge and into my rear.

Usually I charge my Dutch-style horse in as soon as possible but, this time, knowing that the enemy Swedish-style horse would then take the initiative through a counter-charge (something my more ponderous units cannot do) I decided to employ more historical tactics and halt just beyond charge range and discharge my pistols into the advancing enemy.

This worked a treat, as you’ll see in the picture below. All three units to the right are disordered, but it will only take one more hit to break either of the enemy horse units, whereas my greater numbers mean that I can survive another two hits.

All now seemed to be going well, and even Bevan confessed later that he felt that, at this stage, I had the advantage. That was, unfortunately, about to change!

If you look at the picture, below, you’ll see that out at the top of the screen two Royalist units are overlapping my line. I should have taken steps to deal with these immediately, probably by withdrawing back over the hedge or by moving sideways…but I didn’t, not seeing how much of a threat these would turn out to be.

This was a bad mistake, compounded by my response: I thought I move forwards out of danger by breaking through the enemy line.

This is the situation (below) a few minutes later: the enemy unit of pikemen dressed in red in the centre of the photo have swept in from the left and destroyed two of my pike units.

My unit dressed in blue managed to get onto their flank, but the cards didn’t fall for me, and the Royalists would go on to destroy the Highlanders as well. That was nine Victory Medals gone in one fell swoop!

To add insult to injury, on the other side of the field my Dutch horse had now been forced into engaging two battalia of enemy pike: not something that horse enjoy doing! The game continued for another couple of turns, but the writing was on the wall. I eventually had no choice except to order a retreat.

Afterword

I came close this time, so I think when I replay this scenario again I will try pulling back my column and forming on the hedge line behind the first couple of battalia.

Whatever the result, another great game of FK&P: I shall just have to get my revenge at Cookham Moor this afternoon!

TFL Painting Challenge: Second March Update

Two week’s worth of entries today: and some very nice work indeed.

As always, please do visit the individual galleries (see the Nav Bar, above) but here’s a selection of what was submitted:

TTS AAR: The Sasanids Seek Revenge!

Regular visitors will know that my last two games of To The Strongest each involved my Classical Indians getting severely hammered by the Marian Romans. My opponent generously suggested that some of the reasons for my twin defeats were down to the relative strengths of the armies: the Marian Romans were made to kill an army like the Indians.

What might work against them, I asked, to be told that armies consisting of lance-armed cavalry supported by horse archers were very popular on the tournament circuit. Something like the Sasanids, I asked. Exactly, I was told…so this week’s game was to be my Sasanid Persians versus his Marian Romans. Revenge was to be mine!

As is now usual, for the moment, the battle would be played over Zoom, with my remote opponent able to see the table through a combination of helicopter-view webcam and on-table-on-tripod ‘phone camera. Each of his units was also marked with a number, helping with the transmission of orders: “unit 4 will move forward a square” etc

the set up

The Romans were unchanged from last week’s appearance: six units of veteran legionaries supported by some light and medium Gallic cavalry. The Sasanids sported six units of horse archers backing the hard punch of escorted elephants, cataphracts and four units of savaran lancers.

romans. Boo, hiss!

noble sasanids

The Plan

My plan was simple: pin the Romans frontally whilst hooking around their left wing. Horse archers to weaken and exploit flanks and rears; elephants, cataphracts and lancers to hammer into weakened legionary units.

Opening Moves

I had the initiative, so as the game began my right wing shot forward into the start position for their curl around the enemy left flank. Likewise, my left wing moved up to keep his left wing occupied.

the battle begins

You may have noticed that no mention has been made of my centre. This is because my central, most powerful brigade had decided that they hadn’t quite finished their breakfasts yet, and weren’t moving until all porridge (or whatever Sasanids have for breakfast) had been consumed!

The elephants and veteran savaran look on as the wings engage

Now what I should have done at this point was to wait for my centre to get moving before sending in my flanking forces…but I didn’t, and fully paid the price!

On my left flank, somewhat surprisingly and extremely annoyingly, my horse archers and lancers were seen off by the enemy cavalry backed up by legionaries. They moved forward very quickly, got their attacks in first, and soon I was left with cavalry around my left flank and nothing much to oppose them except what I could afford to commit from my centre. Hmmm…I’m sure that this was supposed to be the other way round!

One unit of horse archers lost to javelin-fire already; my savaran about to be defeated in combat with the gauls. my left flank is about to disintegrate.

On my right, I was perfectly positioned to curl in and hit the Romans in the flank. Unfortunately, they used their extreme manoeuvrability (well drilled, these Italians!) to not only turn to face me, but also to form an oblique line that effectively protected them from harrying flank attacks.

unit 4, in orbis (all round defence), protects the new roman right flank from my central command…not that that was doing anything even vaguely threatening anyway!

End Game

With my right flank attack effectively neutralised, the enemy right flank was now in the perfect position to curl around my left flank. I had to commit my centre to holding them off, who then got attacked by his centre: effectively he had done to me what I wanted to do to him!

romans outmanoeuvre me on the right

My right flank bravely tried to crack a few legionary skulls before disaster struck, but the truth of the matter was that I had been comprehensively outmanoeuvred. Game one went to the Romans!

romans to the front, romans to the left!

Game 2

As the above really hadn’t taken very long at all, there was time for a second game.

I was keen to have another go using the same tactics, and this time things seemed to be working much better for me: although the Romans had once again adopted their oblique line, this time my left flank was secure and my centre had kept up…so after the opening moves, the battlefield looked like this:

sasanids poised for victory!

Now, however, Lady Luck decided to intervene.

Really? I hear you cry: you were defeated by bad luck, were you? Not the enemy’s tactics and your own incompetence? Like in the last game?

No, really: it was bad luck.

For those of you who haven’t played To The Strongest, the mechanics work by the use of playing cards (or you can use D10 or chips) with higher cards being better than lower cards. Aces are low so, needless to say, drawing an Ace is generally a very bad thing.

We kept a pictorial record of the cards that I drew as the clash that would decide the game took place:

It was so ridiculous that even my opponent was suggesting that the only solution was a box of matches and some lighter fluid!

Anyway, I lost that game too, but still had a great morning’s gaming

To finish, here are a few more pictures of the game. You look at them whilst I go and get a good fire going…!

A Glut of Eastern Churches Redux

Added to the collection today!

Added to the collection today!

This is a reprise or updated version of a post from January 2019, in celebration of the latest additions to my collection of eastern European churches…

It’s one thing to collect figures - you need all sorts of different sorts to represent different armies, units etc - but to collect models of eastern European churches as well?

That’s what I seem to gave done over the last few years, in that I seem incapable of not buying any model that could vaguely be described as a “religious building, eastern”!

I once joked that I would like to have enough churches to have a different one for each of the maps in my Bashnya of Bust! scenario pack for I Ain’t Been Shot, Mum! That would take seven, eight or nine, dependent on whether you assumed one of the buildings in some of the smaller villages were houses of worship or not. Whichever it is, I seem to have achieved if not exceeded my target. Below is a gallery (in ascending order of size) of my church collection so far:

I’m pretty sure I don’t actually need any more eastern churches now, but if anyone should know of any others that are available…just add their details as a Comment and you can bet your bottom dollar that I’ll be spending my bottom dollar on another house of God!

IABSM AAR: Les Attaques

Another absolutely beautiful battle report, this time featuring a game of I Ain’t Been Shot Mum played using the first scenario from the Defence of Calais scenario pack.

The report was originally posted on the IABSM FB group, which you can access by clicking here.

It’s May 1940, and with British troops being evacuated from the beaches at Dunkirk, the ancient port of Calais stood on the critical western flank of the Anglo-French lines.

In a desperate bid to shore up the flank Churchill committed the British 30th Infantry Brigade to defend Calais to the last. What ensued was an heroic struggle that is writ large in the annals of British military history.

This first scenario features men from the Searchlight Battalion, supported by anti-tank guns, trying to hold off the leading elements of the German advance. Click on the picture below to see all:

IABSM AAR: Le Bleu Ferme

Absolutely brilliant After Action Report from Des Darkin, taken from the IABSM Facebook Group, featuring action in France in June 1944 as a British attack tries to push some Germans back. The game was played using the IABCYM dice-driven variant of I Ain’t Been Shot, Mum.

Played and reported in four sessions, this AAR combines Des’ various FB posts into one document with loads of great pictures: recommended reading.

Click on the picture below to see all:

TFL Painting Challenge: First March Update

This would have been the last February update, but Feb is a day-challenged month so today’s update falls into March!

Whatever the date, some lovely work being submitted today. As always, I recommend that you visit the individual galleries (access via the Nav bar, above) but, to whet your collective whistles, here’s a taster:

Indians Hammered, and then Hammered Again!

Another couple of games of To The Strongest, again on Zoom. This time it was to be my Classical Indians against the Marian Romans: a bit more of a challenge than the Achaemenid Persians!

As before, the set up was for my opponent to have a combination of a stationary overhead camera surveying the whole battlefield and a roving on-table ‘detail’ camera which could be moved to where the action was taking place.

I lost the scouting phase and, as can be seen in the picture above, ended up in a long line across the battlefield facing a Roman force who’s main contingent seemed to be skulking in one corner.

My plan was therefore to hold back my left wing and send forward my centre and right wings to destroy his two separated commands one by one, and then combine my forces again to attack his rather impressive looking camps. Hopefully my superior numbers and mass longbow fire would negate his heavily armoured veteran legionaries (gulp!).

Skulking, I tell you, skulking!

Brave, noble, well-painted!

As already mentioned, I had lost the scouting phase, so my opponent had the initiative and would move first. That should have got him a couple of squares forward, just out of longbow range, but perfectly in keeping with my plan.

Unfortunately not.

A combination of group moves, marches, good cards and, presumably, sheer Roman determination led to a line of annoyed looking Italians appearing right in front of me before my men had had a chance to even finish their breakfasts!

Two thirds of his legionaries are now in my face!

Worse, some of his hairy cavalry had got off the table to the left of my line and were threatening to re-appear and roll me up like a yoga mat!

Well, that was my plan out the window: time for a desperate scramble to retrieve the situation.

A desperate scramble

Most of my men are uninvolved!

The cards were not with me either: although my four-horse chariots managed to manoeuvre themselves into the right position for a flank charge (above left), there they halted to admire the scenery rather than getting stuck in; and my longbows seemed to be firing the wrong sort of arrows today: nerf guns would have been more effective!

Then it was the Romans to go again, and my left hand command just evaporated!

I’m sure I had a left flank around here somewhere!

The Romans were then able to “left turn” with their usual alacrity and, although I did manage to kill one unit of light cavalry, that was really that.

Well that was as comprehensive a mullering as I have ever had!

Game 2

The good news was, of course, that that left us time for a second game: every cloud, silver lining etc!

Things started well: I won the scouting phase this time and ended up in a much better position as the first card was about to be drawn.

Good, tight formation from the Indians this time!

A tough nut to crack!

A tough nut to crack!

The Roman commander looks down on my troops with disdain!

My plan was to quickly kill the cavalry in front of my right wing, then bring the chariots back into the centre for some flank attacks. Meanwhile, my other two commands would advance en masse and pepper his men with their longbows, weakening them in time for the elephants to go in from the front just as my heavy chariots hit them from the side.

Unfortunately, the Gods were against me again (despite me changing the pack of cards I was using in a desperate attempt to change my luck!) and my first turn ended with my men arrayed as shown in the picture above. Chariots: yes, good. Division One: yes, good. Division two…where on earth is Division Two!

If there was anything I’d learnt today about the Romans it’s that they can react really quickly to anything that happens and, sure enough, forward and sideways they came as they attempted to retrieve the situiation.

There was, however, an opportunity here. If I could get my chariots across the field and into the flank of the two legionary units in the centre of the table, then I reckon that I could hit one and then the other and roll them both up. After all, I’d have three attack cards on the first unit with a Hero and a General to get replays. That would put him a third of his main force down with no casualties to me:

I had, of course, neglected to factor in the fact that it was not my day!

Although my chariots flew across the field and got into a perfect charge position, they then stopped! I had had two chances to draw a seven or more (i.e. a 64% chance of success) and failed both times.

The Roman cavalry were thus able to come forward and hit my chariots in the flank (bye bye one unit of chariots and a general), then move the rest of their troops to begin rolling up my line.

Not as bad a mullering as last time, but definitely another hammering!

Aftermath

A couple of great games of TTS despite my ill-fortune. Some of you might be muttering that a good workman doesn’t blame his tools, but even my opponent agreed that it seemed as if every second card I drew was an Ace. For the final chariot combat, needing two 6’s for saves, I drew two Aces: a fitting end to the day!

Still, onwards and upwards, as they say: I’d like to fight the Marian Romans again, but might try one of the other Indian-style armies next time!