A Few More Brute!

Still horribly busy at work in the real world, so posts still thin on the ground.

I have, however, managed to finish off another section of Brute wasteland mutants: 15mm sci-fi models that are actually more like 25mm high.

These are lovely models that paint up really well…even if I do find painting 25’s much more difficult than painting 15’s!

TFL Painting Challenge: Overdue Update!

Apologies for my lack of posts over the past few days: real world in the shape of work got in the way of the important things in life!

Anyhoo, here’s a quick and somewhat overdue update for the Painting Challenge, in which we welcome new contributor Pete Goodrick to the fold. Pete’s first submission includes some lovely looking Italian allies to his 28mm Republican Roman collection.

Do visit the individual galleries, but here’s a taster to persuade you to do so:

Clearing the Lead Mountain

Still on my quest to bring down the Lead Mountain before allowing myself to open any new package…although in this case it is more like the Plastic Mountain.

Many moons ago I invested in a decent size force of 15mm Brute from Nuclear Shrimp. These post-apocalyptic, wasteland mutants are actually more like 25mm in size, so make a formidable enemy for any 15mm figures.

I’d only painted a few command figures and a single stand of infantry to date, but needing to attach the mutant bulls (see previous post) to an army gave me the boost I needed to search the cupboards and paint a few more. This is squad two, and I have another four squads, four guns and some specials to do.

IABSM AAR: September War #24: Ambush in the Beskides

My turn to host a game of I Ain’t Been Shot, Mum, so I chose a scenario from the first September War scenario pack that would allow me to field some of my new motorised infantry vehicles: #24 Ambush in the Beskides.

The game would feature a German attack on a prepared Polish position. The Germans would have the numbers, but had a time limit, and those Poles were very well dug in!

Click on the picture below to see all:

New East European Village Set

I was browsing EBay the other day when I came across a listing for a 15mm east European village set in MDF that I hadn’t seen before. Four houses, some carts and some fencing for only £32.99 including free delivery.

This seemed like good value, and one can always do with a few more village huts, so I ordered a set…which duly arrived within the allotted time.

As with many shiny things, the kits immediately jumped to the front of the painting queue and, within a day, I had built them all:

The buildings went together very easily, even for someone as cack-handed as I am. Only the dascha shown in the first picture, above, caused me any trouble, and I managed to break the chimney meant for the second house as I wasn’t careful enough when extracting the individual parts from the sprue (so my fault is what I mean!). Better modellers than I (i.e. most of you) will have no problems.

The carts were a surprise: six of the them were in my pack. Really good battlefield scatter, and I found that the best way to build them was to do all six at a time, waiting for the PVA glue to dry at each stage before continuing. Don’t try fitting the wheels until the axle is firmly glued in place: you’ll just collapse the whole thing in your hand and have to start again! The fencing was easily put together, and looks reasonable sturdy in terms of how it will sit on the tabletop.

So all in all I’m very happy with the set and would highly recommend a look if you’re interested. With the sad news that 4Ground (where most of my existing huts originate) are closing their doors, these people could be a partial replacement.

You can find the set here.

A Load of Bull!

For some time now I have been trying to follow the rule that if I want to buy more figures then I have to earn the right to do so by clearing something from the existing Lead Mountain.

As I wanted to buy some more Soviet village pieces and a set of 17th Century Swedish command figures (I reckon that if I have them, then I can field my existing ECW troops as early 17th Century Swedes, instantly creating another opponent to friend Bevan’s Poles, saving lots of time and money which can then be spent on something else) I needed to find some already-purchased figures to paint.

A few months ago, one of my favourite sci-fi designers, Loud Ninja Games (available through Alternative Armies) added a range of large (about 25mm tall) mutant bulls to their Wasteland post-apocalypse range.

I didn’t need them, but they were shiny so I bought a set: they would do perfectly as it wouldn’t be too arduous to paint nine 25mm figures…and so it proved:

Nobody moooove!

These paint up very nicely and will join forces with my Brute mutant humans, only one squad of which I have painted so far (candidates for my next purchase-must-paint I think!)

My only criticism, as always, is the lack of variety: just two poses and a command figure. I understand completely why that is so (platoon- or squad-level sci-fi being much more common than the company-level game that I play) but it does mean that I will limit my purchase to just one squad for the moment.

TFL Painting Challenge: Quick March Update

Time for the first update to the Painting Challenge in March. Plenty coming through from the existing challengers, but there’s a few of the regulars yet to open their innings!

Do visit the individual galleries, but here’s a taster of what you’ll find. It’s all very infantry focused this week:

Polish Artillery Limbers

Whilst going through my Poles, I realised that I really needed some more horse-drawn artillery limbers. I looked around the web, but couldn’t find any matches to what I was after. The closest seemed to be the Peter Pig WW1 Russian artillery limber, pictured below:

This looked to be a lovely model, just crewed by chaps from the wrong nationality. No problem: Peter Pig also do an excellent range of spare heads, two of which (one set in Polish infantry helmets, one set in rogatwykas) I could use to convert the Russians into Poles.

The conversion itself is fairly easy. Snip off the existing head with a pair of pointed pliers, use a pin drill to bore a little hole in the now-headless torso, glue new head in place. It can sometimes be a bit fiddly, but you get better with practice and I would recommend having a go if ever you need to.

As you’d expect from the image above, the limbers came out very nicely indeed. Rather than my now-usual Contrast Paints, I matched with how I painted the original Poles with black undercoats, acrylics base painted on top, then an Agrax Earthshade wash, and finally some highlighting.

Job done!

IABSM AAR: Beyond Le Plessy

Yesterday’s post featured an After Action report from Des Darkin covering a game he ran for Iain Fuller and Philip Andrews.

Today’s post is the same game, but written up by Iain.

Usually I would combine the two AAR into one massive report, but both are such good AAR that I’ve decided to keep them separate.

Click on the picture below to see Iain’s colossal report on the second Plessy game:

TFL Painting Challenge: End Feb Update

Just a quick update this time around, although we do welcome back stalwart Painting-Challenger, Ralph Plowman, who has submitted three entries in quick succession since the last post.

Ralph has participated in all eight years of the Challenge, with a top score of 838 in 2018, and an average score of 540.

Do visit the individual galleries, but here’s a taster to encourage you to do so:

FK&P AAR: Cossacks March Out Again

Time for the Zaphorogian Cossacks to ride out again, this time with an away fixture at friend Bevan’s house.

It was an unusually shaped battlefield, and one criss-crossed by small streams and (impassable) lakes. There was also a chunk taken out of one corner, meaning any units deployed there ran the very real risk of falling off the end of the world!

After their first encounter ended in ignominious defeat, the Cossacks had re-organised their army: equipping their tabor wagons with light artillery and dropping the brigade of raw Cossack horse.

On this battlefield, therefore, I placed my up-armed tabor in the centre, infantry to the left and right of them, and a brigade of Tatars on the far right just in front of the edge of the world. That left me a brigade of horse in reserve just behind my tabor’s right flank.

As before, our opponents were the Lithuanian Polish, hereafter known as the Poles or the Polish. They had their infantry and artillery in the centre, with loads of really quite good horse on either wing.

The battle opened with the Poles advancing rapidly on either wing, and the game split into two halves.

On my right flank, my Tatars (one unit of veteran nobles and two units of light bowmen) took on four units of decent Polish cavalry. My lights were quickly sent fleeing from the field, but their veteran comrades managed to destroy two of the Polish horse units despite, at one stage, being hit in the flank.

Half the Poles who had been chasing my lights from the field then returned and, eventually routed my tired nobles, but I’d still effectively won that flank, certainly in terms of victory medals lost.

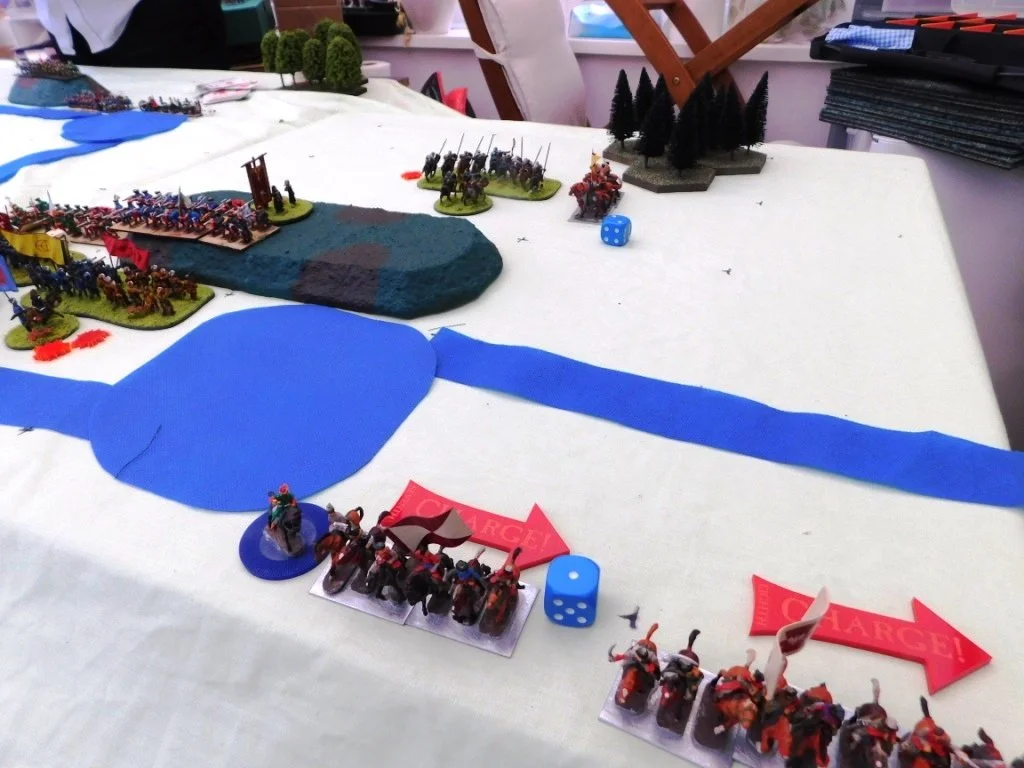
Meanwhile, on the other flank, waves of Polish horse, most of it rather decent, some of it the dread Winged Hussars, came forward and crashed onto the three Cossack foot units right at the end of my line.

[The Winged Hussars were being represented by only their bases as painting their leopard skins had caused a delay in production. This was quite unnerving…as the temptation was to visually dismiss the units that were actually the most deadly on the table!]

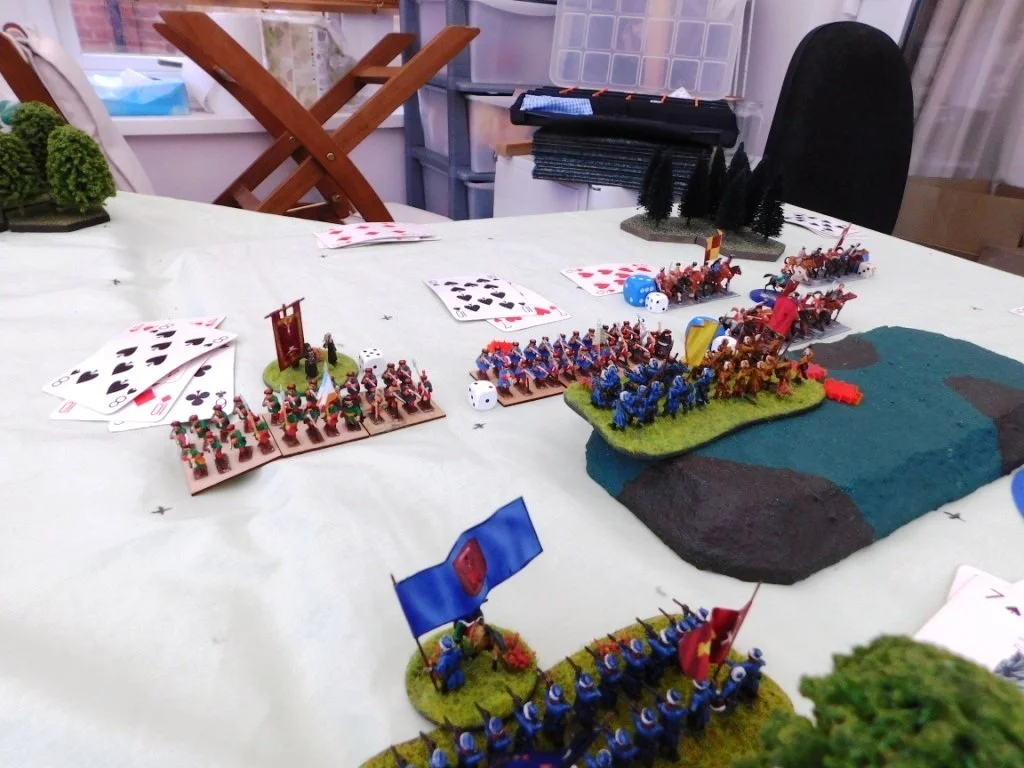
Time and time again the Polish cavalry crashed into one unit of Cossack Moloitsy militia: a unit that just refused to break. Two light units and two medium units of Polish cavalry were sent packing before, finally, the Moloitsy gave way, leading to a general crumbling of that flank.

So exciting was this passage of play that I don’t actually have many photos of it. Below, left is the first wave of Polish cavalry moving forward. Below, centre is the situation after the first wave of Polish cavalry has been repelled, with the black-base-Hussars moving forward in the background. Below, right is after the Hussars have finally shattered the Moloitsy infantry.

Meanwhile, the Polish infantry had also split into two halves. On my right centre, they advanced towards the Cossack foot brigade amongst the trees and rough ground in the bend of the river. A firefight broke out between the two infantry forces, with each of us eventually losing a unit.

On my left centre, after hanging back for some time, the other Polish infantry brigade came forward. They advanced towards the left hand tabor unit but so keen was Bevan to get them into action at the same time as his Hussars were wiping out my Moloitsy that he left their flank exposed.

No sooner seen then acted upon: one of my reserve cavalry units, Tatar lights, smashed into their flank and smashed them from the field. The Tatars went on to knock off a unit of enemy Tatar light horse (Taras Bulba anyone?) before retreating back to safety.

The climax of the battle was now upon us. Before my Cossack Moloitsy on the left broke and ran I had been comfortably ahead: nine victory medals verses the three that Bevan had left. Once my left flank had broken, I was down to three victory medals. Could Bevan now snatch victory from the jaws of defeat?

As his troops massed for further charges into my left flank, the battle was actually decided back on the right centre, where Bevan’s remaining infantry unit had retreated back from its firefight with some of my Registered Cossacks in order to re-group.

I followed up, also deploying my final reserve: a unit of poor quality mounted Cossacks. These managed to pin the retreating Polish Haiduks in place, giving my Registered Cossacks time to follow up and hit them in the flank. They crumbled, their victory coins were lost, and the battle was mine!

The gallery below shows the initial clash between infantry lines on the right center. The position after this initial clash, and then the climactic moment mounted and Registered Cossacks dashed the enemy Haiduks from the field:

So a first victory for my Cossacks, but a very hard fought contest won only by the narrowest of margins.

Again the Poles avoided frontally assaulting my tabor wagons, concentrating on trying to win the battle by killing all my other troops. In this game that actually worked in my favour a bit: my tabor were free to deploy their new light guns with significant effect and the terrain was such that my infantry could hold on for long enough before fleeing the field.

For me, I tried to avoid throwing my cavalry away. Admittedly the veteran Tatar noblemen played a blinder and did much better than they should have, but keeping the other cavalry brigade in reserve worked really well: I would only have lost them to the mass of enemy cavalry as it advanced forward, and this way I was able to shore up my line and then exploit the retreat of the enemy infantry when the time was right. For my next outing, I think I’ll add a unit of artillery to the roster, sacrificing some infantry Gallant Gentlemen to do so. After all, I can only use them if I’m attacking, and my infantry won’t charge enemy horse!

Here’s a pic of the table at the end of the game.

Polish Artillery Tractors Ready To Rock!

Regular visitors will know that I am building a force of 1939 Polish motorised infantry, and that one of my wants was an accurate C4P artillery tractor. You can read the post about it here.

I’ve now had a chance to paint the models up, and am very happy with the result:

To re-iterate, these are custom designed 3D prints in 15mm from Syborg 3D Printing and, to me at any rate, represent what a C4P should look like.

All I need now is for Battlefront to get around to sending me the guns. How spoiled we all are now: it’s only been four weeks and I’m thinking how overdue they are!

At the same time as painting up the C4P tractors, I also completed the larger C7P tractors. These were not normally used for towing guns (they occasionally towed the really heavy stuff) and were used more as tank recovery vehicles by the armoured troops or as general mules for the engineers.

God only knows why I ordered four of them, but I’ll attach two to my tankers (double what’s needed!) and keep two to attach to my engineers…when I get round to painting the engineers that is.

Lovely models again, and I can’t emphasise enough what a pleasure it was to deal with Simon at Syborg: almost instant responses to my queries and a great deal of patience as I wanted the design for the C4P model tweaked again and again.

Oddball and Bowser!

Not the worst named estate agents in the world, but a quick bit of painting to fill in the gaps between Six Nations matches!

First up are two 3D printed Shermans from Syborg.

When I was looking at re-photographing my US troops, I noticed that I was short the tank company HQ. At the same time, whilst browsing the Syborg website I noticed that they do an “oddball” version of a Sherman i.e. a Sherman tank with a loudspeaker mounted on the side in the same way as the one commanded by Donald Sutherland’s spaced out Oddball character in the film Kelly’s Heroes. This was too much of a happy coincidence to resist, so I bought two and clipped the speaker off one of them. I now have both my tank company HQ and a one-off model that could be used as an objective or for a specific scenario.

My only word of caution with these models is that they are a little bit bigger than a PSC plastic Sherman. It doesn’t really make that much of difference once gaming, but it is noticeable.

Second up is one of those delightful bits of tail that make the tabletop really come alive: a water bowser i.e. a truck that carries a tank full of, er, water or, as someone suggested for the Brits today, tea or gin & tonic!

This is also from Syborg, and I would emphasise that “in the flesh” you can’t see the layers built from the printing process as much as you can in the photo. In fact it’s a cracking little model that will go really well with my NAAFI truck and the fuel tanker that I already have.

So two “highly recommended” models from Syborg.