Peleliu at The Other Partisan

The other game of I AIn’t Been Shot, Mum at The Other Partisan was another amphibious assault: Tim Whitworth and the Like a Stone Wall Group’s magnificent Pelelie scenario, set in the Pacific with US Marines assaulting a Japanese-held beach.

This game was, in fact, so good that it won the Best Demonstration Game award for the show. Click on the picture below to see loads of excellent pictures of the game:

IABSM AAR: A Hasty Defence

John Cooper is preparing to play through “The September War” scenario pack with his beautifully painted 10mm figures.

Here’s a quick warm-up game that he played using the fourth game from the random scenario generator in the IABSM v3 rulebook: “A Hasty Defence”. Click on the pic below to see all:

IABSM AAR: Peleliu Warm-Up

Tim Whitworth and his colleagues from the Like A Stonewall Wargames Group have been preparing the game they are showcasing at The Other Partisan wargames show in a couple of week’s time.

It’s a scenario for I Ain’t Been Shot, Mum based on the US Marine assault on Peleliu Airfield in 1944. Click on the pic below to see all:

IABSM AAR: Operation Compass #11: Bardia 1

Another great battle report resurrected from the archives of the A Wargamer in Cyprus blog.

This time, the scenario is #11 from the Operation Compass scenario pack: the first of the three games focusing on the Australian attack on the Italian-held fortress of Bardia.

Click on the picture below to see all:

IABSM AAR: Benghazi Handicap #01

I do so like it when I stumble across a source of material for I Ain’t Been Shot, Mum or one of the other Lardy company-sized games: it does take the pressure off a little…as anyone who runs a blog knows, keeping it fresh and updated is a serious, long-term commitment!

Anyhow, latest discovery is the excellent A Wargamer in Cyprus blog, which contains a plethora of quality wargaming material. I haven’t been able to get hold of the blog’s owner to ask permission (I’m no Tango!), so I hope he doesn’t mind me reproducing some of its content here as part of efforts to support TFL and IABSM etc.

Here’s an AAR taken from the site featuring the German attack at Agheila that formed the first proper German vs Commonwealth encounter in the Western Desert. Just as an aside, I actually have a half-written scenario pack for Sonnenblaum which features this action…and am now feeling all inspired to dig it out and finish it.

Click on the pic below to see all:

IABSM AAR: Anzio #20: Fischfang Day 3

Nice little battle report from Dan Albrecht and his friends at the Vermont Historical Gamers group in South Burlington Vermont.

Scenario is #20 from the Anzio: Wildcat to Whale scenario pack: part of the German counter-attack that was Operation Fischfang, Day Three.

Click on the pic below to see all:

IABSM AAR: Up From Asnelles

It’s been a few months since we’ve had one of these, but here’s another great WW2 After Action Report from Mark Luther.

Here’s his introduction:

I just got back from France and Normandy so I was in the mood for a D-Day game. I also wanted something basic and that would allow for both sides to do some manoeuvring, so a straight out assault on dug in stationery troops was out.

I came up with the move in from Asnelles by the B Company 2 Devons and the counterattack by the 916 Grenadier Regiment later in the day on June 6. The two German grenadier companies had two three-section Zugs. I rated them as poor troops. This company had two attached MMG teams. The German orders were to get off the north edge of the table. A pair of StuG IIIs would show later.

For the Brits, B Company of the 2 Devons had all three platoons, but I also rated them as poor troops for this game. Between being seasick and inexperienced they were not fully up to their game. A troop from the Sherwood Rangers were assigned as support but were running late. Their orders were to advance south and get off the table.They began on the north board edge.

Click on the picture below to see all…

German Howitzers from Battlefront

Another unit destined to see the tabletop very rarely: a battery of German 10.5cm howitzers.

These are, again, plastic, and actually not bad at all. The guns are superb: they go together easily and paint up well; the crews are a bit more average but take also the paint well.

What I do like about the crews is that, unlike the chaps manning the Nebelwerfer battery I was complaining about a couple of weeks ago, these men have dumped all their backpacks, and gas mask cases, waterbottles etc, and are just dressed in their uniforms. Makes a lot more sense and saves a lot of time when painting them up!

Definitely another recommended from me: a great way to get some glorified objective markers onto the table without breaking the bank!

IABSM AAR: Villa Santa Anna

Another great AAR from Mike Whitaker, using a set of terrain boards with which, after Market Larden, I am very familiar!

Set in Italy '44 again. The British (Carl, Rod) are tasked with taking the farm of Santa Anna, a German (Colin) strongpoint. They have a troop of Churchill NA75s, a carrier section and two infantry platoon, as well as a Vickers. Ranged against them are two understrength German platoons, a couple of MG42s, a StuG, and their CO's new pride and joy, an SdKfz 251/10.

Click on the picture of the Villa, below, to see what happened:

You can see more great content on Mike’s blog: Trouble at T’Mill

IABSM AAR: The September War #60: Szack

Great battle report from Tim Whitworth and the Like A Stone Wall wargames group, this time featuring a recent game taken from the September War II scenario pack.

Here’s the background:

Soviet troops consisting of the 112th Infantry Regiment, some 13.000 soldiers supported by fifteen T-26 tanks and fifteen guns, arrived at the village of Szack on September 28th.

The Polish force near the village numbered 4.000 men of the Border Protection Corp, including General Wilhelm Orlik- Rückermann, and sixteen anti-tank guns.

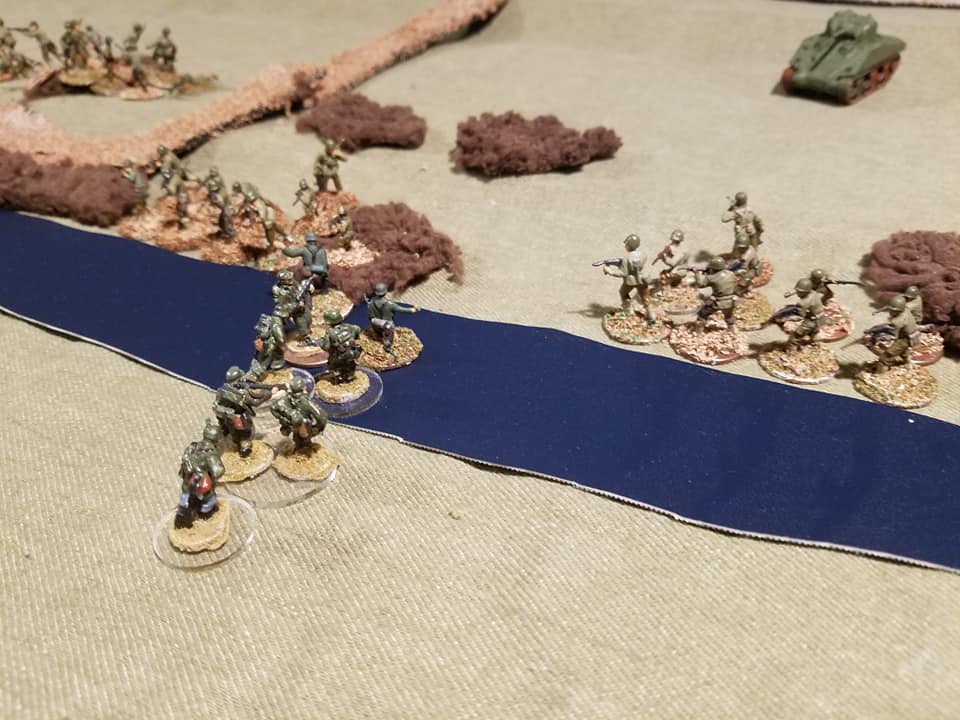
Having taken the village, the Soviets then charged the Polish positions with infantry supported by the T-26 tanks. The Poles waited until the Soviets were right on top of them before opening fire with their antitank guns, destroying eight tanks.

The Polish troops now launched an all-out counterattack: covered by their artillery, the soldiers of the Border Protection Corps charged at their enemies with bayonets fixed. By the afternoon the village was back in Polish hands.

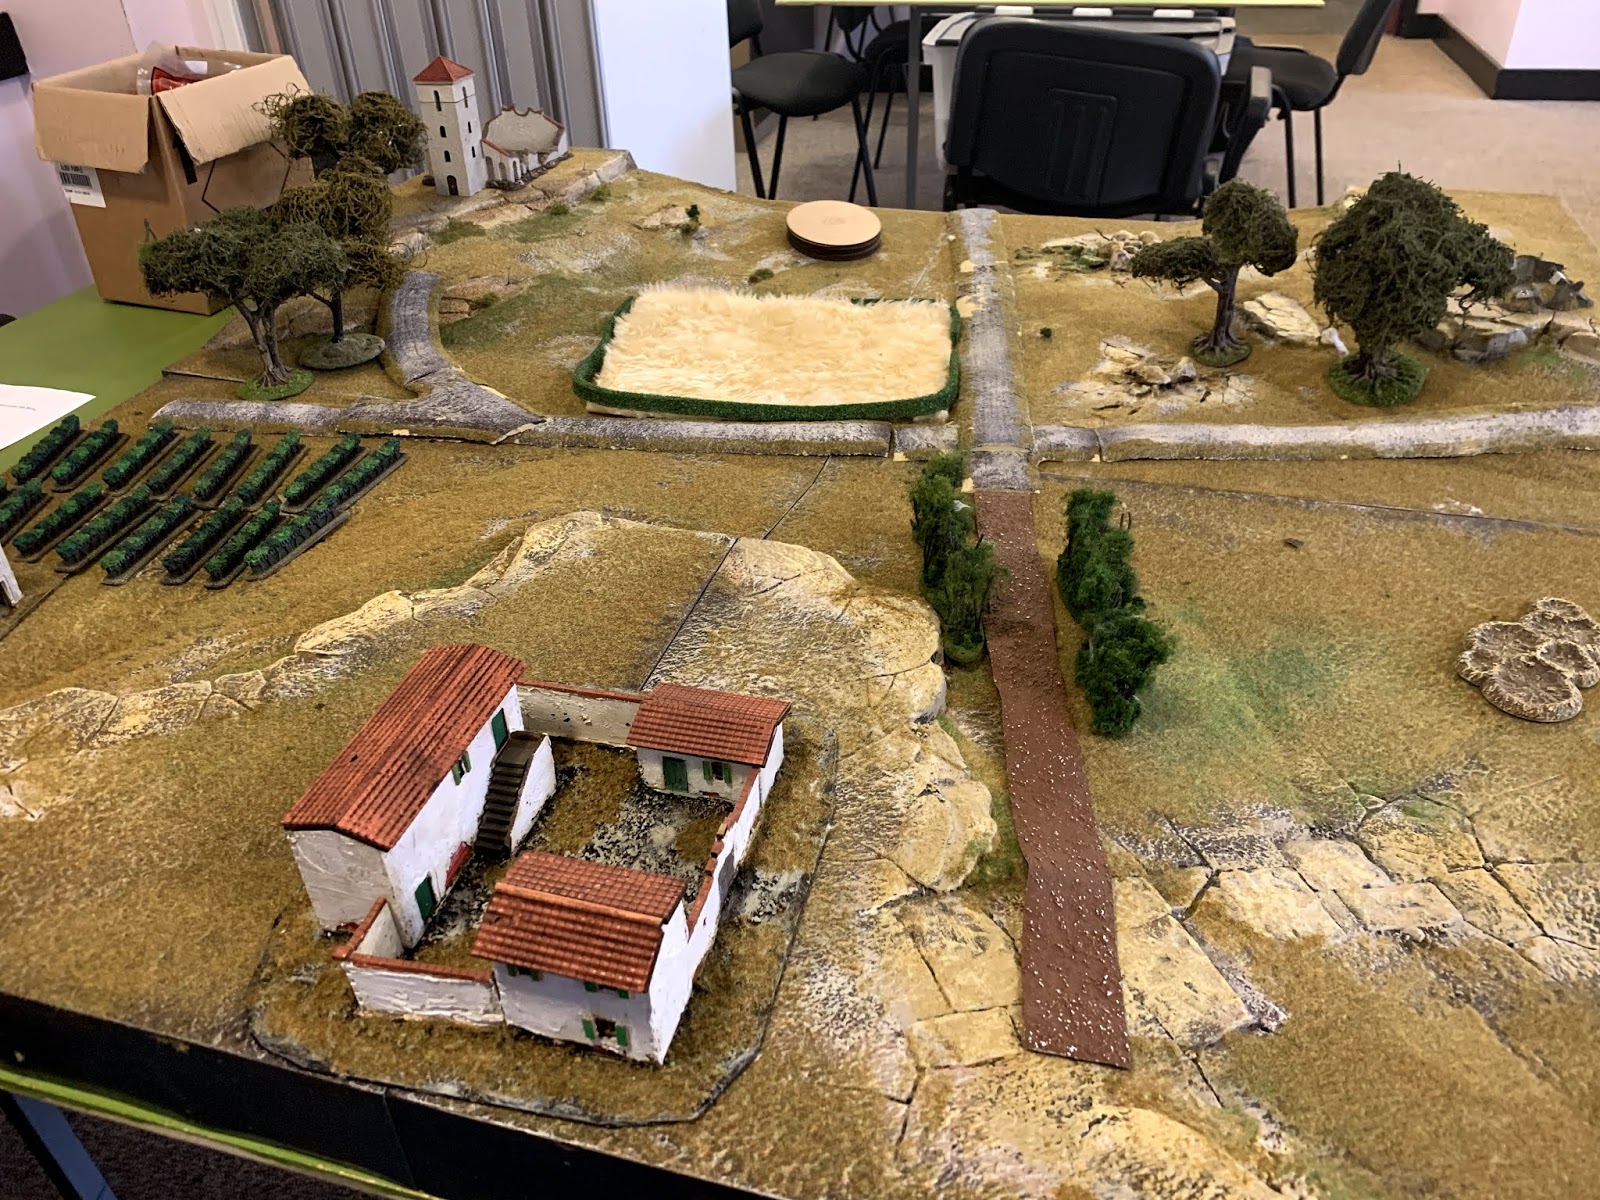
The game played last Friday takes up the story from that point on. Charged with the task of retaking the village, the Soviets again attacked in force. Click on the picture below to see all…

[I still can’t believe that, using Anton’s materials as a starting point, I wrote 60 scenarios for Poland 1939!]

AAR OML7 Game 2: IABSM: Recce vs Recce

My second game at this year’s Operation Market Larden (the Evesham Lardy day) was a rather exciting game of I Ain’t Been Shot, Mum. The scenario, written and umpired by Mike Whitaker, involved a clash between British and German reconnaissance forces somewhere in Italy in around 1943.

Click on the picture below to see all:

15cm Nebelwerfer Battery

Another unit almost certainly destined never to see the tabletop except as an objective for attack!

One of the new Late War box sets from Battlefront, the 15cm Nebelwerfer Battery consists of six plastic rocket launchers with three sprues of six crew each.

Very easy to build and paint up, and I like the extra ammo stowage you get to dress the bases. My only real problem is with the crews. The number of figure provided is fine: you get six figures per rocket launcher, but only four per launcher are actually suitable, the other two being obvious artillery- or anti-tank-men. That’s not the problem.

My gripe, and it is a small one, is that three of each set of kneeling crew members are wearing their full equipment: backpack, gas mask case, haversack, satchel etc. Now, fair enough, you don’t want to lose your stuff by putting it down somewhere and then forgetting it, but these are behind-the-lines artillerymen. I can’t see that they would go about loading their weapons with full pack on…but maybe I’m wrong, maybe they did. Anyone know? Anyhow, looks a bit weird to have all these heavily laden chaps servicing their guns.

But it’s a small gripe and don’t let it put you off buying. When it comes down to it, the set does exactly what it says on the tin. Now all I need to do is to get a table big enough to cope with their minimum range!

IABSM AAR: Sealion #06: The Road Inland

Tim Whitworth and friends recently played scenario #06 from the Operation Sealion scenario pack: The Raod Inland.

It is day S2 of the German invasion and the reconnaissance battalion of the Wehrmacht 26 Infantry Division is heading towards the sleepy village of Herstmonceaux. The reconnaissance unit is light in vehicles and most of the troops are mounted on bicycles ‘liberated’ from a sports shop in Pevensey.

So far British resistance has been patchy comprising of pockets of home guard and the occasional unit of regulars but the British are now frantically attempting to form a solid defensive line to the north of the landing beaches.

What will this day hold in store for Hauptmann Ralph Sturmer and his company? Click on the picture below to see all…

AAR OML7 Game 1: Chain of Command in Malaya

The first game that I played at this year’s Operation Market Larden was a game of Chain of Command set in Malaya 1941 put on in 28mm by Mark Backhouse.

The British, played by Matt Slade and I, were represented by a platoon of Argyll and Sutherland Highlanders. We were defending: our mission was to prevent any Japanese troops exiting the table on our side: Mark, in the picture above, is standing behind the British baseline. A sub-plot also involved us getting a senior officer to the knocked out ambulance to rescue certain vital supplies.

As mentioned, we had a full platoon of Scottish infantry at our disposal: three sections, a light mortar team and a Boys anti-tank rifle team led by lots of officers. In support, we chose a Lanchester armoured car (mainly because this theatre is about the only place you can use one) and a roadblock, which we used to prevent the Japanese bringing any tanks on from the side road on our right flank.

The Japs, played by Jeff Davis and Ian Gilbraith, had the opposite idea. Their aim was to capture two thirds of the table (horizontally) allowing them to exit troops off the British baseline. They also had a secondary mission: explore the two huts in search of rice supplies.

The Japanese also had a full platoon to field, but their sections were enormous: fourteen strong IIRC. In addition to their three regular rifle sections, they also had a grenade launcher squad with three Mk89 teams. In support, they had a Chi Ha tank: something we were not looking forward to facing.

Patrol Phase

The Patrol Phase happened quickly, with the Japanese ending up with their Jump Off Points largely on their left side of the table. We had two of our JOPs on that side of the table too, but as we’d had to protect out entire front instead of being able to schwerepunkt along one road, we had another behind the hut on our left hand side of the table.

The Main Game Begins

The dice really fell for the Japanese in the early stages of the game. I’m not quite sure of the mechanic, but something about them rolling lots of 6’s on their Command Dice twice in a row meant that they shot up the battlefield until there was a section in the jungle to our right, the grenade launchers behind the hut just in front of our positions, and another section right in front of us in front of the hut.

The Japanese opened fire, promising huge amounts of devastation on our lead section. Fortunately (me rolling lots and lots of very low dice) the potential for large numbers of deaths was never realised. In fact, our only casualty was a junior officer knocked down…who promptly got back up again. This did, however, cost us two Force Morale points: the officer was obviously deeply unpopular!

Now the dice swung our way, and we had the chance to pour fire into the Japanese squad out in the open: which we did, knocking their strength down by half. At the same time, our Lanchester appeared, and promptly shot up the Japanese squad to the right.

It was all going so well…then this happened:

The Chi Ha took a shot at the Lanchester, hit it, and almost knocked it right back off the table. One more of them and we’d have no Lanchester left, and a dwindling number of Force Morale points.

Our light mortar popped some smoke down on the road between the Chi Ha and our armoured car, which gave us a little time to breathe…but what to do? There were still lots of Japs on the table, albeit half of them were pretty bashed up, but we needed to do something quickly and decisively if we weren’t going to spend the next four years building railways!

There was nothing for it: we would have to go forward and take the fight to the Japanese!

Bursting from the undergrowth, one of our sections rushed across the road to the right shouting strange Scottish epithets as they closed with the enemy. There were more Japanese there than we expected (the figures were hiding in the scenery!) and we lost the first round of close combat. This boded ill, but then Mark reminded us that as we were Scottish, we could ignore a loss by a mere one man, and carry on fighting until we were properly wiped out!

Back in went the Argylls, and in another two rounds of fighting (the Japs weren’t giving up the ghost easily either) we killed every enemy solider except one senior leader, who fled the field not to be seen again until 1966, when he finally emerged from the jungle not knowing the war had ended in ‘45!

The loss of so many of their men was too much for the already battered Japanese to survive. With a Force Morale of zero, they melted away back the way they’d come. Another successful Argyll ambush: time to fall back and do it all again tomorrow!

Aftermath

A cracking game of CoC, and one after which I am actually starting to remember the rules. I don’t think I’m switching from gaming companies in 15mm (IABSM, CDS, Q13) but I shall definitely play CoC again when I can.

Thanks to mark, Matt, Jeff and Ian for making it such a great game. Here are a few more piccies:

M18 Hellcat Tank Destroyers

I’m still working my way through all the stuff I bought in the Battlefront sale. The next box set pulled out of the pile was a platoon of M18 Hellcat Tank Destroyers.

These are lovely pieces of kit: the traditional resin and metal mix rather than plastic, and well worth the money. They go together very easily indeed, and even my usual bugbear of fitting the crew in to the turret compartment was easily solved with a pair of clippers!

I built two of the M18s without a muzzle brake (left hand picture above) and two with the post-1944 muzzle brake (right hand picture above).

Painting them was easy. I began with a quick spray of a slightly darker shade of green: more a British colour than an American one. Once that was properly dry, I painted all the things that wouldn’t be green at the end of the process: the crew, the tools, the stowage etc. Then I washed the whole vehicle in Agrax Earthshade and, when dry, highlighted everything. The main vehicle body was heavily dry-brushed with brown velvet: this gave me the contrast I was after with the darker and washed green below. The tracks are my usual mix of a steel colour with a flesh wash.

To make sure the crew stood out, I actually painted them in a very light green uniform: not quite accurate, but when washed gave a nice effect. You can’t see it very well in the picture, but the crew member on the left (as you look at the picture) is actually giving someone the finger. Just one of the vagaries of casting, but a nice touch!

One note, the box set does come with some extra stowage and a decal sheet. The extra stowage is great, and the small stars on the turret and the vehicle number are just right, but the aerial recognition stars (the ones within the circle that go on top of the back of the turret) are way too big. I had to use left over decals from another set and, because the top of the turret has got all sorts of knobbly bits on it, loads of decal softener to get a nice fit.

These get a highly recommended from me, which is actually a shame as I’ve just realised that the reason they were in the sale is that Battlefront are relaunching (today actually!) everything late war, so this box set probably isn’t available any more! Shame.

IABSM AAR: Pegasus Bridge Playtest

This year is the 75th anniversary of the successful assault on Pegasus Bridge by glider infantry of the 2nd Battalion, the Oxfordshire and Buckinghamshire Light Infantry, British 6th Airborne Division, commanded by Major John Howard. The successful taking of the bridges played an important role in limiting the effectiveness of a German counter-attack in the days and weeks following the Normandy invasion.

The Soldiers of Oxfordshire Museum (SOFO) is putting on an exhibition to celebrate the anniversary, and it looks as if a few of us might be able to run a demo game of IABSM one weekend at the museum to help bring the event to life for the general public.

All the running for this is being done by friend Dave, so all I had to do recently was to take part in a playtest of the game to be run. Click on the picture below to see all…