First of the Sumerians

When I first saw the new Museum Miniatures Sumerians, I knew I just had to get some. Designed by CAD, they looked absolutely amazing.

The thing with Sumerians, however, is that you need to have an awful lot of them: to play To The Strongest (my current system of choice for Ancients) you need five or six spear blocks, with each spear block containing (the way I base) 48 figures. That’s 288 infantry: a significant investment in both money, and perhaps more significantly, time.

So a test unit was called for: 48 figures were ordered i.e. one spear block’s worth.

This was to be a double test: one for the figures themselves, and the second for the new Citadel Contrast paints I keep banging on about. I couldn’t face painting 288 figures my normal way (basecoat, wash, highlight i.e. paint each figure three times) but maybe I could if I only had to paint each figure once.

Sold!

The figures are as good as promised, and the paint as well. To emphasise again, the flesh, kilts, spear shafts, cloaks and shields are painted with one coat of a Contrast paint each. Only the bronze is double-painted, but that’s using non-Contrast paints.

Right, once more into the breach: only 264 spearmen to go!

TTS Battle Day: Wars of the Roses

Time for another day of To The Strongest: with friend Neil bringing over his vast collection of 28mm Wars of the Roses figures for us to play with. These are all professionally painted Perry Miniatures plastics, including some hobelars specially put together for the occasion.

We managed three games in all.

The first, with me playing Yorkshire, was a nail-biting backwards-and-forwards kind of game where either side could have triumphed. As it happened, my mounted Later Knights, accompanied by Richard of York himself, suddenly managed to burst through the enemy battle line and find the way open to looting the Lancastrian camps. A hard fought victory.

The second, with me now playing the noble house of Lancaster, was again looking close. The two main lines had clashed in the centre of the field, and the luck was swaying backwards and forwards, when each sides’ one unit of Later-Knights-plus-Royal-Personage charged into each other. Luck was obviously on my side, as Richard of York (my erstwhile self but now enemy commander!) was wounded and carried from the field. This gave me the edge and gradually the opposition crumbled. A narrow victory.

Onto the third game, with Neil making sure that I would play to win and not gift him a consolation victory…which just goes to show how little you can know about someone you have known for years! Play to win? I was playing to grind him into the mud! Anyhow, this was a very cagey game: very different to the previous clashes. Neil hung back, not really moving (annoyingly keeping his troops out of the range of my single cannon, the only one on the field) and waiting for me to make the play.

I edged forward, thinking that perhaps I could get a bit of advantage on the right hand side: maybe two archer units vs one, kill them, then try and curl around the edge of his now-slightly-decreased line. Neil read my intentions, however, and moved troops forward to counter. A clash began to develop, and one not in my favour. He moved more units in and my right flank was beginning to crumble, when both of us realised that he had now moved forward into cannon range. Bang went the gun and finished off a unit of Men At Arms, giving me the initiative. Neil sent forward his Household Knights and King to plug the gap and force me back onto the defensive…and then either bang went the gun again or in went my Household Knights (I can’t remember which) and off came the head of Richard of York again!

A horrible piece of luck for Neal which once again swung the game in my favour.: making it a three-victory whitewash to me.

A great day’s gaming, however, but an interesting demonstration of how a non-normal distribution game mechanic can swing a game in seconds. Oh, and Neil wants to know if anyone wants to buy two 28mm Wars of the Roses armies, one with the command figure slightly dented! Here are some pics:

First of the Praesentia

One of the armies that has been sitting in my lead mountain for some time is the Praesentia: mysterious, super-high tech beings originally designed and produced as part of the Critical Mass Games universe and now available, with the demise of CMG, from Ral Partha.

I like the way that although the figures themselves are fairly humanoid, there is an impressive back story which explains, amongst other things, that the Praesentia equivalent of Big Men always operate as a Trinary i.e. always in a three.

Mind you, in Q13 terms, who wouldn’t want a Tech 5 army that includes teleporting killer robots (excellent for dealing with those hidden away mortars); and Specialists who can alter dice rolls, prevent units from moving, and other fun stuff!

Here are the first two units off the painting table, each painted with one coat of the new Citadel Contrast paints. First up are the Phase Shifters and their RAL Phase-Shifting robots:

Second up are a Trinary of Enlightened with their RAL robots with ranged weapons:

I like these, as I can see them being used for a variety of different robot-types.

Q13 AAR: Rivets and Ribbets!

Those of you who read my last Q13 AAR will know that I am currently playing “king of the ring” with my new sci-fi factory complex. Last game, the Felids defeated the Hauk, so now it was their turn to defend, with their opponents being the Aphids: frog-like beings from Zombiesmith.

My opponents were Dave and John, who were on a strict time limit which actually nicely suited the type of game we were playing: they would play the Aphid attackers, and would have almost exactly 2½ hours to reduce my position.

Click on the picture below to see how they did:

Kudos to 4D Model Shop!

Regular visitors will know of my woes in trying to find some Citadel or GF9 Grass flock: a right pain in the posterior as I have models to base!

I suddenly thought of widening my search to the general modelling retail community and came across the 4D ModelShop.

Rather impressively, they have the url modelshop.co.uk, so must have got into this Internet thing pretty early on.

They have flock for sale: lots of flock, and some of it grass. They have lots of other things for sale as well, as you can see by their home page, promise that items ordered by 2pm will be posted that day:

Well I did, and I did, and they did, and, for once, the Royal mail did their bit, and lo and behold, the very next day I had a packet of Grass flock in my hands. I was happy as Larry!

So kudos to 4D Model Shop from a very satisfied customer!

Like Magic: Citadel Contrast Paints

I might be a bit late coming to this, but these new Contrast paints from Citadel are absolutely fantastic!

For those of you who haven’t heard of them before (especially those who would normally eschew anything to do with Games Workshop), let me explain why.

Imagine you are painting a hundred 15mm figures who are largely one colour: skeletons, naked warbands, chaps in khaki, robots. Once prepped for painting (including undercoat), my usual method would be to paint in a base colour, wash with Agrax Earthshade, then highlight once, maybe twice. That’s three or four stages.

These new Citadel paints allow you to do those three or four stages in just one go.

Yes: just one go.

It’s like magic…like one of those cartoons where the paint brush paints in multiple colours at the same time.

Let me give you an example, and one involving one of the hardest colour to paint: yellow.

On the painting table I had 18 Phase-Shifter RAL robots for my new Praesentia sci-fi army. I decided to paint them yellow. I then had 48 normal RAL robots that I decided to try and paint what I would call technology-white i.e. a bit like a white iMac.

I undercoated both sets in the recommended (and expensive) Citadel undercoat, let it dry and then opened the yellow Contrast paint. In went the brush and onto the model: low and behold a fully base-coated, washed and highlighted model in one coat. It was incredible. Once the yellow had dried, all I had to do was add some metallic claws and red scanner-eye and that was that.

Virtually the same for the others: one coat of the white Contrast paint and I had an effect like some of these genius painters achieve with their white trousers for French infantry but that I never have. Incredible!

Now I know you all want to see some pictures - the proof being in the pudding - but until my flock arrives (see yesterday’s post) I haven’t got any of the finished models. There are, however, many examples of how these paints can be used on the web: just Google and you’ll see what I mean.

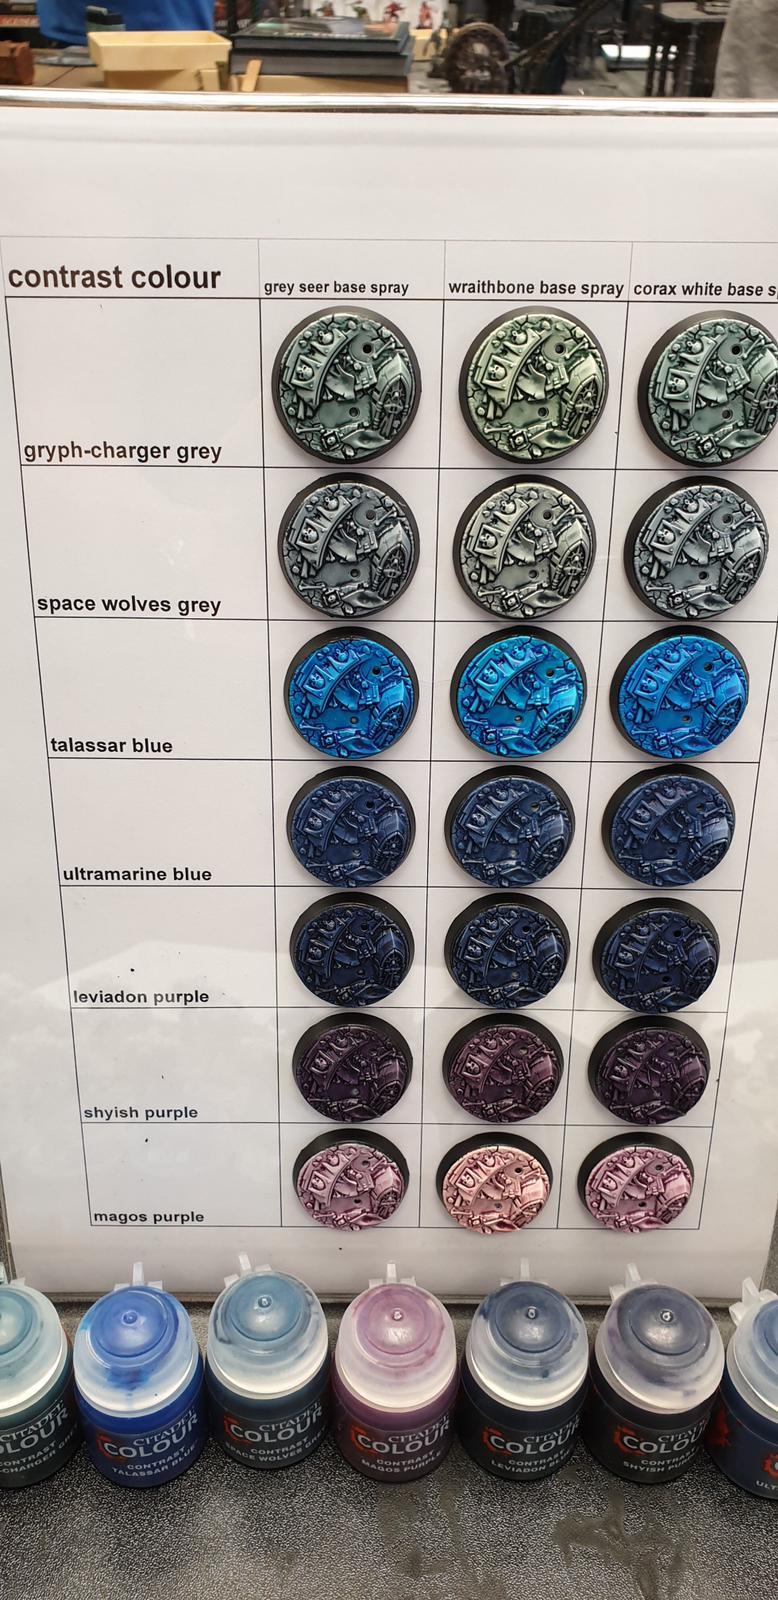
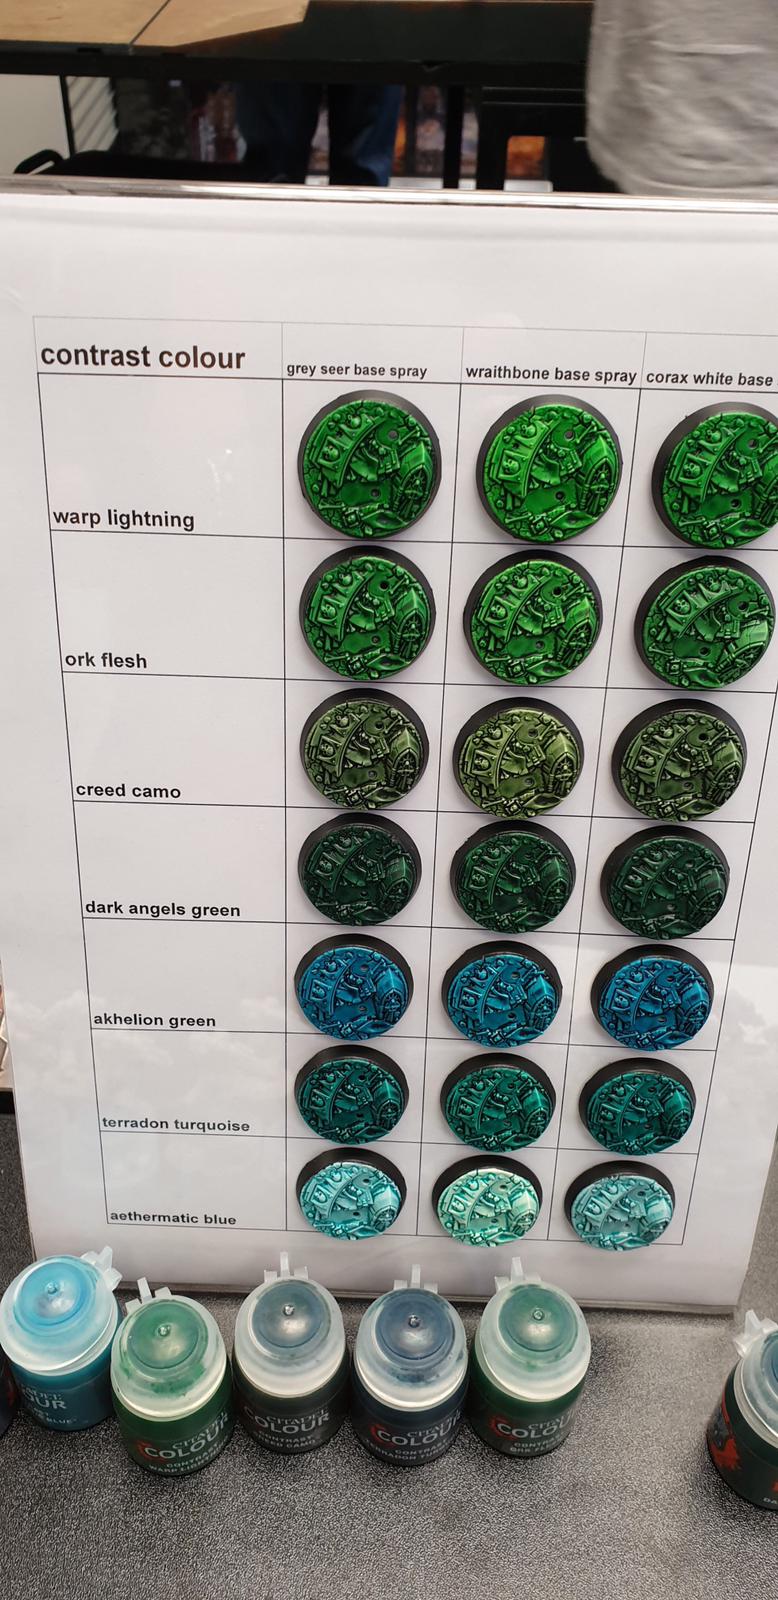
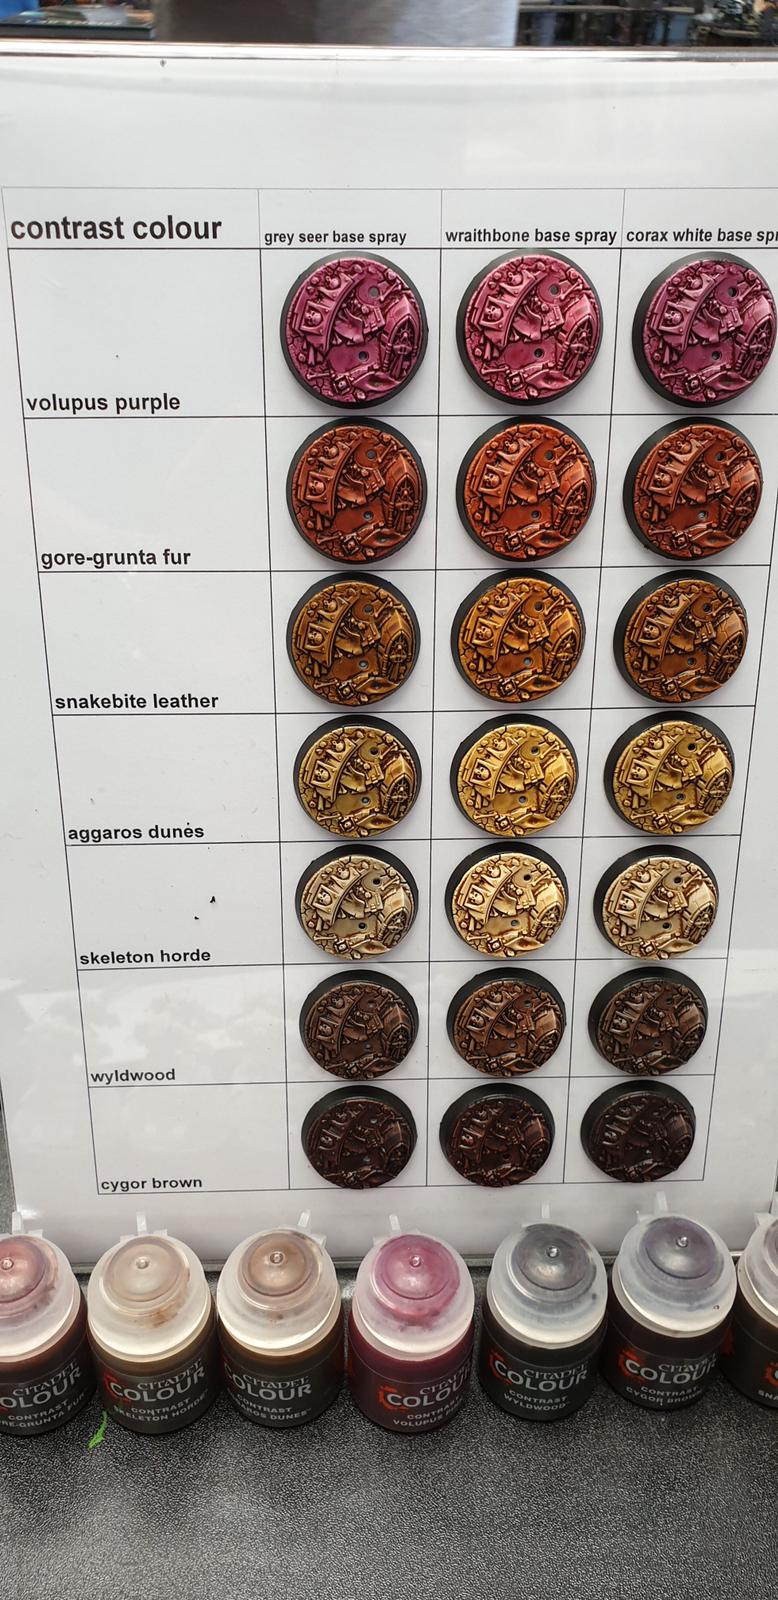
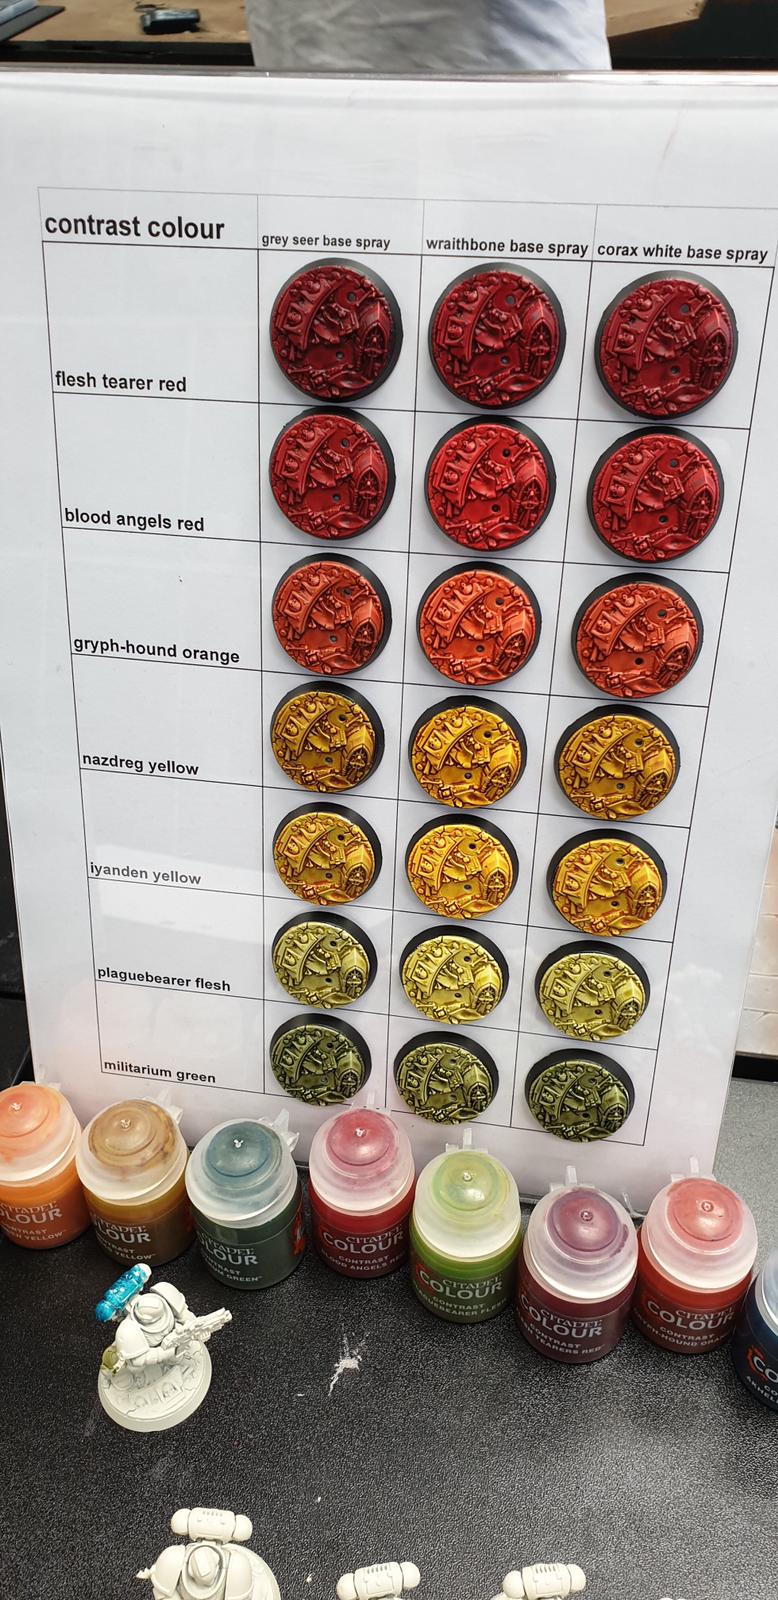
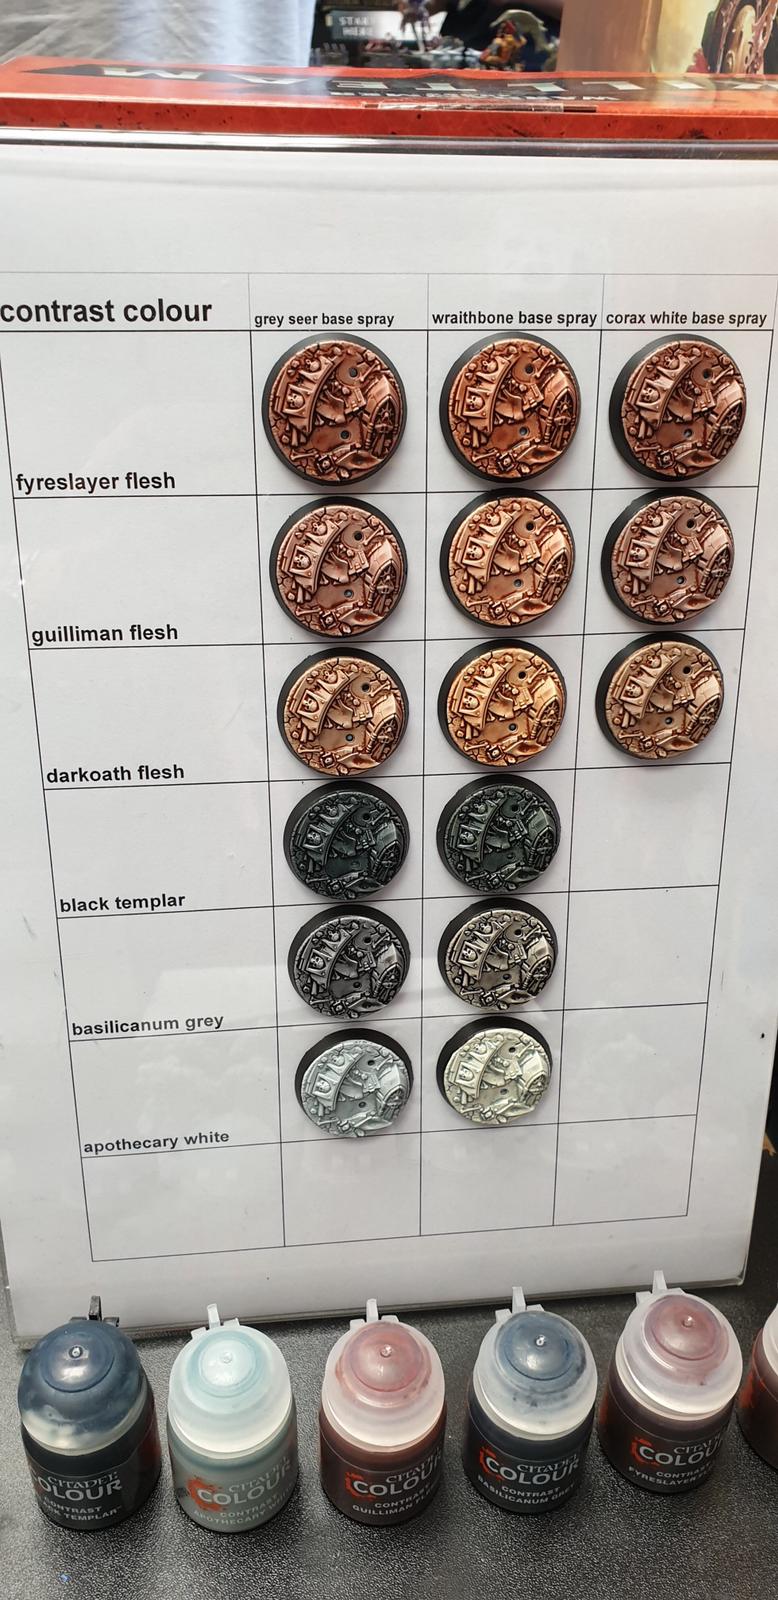
What I am doing, however, is posting a colour chart nicked from someone who had nicked it from the person who originally produced it. When you look at it, just remember that the effect was achieved with JUST ONE COAT OF PAINT!

And there are a lot of colours available!

Oh, a couple of downsides: the Contrast paints are expensive (almost £5 a pot), and I understand (from other posts that I’ve read) that you must deffo varnish your figures, as they are not as hardy as a pure, single-colour acrylic…but then I varnish my figures anyway.

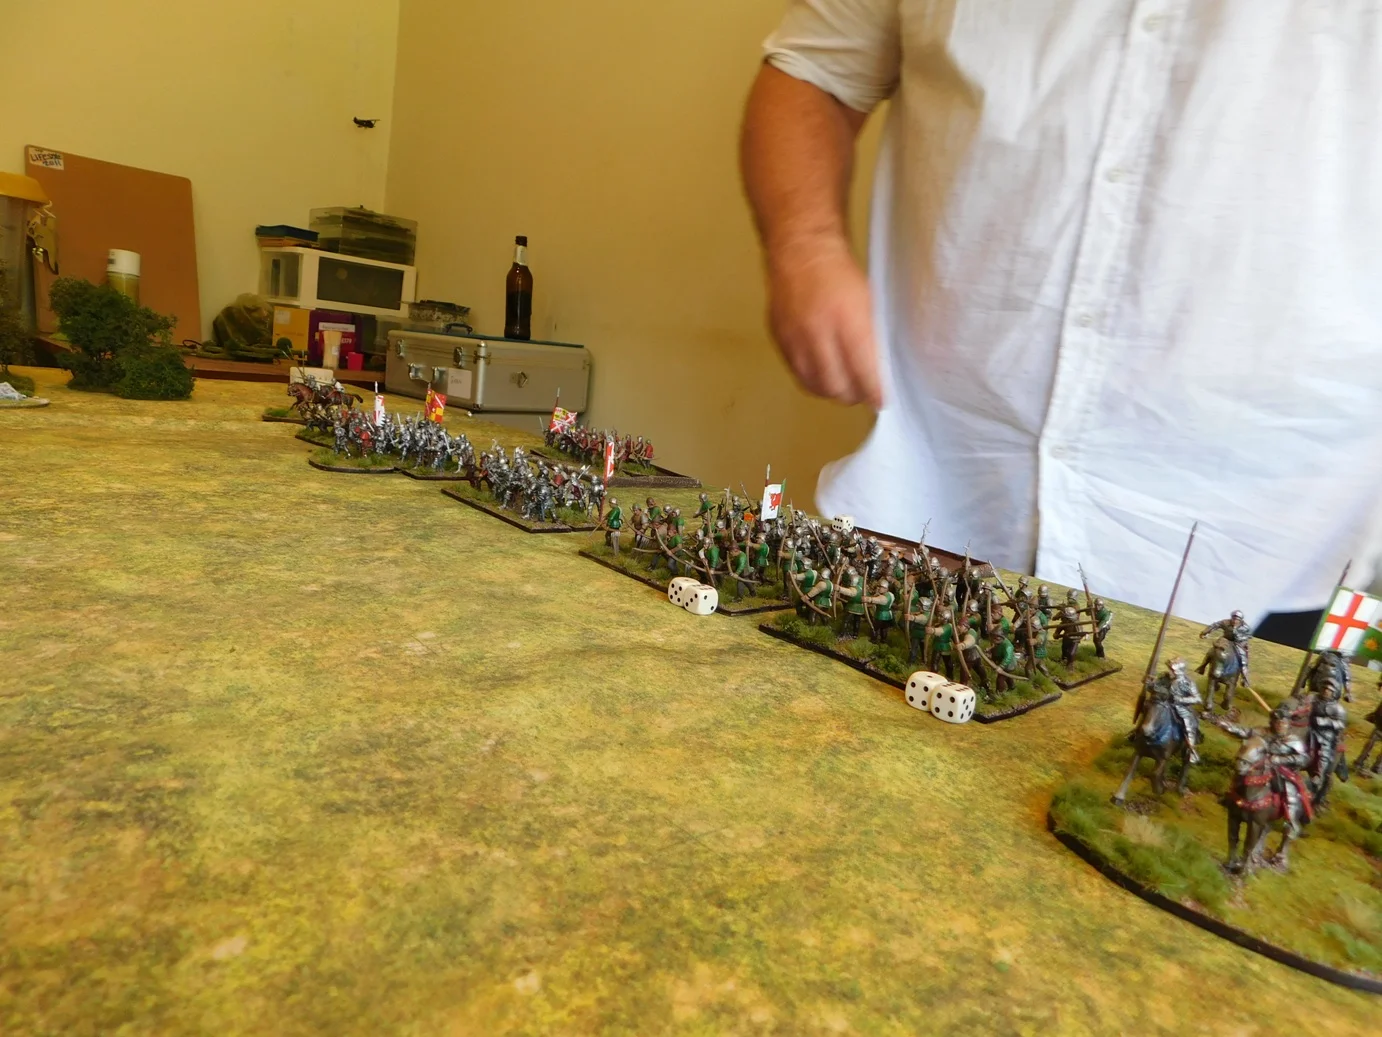
Right: off to start my new Sumerian ancients army: six blocks of 48 spearmen figures means 288 spearmen to paint. Luckily that’s now one coat for the cloak, one coat for the skirt, and one coat for the flesh!

POSTSCRIPT

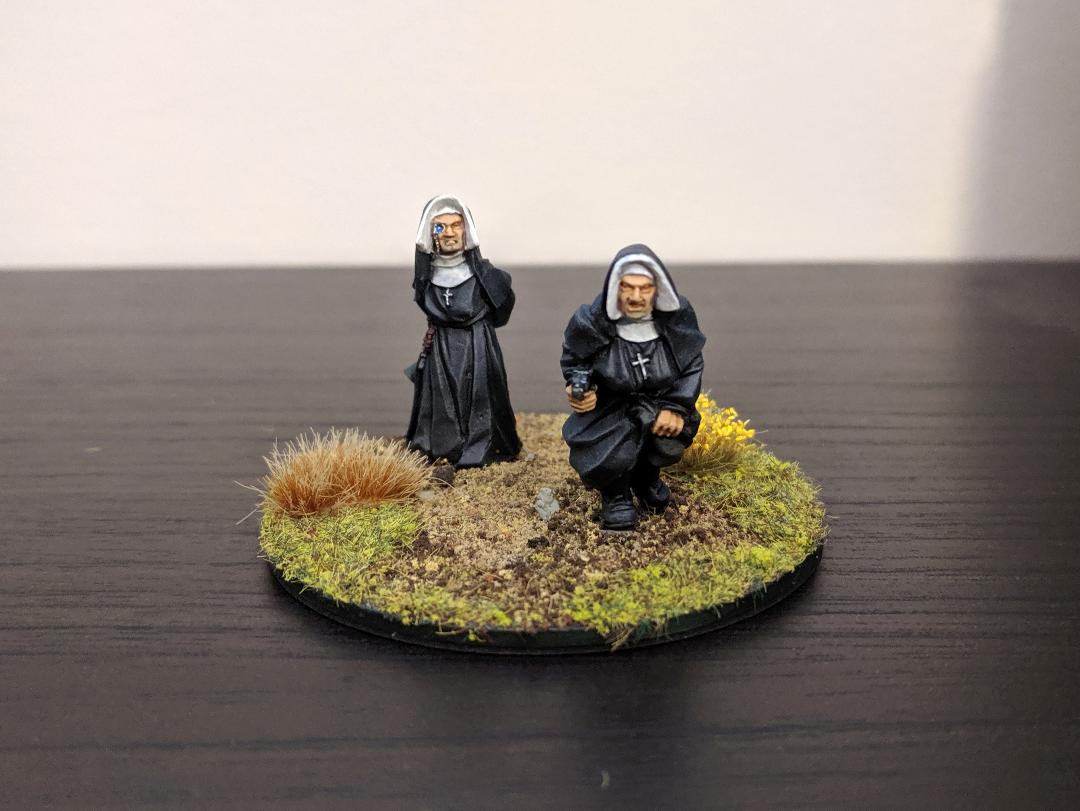
I’ve now had a chance to flock my first lot of Praesentia:

As mentioned above, this is just one coat of Iyanden Yellow!

Where the Flock?

Missing!

Is it me, or is it impossible to get Citadel/Games Workshop grass flock any more?

None of the three GW shops I’ve been into have any (“we don’t stock it any more: people only want to buy tufts”); the GW online store has none; my order from Element Games is on back order…where the flock has all the flock gone?

I can’t even buy the Gale Force 9 stuff from their store, as the speed checkout that the link to the Battlefront shopping cart sends you to is faulty.

Why does this matter?

Well, I’ve been using the stuff for thirty years or so. I have literally thousands of figures based with the stuff, and would rather like any new ones I get to match!

Meanwhile the painted and partly-based minis mount up on my painting table!

IABSM AAR: Up From Asnelles

It’s been a few months since we’ve had one of these, but here’s another great WW2 After Action Report from Mark Luther.

Here’s his introduction:

I just got back from France and Normandy so I was in the mood for a D-Day game. I also wanted something basic and that would allow for both sides to do some manoeuvring, so a straight out assault on dug in stationery troops was out.

I came up with the move in from Asnelles by the B Company 2 Devons and the counterattack by the 916 Grenadier Regiment later in the day on June 6. The two German grenadier companies had two three-section Zugs. I rated them as poor troops. This company had two attached MMG teams. The German orders were to get off the north edge of the table. A pair of StuG IIIs would show later.

For the Brits, B Company of the 2 Devons had all three platoons, but I also rated them as poor troops for this game. Between being seasick and inexperienced they were not fully up to their game. A troop from the Sherwood Rangers were assigned as support but were running late. Their orders were to advance south and get off the table.They began on the north board edge.

Click on the picture below to see all…

TFL Painting Challenge: June Over!

We’ve definitely passed the half-way stage now, so check your scores and if you’re lagging behind where you think you ought to be, then get painting!

To inspire you, here’s what everyone else has been doing whilst you’ve been avoiding the painting table (and you know who you are!):

  • Travis contributes his usual entry: a lovely Bison, some winter war Germans, and a fantasy bolt-thrower to finish

  • Carole is into snakemen, and also shares a couple of 28mm specials

  • There’s a hovel and some barrels from Mr Burt

  • It’s back to sci-fi for Mr Plowman: a slow start and then a bumper second entry

  • Chris Kay sends in just about an entire WW2 US infantry platoon

  • More Gaslands cars for Andy Duffell

  • Loving the Sealion specials from Mr Emmett

  • Andy Helliwell finds that retirement still gets in the way of painting figures

  • Lloyd “the hat” Bowler is still painting 6mm ACW: another 300 or so hit the battlefield

  • Skeletons from Mervyn

  • And last, but by no means least, a quick set of WW2 Soviet Naval Infantry from Mark Luther

As usual, clicking on the name of the person in the list above will take you straight to their gallery (opens in new window).

Here are today’s pictures:

German Howitzers from Battlefront

Another unit destined to see the tabletop very rarely: a battery of German 10.5cm howitzers.

These are, again, plastic, and actually not bad at all. The guns are superb: they go together easily and paint up well; the crews are a bit more average but take also the paint well.

What I do like about the crews is that, unlike the chaps manning the Nebelwerfer battery I was complaining about a couple of weeks ago, these men have dumped all their backpacks, and gas mask cases, waterbottles etc, and are just dressed in their uniforms. Makes a lot more sense and saves a lot of time when painting them up!

Definitely another recommended from me: a great way to get some glorified objective markers onto the table without breaking the bank!

IABSM AAR: Villa Santa Anna

Another great AAR from Mike Whitaker, using a set of terrain boards with which, after Market Larden, I am very familiar!

Set in Italy '44 again. The British (Carl, Rod) are tasked with taking the farm of Santa Anna, a German (Colin) strongpoint. They have a troop of Churchill NA75s, a carrier section and two infantry platoon, as well as a Vickers. Ranged against them are two understrength German platoons, a couple of MG42s, a StuG, and their CO's new pride and joy, an SdKfz 251/10.

Click on the picture of the Villa, below, to see what happened:

You can see more great content on Mike’s blog: Trouble at T’Mill

Q13 AAR: I Did See A Putty Cat!

Regular visitors will know that at this year’s Salute I purchased a bargain pack of mdf sci-fi terrain from TT Combat and have spent the last couple of months building it. It was now time to get some figures onto the table and actually use the damn thing!

The scenario was to be a simple attacker/defender game, with the Hauk (sci-fi birdmen from Khurasan) defending the industrial complex against an assault from the Felids (sci-fi lionmen, also from Khurasan). I would play the Hauk, friend Neal would play the Felids, and in order to make things interesting, there was a time limit for the Felids to take the complex.

Click on the picture below to see what happened:

IABSM AAR: The September War #60: Szack

Great battle report from Tim Whitworth and the Like A Stone Wall wargames group, this time featuring a recent game taken from the September War II scenario pack.

Here’s the background:

Soviet troops consisting of the 112th Infantry Regiment, some 13.000 soldiers supported by fifteen T-26 tanks and fifteen guns, arrived at the village of Szack on September 28th.

The Polish force near the village numbered 4.000 men of the Border Protection Corp, including General Wilhelm Orlik- Rückermann, and sixteen anti-tank guns.

Having taken the village, the Soviets then charged the Polish positions with infantry supported by the T-26 tanks. The Poles waited until the Soviets were right on top of them before opening fire with their antitank guns, destroying eight tanks.

The Polish troops now launched an all-out counterattack: covered by their artillery, the soldiers of the Border Protection Corps charged at their enemies with bayonets fixed. By the afternoon the village was back in Polish hands.

The game played last Friday takes up the story from that point on. Charged with the task of retaking the village, the Soviets again attacked in force. Click on the picture below to see all…

[I still can’t believe that, using Anton’s materials as a starting point, I wrote 60 scenarios for Poland 1939!]

TFL Painting Challenge: A Large Update

A large update to the Painting Challenge after missing a week due to Market Larden.

To dive straight in, in no particular order we have:

  • Travis with a mix of figures: some WW2, some not

  • And the same is true for Mervyn: tanks and barbarians together

  • Stumpy is in the Ancients camp

  • Steve Burt is back in Natal

  • Carole clears some odds and ends

  • It’s off to the Western Desert with loads of Italians for Matt Slade

  • Andy Duffell is another mix of WW2 and fantasy…well, near future sci fi to be more precise

  • Loads of painted 15mm terrain from Chris Stoesen

  • Andrew Helliwell is off to the American War of Independence

  • And, again, Derek has skeletons and tanks for us. What is it about the mix of WW2 and fantasy?

  • Finally, and having obviously forgotten his fantasy, Sapper has some nice WW2 British infantry with not a hint of Dungeons & Dragons about them!

As per usual, clicking on the name of the person in the list above takes you straight to their gallery (opens in a new window).

Today’s pictures are below:

AAR OML7 Game 2: IABSM: Recce vs Recce

My second game at this year’s Operation Market Larden (the Evesham Lardy day) was a rather exciting game of I Ain’t Been Shot, Mum. The scenario, written and umpired by Mike Whitaker, involved a clash between British and German reconnaissance forces somewhere in Italy in around 1943.

Click on the picture below to see all:

15cm Nebelwerfer Battery

Another unit almost certainly destined never to see the tabletop except as an objective for attack!

One of the new Late War box sets from Battlefront, the 15cm Nebelwerfer Battery consists of six plastic rocket launchers with three sprues of six crew each.

Very easy to build and paint up, and I like the extra ammo stowage you get to dress the bases. My only real problem is with the crews. The number of figure provided is fine: you get six figures per rocket launcher, but only four per launcher are actually suitable, the other two being obvious artillery- or anti-tank-men. That’s not the problem.

My gripe, and it is a small one, is that three of each set of kneeling crew members are wearing their full equipment: backpack, gas mask case, haversack, satchel etc. Now, fair enough, you don’t want to lose your stuff by putting it down somewhere and then forgetting it, but these are behind-the-lines artillerymen. I can’t see that they would go about loading their weapons with full pack on…but maybe I’m wrong, maybe they did. Anyone know? Anyhow, looks a bit weird to have all these heavily laden chaps servicing their guns.

But it’s a small gripe and don’t let it put you off buying. When it comes down to it, the set does exactly what it says on the tin. Now all I need to do is to get a table big enough to cope with their minimum range!

IABSM AAR: Sealion #06: The Road Inland

Tim Whitworth and friends recently played scenario #06 from the Operation Sealion scenario pack: The Raod Inland.

It is day S2 of the German invasion and the reconnaissance battalion of the Wehrmacht 26 Infantry Division is heading towards the sleepy village of Herstmonceaux. The reconnaissance unit is light in vehicles and most of the troops are mounted on bicycles ‘liberated’ from a sports shop in Pevensey.

So far British resistance has been patchy comprising of pockets of home guard and the occasional unit of regulars but the British are now frantically attempting to form a solid defensive line to the north of the landing beaches.

What will this day hold in store for Hauptmann Ralph Sturmer and his company? Click on the picture below to see all…

AAR OML7 Game 1: Chain of Command in Malaya

The first game that I played at this year’s Operation Market Larden was a game of Chain of Command set in Malaya 1941 put on in 28mm by Mark Backhouse.

The British, played by Matt Slade and I, were represented by a platoon of Argyll and Sutherland Highlanders. We were defending: our mission was to prevent any Japanese troops exiting the table on our side: Mark, in the picture above, is standing behind the British baseline. A sub-plot also involved us getting a senior officer to the knocked out ambulance to rescue certain vital supplies.

As mentioned, we had a full platoon of Scottish infantry at our disposal: three sections, a light mortar team and a Boys anti-tank rifle team led by lots of officers. In support, we chose a Lanchester armoured car (mainly because this theatre is about the only place you can use one) and a roadblock, which we used to prevent the Japanese bringing any tanks on from the side road on our right flank.

The Japs, played by Jeff Davis and Ian Gilbraith, had the opposite idea. Their aim was to capture two thirds of the table (horizontally) allowing them to exit troops off the British baseline. They also had a secondary mission: explore the two huts in search of rice supplies.

The Japanese also had a full platoon to field, but their sections were enormous: fourteen strong IIRC. In addition to their three regular rifle sections, they also had a grenade launcher squad with three Mk89 teams. In support, they had a Chi Ha tank: something we were not looking forward to facing.

Patrol Phase

The Patrol Phase happened quickly, with the Japanese ending up with their Jump Off Points largely on their left side of the table. We had two of our JOPs on that side of the table too, but as we’d had to protect out entire front instead of being able to schwerepunkt along one road, we had another behind the hut on our left hand side of the table.

The Main Game Begins

The dice really fell for the Japanese in the early stages of the game. I’m not quite sure of the mechanic, but something about them rolling lots of 6’s on their Command Dice twice in a row meant that they shot up the battlefield until there was a section in the jungle to our right, the grenade launchers behind the hut just in front of our positions, and another section right in front of us in front of the hut.

The Japanese opened fire, promising huge amounts of devastation on our lead section. Fortunately (me rolling lots and lots of very low dice) the potential for large numbers of deaths was never realised. In fact, our only casualty was a junior officer knocked down…who promptly got back up again. This did, however, cost us two Force Morale points: the officer was obviously deeply unpopular!

Now the dice swung our way, and we had the chance to pour fire into the Japanese squad out in the open: which we did, knocking their strength down by half. At the same time, our Lanchester appeared, and promptly shot up the Japanese squad to the right.

It was all going so well…then this happened:

The Chi Ha took a shot at the Lanchester, hit it, and almost knocked it right back off the table. One more of them and we’d have no Lanchester left, and a dwindling number of Force Morale points.

Our light mortar popped some smoke down on the road between the Chi Ha and our armoured car, which gave us a little time to breathe…but what to do? There were still lots of Japs on the table, albeit half of them were pretty bashed up, but we needed to do something quickly and decisively if we weren’t going to spend the next four years building railways!

There was nothing for it: we would have to go forward and take the fight to the Japanese!

Bursting from the undergrowth, one of our sections rushed across the road to the right shouting strange Scottish epithets as they closed with the enemy. There were more Japanese there than we expected (the figures were hiding in the scenery!) and we lost the first round of close combat. This boded ill, but then Mark reminded us that as we were Scottish, we could ignore a loss by a mere one man, and carry on fighting until we were properly wiped out!

Back in went the Argylls, and in another two rounds of fighting (the Japs weren’t giving up the ghost easily either) we killed every enemy solider except one senior leader, who fled the field not to be seen again until 1966, when he finally emerged from the jungle not knowing the war had ended in ‘45!

The loss of so many of their men was too much for the already battered Japanese to survive. With a Force Morale of zero, they melted away back the way they’d come. Another successful Argyll ambush: time to fall back and do it all again tomorrow!

Aftermath

A cracking game of CoC, and one after which I am actually starting to remember the rules. I don’t think I’m switching from gaming companies in 15mm (IABSM, CDS, Q13) but I shall definitely play CoC again when I can.

Thanks to mark, Matt, Jeff and Ian for making it such a great game. Here are a few more piccies: