FK&P AAR: Fire Over Barsetshire

Friend Rob came round today and brought with him his collection of Elizabethan era English and Spanish for a 16th Century dust up of some kind.

Difficult to decide which rules to use, as we wanted to employ the TTS engine but the Elizabethan era sits neatly between the end of To The Strongest and the beginning of For King & Parliament.

In the end we plumped for FK&P, but with a few minor variations very much like the Eastern Front variant that we use for 17thC warfare in eastern Europe.

The Scenario

Rob had worked out a simple scenario involving some Spaniards “left over” from the Armada launching an invasion of England from a base in Ireland…

Spanish Briefing

When the Armada was driven north into the teeth of storm and gale, England believed she was saved. You, Captain General Velazquez will prove the heathen English and their she-devil Queen wrong.

Fortuitously as you limped south through the Irish Sea, you came upon the remains of the Squadron of Portugal also making their way slowly back to Spain and safety. Inspiring your fellow officers and the commandantes of the much-reduced fleet, you came up with a cunning plan. Landing with what force you had remaining on the coast of Ireland, you recruited a brigade of good Irish Catholics to your cause, rallied by the patriotic songs of a passing group of folk singers who conveniently agreed to lead the Irish forces.

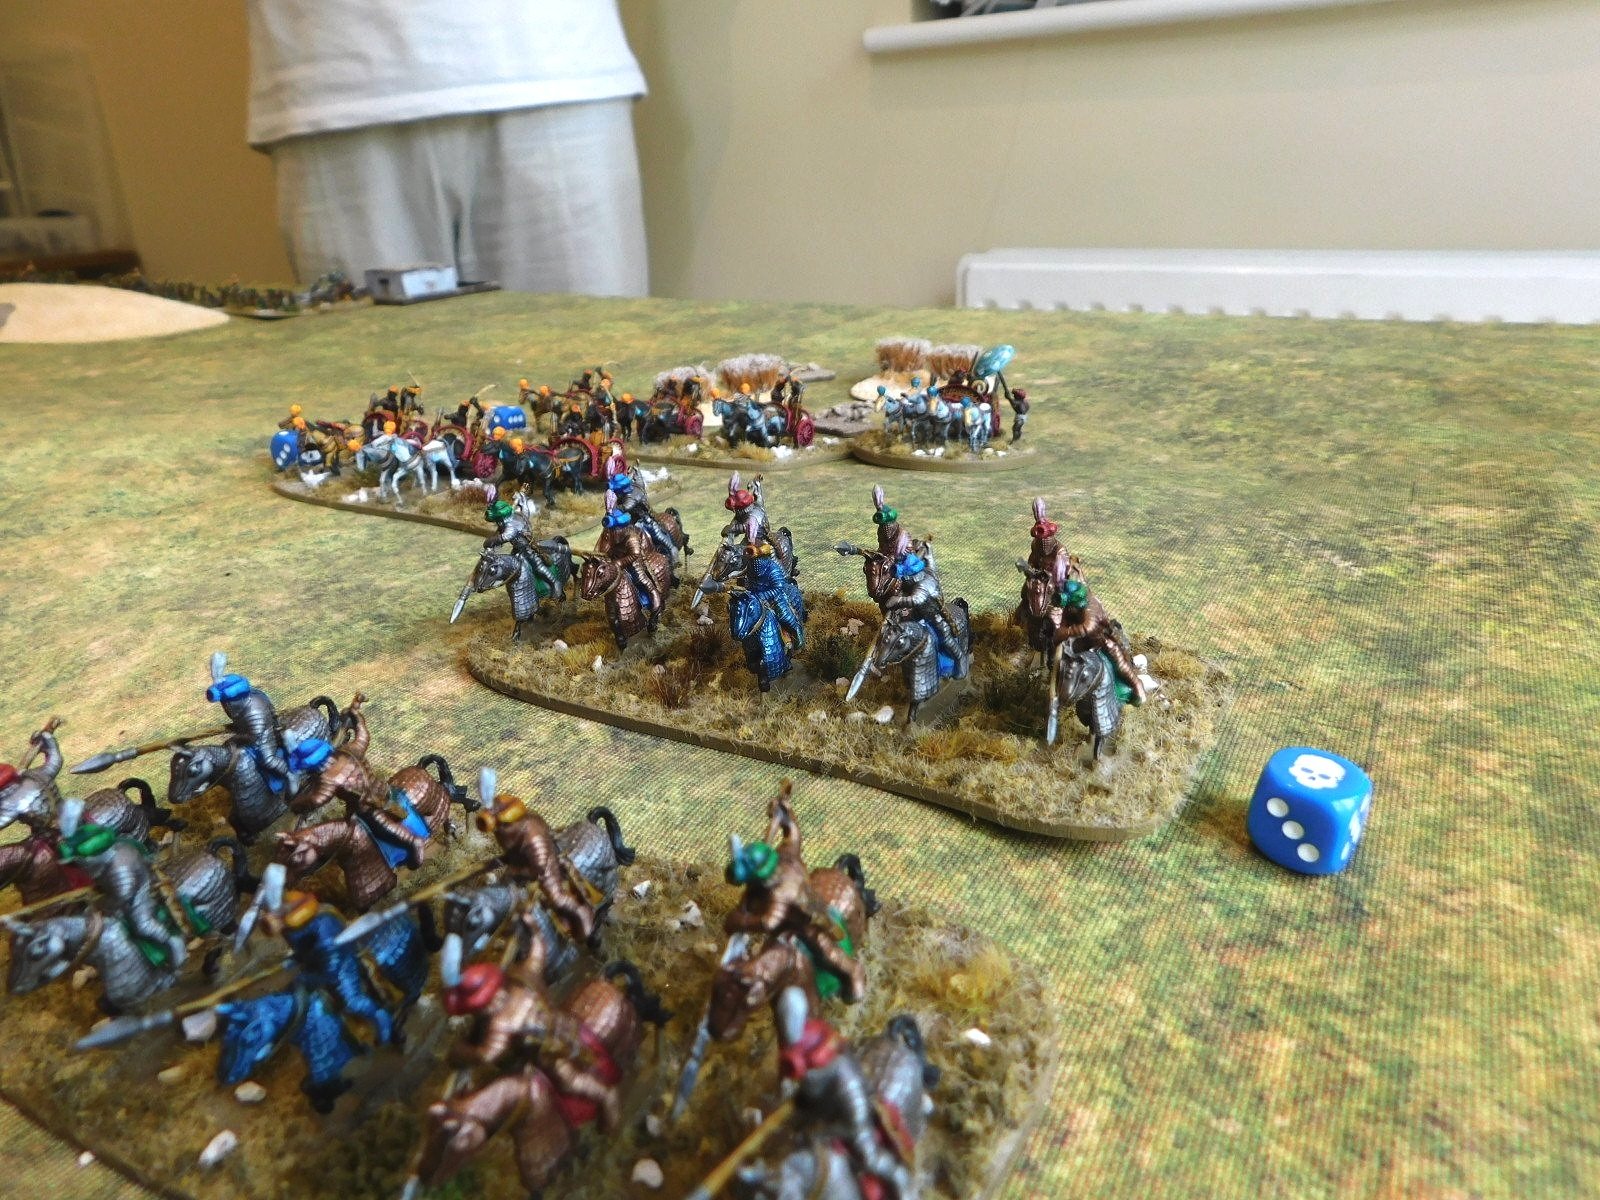
Spanish Pike & Shot with Captain General Velazquez

Making a dash for the western coast of England, the Lord has finally blessed your endeavours, your landing was unopposed and, with what forces you have left, you have marched inland, hoping to rouse the English Catholics to your banner and still snatch victory from the jaws of disaster. So far, they have been less than forthcoming. One real victory, though, should inspire a rising across southern England.

You have made good time and have reached the county of Barsetshire, a hive of Protestant scum and villainy. As you ready to advance on a small farm just to the south of Uffley, you sight a ragged band of English soldiers: this is finally your chance to claim revenge for all the wrongs the English have done to Spain and God’s true cause.

The Irish Brigade

With you, you have the “volunteers” from the fleet, being a mixture of ships’ crews and what cavalry you have been able to raise using horses liberated on your march east. The least motivated, at least they will distract the English! Your core troops are your four battalia of Spanish infantry, the terror of Europe and veterans all. Finally, you have a brigade of Irish volunteers: untried, but ready for plunder and true to the faith.

Seize the farm, rout the English, and the road will be clear to Barchester itself!

English Briefing

The Godless Spanish don’t know when they’re beaten…but it’s time to show them once and for all that they are.

You are Lord William Harding, the Duke of Barsetshire. It’s a proud name, and you are determined to honour it. Unfortunately you missed the battles at sea, and thought all the glory would got to privateers like Drake, but God has given you the chance to feast upon one small part of the Spanish pie!

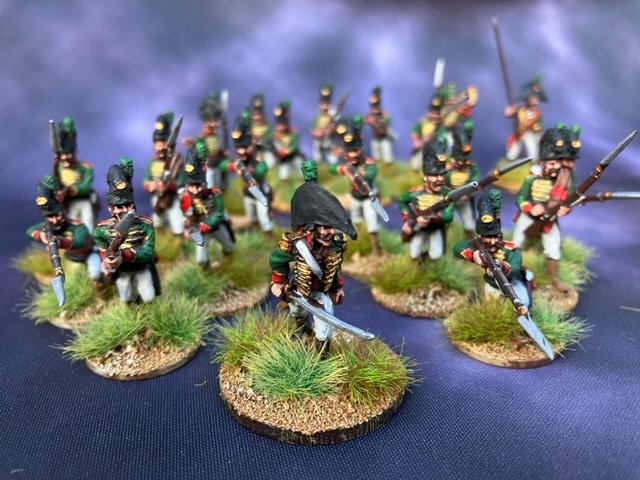
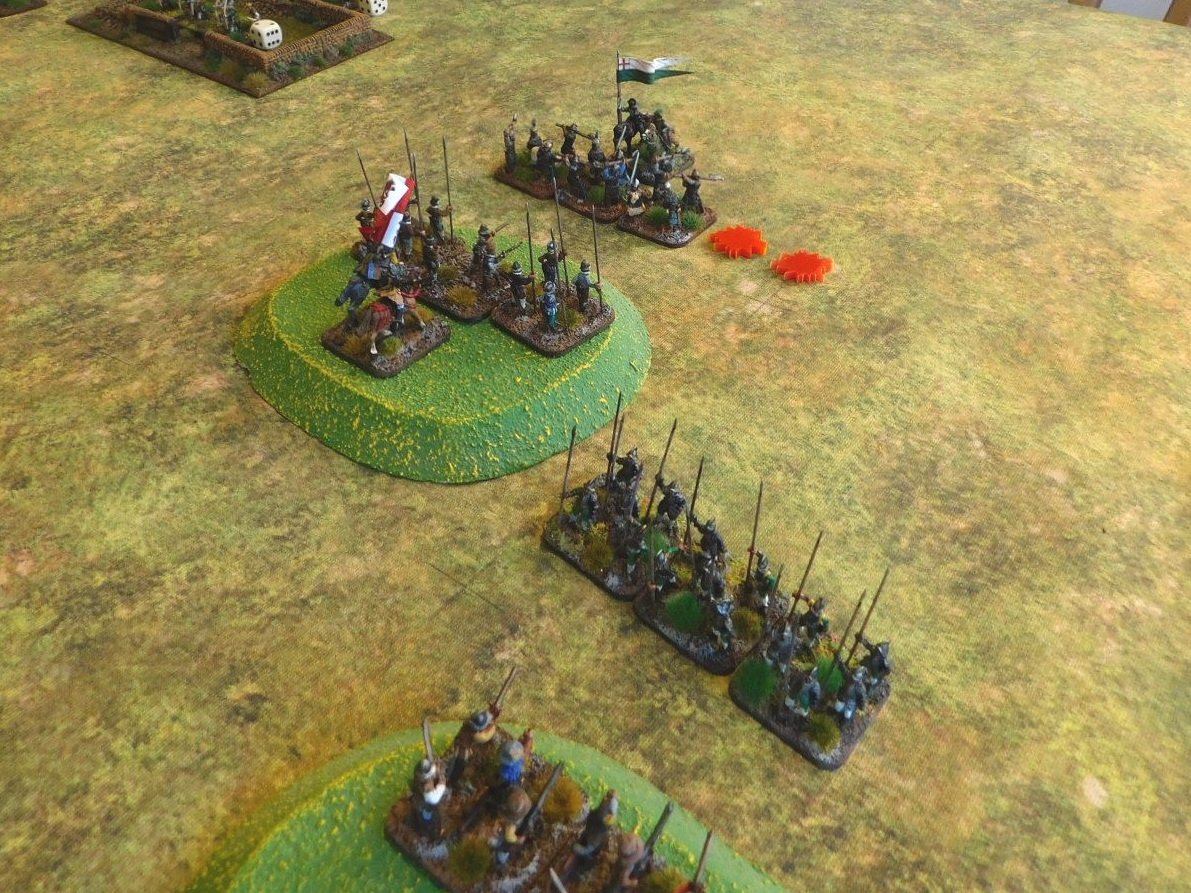
Sir Mark Proudie’s Pike from the Royal Army

Word of a Spanish landing in the west reached London and at first none believed it: the Spanish had been defeated weeks ago! As, however, reports of Spaniards marching inland grew, the Queen has dispatched you and a (concerningly small) force to deal with what are surely just some remnant Spanish brigands who’ve been blown ashore.

As you neared your home county, however, you became aware that what faced you was not a band of weakened, dispirited sailors but the core of a Spanish army, supported by Irish rebels. So be it: whatever the odds, God is on your side!

Sir Bernard Crosbie, a venerable old gent, has not been inactive either, and the West Barsetshire Militia have been raised, accompanied by some welcome artillery and the Reverend Crawley, rumoured to be in line for a Bishopric and certain to inspire the men. Most of your troops are lightly armed and untried, but you have strong cavalry, and every stout yeoman of England is worth at least two Papist wretches!

You intend to make a stand to the south of Uffley, not least because you own farmland there and would rather it stayed that way! Defend the road, save Barchester, and show the Spaniards once again that God is an Englishman!

The Silverbridge Gunsmiths Guild artillery: part of the West Barsetshire Militia
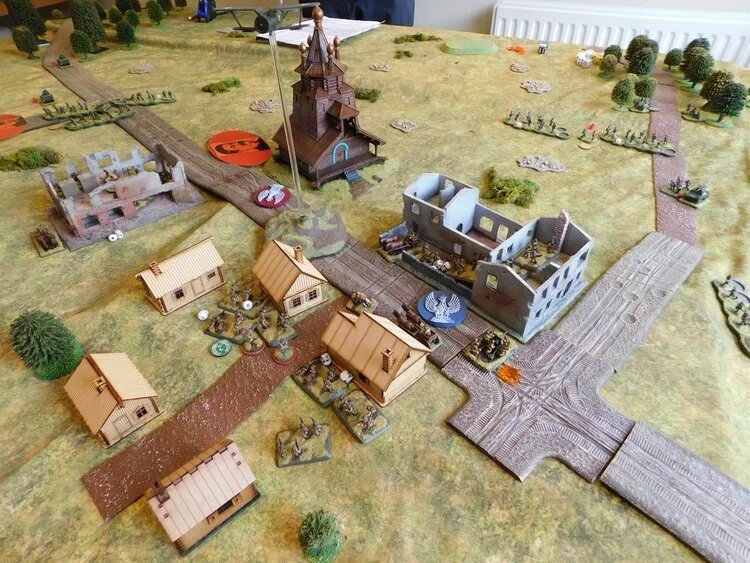
The Game

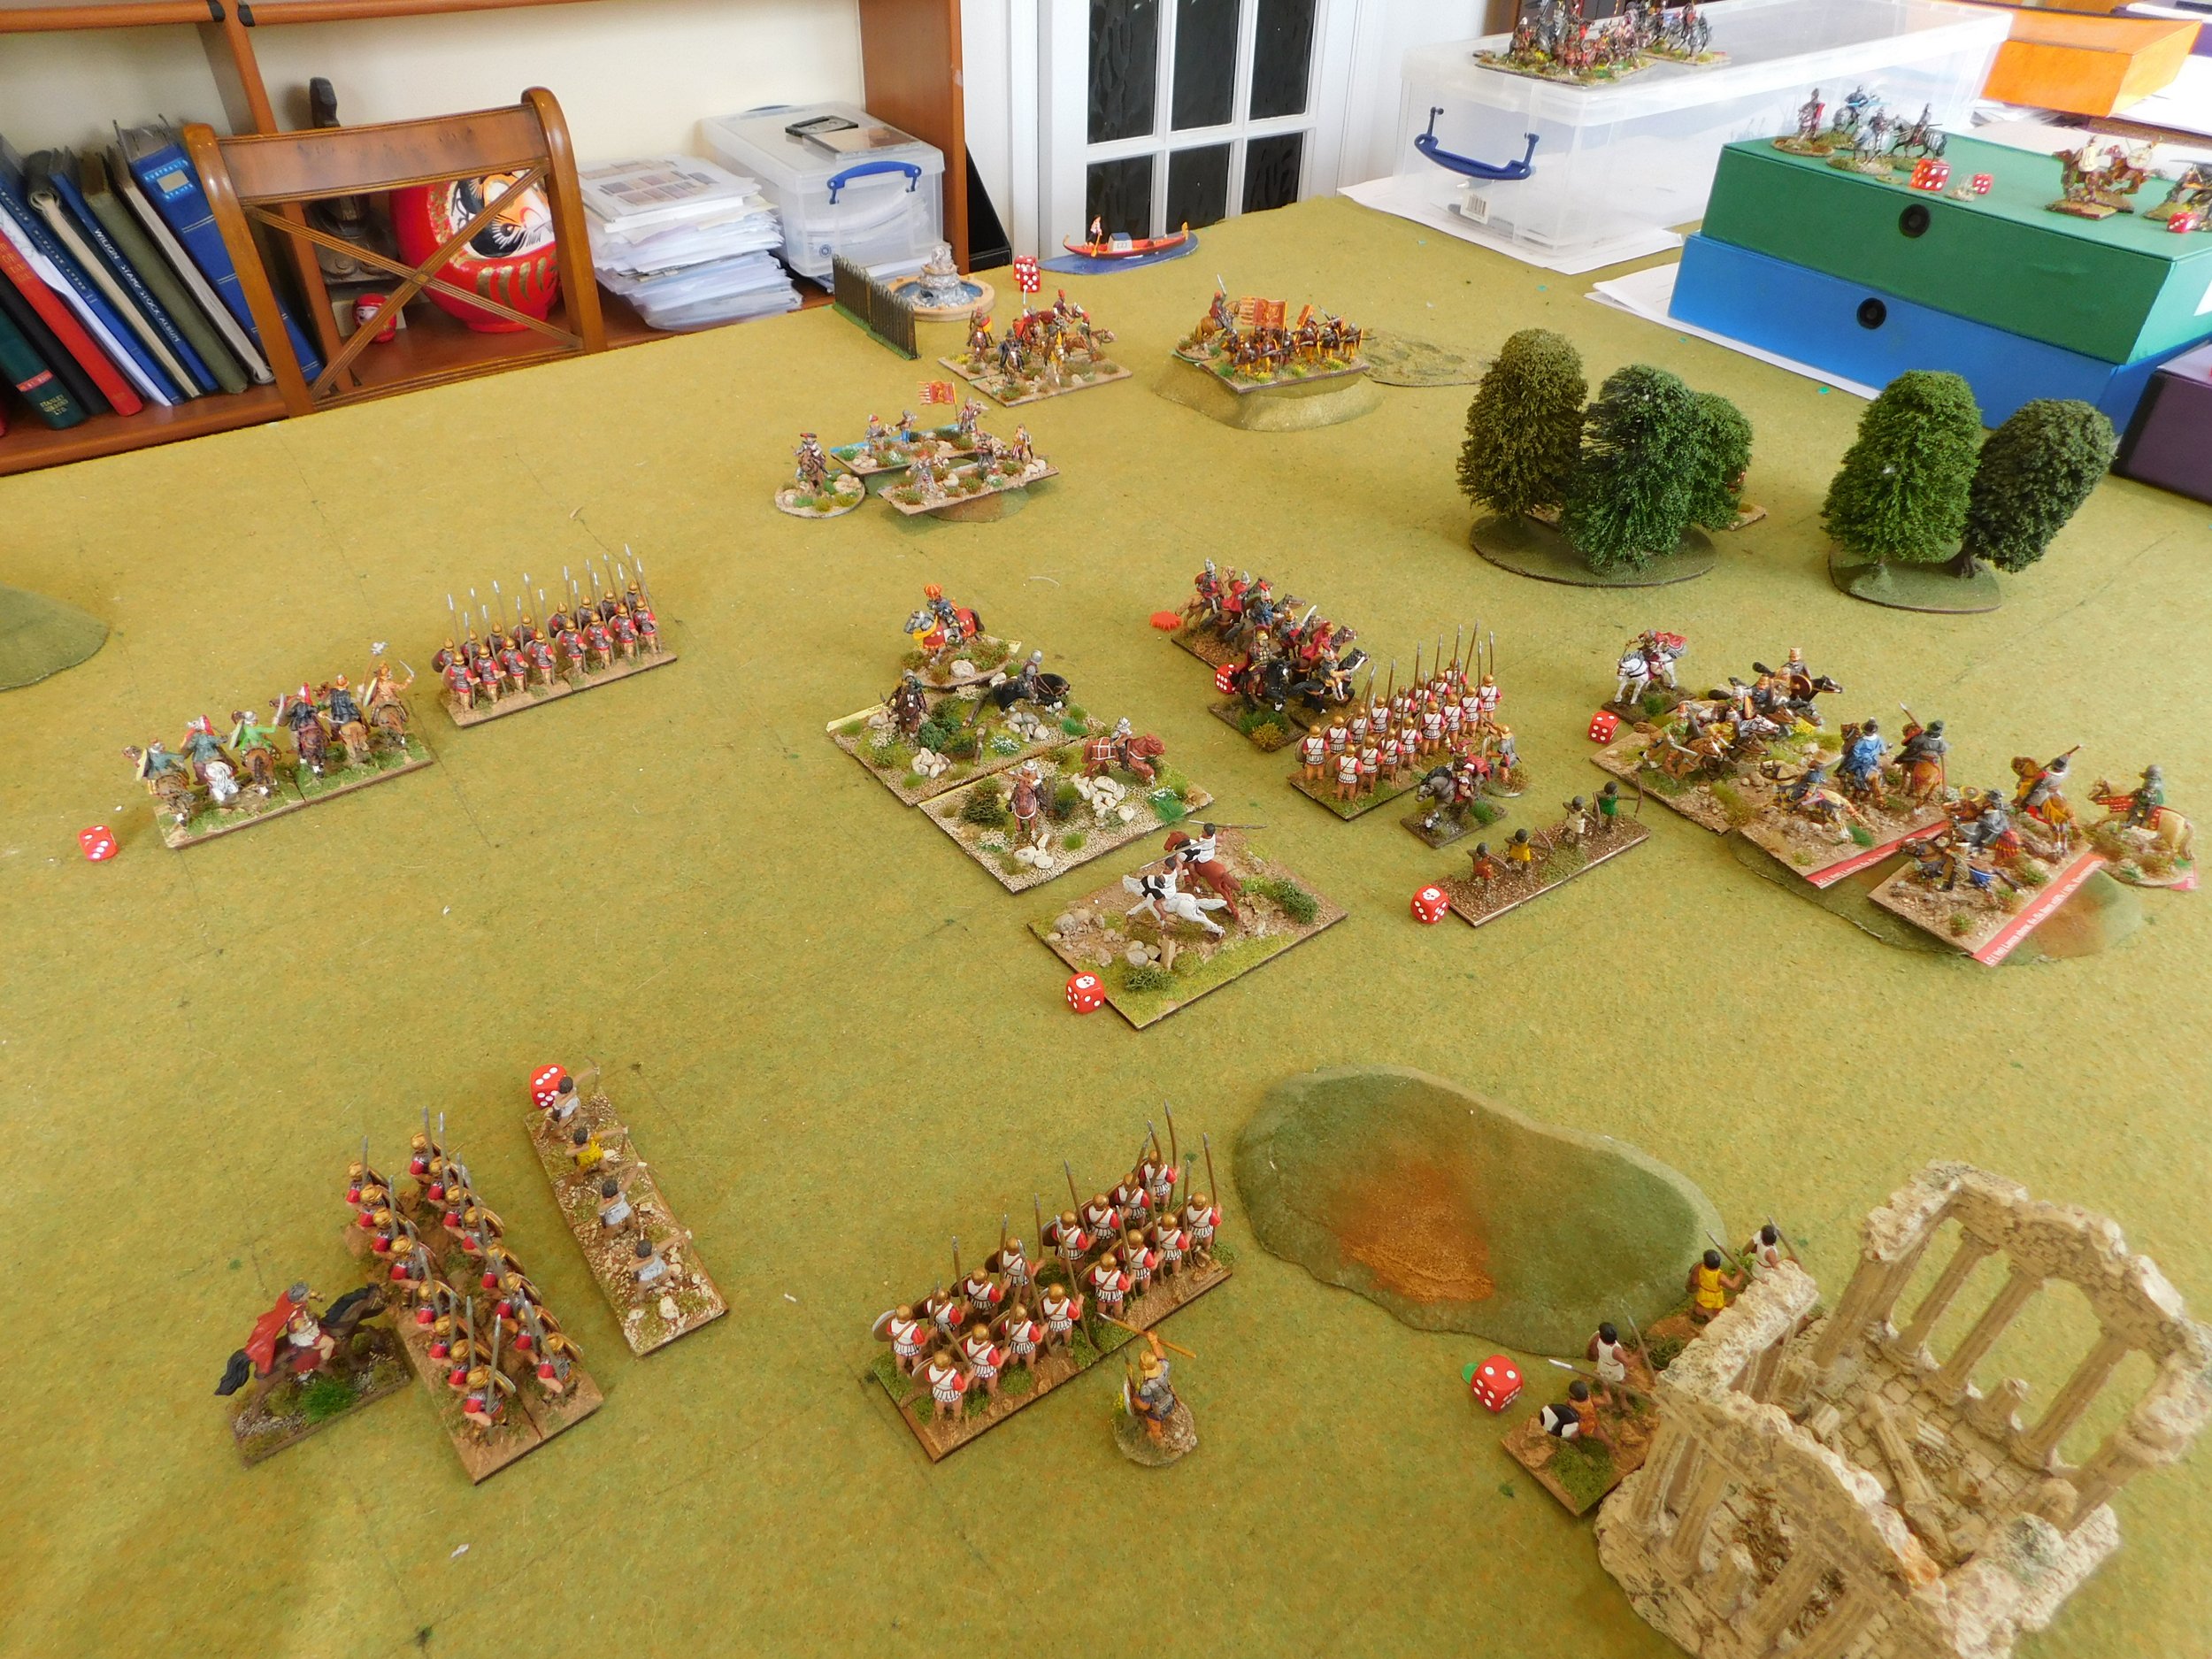
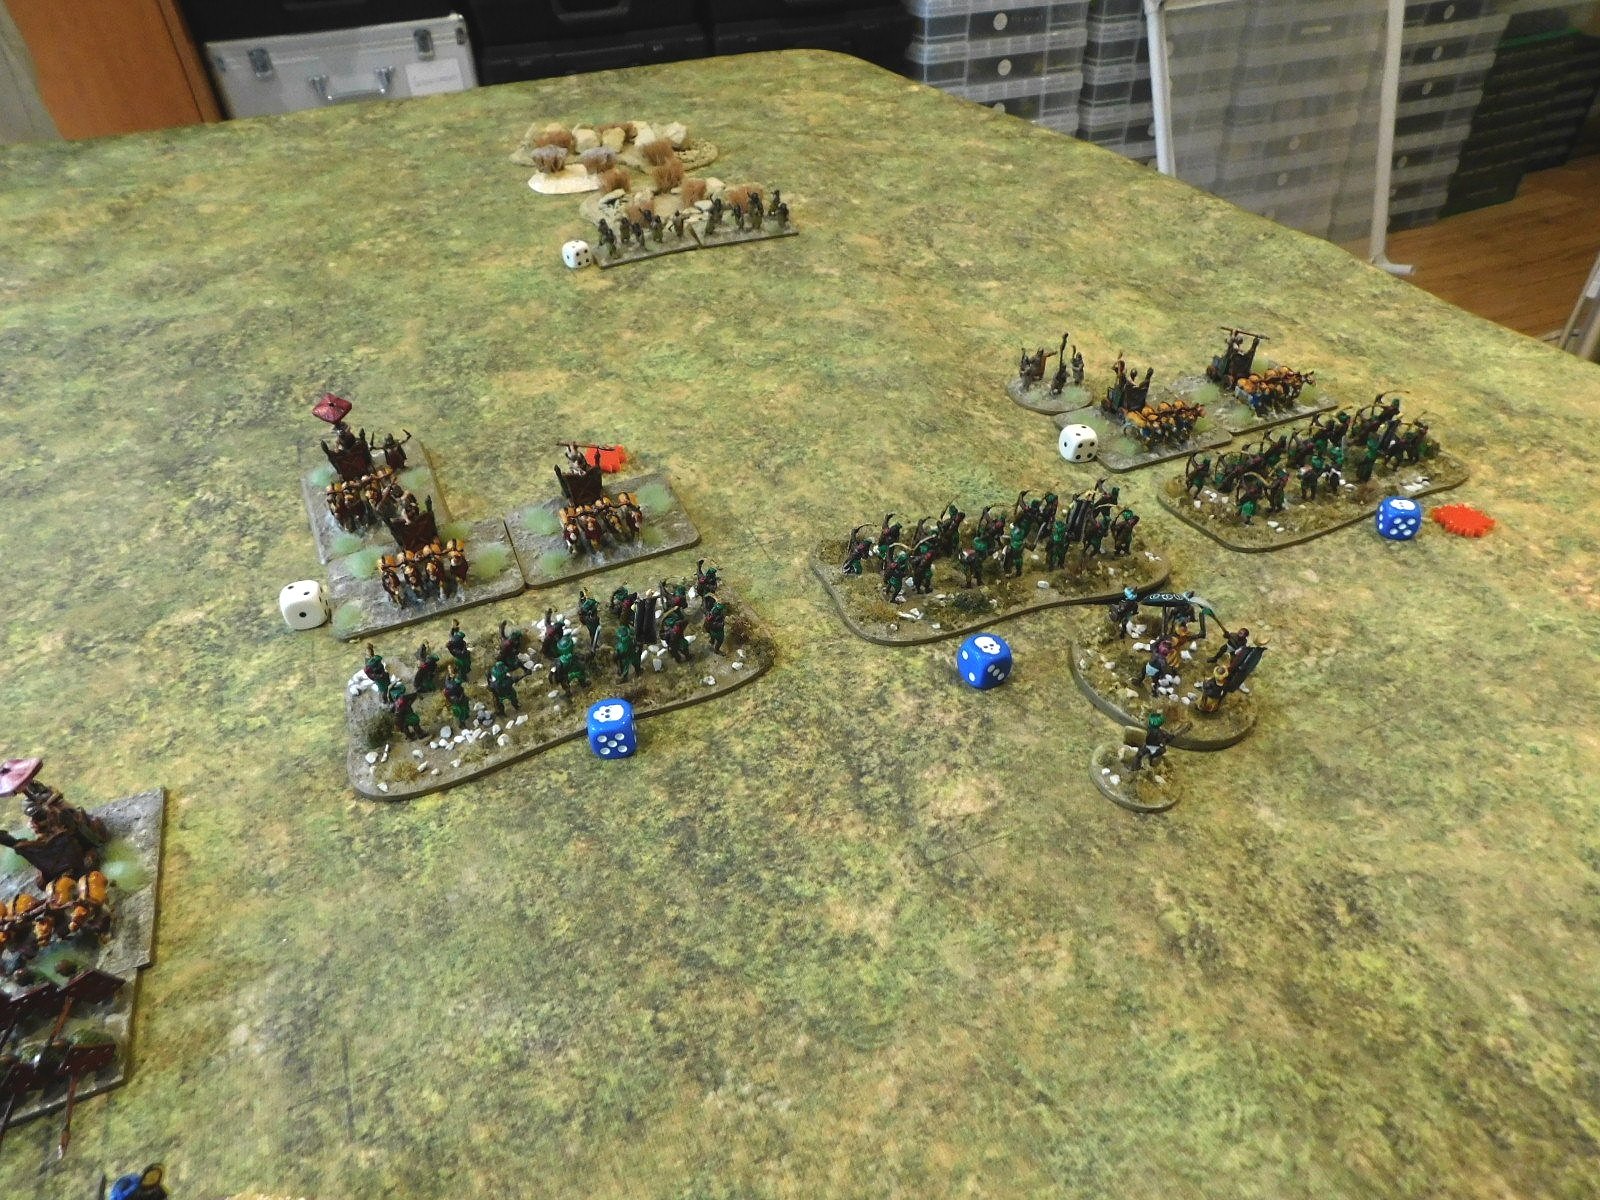
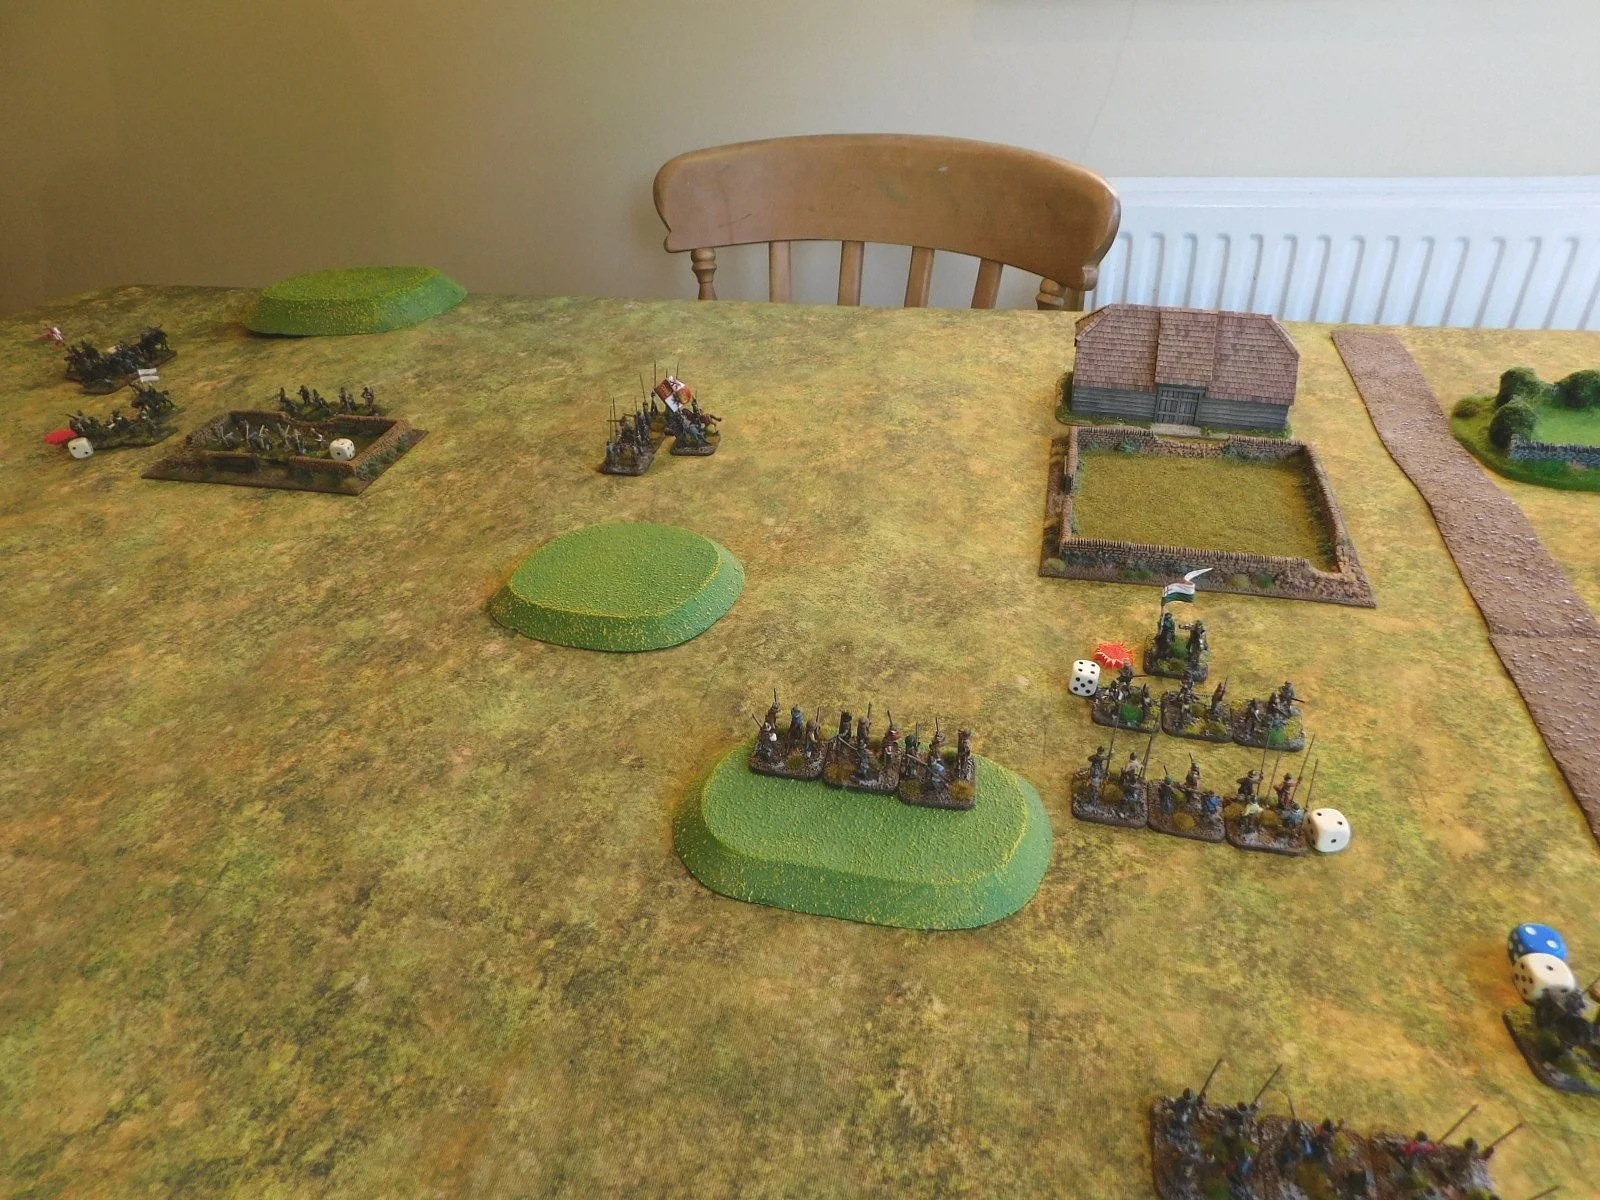
I would play the Spanish, Rob would play the English. The Spanish set up with the Irish on their right, the Tercio (their best troops) in the centre, and the somewhat dodgy “Volunteers” on the left. The English had the Militia of their left (i.e. opposite the Irish), the Royal army in the centre, and a locally raised mixture of musketeers and longbowmen, with a bit of light cavalry, on the right.

My plan was simple: advance my flanks forward as fast as possible then bring up the Tercio in the centre to finish off anything that was left!

The Battle Begins

View from Behind the English lines

English light horse advance to their doom

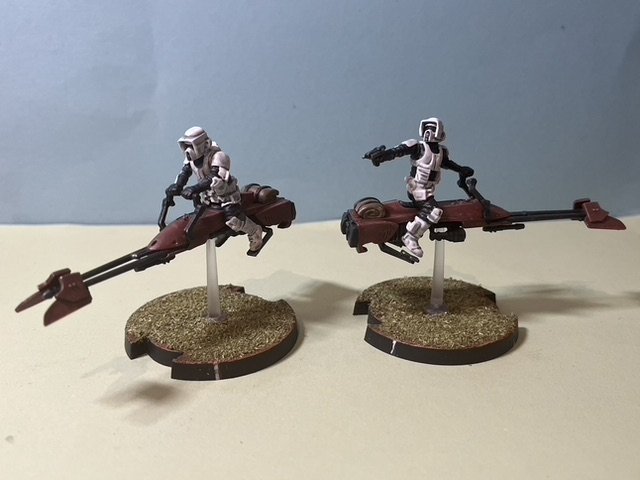
On the Spanish left, the two units of Mounted Arquebusiers faced off against a unit of English light horse and soon, with a combination of shot and a quick charge, sent them fleeing from the field. Despite instructions to the contrary, the arquebusiers who had actually charged home (Los Dopicos Horse) then pursued the fleeing cavalry: rapidly disappearing into the distance!

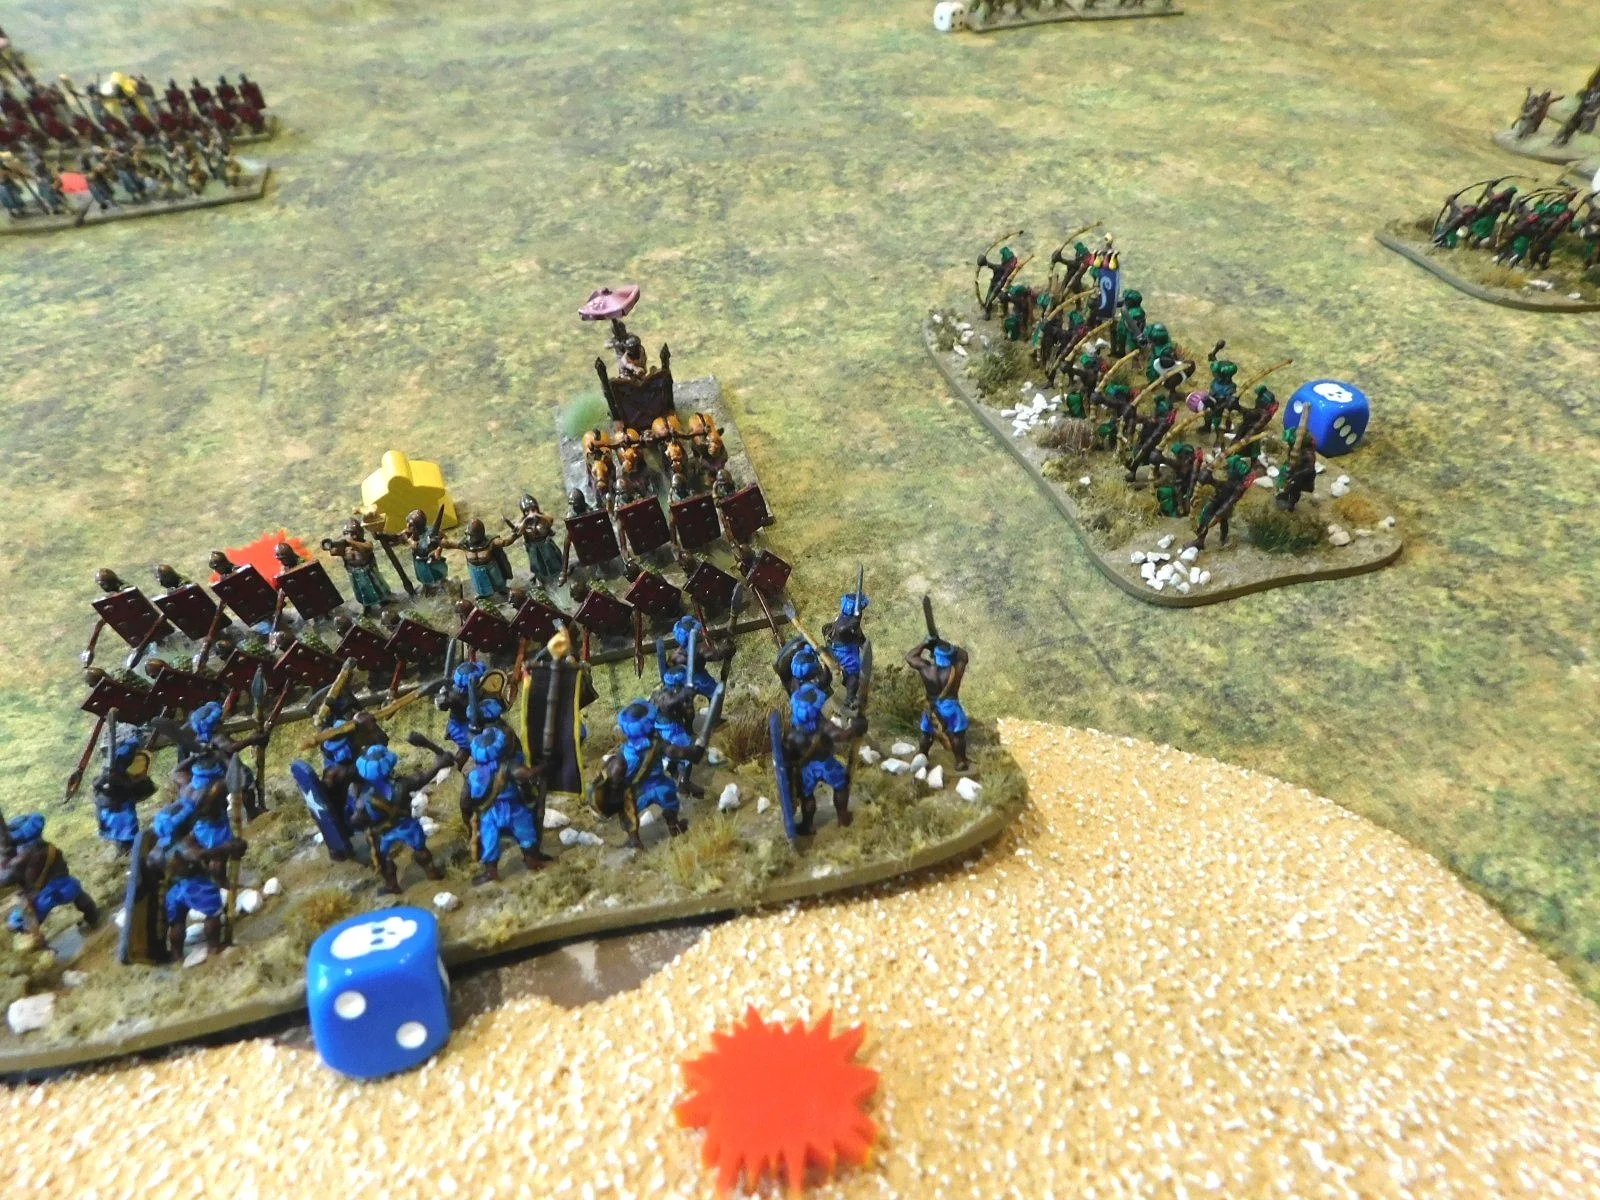
On the right, the Irish brigade moved forward as fast as possible towards the English Militia in their walled enclosure.

A unit of English light cavalry with lances and pistols hit the untried McKenna’s Kern and dispersed them, but they in turn were blown away by musketry from the right hand unit of the Tercio coming up from behind. This left the rest of the Irish free to assault the Militia in what turned out to be a series of hard fought melees with bill-armed troops but, as the battle ended, the Irish definitely had the advantage.

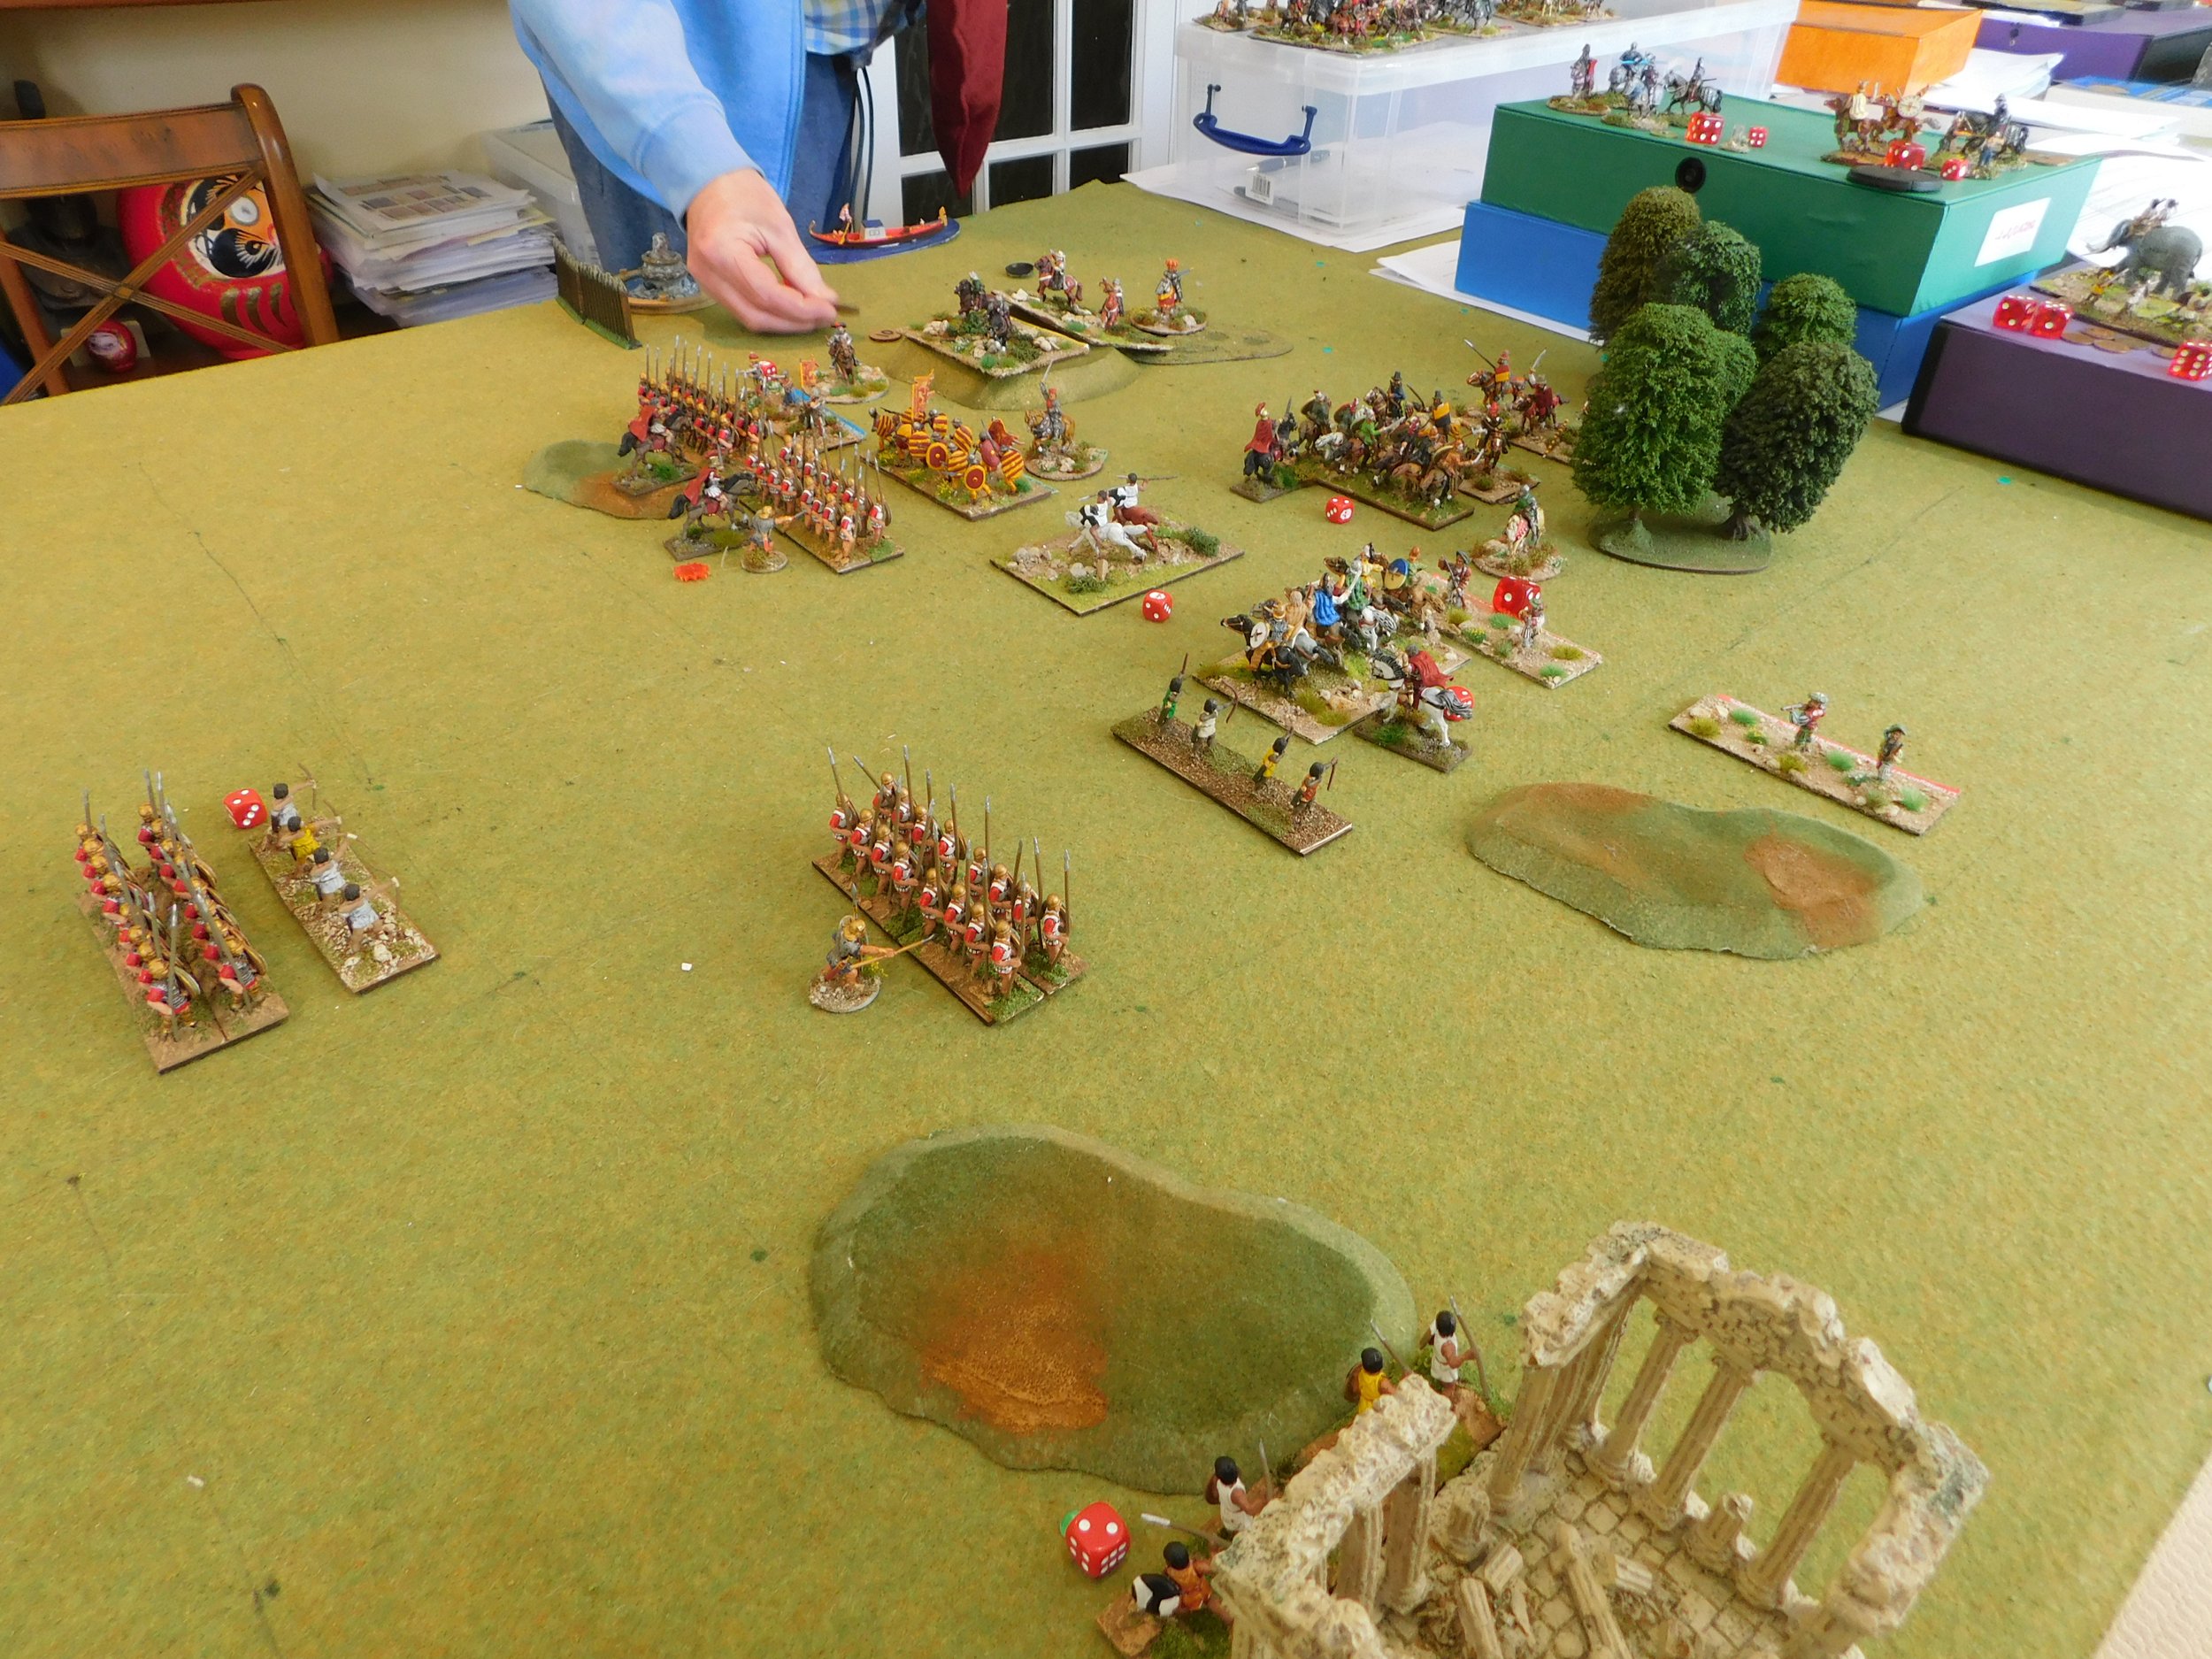
Meanwhile, in the centre, the Tercio had been steadily advancing towards the English Royal Army. Both sides were veteran infantry: the Spanish consisted of three pike and shot battalia and a unit of commanded shot; the English one pike and shot battalia, two commanded shot, and the Royal Gallowglass.

My Tercio managed to shrug off the fire coming from the enemy arquebusiers and get stuck in with their pikes, and the English centre began to give way. This allowed Juanitos’ Pike, led by General Tapioca, to burst through the line and then head off to the left flank to help out Volunteers.

Before we come to the climax of the battle, a quick interlude.

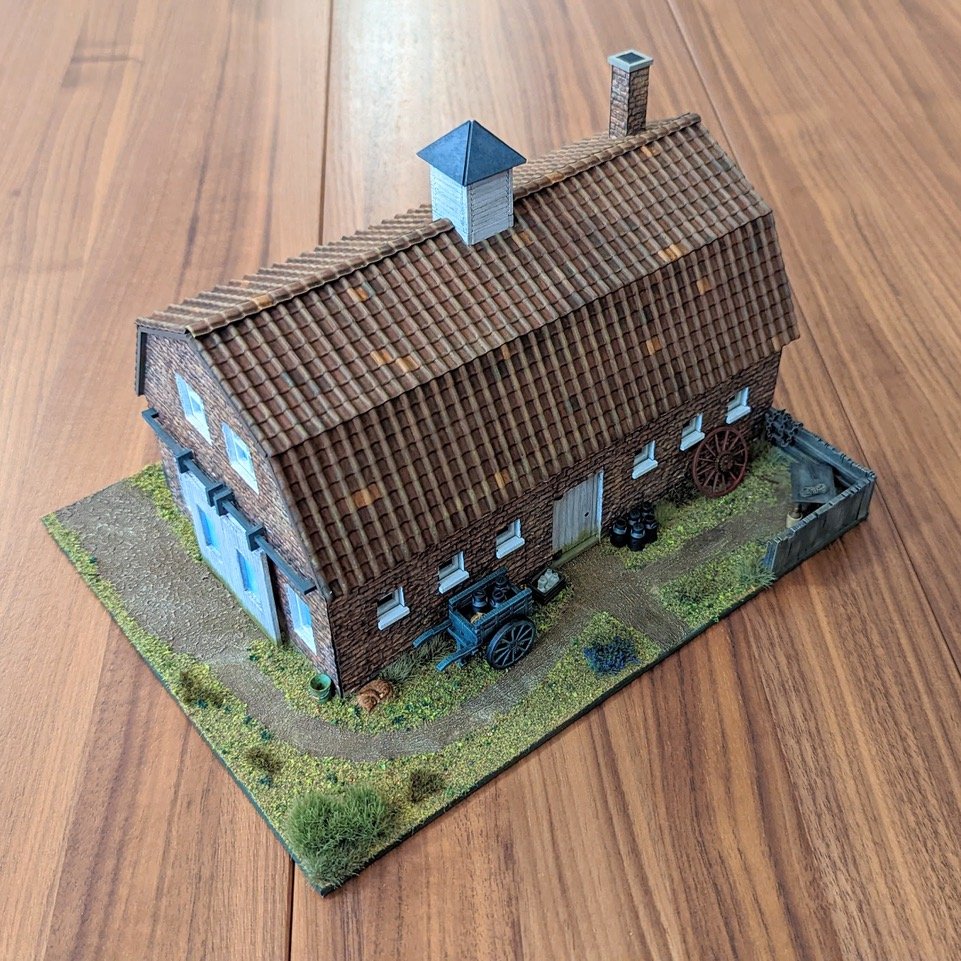
The English Demilancers, Robart’s Horse, had punched their way through the Spanish line earlier in the game, but also pursued their fleeing enemy right the way to the other end of the table. Eventually rallying and forming up again, they actually found themselves next to a farmhouse in which the crew of the Spanish galleon, the Sao Martinho, were sheltering: the crew counting as a Forlorn Hope, presumably because there was only a forlorn hope of getting them into action!

English Demilancers and the crew of the Sao Martinho line up next to each other!

The sailors fired off all the ammunition they had at the English horsemen…who utterly ignored them and trotted off, untouched, to see if they could get back to the main battle in time to influence its outcome.

Right, back to the main action.

The Spanish were definitely winning, but still needed to deliver the coup de grace to the English and, as anyone who plays FK&P knows, the fortunes of war can turn in an instant. A good example of this was about to happen.

The other unit of mounted arquebusiers, the Nuevo Rico Horse, charged into the flank of some enemy commanded shot. This should have led to a glorious victory but, instead, the Englishmen took the charge, turned and blew the Spaniards away with fire.

not, as many predicted, the End of some commanded shot!

This left the enemy commanded shot and two units of longbowmen holed up near or in a walled enclosure: not a suitable charge target for the remaining Spanish mounted arquebusiers even if the archers were all out of arrows.

Fortunately General Tapioca and Juanitos’ Pike were on hand and, still fresh after chomping through the English in the center, went in over the walls to skewer the longbowmen on their pike.

Over the walls the pikemen go!

The lonbowmen crumbled and fled the field and this proved too much for English morale to withstand. With their Militia on their left about to lose to the Irish, the Royal army in the centre under extreme pressure, and the loss of their right, they decided that discretion was the better part of valour and fled for safety. Victory to the Spanish!

Aftermath

Although the Spanish had gained the advantage early on in the battle, it had been a great and hard fought game. The rule modifications we used worked well, although we had needed to clarify a few bits and bobs as the game progressed: can Kerns use their javelins as part of the charge sequence, for example.

The figures (all from Khurasan) had looked very good indeed and all that now remained was to have a quick bite to eat before setting up for the return game where I would play the English…but that’s another post!

CDS at SELWG

Yesterday, Milton Hundred Wargames Club demoed a game of Charlie Don’t Surf at SELWG.

They had a load of interest, plenty of people stopping and asking after the rules…who later went over to the TFL stand! A big shout out to Full Metal Miniatures for printing the sampans as a test. They’ll be on his web store soon!

Here are some pictures of the game, posted onto the CDS Facebook Group by Steve Thomas.

Just A Quick Eastern Church...Promise!

Not one I built, but another for the collection.

This church comes from E-Bay seller babyphez and is described as a “Fully Painted 15mm East European style Wooden Church for Napoleonics - WW1/WW2” and will cost you about £30 once P&P is added.

It arrived in five parts which glue together easily if you prefer your buildings as one solid object and does “exactly what it says on the tin”. I’ve actually painted the two mini cupolas with bronze paint but otherwise needed to do nothing in order to pop it onto the tabletop.

It’s an unusual shape, so makes a change from all the other 15mm eastern-style churches I have. I rather like it, so it gets a “recommended” from me.

CDS AAR: Surf's Up #09: AirCav

Russell Smith posted some great pictures from a recent game of Charlie Don’t Surf onto the CDS Facebook group.

Check them out below:

You can find lots more CDS AARs here.

TFL Painting Challenge: Huge October Update

A huge update to the Painting Challenge today: a total of 1,283 points from eight entrants i.e. an average of 160 points each!

All the high-scoring regulars are there, and it’s nice to see a couple of the more occasional participants contributing as well. We also finally have Ashley’s latest entry, despite the fact that my Inbox seems to dislike her e-mail address immensely!

Do visit the individual galleries, but here’s a taster:

TTS AAR: Elephants Swimming in Canals

Back in April this year, friend Peter asked me if I would have a game of To The Strongest with him as a test for one of the armies he was considering taking to the Chalgrove World Championships. Why has it taken me so long to deliver the After Action Report? Well, Peter didn’t want any hint of which armies he might be using to leak to possible opponents, so had slapped a D-Notice on me. Now, however, that he is basking in another victory, he has graciously given permission for the secret files covering our game to be released!

Peter’s test-army was the Venetians, and he had asked if I would use a Later Carthaginian army against them. This would be a real test for the canal-dwellers: a cavalry army against Hannibal’s spear-armed infantry supported by elephants…and on a board with at least some trees on it.

The Venetians: Knights & Lights!

Hannibal’s Brave Boys

Of course, part of the problem with writing an AAR six months after the event is that I can’t actually remember much of how the game played out!

What I do know is that Peter completely wrong-footed me at the start by gaining the initiative and deploying all on the (from my point of view) right side of the table versus my more evenly spread line. This would mean that he could concentrate his army on only a portion of mine, gaining victory there before then turning to polish off the rest. Cunning stuff!

As it happens, however, this didn’t work as, somehow, I managed to get my heavy spearmen moving and across the field to support my by now beleaguered right flank.

My Celtic warriors also refused to give way despite being hit by veteran knights with a general from the front and two units of knights from the rear, joined by two lights, for several turns. Their Celtic cavalry comrades were equally resilient: normal Celtic cavalry convincingly winning a melee against veteran lance-armed later knights supported by lance-wielding mass lights: they killed the knights and drive the lights back without suffering a single hit!

The game developed into a huge melee in the centre of the table, with the action swirling backwards and forwards. Despite my successes, above, my army was starting to look a bit ragged and I could see that a collapse was fairly imminent: there were just too many light units hitting or threatening to hit my flanks.

It was time for a Hail Mary. I had one unit of Celtic horse still undamaged. I could see the Venetian camp (complete with fountain and gondola) in a straight line in front of them, with only some more of those massed lights blocking their way. The Celts charged forward and, with a great run of cards, smashed the light horse out of the way and then thundered into the enemy camp. Three victory medals to the good, the victory was mine!

It had been a cracking game that I had won through good luck and by the very thinnest of margins. As Peter said afterwards, “if it wasn’t for your extended gallop into my camp I would have won in my turn”. My only reply is, obviously, and with apologies to the Spartans: "If..."!

Here’s the full pictorial story of the battle:

Eastern Orthodox Church Update

Whilst finishing off eastern orthodox church number twelve, I was again pondering why I was collecting them, so I thought I’d better look back over the many After Action Reports posted on this site and see how many of them had actually seen the tabletop.

An interesting exercise:

All I’ve done is find one picture of the church in question in action, so some of the above that have seen action have seen action multiple times. And two of the above are so new that I haven’t had a chance to get them into action yet.

So, in summary, five out of the twelve haven’t yet seen the tabletop, and I’m now wondering how that compares to my collection in general.

And how does it compare to yours?

How many units or terrain pieces have you spent your precious money, time and effort getting ready for battle only to see them languishing gathering dust somewhere in your storage area? My churches are a bit of an extreme, niche example, but I’ve got quite a few WW2 AFV platoons (especially tank hunters) that have never seen the tabletop…

Yet Another 15mm Eastern Orthodox Church

Last week I posted that I had bought another two 15mm eastern orthodox churches, and here’s the first of them, from E-Bay seller WarFayre.

This is a lovely model, and well worth the £19.95 I paid for it.

It’s 3D printed in hard plastic, so surprisingly light for a model this size. It actually comes in three pieces (one per floor) but I glued it all together before painting…but you could use it as an open-up building if you wanted too: the interior would hold quite a few figures!

I painted it in two short sessions: three colours of Contrast paint for the main body, then the dome, doors and windows in acrylics. Note that I used GoreGrunter Fur for the main body and trim: I like the warm look you get if you use that colour for wood. The rooves are all in Wyldwood.

Those of you who have been keeping count will know that this is eastern orthodox church number twelve for me: here’s the full gallery so that you can see how this one scales.

One more to go!

ECW Scots Lancers

Another lot of figures rescued from the depths of the lead mountain: a unit of Scots Lancers for the English Civil War period.

What I usually find is that I get into a new period or army and fanatically paint enough figures to enable me to get it onto the tabletop as soon as possible.

As I’m doing that, however, I add more units to my core, initial purchase as I think about all the different variants I could play. These, new, purchases generally go to the back of the queue and, as my initial surge wears off, get relegated to the lead mountain as I switch from painting the army to playing with the army. Painting-the-same-uniform-a-million-times fatigue also sets in!

So here is a unit of Covenantor lancers that were initially bought a couple of years ago when I first started putting my ECW Scots together. It was actually a pleasure to paint them. The lancers are 15mm figures from Khurasan, with a Peter Pig command figure. Paints were from the Contrast range, with the horses actually painted in Fyreslayer Flesh!

Time for another game of For King and Parliament

TFL Painting Challenge: Late September Update

The entries to this year’s challenge are still flooding in, and some very impressive scores are being racked up.

We already have Andrew with a score of just over 3,000 points; Lloyd and Sapper with over 2,000 points; and Steve, Nick, Carole, Matt, Stumpy and I on over 1,000 points.

Personally, I’m chasing a personal best of 2,004 achieved a couple of years ago, so need about another 300 points to do so. Some desert war American tanks should take care of some of it, then some more Napoleonics and Hoplites, and then perhaps finally getting around to re-basing my Crimean War British to polish it off. So much to do, so little time!

Anyhow, here’s a taster of this week’s entries: do visit the individual galleries to see all.

Still plenty of time to get your entries in!

Another Eastern Orthodox Church?

It’s happened: I’ve finally cracked!

There am I saving up to buy Museum Miniatures’ excellent, CAD-designed Z Range 15mm Normans when I come across another 15mm Orthodox church.

Borodino Church from Monday Knight Productions

Now for those of you who have not been keeping up with the story so far, I seem to have developed an unhealthy obsession with making sure I have every 15mm Orthodox church available, Most people might have one, or possibly two: I now have eleven!

What could I possibly need with eleven 15mm Orthodox churches? Even I do not know the answer to this. Worse, I have another two on order!

This latest one is from Monday Knight Productions as part of their Borodino range of 15mm scenery. Excellent service from them sorted any potential problems with the fact that they are in the States. The church has actually been sitting on my painting table since the beginning of the year, and it was really the purchase of the other two that spurred me to complete it.

Here’s the full gallery of churches so far in size order, smallest to largest:

Some Painting, Some Re-Basing

Almost unbelievably, I recently actually managed to find time to do some painting!

What with real life being very busy and all the actual gaming I’ve been doing, the painting side of things had slipped, but I had a spare hour or two and thought that I really should get something done…so I did.

These are the Laminids: more 15mm sci-fi from Khurasan. I’m going to add them to the Pelagic Dominate force that I already have: they will fit right in with the other “sea creatures” that that range features.

These are very simply painted with GW Contrast paints: just one coat per colour, so only four paint pots opened. They were, in fact, so easy to paint that next time I order from Khurasan, I shall add another two squads to make a platoon and ask Jon if he can add a command figure to the range.

Sassanids

I’ve also finally got around to re-basing the Sassanid infantry to go with the recent re-basing of the cataphracts, clibanarii, horse archers and elephants.

I almost didn’t bother: I mean, who fields Sassanid infantry anyway? But the figures were there, and would have prayed on my slightly OCD mind as “incomplete”, so re-base them I did.

The latest To The Strongest lists give them as either standard or deep javelinmen, so I split the figures into two units of each:

I was a bit nervous how the deep bases would turn out - I’ve only ever used the double-sized bases to deep elephants before - but, actually, these look just as good…and I had a bolt-shooter set that I could add to one as dressing as well, so all good.

Polish Lithuanians

Finally in this burst of figure production, the painter I use to augment my own efforts sent through the first of the Polish Lithuanians: a unit of Petyhorsy armoured cavalry.

Nice figures and beautifully painted.

One thing, though. By Fire & Sword, the manufacturer, use plastic horses with metal riders. Now I’ve no objection to plastics and have loads, but they seem to be using the soft rather than the hard plastic, which can sometimes lead to the horses, particularly with ‘heavy metal’ riders, not standing up straight.

So bad was this on one of the mounts in the unit above that, despite its proximity to its neighbour, the horse leant to one side to the extent that its rider’s lance was tangled with that of his comrade next door…and nothing I did would make it otherwise. Worse, it made the whole unit look weird.

The solution: a bit of stiff wire (actually the bit cut off a lance to make a spear) as a brace between the two steeds:

The close up makes it look very noticeable in the photo, above, but it isn’t on the tabletop. Job done!

TTS AAR: Classical Indians versus Akkadians

Having played Kavan using the Akkadians versus his Classical Indians, we decided to swap sides and play the game the other way round.

The Akkadians were outscouted, and set up in a long line of men holding sharp pointy sticks, placing their veteran battle carts on their left/my right. I matched their infantry with my own, but put all my chariots and cavalry on my left. My plan was to hold my infantry back, giving them as long as possible to shoot their longbows, whilst I outflanked and won the battle with my mounted troops on the left.

Initially, this actually worked very well indeed. On the left, my chariots and horse neatly swung out a bit and headed past the end of his line at a rapid rate of knots.

This allowed me to send one unit of chariots towards his camp, and the other into the flank of his right-hand infantry.

Surely this was the game sown up…but, no, the Gods laughed and shuffled the deck, and the lone Akkadian spear unit at the end of his line snapped round neatly and disposed of my (previously outflanking) chariots without much difficulty!

This was disappointing, but his camp was still about to fall:

Meanwhile, on my right, his battle carts and infantry had finally reached my line and were dashing themselves against it.

This was actually quite worrying as although my javelinmen can hold their own in hand to hand combat, my longbowmen have a tendency to crumble really quickly.

Fortunately, the Akkadians assaulted the longbowmen piecemeal, so my three units of archers could concentrate their fire and pincushion the most forward enemy unit each turn. This meant that they tended to hit my line disordered, which really evened things up.

Moreover, my javelinmen were up on a hill, and resolutely refused to give way no matter what. Here’s a pictorial account of events on that wing:

So the left wing was doing well, but hadn’t won the game for me; and my right wing was holding, but under pressure. I would now have to win the game in the centre, and that was where I had my elephants and the elite Maiden Guard.

In they went as fast as a charging pachyderm, and nothing could stand before them!

Well, that’s a slight exaggeration, but with the cavalry on the left now free to assist, and the right wing just about won, the elephants did provide the coup de grace needed to take the last of Kavan’s victory medals.

A glorious victory for the Classical Indians!

TFL Painting Challenge: First September Update

Lots of entries today and from a wider selection of people than normal: must be all the summer holidays work coming in!

Do look at the individual galleries, accessed through the nav bar, above, but here’s a taster to wet your whistle (correct spelling!):

Colours 2022

A good visit to the Colours show yesterday. Very crowded in the morning, but had largely emptied out by the time I left at two-ish.

A big fantasy game from the show. They obviously knew the way in!

Interesting journey there: I’ve been many times before, so went my usual route, only to find that that entrance to the racecourse was closed, with no way through to the correct entrance just the other side of a traffic barrier. It was really a case of so near, yet so far! I then spent the next twenty minutes driving around the nearby industrial estate trying to find my way in…and all the time I could see the racecourse, and the stand where the show was held, but just couldn’t work out how to get there! Eventually ended up looping onto the end of a convoy of obvious wargamers following someone who did actually know the way in, but that’s still twenty minutes of my life I’m not getting back LOL.

My irritation immediately disappeared, however, when I remembered that there was no entrance fee this year, so one could just swan in and out as required. Jolly good show already!

Colours followed its usual format. The ground floor (the betting hall) was packed full of traders, and ws the usual scrum to get through. Slight need for more deodorant from some people as well, particularly in one corner away from the doors, but that could just be my still-unusual, post-COVID sense of smell kicking in. I bought some bases and tufts, but nothing major: just the things you get irritated having to pay postage and packing for.

I did fail to immediately buy a giant crab for £14 from Disain Studios only to find that they had sold out when I eventually decided that I had to have it, so I remain crab-less. I have no need of a giant crab, I hasten to add, nor any expectation of needing one anytime soon, but it was calling its siren song to me, so I will probably end up getting one at another show. Or I could go to their website to get the link for this post…no, must resist…at least until I see it in the flesh (the shell? the resin?) again!

I couldn’t find the crab on their website (am I destined never to get crabs?!) so here’s a shot of a large ancients game from the show

Next floor up was combination of demo games, trade stands and places to eat and drink. Catering was the usual snacks and sandwiches (can we go back to Ascot again please: the food there was lovely!) and this was the floor where the Lardies had set up shop with games of Chain of Command and Strength & Honour.

The CoC set up was part of the legendary TFL Arnhem triptych some of which I had seen at Operation Market Larden, and looked even better than before. Can’t wait to see all three in place in the near future.

Then onto the top floor: demo games and the Bring & Buy. This latter didn’t have anything I wanted, but at least had a sizeable frontage that meant not too much barging around to see what was what.

Roundway Down

Lovely For King & Parliament demo game was up here as well: featuring the Roundway Down scenario. Also good to finally meet Simon and Andrew face to face.

So that was Colours for another year. As I said, a good show, and loads of people to say hello to and chat to.

TTS AAR: Akkadians versus Classical Indians

Time for a game of To The Strongest: I would take the Akkadians (the new, ‘slim-line’ version from the latest army lists) and Kavan would use a Classical Indian army of the Republican variety.

My plan was to act almost purely defensively: luring the Indians forward onto the tips of my spears. My only offensive move would be to send my heavy chariots forward on the left to try and get around the Indian right flank.

Everything went almost to plan, as the Indian javelinmen, chariots, elephants and cavalry hurled themselves forward without the first on the list even bothering with their extra longbows. To cut a long story short, they impaled themselves on the Akkadian line, and the game was won pretty easily.

Chronological pictures of the game appear below, but it’s worth mentioning why I said “almost” above. My heavy chariots did indeed thunder forward on the left most impressively, but then ran into bother facing a couple of raw units of Indian javelinmen. I sent some Household Infantry to help, and they got into trouble as well!

Unbelievably, the only thing that saved the day was the unit of Nim skirmishers in the rough ground (the unit with the die with ‘1’ on it in the picture above) who not only resisted every attempt of the Indian javelinmen to evict them from said rough ground, but went on to use their javelins to wipe them out as well!

Their success held my left flank together and allowed me to win the battle in the centre and on the right.

So a relatively workmanlike victory for the Akkadians. Here are the pics:

One thing to note: figures for both sides come from the Museum Miniatures CAD-designed Z ranges: highly recommended.

FK&P AAR: Cossacks & Transylvanians versus Muscovites

After the Cossacks got so badly hammered last time out against a Muscovite army, it was time to reinforce them with some Transylvanians: the Cossacks would provide the war wagons and foot, the Transylvanians some fairly decent cavalry.

The Muscovites were, again, mostly Sons of Boyars or Reiter cavalry supported by two small brigades of infantry.

View from behind the Muscovite line

Muscovites

Transylvanians & Cossacks

Muscovite Reiters

Elite Transylvanian Cavalry

As the battle began, both sides advanced forward smartly, with the terrain meaning that the game divided into three sectors: my left flank, the centre and my right flank.

On My Left

On my left, some scummy looking Border Guards had appeared in front of me: the perfect target for the Transylvanians!

Apparently not, as rather than running over them like a badly dressed speedbump, my horsemen got impaled on their pikes. This flank then turned into an uneasy stalemate as horse and foot units milled around charging each other with little effect. The battle would be decided elsewhere!

On the Right Flank

On my right flank, I had some Transylvanian Enlisted Light Cavalry supported by two Haiduk units sheltering in the woods.

The plan was to send the light cavalry forward to soften up the three units of Reiters coming towards me so that the Haiduks could wipe them out from safe amongst the trees.

This did not work: the light horse were swept away almost immediately, and then the Haiduks were charged from the flanks and front and, despite the bonuses for being in cover, were swept away as well. The final unit of Haiduks did hold out for some turns, but eventually succumbed, leaving my centre now vulnerable to flank attacks.

Meanwhile in the Centre…

Meanwhile in the centre, the main body of Muscovite Reiters steamed towards my line: a mixed line of raw Moloitsy short-pike-and-shot and tabor war wagons.

My tabor fired valiantly away with both their light guns and musketry, but because I only had two of them rather than my usual four, I couldn’t get the concentrated fire I needed to halt the enemy Reiters heading towards me.

The Moloitsy were charged and gave way, leaving the tabor as islands of resistance amongst a swirling sea of Muscovite horsemen.

By this stage, I was also getting very short of victory medals…

The End

As my right wing collapsed, the loss of one unit too many caused my army as a whole to collapse: the Muscovites had won the day!

This wasn’t a hammering, I hasten to add: the Muscovites had been losing units as well, but it the Cossacks and Transylvanians who crumbled first!

Another great game, through, even if the Muscovites are currently proving unstoppable!