Britcon Day One: Game Two

My second game at this year’s Britcon To The Strongest tournament was against Si’s Sassanid Persians. I was someone nervous about this one: Si is a very good player and the Sassanids are a nasty army for the Romans to fight. All that cavalry laps around the Legions’ flanks!

This game, however, went my way…but mainly because Si had the worst possible luck throughout the match: he failed every save he should have made and missed every hit that should have gone in!

As a result, my cavalry held up the Sassanid heavies on my left flank for long enough for my Legionaries to get to grips in the centre and, as my auxilia sagittarii defended my camp against his lights, ground forward pushing his other horsemen back until they had nowhere to evade to. I then took his camp and the game with a 15-0 victory.

So a great result for the Romans, but mainly because Fortuna was firmly on my side.

Britcon: Day One: Game One

My first game of the tournament proper was against Andy’s Dacians. Co-incidentally, Andy was also the first person I played against at the European’s in Ewelme, so it was good to see him on the other side of the table again.

As per usual with the Romans, I got into trouble on both flanks, but somehow held on for long enough for the Legionaries to win the battle in the centre.

On my left flank, the cavalry achieved nothing except to hang on against multiple flank attacks: not good for veteran cavalry but a considerable improvement compared to their usual dire performances.

On the right, one unit of Legionaries held on against a series of vicious flank and rear attacks for three consecutive turns: laurel wreaths all round.

In the end the battle was decided by my equites sagittarii (horse archer Auxiliaries) who managed to charge some rather nasty cataphract types in the flank and took them out.

Result: a 13:6 victory, worth 17 points once the extra for winning all my opponent’s coins was added in.

Britcon: Day Minus One

One of the five To The Strongest competitions that I am playing in this year is currently taking place at Britcon: the massive wargames competition event held in Nottingham each year.

As I’m quite a long way from Nottingham, I travelled up on the Friday i.e. yesterday. Horrible journey where a combination of a very busy M40 and a clogged M1 meant that the trip took me an hour longer than I expected, but I found the car park no problem and, almost even better, a cracking place to re-charge my car - I’m 40 miles short of being able to do the round trip in one charge: a bit too much to risk!

Check in to the accommodation was easy too, so kudos to BHGS for their superb organisation. Okay so the room is not what one is used to (it’s been a long time since I was a student!) but very pleasant once you get used to it. The shower is very good, so things could have been much worse!

Carrying a metal 28mm army from flat to venue proved challenging: my arms and fingers had just about reached their limit by the time the main hall sprang into view, but a quick cup of coffee soon revived me and I was able to have a wander and get my bearings.

The rest of TTS lot arrived soon after, and we decided to have a warm up game to get into the swing of things. My opponent was Simon Miller, author of the rules and all-round good egg, with his Burgundian Hapsburg army of mostly raw pikemen.

My Early Imperial Romans advanced in echelon, and got into the perfect position to flank charge his slowly advancing line…but then I suffered the most extraordinary bad luck for the rest of the game and got thrashed 0-13!

Now you may say “oh, the old "‘bad luck’ excuse, eh?” but even Mr Miller kept apologising not just for my card draws but also for his extraordinary good luck. Put it this way, during the game I had nine flank charges that resulted in no effect whatsoever: not even a single disorder!

All I could hope for was that this was not an omen for the competition itself, and that I had used up all my bad cards!

Here are some pics of the game:

TFL Painting Challenge: August Update

Three weeks since the last update and the entries have been flying in. The July update was a little early as well, so there are some catch-up entries as well: all in all, a bumper crop.

Do look at the individual galleries (accessible via the NavBar, above) but today we have entries from Carole, Stumpy, Matt, Sapper, Mervyn, Nick, Andrew, and Yours Truly.

Here’s a taster:

I’m off to Britcon now for a To The Strongest competition and a look at the Lard Workshop. Can’t wait!

IABSM AAR: Storming the Citadel

Will Depusoy and friends have been converting the Kursk “Storming the Citadel” campaign to I Ain’t Been Shot Mum, but using Chain of Command activation and buying support “platoons” instead of single models.

Here’s a quick report from one game taken from the IABSM Facebook Group. Click on the picture below to see all.

TTS AAR: Romans versus Indians

More practice for Britcon as friend Rob comes over for a couple of games of To The Strongest. The first game was my Early Imperial Romans (well, the Marian Romans proxying for them) versus Rob’s Classical Indians.

not a lot of romans…

but an awful lot of indians

My plan was simple: my veteran cavalry would sweep forward on my left wing and quickly dispose of his raw horse; meanwhile the Legion would advance forward into combat using their superior strength and flexibility to chew through his javelinmen and elephants; once the lines were fully committed, my cavalry would return and hit the enemy from the flank and rear or sack the enemy’s camp.

Unfortunately, my cavalry were having an off day and just couldn’t break the Indian horse: they spent the entire battle tied up way out on the left. That meant that the job of winning (as usual, some would say) was all down to the legionaries.

Fortunately they proved more than up for the task and, apart from the odd minor set back mainly down to the Auxilia, once the lines had closed and the Roman “mincing machine” had started up, there wasn’t a lot that could stop them.

The coup de grace came from one legionary unit breaking through the Indian line and sacking their camp, taking the last Indian victory medals in the process.

Here are some pics of the game:

IABSM AAR: A Final Effort

Great After Action report from Dan Albrecht and friends, originally posted on the IABSM Facebook Group.

The battle recreated an engagement between 12th SS Panzer Division and the British 11th Armoured Division on June 27th near Caen. Order of Battle is from the excellent book Monty's Epsom by Skirmish Campaigns.

Click on the picture below to see all the action:

Horse Archers in 28mm

Regular visitors will know that I’m about to take part in the To The Strongest competition at Britcon this year, fielding a Roman army not in my usual 15mm scale but in 28mm, using an army borrowed from a friend.

The army is great: plenty of legionaries and auxilia etc, but a bit of playtesting revealed the need for some equites sagittarii auxiliary horse archers, of which I had none.

A quick trawl through eBay suggested that I’d need to pay vast some of money for painted models, and would be jolly lucky to be able to buy only the three that I needed. The solution was at hand, however: I could buy a single sprue of Victorix Arab horse archers for the princely sum of £9: a bargain even if I would have to build and paint the figures myself.

Building the figures was quite fun, although I did find it tricky to get the two sides of horse to fit together snugly: you’ll see the tan horse in the middle has quite a VNL (visible neck line!). The arms were also tricky: superglue wouldn’t set quickly enough so I used a mixture of PVA and superglue which did the trick nicely. Any puffing just looks like the seams of their coats are coming apart!

Painting them was easy: using Contrast paints on 28’s after 15’s is like slapping paint on a shed, and even the tack (my usual bugbear) wasn’t too bad to do. I hashed up the man in the middle’s jacket: my purple dots are not good at all…but don’t look too bad from a distance. I was, however, very happy with the faces.

So thumbs up for Victrix and multipart plastic cavalry. I won’t be switching from my beloved 15’s, but have no problems in giving these a Recommended rating!

Romans Take To The Field (x3)

I needed to get some practice in for the To The Strongest tournament I’ve entered at Britcon this year, so friend Peter kindly invited me round for a gaming session where I would fight the Romans against whatever he fancied playing.

Given that my Early Imperial Romans are mostly infantry, it was no surprise to see a huge mass of cavalry waiting for me on the other side of Peter’s table. The first two games we played would be Mongols versus Romans, the last would be Normans versus Romans.

Game One: Mongols versus Early Imperial Romans

Being a mostly infantry army, I was comprehensively outscouted and ended up with my troops exactly where I didn’t want them. At least a fifth of my army was out-of-play until they moved in from the flank, and what cavalry I did have were faced by enough swarms of light horse archers to also keep them occupied for the whole game.

Outflanked on my left, my left flank collapsed, and I spent the entire game reacting to the threat from that side. The upshot was a massive 13-0 defeat for the Romans (including the death of the CinC) that boded ill for the rest of the day!

Game Two: Mongols versus Early Imperial Romans

Much to all’s amazement: I won the scouting and, as a result, began the game in a much better position than last time.

Despite this, my left flank collapsed again and I soon found myself 0-4 down in terms of medals. This time, however my better deployment meant that I could recover from this set-back, and in one glorious charge, a unit Roman Equites Alares dashed six victory coins of Mongols from the table, tearing a great big hole in the enemy centre.

Although I was by now running out of victory medals, knocking out another unit of Mongol Lancers and taking the enemy camp finished the job, although I did lose my CinC and part of my camp again. An 11-11 scoreline, but victory for the Romans.

Game Three: Normans versus Early Imperial Romans

Amazingly, I won the scouting again and, if I say so myself, deployed perfectly against the Norman threat.

I advanced forward confidently, only to have my cavalry charge forward with an advantage and get comprehensively stuffed. The worst that should have happened was an even-stevens tussle, but my horsemen just evaporated!

I might have been able to hold on and counter-ruck against an infantry army, but against a mobile mounted army I stood no chance. The rest of my Romans put up a brave fight, so it was no whitewash, but in the end a 6-13 defeat.

Conclusions

So what did I learn? Well, I shall be changing my list slightly just to give me a bit more flexibility, but the main lesson learnt was “don’t fight cavalry armies” which is not very helpful at all!

Attack! in Devises (and some musings!)

Last weekend I went to the Attack! show in Devises for the first time.

A lovely drive through the Wiltshire countryside almost made the trip worthwhile on its own and, after a little confusion as to where the actual carpark was (Attack! takes place at a school, and you have to snake your way through almost the entire campus to get to the area where you can park your car), I duly arrived and headed into the show.

Attack! is an old school (pun intended) show where rather than being in a single, purpose built exhibition hall, the various venues are scattered across the school campus: main hall, gym one, gym two etc. I rather liked this: it was quite fun exploring, but I was glad it wasn’t raining!

There was a good selection of traders, and I managed to pick up all those odds and ends you need but don’t want to pay postage on, a fair selection of demonstration games, and a large bring and buy. Part of the bring and buy was the sale of a truly massive collection of 28mm mixed historical and fantasy figures that apparently came from a recent house clearance: there were twelve dragons as part of it, which shows you how big it actually was.

Painted Figures for Sale

One thing that was noticeable was the amount of painted figures on sale throughout the show i.e. both on the trade stands and on the B&B.

Even five years ago, painted figures for sale were a comparative rarity, now they are all over the place…and I can’t decide whether this is because:

  • we are all more time-poor these days, so buy painted figures instead of taking the time to paint things ourselves

  • are of the instant gratification generation i.e. want to play now rather than spend the time building an army

  • are more butterfly in our wargaming habits: moving from period to period, scale to scale, and funding the change with the sale of figures from our last, now abandoned project

  • wargames from the start of the ‘golden age of wargaming’ are now all dying from old age and their collections are being disposed of

I am certainly guilty of the first two, but then don’t sell any figures, so my collection just keeps on growing!

The Circle of Life…

That said, I have been selling off a few wargaming bits and pieces that I found in Mother’s attic when helping her clear it out. These I had deposited some thirty years ago, and included any non-15mm kit that I had, including a cardboard box full of nearly-all-unpainted, still-in-the-packets 28mm Celts from Garrison.

I duly popped them up the ‘net, and friend Steve said he’d take them off my hands…but it was only when I came to give them to him that we realised that he had actually sold them to me over thirty years before when he was Garrison in that little shop in Twyford. Proof of the pudding: my name was written on the box in his handwriting!

TFL Painting Challenge: July Update

Some lovely work on show this update:

That’s six people out of the sixteen taking part so far in this year’s challenge. Come on the rest of you: paintbrushes and cameras out please!

PS Do make sure you look at people’s galleries as well as just the taster I’ve posted above. Navigate through the black navbar under the site’s title.

March to Hell 3D Prints

A post on the Lead Adventure Forum reminded me that although I’d read about the March to Hell 3D printed miniatures from 3D Breed, I hadn’t actually seen any in the flesh and, as I needed an extra command figure for my Marian Romans, I thought I’d take a look and see what all the fuss was about.

You can get them in the UK from the Geek Villain website, which is well presented and easy to navigate. There are a lot of 15mm 3D prints available: the main WW2 forces, medieval Spanish and Moors, and then the usual suspects ancients-wise: Republican and Early Imperial Romans, Germans, Celts, Persians, Greeks, Macedonians and Carthaginians.

I decided to stay focussed (for once) and headed for the Roman section in search of enough figures for a command stand, and almost immediately came across a special model representing Scipio Africanus: both mounted and dismounted. Looked great in the pics, so I ordered them, and then browsed through and, as I still have plenty of Baueda legionaries in the lead mountain, a couple of the other specials: a medicus set, with a standing and kneeling doctor; and a legionary accompanied by a couple of wardogs!

Scipio and the wardogs were £3, the medicus set was £2.50.

A few days later, a box arrived from the Post Office. The box was about 10cm square and seemed to weigh almost nothing. Opening up, there was a vast amount of bubblewrap folded around the loose miniatures.

Okay, I can live with that - saves on the packaging, the environment and all that (and I’m sure the dustmen/neighbours etc think I’m a drug dealer with all the little plastic ziplock bags I throw away) - but how would that work for a larger order, or did they just loose pack them for this order because it was small and easy to work out which model was which?

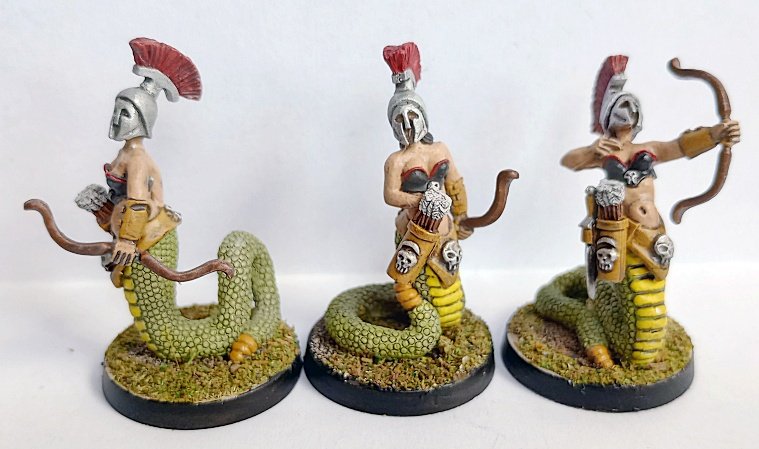
The models themselves were beautifully crisp: little works of art. Every last bit of detail was present, with no mould lines, build lines or flash. Lovely.

One thing, though, as represented in the pictures above, they had no bases. They were literally just the same as the images. I’m not sure why I expected them to have bases, after all there are no bases in the pictures, but this did come as a bit of a surprise.

This also wasn’t a problem for the specials: rather than my usual lolly stick mounting for painting, I could glue them straight onto the bases I would be using as mini vignettes…but that did raise the question of what I would do if I was going to buy whole units to be mounted multiple figures per base. I would definitely have to think about that one.

Also, although the lack of bases wasn’t a problem for the infantry (they stood up on their own) it was a bit more a problem for the horse that one of the Scipios sits on. Yes, I did get three horses in my order (not sure why, as only one horse had Roman tack: one even had heads hanging from the breast strap) but none of them had all four feet on the ground. In the end, I mixed a little superglue and PVA together and glued the whole of two hooves to the base…but the horse still sways freely if you knock it. We will have to see how that stands up to battlefield usage.

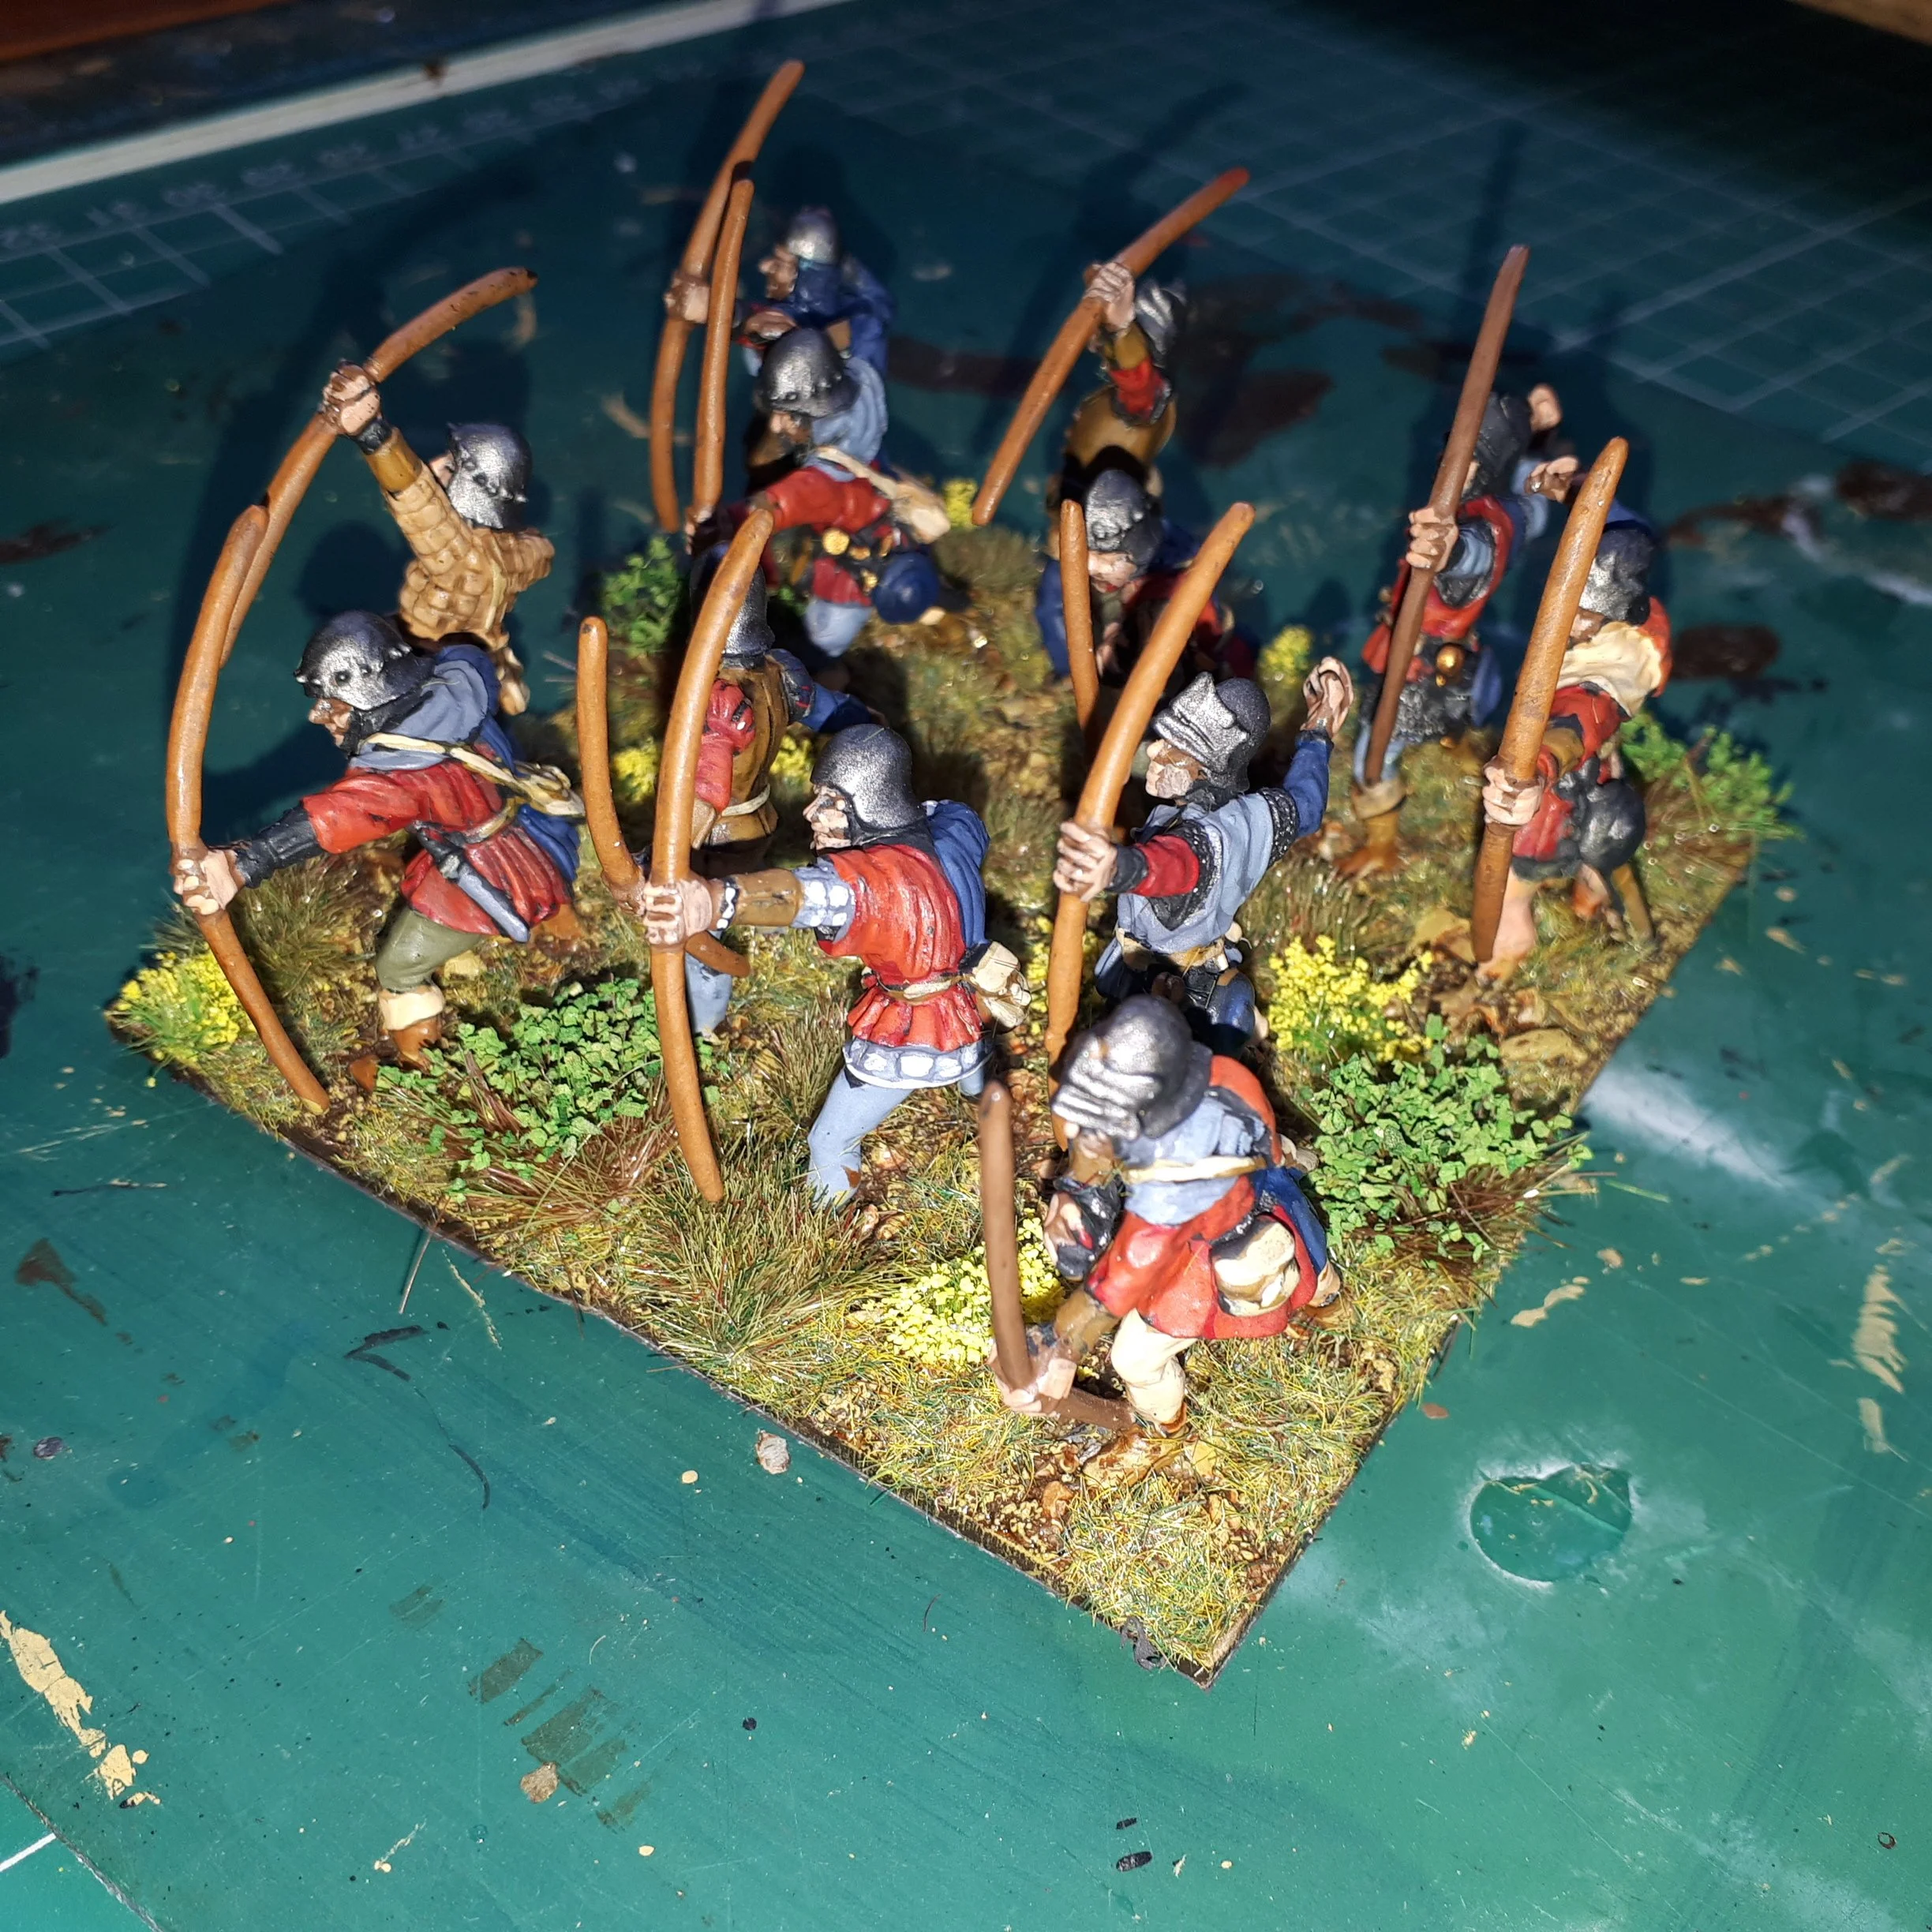
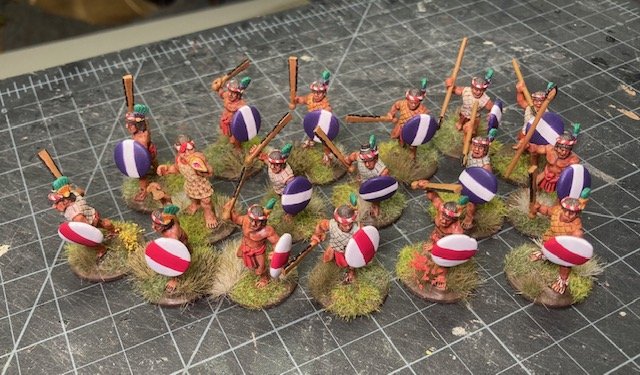
So how do they paint up?

The quick answer is “beautifully”. I painted them with a black undercoat then with base-wash-highlight, and am very pleased with the results:

Apologies for my crude painting and even cruder photography. Ignore the signifier with the Scipios: he’s from another manufacturer.

So, you can see what they look like, but how do they compare with other figures size-wise.

Here’s a couple of group shots with a base of Baueda Marian Roman legionaries:

No problem with sizing: they match very well indeed.

In conclusion, I liked these and am very pleased with what I’ve got.

Plus points are size, beauty, price and, for the models I ordered, uniqueness and quirkiness.

The big minus point, however, is the lack of bases: I’m not sure how I would mount an infantry unit for painting, and the cavalry without bases is just plain difficult to deal with.

I will be scouring the other listings for more specials like the above and, as I sit here, am severely tempted to see how I get on with a unit of legionary cavalry…

A Few More Romans

I’m waiting for newly-ordered figures to arrive at the moment and, as I felt like painting something, thought I’d dig into the lead mountain and see what I could find.

Back when I started a Marian Roman army in 15mm, I ordered enough figures to field my equivalent of two legions: ten two-base units, with each base holding 12 figures. I painted up the first legion, no problems, but stalled a bit with the second, only finishing one unit. The problem was that I didn’t need them (six bases of legionaries is quite enough for most To The Strongest Marian Roman armies) and I was, quite frankly, a bit sick of painting them!

Fast forward to now, however, and painting up another two bases worth (i.e. 24 figures) seemed like just the thing.

These are Baueda figures, bought through Magister Militum in the UK, and paint up very nicely indeed. Rather than use Contrast Paints, I went back to a black undercoat for these: seemed more suited all the chainmail.

I had, of course, forgotten how fiddly the Little Big Man Studio shield transfers were! They are great, I hasten to add, and really make the unit a unit, and are easier (for me) than painting every shield with the winged pattern shown, but it does mean cutting out forty-four individual half-shield decals, which was a very tedious affair indeed!

So seven out of ten Roman units finished. I wonder if it will be another few years before I do the next one!

19thC AAR: The Battle of Nachod

Bevan and I played another game using Neil Thomas’ 19th Century rules, this time using one of the scenarios included in the book: the battle of Nachod from the Autro-Prussian war of 1866.

There are three small towns above Nachod (which is the one with the pond): Wenzelberg, Wysokow and Aldstadt. The Prussians occupy two of them, Wenzelberg and Wysokow, with cavalry on the hill above and reinforcements on the way. The Austrians are just arriving near Wenzelberg. Victory goes to whoever occupies all three of Wenzelberg, Wysokow and Aldstadt at the end of turn 15, with any other result being a draw.

The Austrian infantry pushed the Prussians out of Wenzelberg fairly easily (historically they were cut to pieces by defensive fire) but rather than retreating the Prussian previous owners hung around and, together with the Prussian Uhlans and Jaegers, caused huge delays in the Austrian advance towards Wysokow.

Meanwhile, the Prussian reinforcements had also started to arrive.

The Austrian were pouring troops onto the battlefield, and lined up ready to begin their assault on Wysokov. Behind them, the Prussian Guards from Wenzelberg were still causing problems, and it took another two Austrian units to finally get rid of them.

This was all taking up too much time: the Prussian column was getting closer!

The Prussians in Wenzelberg weren’t waiting for the Austrian hammer blow to fall: taking advantage of a pause in the Austrian advance (the Austrians were “exhausted” for three turns i.e, couldn’t charge, and moved and fired at half effect) they advanced out of the town, formed line, and began blasting the advancing Austrian columns with fire from their breechloaders.

Meanwhile, a terrific cavalry battle developed between two Prussian and three Austrian regiments. The Prussian Uhlans were, however, on fire, as they were historically, and although the various cavalry melees would continue until the end of the game, the Prussian Uhlans would effectively fight the superior number of Austrian cavalry to a standstill.

The Austrian infantry were, however, doing better than their donkey-walloper comrades and, ably supported by artillery, were able to defeat the other regiment of Prussian Guards and occupy Wysokov. They then prepared to face the onslaught of the arriving Prussian reinforcements.

Keen not to allow the Prussians any time to deploy effectively, the Austrian columns marched straight out of Wysokov and straight at the enemy.

The Prussians had managed to deploy some of their regiments into line, but their guns were still on the road behind them, and although those that had deployed opened up a withering fire on the Austrians, there just weren’t enough of them ready to fight.

As the game drew to a close, the two sides were locked into a firefight that was slightly going the Austrians way: if only because their guns were deployed and firing whereas those of the Prussians were still limbered.

With two of the three objectives in Austrian hands, and with a superior tactical position, the game was declared a winning draw for the Austrians.

Aftermath

This was a tight-fought game with the Prussian Guards fighting for every yard: at one stage, two units of Prussian guard were fighting six units of Austrians and holding their own! It was only when the Austrian guns came up that the situation turned against them.

In the end, Austrian aggression won the day for them, although we probably had the width of the table too wide by 30cms or about two turns of road movement. A right-sized table would have let the massive Prussian column of reinforcements close with the Austrians earlier than actually happened, something that could well have turned the game in their favour.

So a draw was the right result: as the person playing the Austrians, I was not looking forward to facing the Prussian breechloaders should they have had the time to properly deploy!

TFL Painting Challenge: Tlaxcallan Update!

Today’s Painting Challenge update is named in honour of Lloyd’s Tlaxcallan entries: some amazing painting there which I will further honour with a little gallery of their own:

These are in 28mm and mostly from Outpost. They are not the only Meso-American figures Lloyd has to show us: visit his gallery for more.

Otherwise, we have entries from Matt, Carole, Mervyn and Chris. Check out their galleries for their work, but here’s a taster:

Keep them coming!

A Few Burgundians

Regular visitors will know that I bought a 15mm Burgundian Ordonnance army at the Warfare show last year. I’d already added some organ guns to its roster, but now needed to properly finish it off.

First up were some mounted crossbowmen, the only light cavalry in the army and thus the source of all of my scouting points.

These are Essex 15mm figures, painted with Contract Paints. Painting these after the Khurasan Normans was a real pleasure, and I am quite in love with the Essex style again. Their chunky, broad surfaces really take Contrast Paint well and I’d say that if you didn’t know they were 15’s, the photo above could show 25’s.

Next up were some light infantry handgunners, also Essex.

The photo above doesn’t really do them justice, but the Contrast white really works when placed next to the blue and the red: look at the chap second from the left in the back row (the one with the red hat). He’s the one that the photo has actually captured well.

SP AAR: OML9: Xhosa Raid!

My second game at Operation Market Larden 9 was a game of Sharp Practice set in South Africa in 1846.

To quote the briefing, “Xhosa raiding parties have brough terror to European settlers along the border with Cape Colony, destroying farmsteads, murdering their inhabitants and driving off livestock. The Governor has ordered both Regular and locally-raised auxiliary units up into the Waterkloof mountains to escort the civilians back to safety”.

I would play the commander of the auxiliary units tasked with rescuing the civilians.

The column I was helping to protect. My auxiliaries will enter the table from far to the right of what you can see here. The xhosa will come from where the camera is and off to the right as well.

This turned out to be a Ripping Yarn of a game, with waves of Xhosa initially trying to overwhelm the column and my troops with fire then, realising that we were winning the firefight, attempting to charge in and fight us at close quarters.

Most of the work, I admit, was done by my colleague controlling the Regulars, who established a firing line towards the rear of the column and a group of Riflemen in a ruined farmhouse and, quite frankly, shot the Xhosa to death.

For my part, apart from an initial hiccup with Corporal Nutter’s section of militia, who used my first move to retreat behind cover and then did not activate for the whole of the rest of the game, I managed to get some very useful Frontier Light Horse types into a position where they were protecting the road and could use their double-barrelled carbines to good effect, and then started rolling up the Xhosa’s left flank with the rest of my troops.

A charge from the Xhosa just about wiped out another of my units (horsemen who were, at that point, fighting dismounted) but that left the charging Xhosa vulnerable to a couple of volleys and a counter-charge that sent them scurrying from the table.

In the end, we defeated the Xhosa without taking too many casualties ourselves. Here’s a gallery of the action:

My thanks to everyone who was running/playing the game (it was great to use such beautifully painted figures on a cracking layout) and, of course, to Ade Deacon for organising the event as a whole. Can’t wait for OML10!

IABSM AAR: OML9: The Race to Brussels

One of the games I played in at this year’s Operation Market Larden was a superbly presented I Ain’t Been Shot Mum scenario put on by Phil and Jenny.

Iaon and I would lead tanks from the Welsh Guards supported by motorised infantry from the Grenadier Guards in a race across Belgium to be the first units into Brussels. Historically, the only opposition encountered was in the town of Halle, and that’s what the day’s affairs would recreate. Our mission was to get a “significant force” off either of the bridges at the other end of the table.

Unfortunately, things did not go entirely to plan mainly, I hasten to add, due to a spectacular cock-up in tactics on my part!

Click on the picture below to see how easy it is to snatch defeat from the jaws of victory!