IABSM: Poland 1939: 21st Light Tank Battalion

Yes, you guessed it: it's another list for the Poland 1939 project!

This time we have an order of battle for the 21st Light Tank Battalion, equipped with French R-35 tanks.

The 21st saw action against both the Germans, at Kamionka Strumilowa, and the Soviets, at Krasne. It contained forty-five R-35s.

You can see the list by clicking on the pic to the right, or click here to go to the main Poland 1939 page.

Now that I've warmed up on the lists for the armour, tomorrow should be the big one:  the standard Polish infantry rifle company. 

IABSM: Poland 1939: 2nd Armoured Battalion

Another list for the plucky Poles: this time covering forces based on one of the three light tank companies from the 2nd Armoured Division.

FT-17 Tank photographed at the Musee d'Armee, Paris

These units were equipped with somewhat obsolete French FT-17 tanks, some of which were still only armed with machine guns. To give you an idea of how bad they were thought, the platoon and company commanders didn't actually ride in the tanks, but drove around in field cars or on motorcycles!

To see the list, click on the pic; or click here to go to the Poland 1939 home page to see all available lists.

IABSM: Poland 1939: 10th (Motorised) Cavalry Brigade

A third list for the Poland 1939 project, and this time it's the turn of the 10th Motorised) Cavalry Brigade.

The brigade consisted of cavalry units converted to the role of motorised infantry, and was the only fully operational Polish motorised infantry unit of the campaign. The infantry element of the brigade consisted of the 10th Mounted Rifle Regiment and the 24th Uhlan Regiment, each consisting of four company-sized motorised rifle squadrons; an HMG squadron; and an AT platoon.

This was the formation christened the "Black Brigade" by the Germans because of the black jackets worn by the Polish motorised troops.

Click on the pic to see the list.

Or click here to go to the Poland 1939 page with all the lists.

IABSM: German Aufklarung unit

A bit of a break from Polish army lists today: some painting instead.

I've been wanting to add a reconnaissance element to my late war Germans for some time, but have been distracted by all the Arab/Israeli kit sitting on my painting table. Now that that's gone, it was recon all the way!

First up was the infantry recon element: a platoon from the Aufklarungkompanie described in both Battle for Liberation and Vpered Na Berlin. This consisted of eight half-tracks: one SdKfz 250/1 as command, one 250/10 with PaK 36, and then six more 250/1 carrying the three squads of infantry.

Command Element

With eight half-tracks to buy and paint, I decided to go the Plastic Soldier Company way: half the cost (at least) of buying them in metal, and the extra two half-tracks could go towards my next unit: recon for the panzers.

Building them was pretty easy. The only tricky bit was fitting the two crewmen into the cockpit. One stands, firing the MG, the other sits on the bench, presumably complaining that its his turn with the gun now! The problem is that it's a very tight fit to get both stander and sitter in place and, if you're not careful, you end up with Herr Stander's bottom firmly pressed into Herr Sitter's face!

The half-tracks paint up nicely. I undercoated in a dark yellow, then used one of the sponge things you get in a Battlefront blister to create a camouflage pattern with a light green and then a dark brown. In order to keep things consistent (und orderly, ja!), I made sure the camouflage blobs for each colour were in the same places on each half-track.

1½ squads-worth of half-tracks!

The crew were painted in German uniform rather than camouflage. I could have gone splinter pattern, but I felt that the contrast between the half-tracks and their crew worked better than if I'd camouflaged both. BTW, I only painted the bits of the crew that can be seen...and had to go back and paint the drivers' helmets as I forgot to do them as I did the others.

A wash with Agrax Earthshade (what did we do before Agrax Earthshade) and a bit of highlighting and the paint jobs were done.

Decals were then applied...and I've just realised that the numbering that I've used doesn't make any sense in that I have treated the main body of the unit as two squads of three half-tracks rather than three squads of two half-tracks. Doh! I have also had a problem with the backing film showing, despite using a decal softener as I applied them. It's a pain, but I shall have to learn to live with it.

The other 1½ squads-worth!

Anyhoo, a coat of matt varnish softened the colours so they looked less clown-like, and we're now all ready for some recon action. 

Nice figures: PSC = highly recommended.

IABSM Poland 1939: New List Added

I have now completed and posted the second of the IABSM v3 OBs for the Polish army of 1939: that of the 3rd Light Tank Battalion.

The 3rd Light Tank Battalion was a make-shift unit consisting of only two companies of tanks: the 2nd Company, equipped with double-turreted 7TPs; and the 5th Company, equipped with single-turreted, improved 7TPs.

Originally intended for the 10th Motorised Cavalry brigade, the 3rd remained in Warsaw for the city's defence, and was attached to the central city defence HQ.

As ever, the core content of the list comes from Alexander's work on the Anatoli's Game Room blog, and is gratefully used with his permission.

Click on the pic to see the list, or click here to visit the Poland 1939 page containing all the IABSM v3 lists published so far.

IABSM: New Project: OBs for Poland 1939

Today marks the start of my latest project for I Ain't Been Shot, Mum!: the creation of a set of v3 compatible army lists for re-fighting the September 1939 invasion of Poland.

I have been looking to model a 1939 Polish force for some time but, being someone who likes to have things handed to them on a plate, have been waiting for the v3 Blitzkrieg! theatre supplement to arrive before starting to buy figures. Until now, that is, when I have decided to produce IABSM v3-specific lists myself.

The impetus behind this project are the superb September 1939 campaign army lists for Flames of War that appear on the Anatoli's Game Room blog. Their author, Alexander, has given me permission to use his work as the basis for a set of IABSM lists which, combined with my own (much more limited) research, will appear on this website over the next few months.

The lists will follow Alexander's format of, where possible, concentrating on specific formations, especially for the armoured and specialist units. I'm afraid I don't think I'll be posting the Armoury until all the lists are up...but only because I want to put together all the stats for the various troops, weapons and vehicles on offer all in one go.

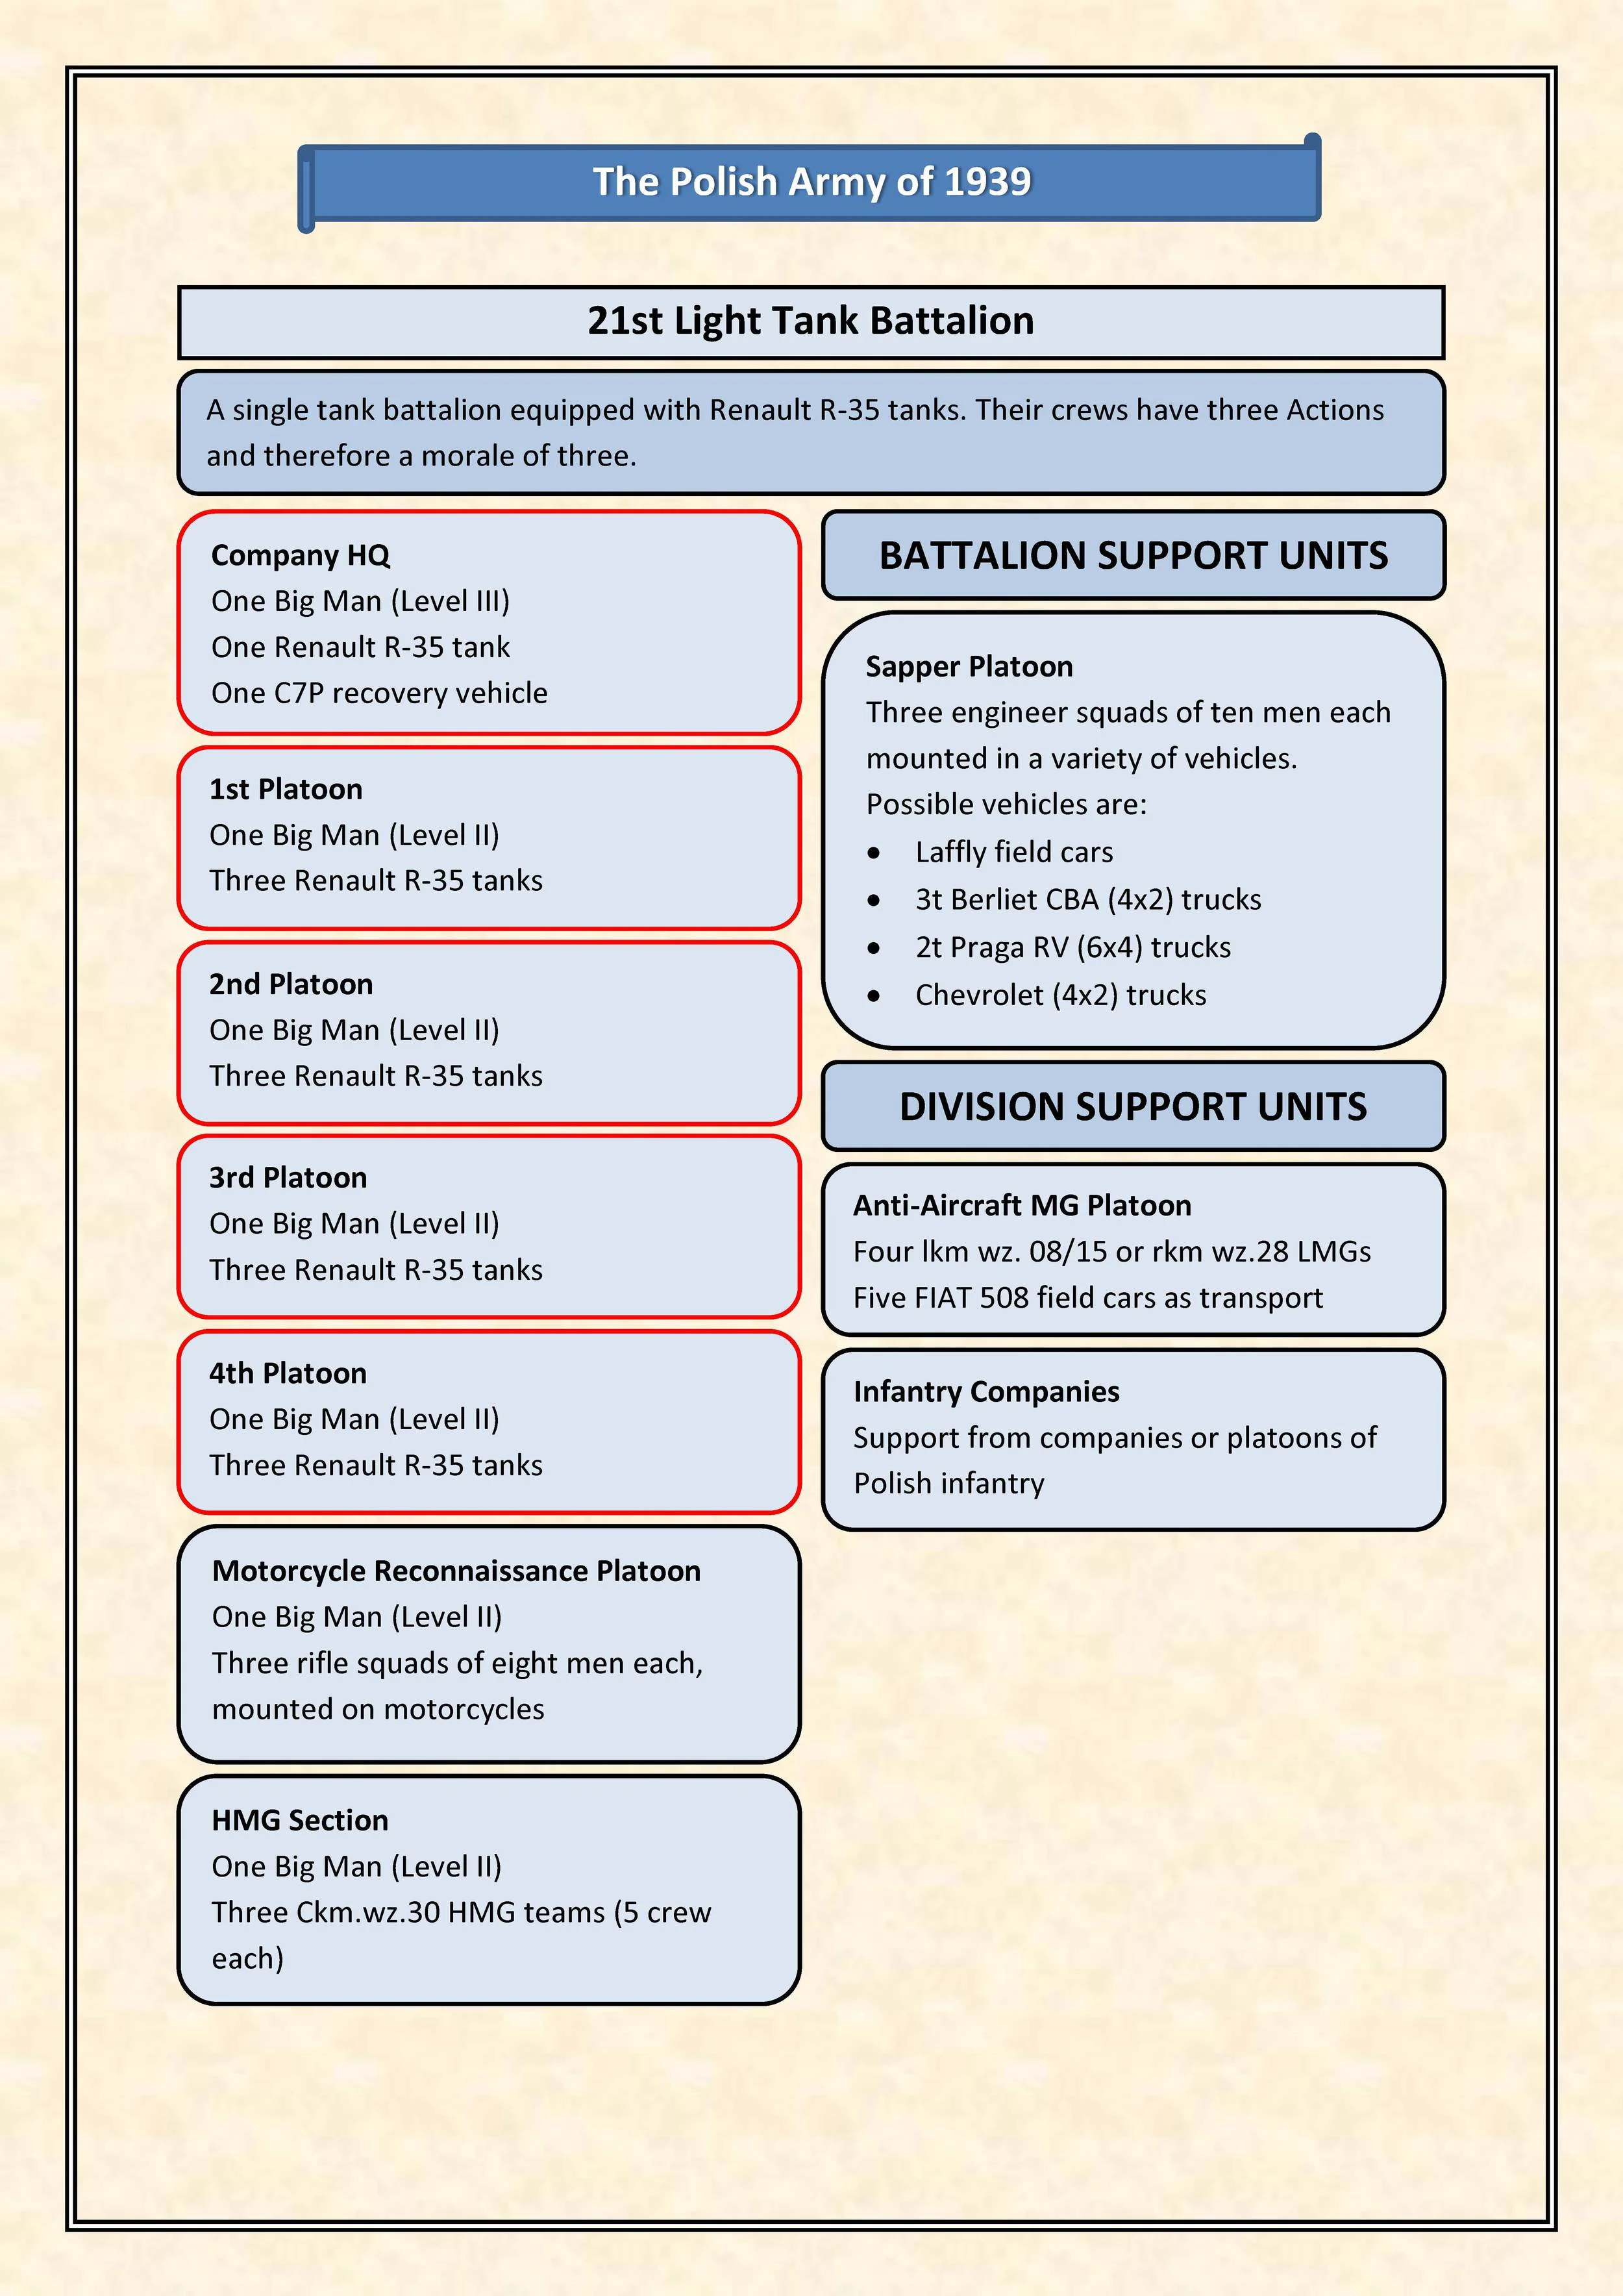
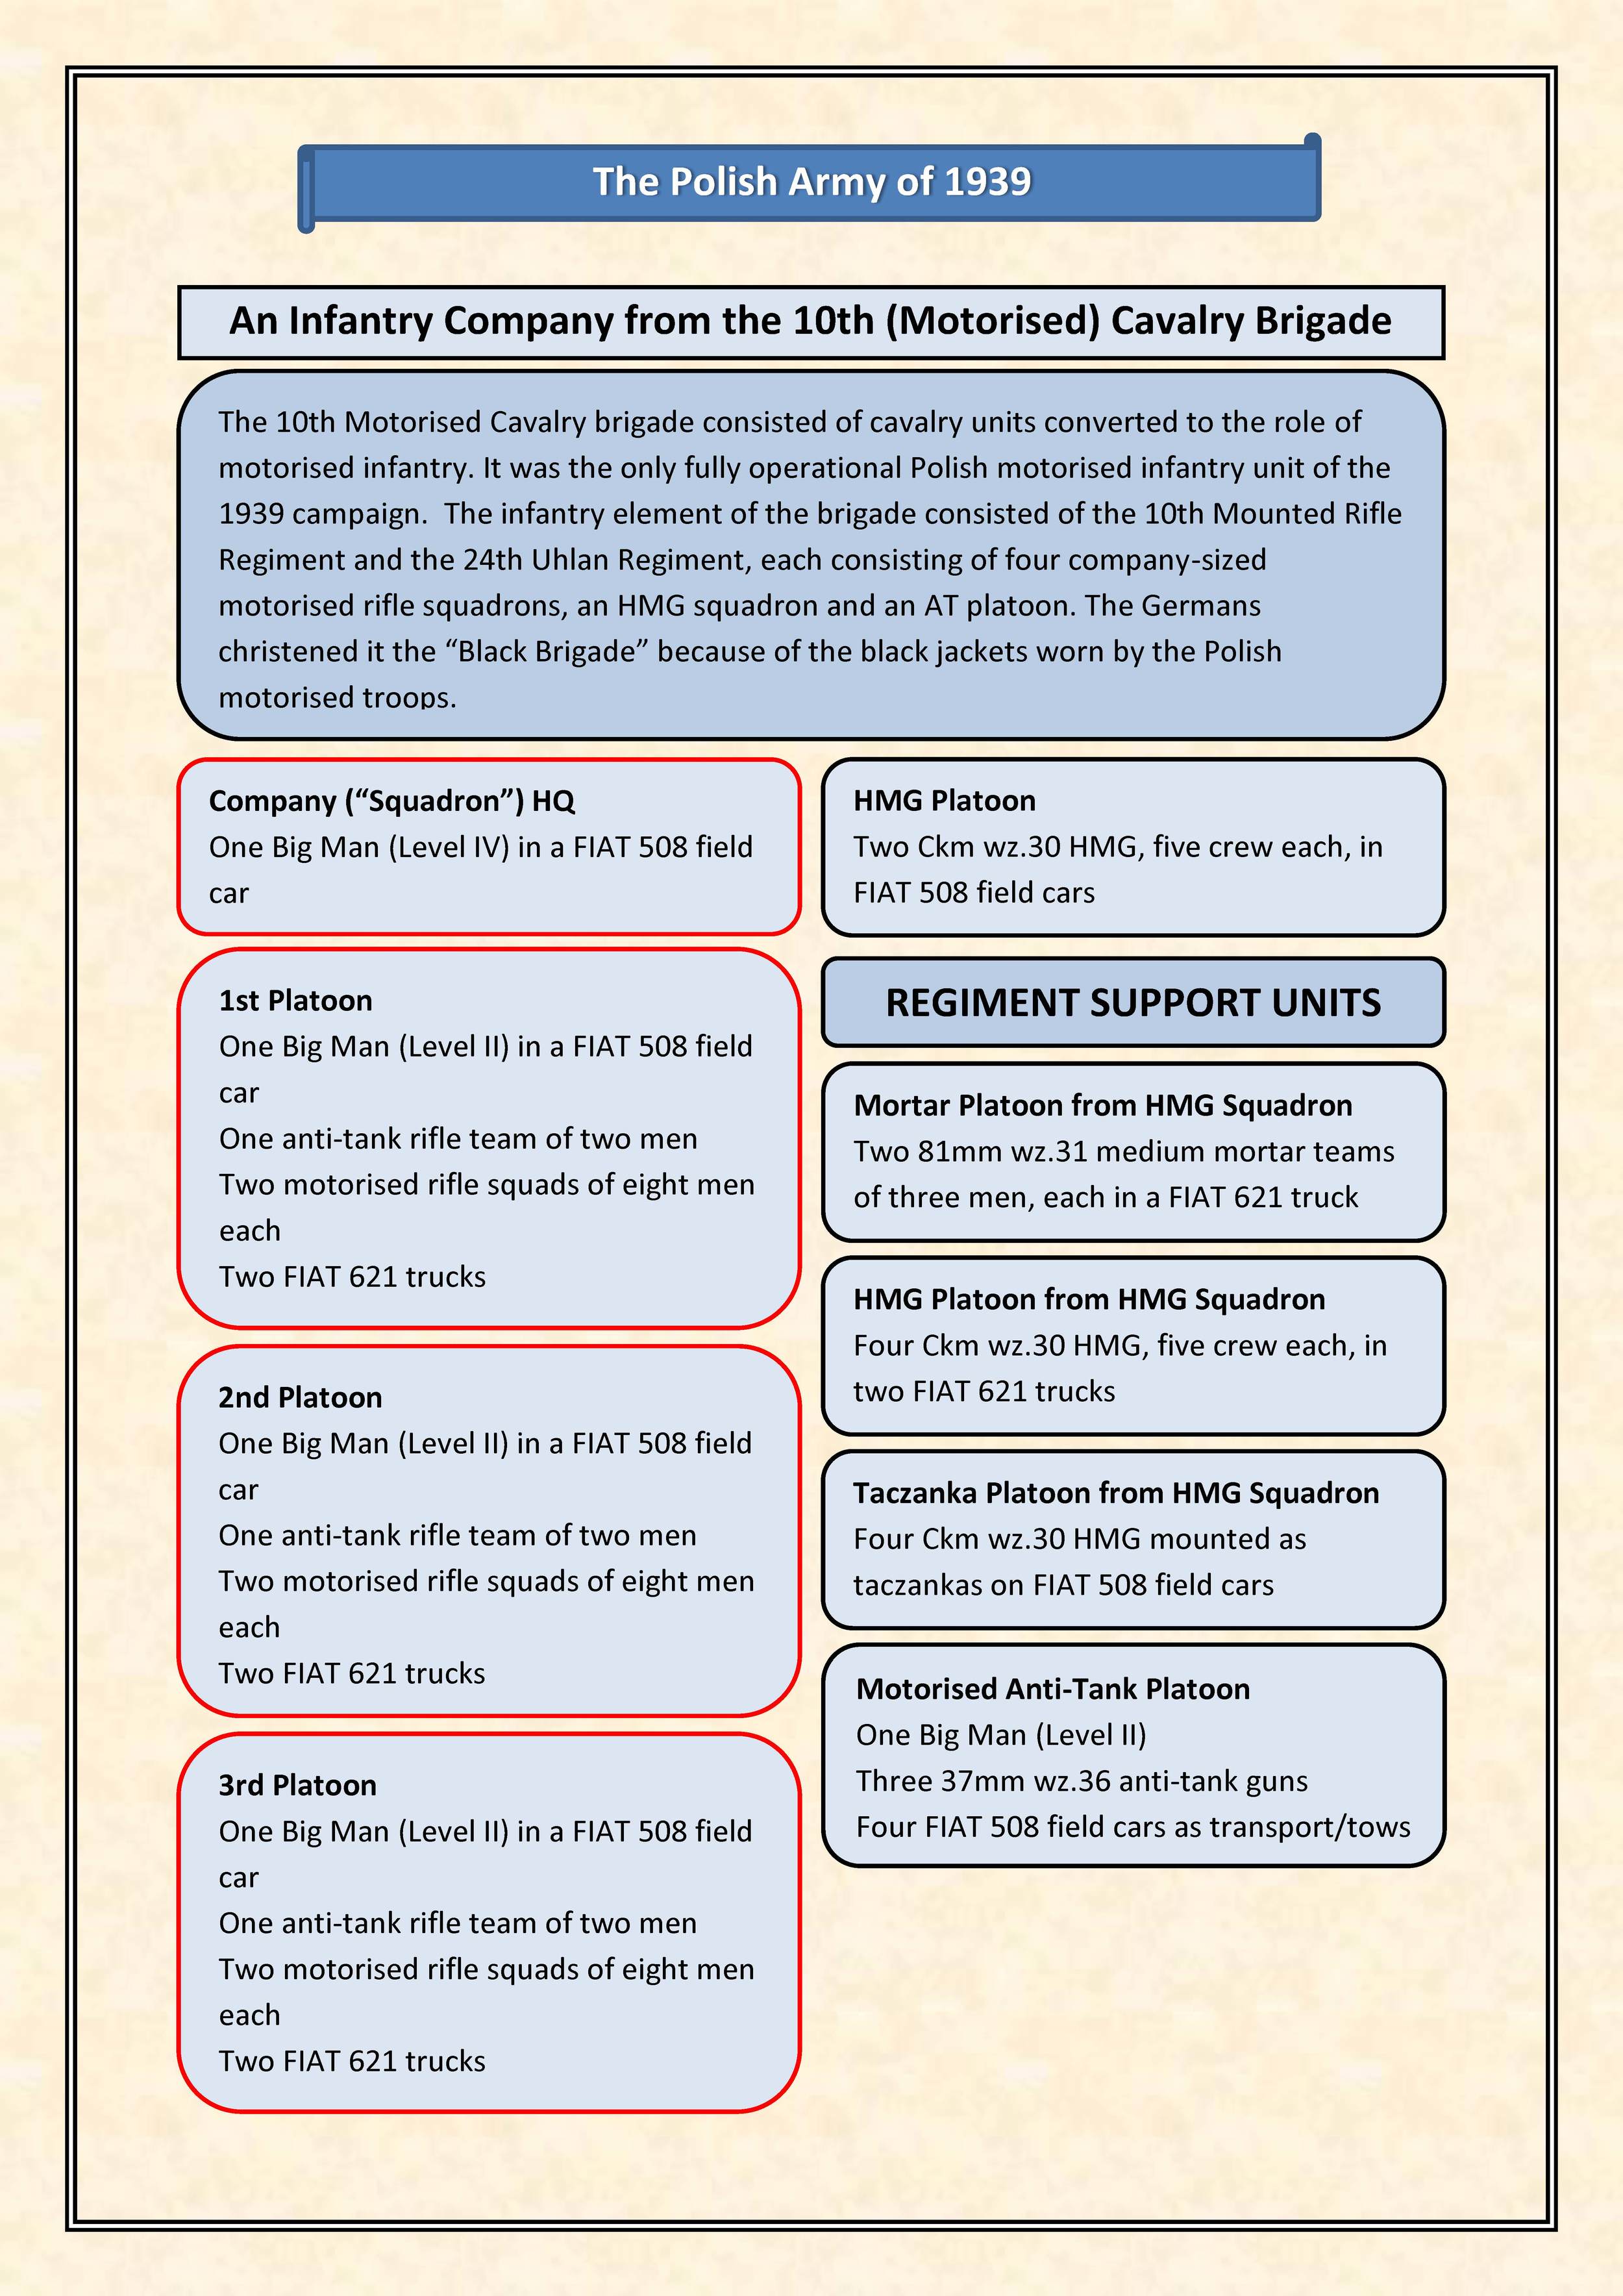
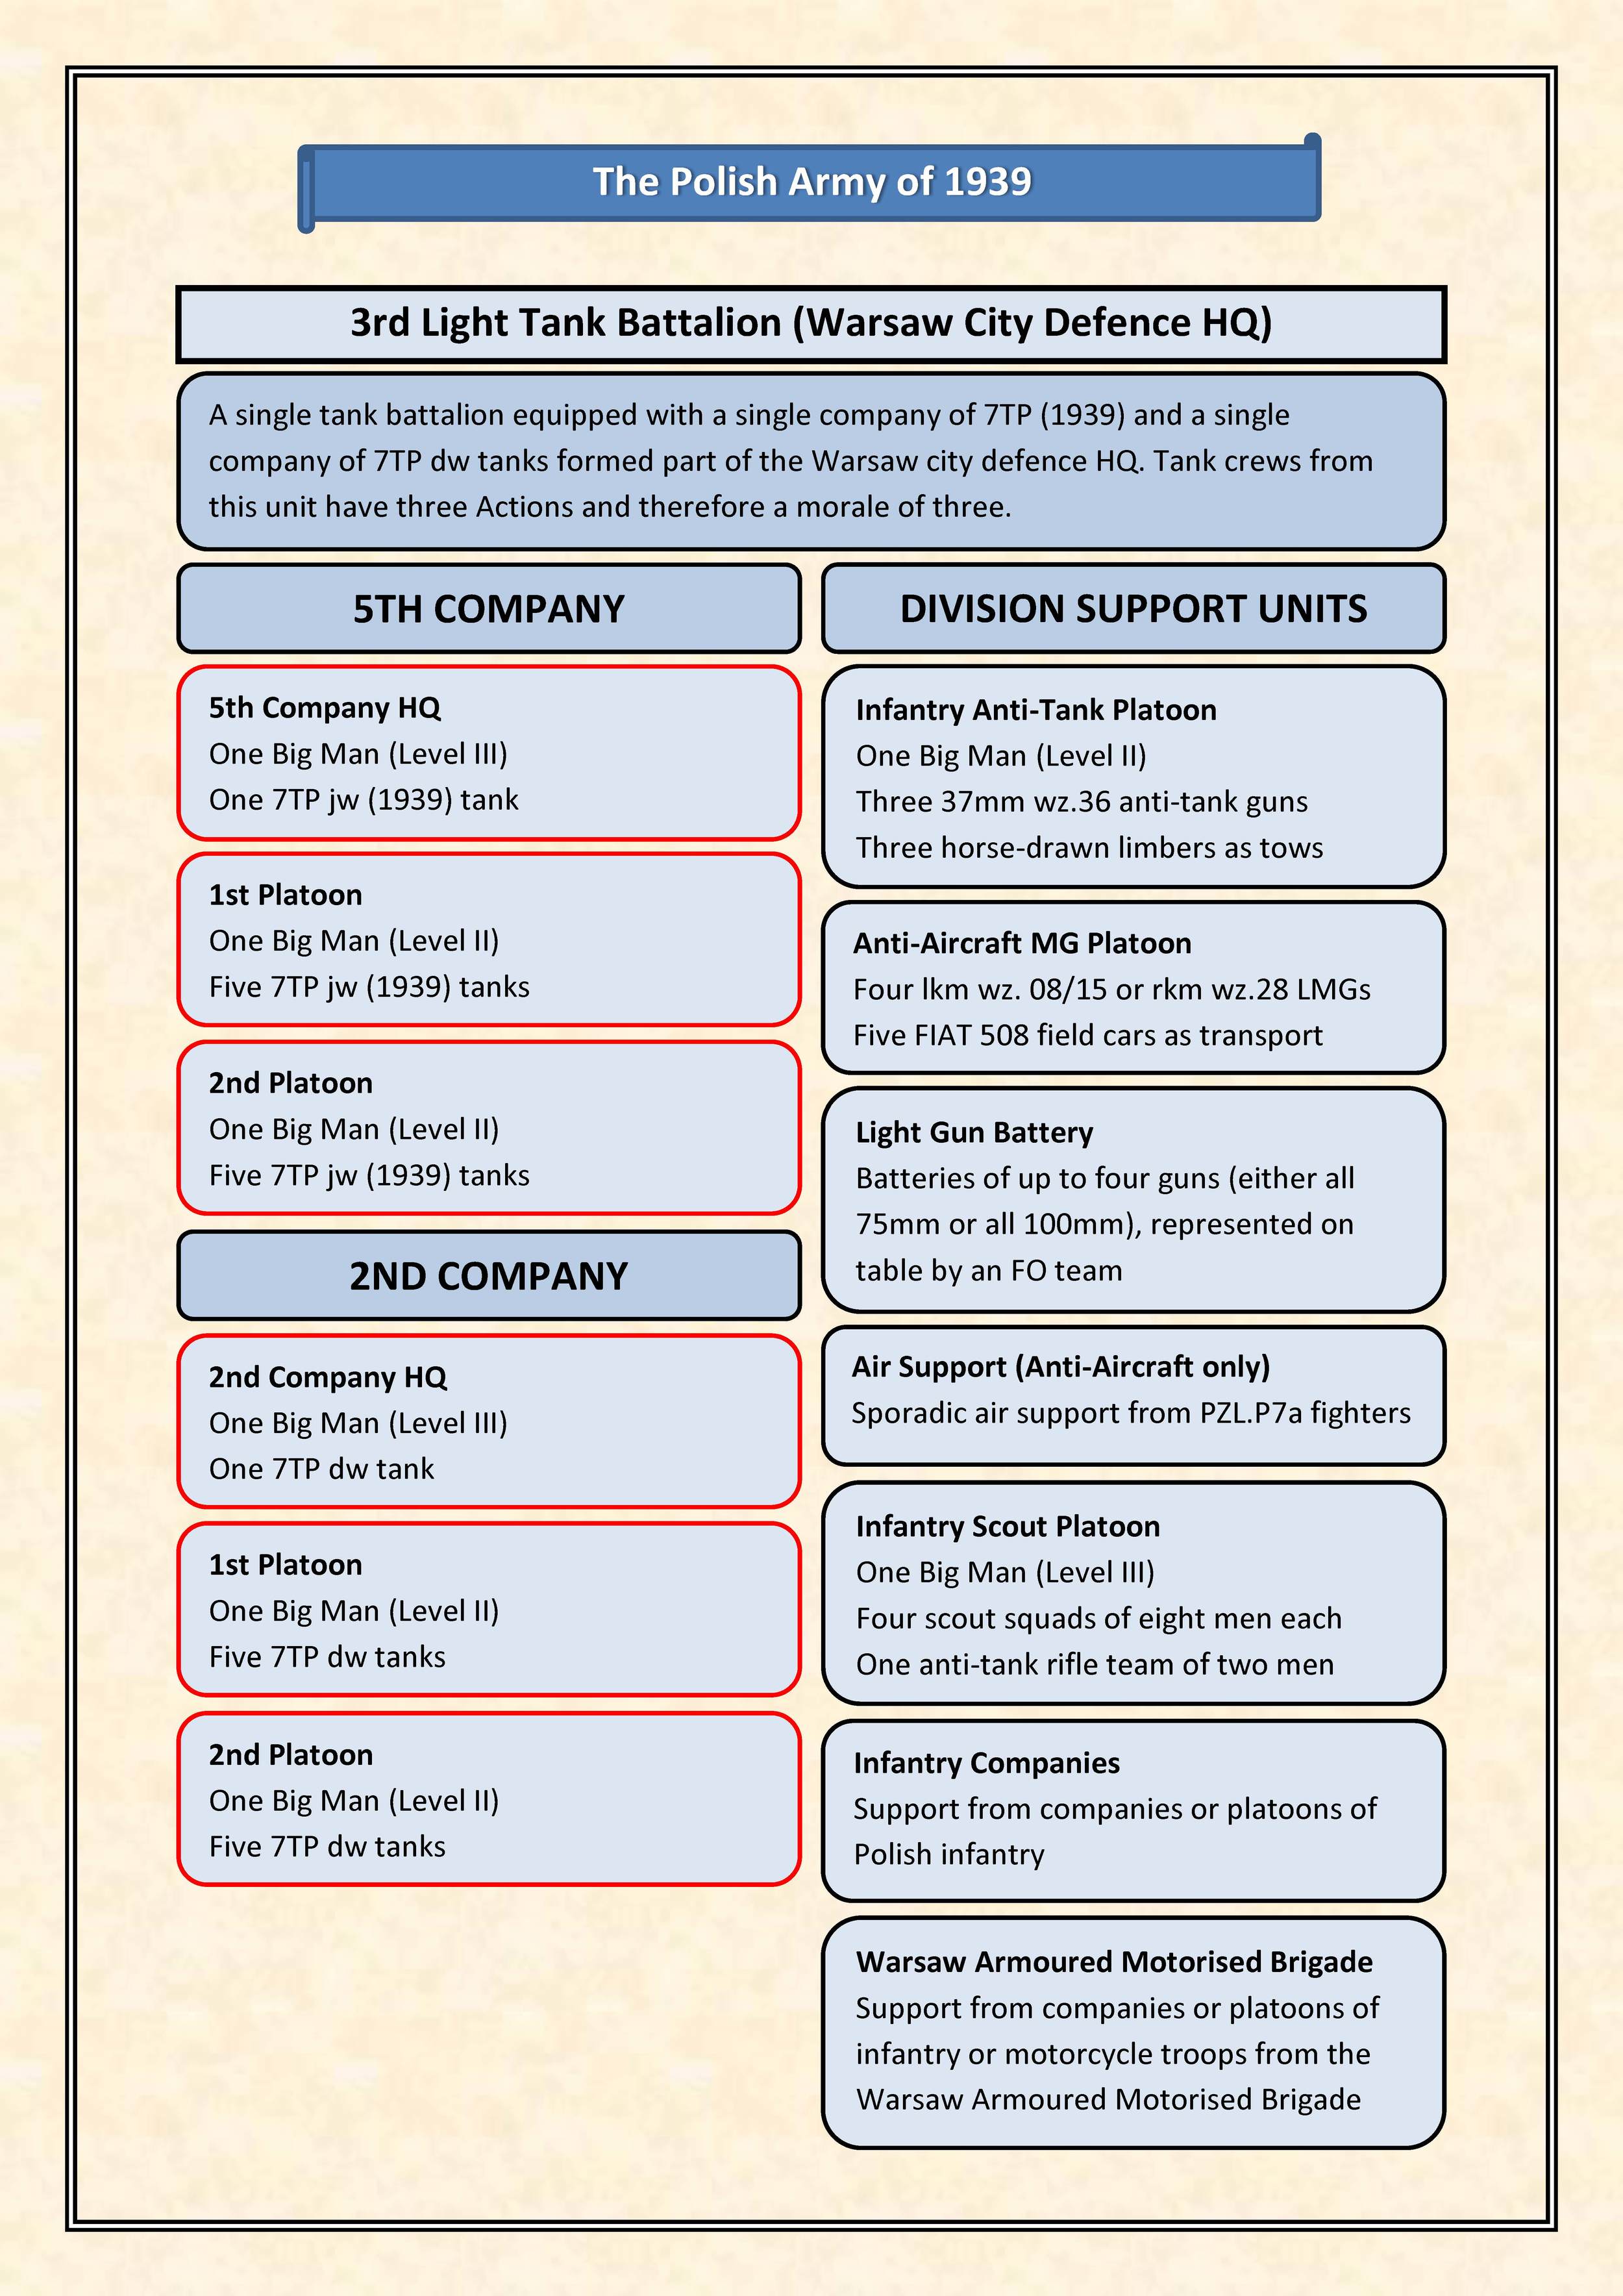
Today's launch includes the posting of the first of the lists: the 1st & 2nd Light Tank Battalions i.e. a force built around a company of 7TP jw (i.e. single turret) tanks. The OB also provides the detail needed for those elements of the the two battalions that appear as support options for other lists.

You can follow the progress of the project and download the various lists from the Poland 1939 page, available by clicking here or from the IABSM dropdown in the page header, above.

IABSM: Japanese Type 89 Chi Ro Tanks

Next part of my catching up with the Japanese Battlefront pre-Pacific releases: the Type 89 Chi Ro (aka I-Go) medium tanks.

These come in boxes of five tanks, which is a bit weird really, as they fought in platoons of three tanks with a two-tank HQ. Must be Battlefront economics to always sell this sized tank in boxes of five.

Anyhoo, as you'd expect from Battlefront, these are lovely models: nicely detailed, and with relief deep enough to really bring out that detail when washed. Quality control was very good as well:  no missing parts, no horribly contorted parts, and everything went together very easily. You see, Battlefront, you can do it right!

The five tanks above were painted using the guide on the FOW website: spray undercoated in a deep yellow; camouflage added; then washed with GW Agrax Earthshade. All I would suggest is that you think about where you want the thin yellow line to go before you paint the main brown and then green camouflage stripes i.e. plan your paint job rather than just starting willy-nilly.

The command figures are also well detailed. I love the pointing-chap, but I'm not sure about the bloke with the sword. Leaving aside his grip (that's the martial arts geek emerging from his lair!) I'm not sure that it's very practical to carry a katana, even a WW2 cut-down one, in a smallish tank such as a Chi Ro. Surely that's what a wakisashi is for!

Nice models, recommended for re-fighting Khalkhin Gol.

Japanese Self-Propelled Guns

With Battlefront bringing out their new range of Pacific Theatre miniatures, I thought it might be about time to catch up on the models I missed from their pre-war Manchurian Theatre range. I do always seem to be one range behind!

First off the production line are the Type 4 Ho Ro self-propelled guns:

So, wanting to put a bit of background in for this post, I've done a bit of research. Apparently only twenty-five Ho Ros were ever produced, which means that I have about a sixth of the entire production run!

They were also not very useful, as the crew had no protection,  and you had to turn the whole vehicle in order to acquire your targets. Excellent!

They also fought only in the Philippines and on Okinawa: so no good for Manchuria either.

All in all, an excellent example of a model that I am going to struggle to field on the tabletop. I wonder how many other wargamers have collections full of the same!

Russian Chapel from Ironclad Miniatures

My stock 15mm WW2 Russian village consists of a large number of 4Ground wooden huts. Very nice, loving the smell of lasercut mdf in the morning and all that, but quite same-y.

I leaven them with different churches (I currently have two, but have my eye on at least three more!) but still feel that a bit of variety would help dress the table.

In yesterday's post, I mentioned how I had bought and painted an Ironclad Miniatures Russian Windmill at the Vanquish wargames show. This was a good start on the leavening front, but as I was about to pay for the windmill, the Russian chapel also caught my eye.

Okay, so it's not a full church, but would be ideal as dressing for small villages that wouldn't necessarily merit the full house of God treatment.

The chapel has the same footprint as a 4Ground hut, and looks as if it would take two FOW medium bases inside it (see below to see how it comes in two bits).

Again undercoating in sand, I painted the roof dark grey, and then washed it with a black ink. The whitewashed woodwork I achieved by block painting in a light grey, and then very heavily dry-brushing with white. Although the knob on top looks very dull, I've since brightened it up with a bit of extra shiny gold paint to properly give those enemy artillerymen something to aim at!

It's a nice little model: also recommended.

Russian Windmill from Ironclad Miniatures

This bank holiday weekend just gone, I was browsing TMP when I saw news of a new wargames show, Vanquish, just around the corner in Bourne End. 

Despite the fact that I usually only do Salute, Colours and Warfare, I thought it would be nice to support my local show, so turned up to see how it was.

Well, it was small, as one might expect , but had enough traders carrying things that I wanted to buy to make it very easy for me to make a few purchases...one of which was Ironclad Miniatures' Russian Windmill in 15mm.

As a new purchase, this naturally went to the front of the painting queue (zipping past those Israelis!) and was completed very quickly on the bank holiday Monday.

It's a nice looking model. I undercoated in a sand colour (bought two cans accidentally, so sand is now my default undercoat!) then over painted that in a nice wood brown. On went a wash, then a dry brush in bone white to highlight, and then a final wash to soften the highlight. Recommended.

Pegasus Bridge

Some time ago, pre-Xmas I think, I was feeling quite rich, or maybe in need of a little retail therapy, and bought the 15mm Pegasus Bridge model in laser-cut wood from Warbases. I believe I opened the box at the time, but then put it to one side as my focus was on other things.

Well, a few weeks ago, I'd had enough of painting Egyptians and Israelis, and decided to bite the bullet and build the bridge.

This proved to be an enormously fun task, even if sometimes it was quite challenging. Like when I didn't read the instructions properly and glued the wrong bit in place - a vital bit obviously - that then broke when I tried to remove it (Warbases sent me another with my next order: very generous of them, and just another example of their always-excellent service).

I used superglue to put the bridge together (hence my problem with the mis-glued part!) although white glue is actually recommended. This is because I am impatient, and can't stand waiting once I've started building something.

What's even better, is that the bridge actually lifts up, and stays lifted once fully, er, erect:

The canal pieces are from Hornby: very expensive (ridiculously so) bits from their model railway terrain range.

Anyway, once the bridge was built, I sprayed it grey, and then dry-brushed in a lighter and a darker shade of grey. Looks okay, but I'm sure that there are better ways of painting it to make it look even better.

The barriers go up and down as well, despite my best efforts to either (a) accidentally glue them in place and (b) accidentally paint them in place.

The above pictures don't really give you a sense of scale, so here are a couple of pictures of my 15mm British Paras occupying the thing:

In all, a great piece of terrain, and one that I can't wait to make the centrepiece of a game. Well done Warbases, and well done me!

PS I have decided to count this as four 15mm houses and a little bit more for the purposes of the Painting Challenge, and have awarded myself 50 points for the bridge. Very fair, if I say so myself. 

More Sabot Bases

Regular visitors may remember that I had Warbases make me up some custom built sabot bases to accommodate the way my 15mm WW2 infantry are based.

To remind you, a standard squad consists of a two-man LSW mounted on a 2p piece and six or eight single figures mounted on 5p pieces. Together with a hole for a dice to show Shock, each sabot base carries a single squad.

The difficulty is, however, dealing with squads with two LSWs, such as my later war Fallschirmjaegers. Here, each squad consists of two LSW teams mounted on 2p pieces together with four singles on 5p pieces.

I'd been fudging it for some time, but last week decided it was time to get some more sabots to accommodate these double-LSW squads. One quick e-mail to Warbases and a few days later I had the bases in my hands:

Quick spray of green paint, bit of glue and some flock, and away we go. All ready for the big game next month!

Thanks to Warbases for their usual excellent service.

New Female WW2 Soviet Troops from Bad Squiddo Games

I have wanted a platoon of 15mm WW2 Female Soviet infantry for ages. I even started a Eureka Miniatures 300 Club push to try and get some made, but although quite a few people joined, we just didn't quite reach the required target.

It's very nice to see, therefore, that Bad Squiddo Games (aka Annie, The Dice Bag Lady) have released a range of Soviet fighting women...it's just that they seem to have made a terrible mistake and done so in the wrong scale!

Available for pre-order now (shipping 25th April) this 28mm range looks really good. There's enough variety to produce a whole platoon i.e. there are figures with rifles, SMGs, LMGs and officers; and the figures are beautifully proportioned and, dare I say it, realistic looking. I'm particularly liking the snipers and tank riders/commanders.

You can see pics of some of the figures below, and here's a link to the Bad Squiddo website. Now will someone please produce these in 15mm. Please.

Sniper Team, Standing

Sniper Team, Standing

Command, Medic, WO

LMG Team

Tankers

Tank Riders

SU-100 Tank Destroyers from Battlefront

I've been wanting to get some Soviet SU-100 tank killers for some time. I've had the lesser SU-85s for ages...but, frankly, they are so last season...and I just wanted the ones with the bigger guns...and I wanted them now! The trouble was, I didn't fancy shelling out for the metal versions at £8-£9 a time.

Fortunately Battlefront came to my rescue with the release of their box set allowing you to build five plastic SU-100s for the princely sum of £23.40 or £4.68 per model.

Now I actually quite like plastic tanks. Yes, nothing beats the heft of a decent metal or metal-and-resin tank, but the relative pricing (allowing you to build big units), incredible detail, and the way that they paint up make plastics a very viable option. I'd almost go as far as to say I prefer plastic tanks:  try dropping a plastic and a metal tank and see which one survives better!

The box set comes with all sorts of options, including just what I wanted: five SU-100s.

The kits go together very easily (less than 5 minutes a tank) and paint up very well indeed. These were done with an undercoat/basecoat of Army Painter spray, washed with GW Agrax Earthshade, then highlighted with one of lighter GW greens...Loren Forest IIRC. I put together, painted and based all five in about four hours in all.

Excellent value, great kits:  which is a good thing as I have another box of them to do for the Egyptians for the Six Day War!

The Soviet 203mm Howitzer from Battlefront

One of the great things about Battlefront is the huge range of models they produce, even if sometimes the vehicle or gun that the models are based on only fought in one particular theatre or weren't produced in very large numbers. 

Their recent Berlin supplement and its related new releases contain many good examples, one of which is the giant Soviet 203mm howitzer: something that, showing appropriate restraint, I ordered as soon as it hit the streets.

This thing is a monster. It's also easy to put together, easy to paint, and looks absolutely cracking. A very worthwhile addition to the arsenal!

Gebirgsjaeger: 15mm Opel Maultier

Earlier this year I added Waugh Games to the list of WW2 figure manufacturers. If you remember (assuming you follow this blog fairly regularly) I ordered three Opel Maultier from them at the bargain basement price of £2.50 each: under half the cost of the Battlefront equivalent. I've now had a chance to paint them up, giving my Gebirgsjaeger a bit of additional transport.

So, how did they turn out?

The first thing to point out is that they come with a HUGE base built in i.e. on one side of the truck the base sticks out at least an inch; on the other, at least a centimetre. I'm not sure why they come like this, but they do. Here's the picture from their website that shows what I mean.

The other thing the picture shows is the holes in the resin: you can see a big one on the door, and lots of little ones in the main body's wooden panels.

Well, I could do something about the bases - snapping them off to a decent distance from the tracks wasn't too difficult - but I decided to ignore the resin bubble holes: far too fiddly to fiddle with.

A black undercoat was followed by an all-over coat of a medium dark grey. I then dry-brushed the canvas top in a lighter grey, then  dry-brushed both canvas and body with white. The windscreen and other glass was dark blue and then my (only slightly successful) attempt at a glare effect. The tracks were my usual gunmetal covered with flesh wash. Here they are:

As you can see, the resin holes aren't really significant: they just look like wear and tear. The bases are still a bit thick, and aren't very even...but that won't show on the tabletop either. The only real disappointment is the bit between the tracks and the main body paneling: there's a big resin bulge that looks like, well, a big resin bulge.

In all, however, not bad for £2.50 a time. The old adage that you gets what you pays for has certainly held true! 


Sarissa's 15mm Factory

Sorry for the lack of updates over the last few days:  been horribly distracted with real world affairs.

Anyhoo, to get back into the swing of things, here's a quick post showing my latest 15mm building for anything from WW2 right up to sci-fi: Sarissa Precision's factory.

The factory is mainly a single building with a nice roomy inside. There is a walkway halfway up one wall, and the windows and doors are made from heavy card stuck to the inner walls: nicely robust. There a small powerhouse plus chimney on one side, and the kit comes with a steps-and-gantry walkway that leads to one of the doors portrayed on the upper floor.

Now this is quite a challenging kit to build, but the instructions are excellent and easy to follow. It's just a bit fiddly in places, and I don't really do fiddly! The result, however, is definitely worth the time and effort. The outside looks brilliant, even with my rather crude paint job, the gantry is a very nice touch, and the inside is amazing. That walkway is surprisingly easy to build, and will provide a nice little fire step.

On the whole, highly recommended.

Battlefront's Desert Fort

Those of you who read my post about Battlefront's Dust Cloud terrain markers will know that I have had some stuff on backorder from them for some time. One of the other things that was on backorder was their Desert Fort and expansion pack.

Now I can't remember exactly how this worked, but I think that they said they would only produce another batch of these if enough people agreed to buy them: a bit like a mini-kickstarter. Well I agreed to do so, and then promptly forgot all about it until the e-mails saying they were on the way started to arrive in my inbox, followed shortly afterwards by two quite big boxes.

Here's the fort itself:

It's a lovely piece of battlefield terrain. The walls and turrets are really chunky...and I've just realised I've set it up in the picture above with all but one of the walls the wrong way round...but you can see from the left hand wall what it should look like! Plenty of room for figures on those parapets, and for at least light guns on the tower-tops.

Here are a couple of views with a figure in them for comparison:

fort02.jpg

The expansion pack contains two ruined walls and two mid-wall towers that would allow you to double the length of two of the wall sides, provided you were happy to have the ruined walls included to make up two of the sides. Or you could just have the ruined walls as part of the original square fort.

Here's a pic of the fort set up as a square with on side bashed in:

In all, this is a lovely set of kit, ideal for portraying the desert forts of the western desert in the early 1940's. It would also do, of course, for sci-fi wargaming, and for Beau Geste-style games as well. Recommended.

PS  Sorry about the pictures: I seem to have got most of the walls round the wrong way. That's what comes of drinking a bottle of wine whilst gaming, and then deciding to do a bit of photography afterwards!

The Stalingrad Mill

The last building I had to put together from Commission Figurines was the gigantic Stalingrad Flour Mill.

Retailing at £45, this is a cracking piece:  two joined buildings, one large, one small; five floors and a roof, with each floor having its own little ledge on which to place figures. You actually have to build it twice: once for the internal frame on which all the shelves sit, and once for the outside walls.

Here's a modern-day picture of the mill itself:

And here's a picture of my completed model:

Not the sharpest of photos, but you can see what I mean about the sheer size of the thing, and how well it compares to the actual building.

I painted this in orange, and then washed with GW Agrax Earthshade. It didn't need any sort of highlights dry-brushed on, so I didn't do any. The inside I left in raw mdf, as it looked okay and painting it would have been a real pain now that I had put it together. The outside pavement I did in the usual dark grey, black wash, light grey highlight, but I left the highlighter brush a little dirty from when I painted the orange on, so some of the pavement has a little bit of a brick hew, as if covered in brick dust or rubble.

The only thing I'm not 100% satisfied with the way I've painted it is the roof. You get two bits of flat roof, and then a sort of tunnel-walkway-attic as well. These I painted in dark brown, again with a hint of dirty orange in it. It looks okay, but I'm not sure quite how else to do it. Suggestions on a postcard please...

To finish, here are two close-up shots of the inside so that you can see how good it will be for actual wargaming. As I said above, cracking piece: highly recommended.

Another Ruined Building from Commission Figurines

Here's the second of the three buildings I purchased from Commission Figurines at Warfare.

This one is Potsdammer Platz, and very nice it is too. Goes together very easily - literally the work of minutes - and then simple to paint as well. This one I undercoated in dark grey, then added a heavy wash with black ink, then dry-brushed with dark grey, then light grey, then bleached bone to bring out the relief. Again I painted the inside dark grey.

Looks good to me and I can't wait to get them onto the tabletop.

You can find Commission Figurines by clicking here.